Crochet Holly Leaf Design For Christmas – DIY Crafts

Table of Contents
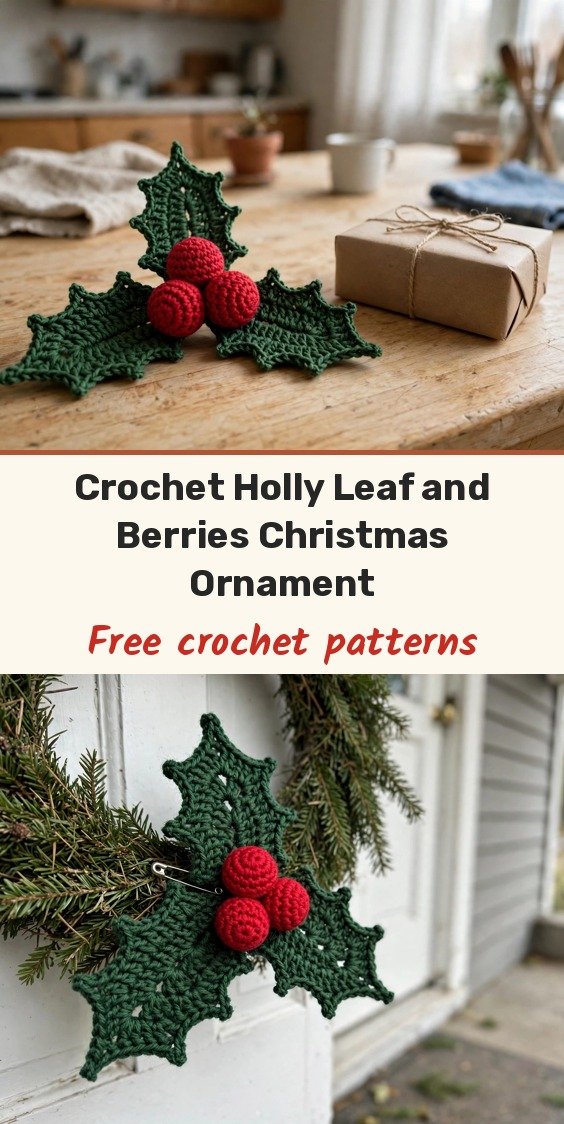
There is something so satisfying about a little cluster of holly. Three pointed green leaves, three plump red berries, and suddenly a plain gift box or a bare spot on the wreath looks properly festive. This is one of my favorite small makes of the season.
The leaves are the clever part. You work down one side of a foundation chain and back up the other, letting the stitch heights grow and shrink to taper the leaf, then a spiky little border adds those unmistakable holly points. The berries are quick magic-ring rounds, lightly stuffed so they stay plump.
Materials
- Worsted weight yarn (Medium #4) in green
- Worsted weight yarn (Medium #4) in red
- Brown yarn or brown floral tape for wrapping the stem
- 3.0 mm crochet hook
- Small amount of fiberfill stuffing for the berries
- Yarn needle
- Scissors
- Stitch markers (optional)
- Floral wire (optional, for poseable leaves)
Abbreviations
- ch: chain
- sl st: slip stitch
- sc: single crochet
- hdc: half double crochet
- dc: double crochet
- tr: treble crochet
- inc: increase; work two stitches in the same stitch
- dec: decrease; work two stitches together
- st(s): stitch(es)
- MR: magic ring
Gauge & Size
- Gauge: not critical; cotton yarn gives crisp leaf definition, acrylic gives a softer look
- Makes: one cluster of 3 leaves and 3 berries
- Use bulky yarn for a larger statement piece or crochet thread for smaller, delicate appliques
Holly Leaf Pattern
Make 3 leaves. Using green yarn, chain 13.
Row 1: Starting in the 2nd ch from the hook, work 1 sc, 1 hdc, 1 dc, 3 tr across the next 3 chains, 2 dc across the next 2 chains, 2 hdc across the next 2 chains, and 1 sc in the final chain before the tip.
Leaf Tip: Work 3 sc into the very last chain stitch to turn around the point.
Row 2: Working up the opposite side of the foundation chain, work 1 sc, 2 hdc, 2 dc, 3 tr, 1 dc, 1 hdc, and 1 sc; finish with 1 sl st into the first stitch to join.
Holly Points Border
Border: Ch 1, then work [3 sc, 2 ch, sl st] 3 times along the first edge. At the top tip, work [4 sc, 3 ch, sc]. Continue down the second edge with [3 sc, 2 ch, sl st] twice. Finish with 3 sc and 1 sl st into the base; fasten off and weave in the ends.
If you want the leaves to hold a particular pose, floral wire can be placed along the back center of the leaf during the border stage and crocheted over or woven in. Keep any wire securely covered and trimmed so no sharp end is exposed.
Repeat until you have three leaves, keeping them similar in size so the finished cluster looks balanced.
Berry Pattern
Make 3 berries.
Round 1: With red yarn, make a MR and work 6 sc into the ring. (6 sts)
Round 2: Work 1 inc in each stitch around. (12 sts)
Rounds 3-5: Work 1 sc in each stitch around. (12 sts)
Round 6: Work 6 dec around to close. Lightly stuff the berry with fiberfill before closing completely, then pull the yarn tail tightly through the remaining front loops, fasten off, and secure.
Finishing & Assembly
Arrange the three finished leaves into a balanced triangular cluster, with their pointed tips spreading outward. Place the three stuffed berries tightly together in the center, directly over the bases of the leaves.
Once the arrangement looks even, secure and wrap the stems and leaf bases together with brown yarn or brown floral tape. Wrap firmly enough to hold the cluster together and leave a neat stem tail for attaching or displaying the ornament.
Tips
- Lay each leaf flat before adding the border; you should see a narrow base, a fuller middle, and a pointed end from the 3 sc worked into the final chain.
- Stuff the berries lightly; overstuffing makes the final closure difficult and can stretch the stitches.
- The finished cluster is compact and lightweight, lovely on a gift, a wreath, the tree, or worn as a holiday pin.
Crochet Holly Leaf Design For Christmas – DIY Crafts
Materials
Steps
- Chain 13 and work row 1 down one side of the chain
- Turn the tip with 3 sc and work row 2 up the other side
- Add the spiky holly-points border
- Repeat to make 3 leaves
- Crochet 3 red berries from a magic ring and stuff lightly
- Arrange the leaves in a triangular cluster with the berries in the center
- Wrap the stems together with brown yarn or floral tape
- Check the leaf shape before the border: narrow base, full middle, pointed tip
- Stuff berries lightly so the decrease round closes neatly
- Add floral wire along the leaf back if you want poseable leaves


