Sunny Yellow Duckling Baby Sweater Free Crochet Pattern
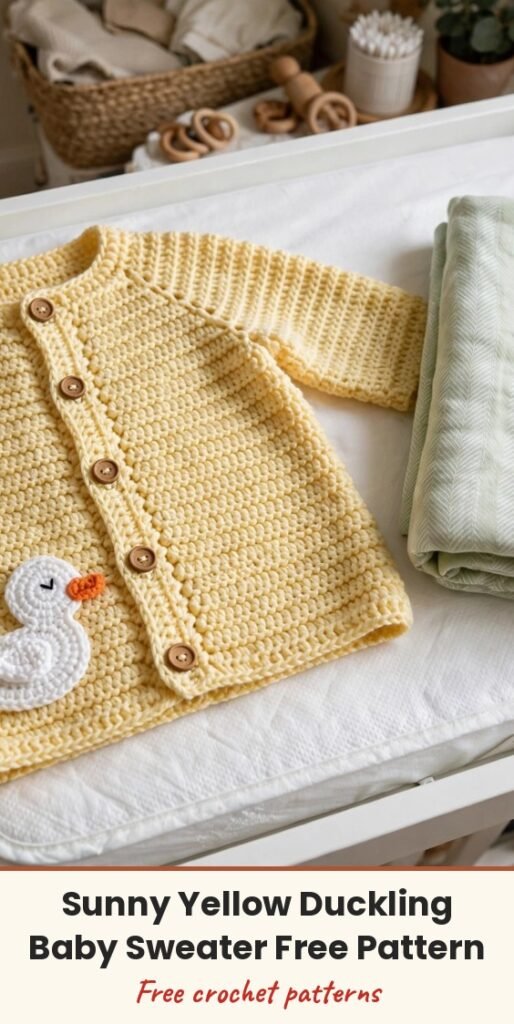
Table of Contents
Butter yellow, tiny wooden buttons, and a little white duck on the front — this baby cardigan is pure sunshine! It is worked from the top down with raglan shaping, so the body comes together in one piece with no seaming, and the sleeves are finished in the round.
The gentle texture comes from alternating rows of single crochet and half double crochet, which gives us subtle horizontal ridges without any complicated stitch patterns. If you can work those two basic stitches, you can absolutely make this sweater. The duck applique is crocheted separately and sewn on after blocking, and its little orange feet are surface slip stitches worked right onto the sweater.
It fits babies of 6 to 12 months and is rated intermediate. Let me walk you through the neckband, yoke, body, sleeves, and that adorable duck, step by step!
Materials
- Worsted weight (Category 4) yarn, Main Color (MC): approximately 280 yards in butter yellow
- Contrast Color 1 (CC1): small amount of white, for the duck
- Contrast Color 2 (CC2): small amount of orange, for the beak and feet
- US G-6 / 4.00 mm crochet hook, for the body and sleeves
- US F-5 / 3.75 mm crochet hook, for the neckband and cuffs
- US E-4 / 3.50 mm crochet hook, for the duck applique
- 6 wooden buttons, approximately 15 mm / 5/8 inch diameter
- Yarn needle
- 4 locking stitch markers
- Scissors
- Blocking mats and pins
Abbreviations
- beg: beginning
- BLO: back loop only
- ch: chain
- dc: double crochet
- hdc: half double crochet
- inc: increase, work 2 stitches in the same stitch
- MC: main color
- CC1: contrast color 1 (white)
- CC2: contrast color 2 (orange)
- MR: magic ring
- pm: place marker
- rem: remaining
- rep: repeat
- RS: right side
- sc: single crochet
- sl st: slip stitch
- sm: slip marker
- sp: space
- st(s): stitch(es)
- tch: turning chain
- tog: together
- WS: wrong side
- yo: yarn over
- sc2tog: single crochet two together
Special Stitches
- Body Stitch Pattern (worked flat): Row A (RS) — chain 1, turn, single crochet in each stitch across. Row B (WS) — chain 1, turn, half double crochet in each stitch across. Alternate these two rows throughout the body and yoke.
- Raglan Increase Row: At each of the 4 raglan markers, work: sc in the stitch before the marker, move the marker up, 2 sc in the next stitch, sc in the next stitch. This adds 8 stitches total per increase row.
Gauge & Size
- Gauge: 16 stitches and 18 rows = 4 inches in the body stitch pattern with the larger hook, after blocking
- Finished size: chest circumference (buttoned) 20 inches, total length 10.5 inches, sleeve length (underarm to cuff) 6.5 inches, upper arm circumference 7 inches; fits 6 to 12 months
- Construction: worked flat from the top down with raglan shaping; sleeves finished in the round; applique sewn on after blocking
- Skill level: Intermediate
A few pattern notes before we begin: the cardigan is worked flat from the top down — do not join into a round during yoke construction. The chain 1 at the beginning of every row does not count as a stitch. Raglan markers sit in the chain stitch between each section, and we move them up every row. When we divide for the sleeves, we place the sleeve stitches on scrap yarn holders, and we block the finished garment before sewing on the buttons and duck.
Neckband and Yoke Pattern
With the smaller hook (F-5 / 3.75 mm) and MC, chain 66.
Setup Row (WS): Single crochet in the second chain from the hook and in each chain across. (65 sc)
Row 1 (RS): Chain 1, turn. Single crochet in each stitch across. (65 sc)
Row 2 (WS): Chain 1, turn. Single crochet in the back loop only of each stitch across. (65 sc)
Row 3 (RS): Chain 1, turn. Single crochet in each stitch across. (65 sc)
Do not cut the yarn. Switch to the larger hook (G-6 / 4.00 mm). The BLO row creates a fold ridge — later you will fold the neckband in half and sew it down for a clean finish. Now the yoke setup row.
Yoke Setup Row (RS): Chain 1, turn. Single crochet 10 (right front), chain 1 (raglan spine, place marker), single crochet 10 (right sleeve), chain 1 (raglan spine, place marker), single crochet 25 (back), chain 1 (raglan spine, place marker), single crochet 10 (left sleeve), chain 1 (raglan spine, place marker), single crochet 10 (left front). Total: 65 sc plus 4 ch-1 raglan spines.
Raglan increases happen every RS row, and WS rows are worked even in hdc with no increases. From now on, treat the chain-1 spine from the previous row as a regular stitch, and keep a locking marker in each spine stitch, moving it up every row.
Yoke Row 1 (WS): Chain 1, turn. Half double crochet in each stitch and in each chain-1 spine across. (69 hdc)
Yoke Row 2 (RS, increase): Chain 1, turn. Single crochet to 1 stitch before the marker, 2 sc in next st, sc in spine stitch, 2 sc in next stitch — repeat 4 times, sc to end. (77 sc)
Yoke Row 3 (WS, even): Chain 1, turn. Half double crochet in each stitch across. (77 hdc)
Yoke Row 4 (RS, increase): Work as Row 2 increase. (85 sc)
Yoke Row 5 (WS, even): Half double crochet across. (85 hdc)
Yoke Row 6 (RS, increase): Work increase. (93 sc)
Yoke Row 7 (WS, even): Half double crochet across. (93 hdc)
Yoke Row 8 (RS, increase): Work increase. (101 sc)
Yoke Row 9 (WS, even): Half double crochet across. (101 hdc)
Yoke Row 10 (RS, increase): Work increase. (109 sc)
Yoke Row 11 (WS, even): Half double crochet across. (109 hdc)
Yoke Row 12 (RS, increase): Work increase. (117 sc)
Yoke Row 13 (WS, even): Half double crochet across. (117 hdc)
Yoke Row 14 (RS, increase): Work increase. (125 sc)
Yoke Row 15 (WS, even): Half double crochet across. (125 hdc)
Yoke Row 16 (RS, increase): Work increase. (133 sc)
Yoke Row 17 (WS, even): Half double crochet across. (133 hdc)
Yoke Row 18 (RS, increase): Work increase. (141 sc)
Yoke Row 19 (WS, even): Half double crochet across. (141 hdc)
Yoke Row 20 (RS, increase): Work increase. (149 sc)
Yoke Row 21 (WS, even): Half double crochet across. (149 hdc)
Yoke Row 22 (RS, increase): Work increase. (157 sc)
Yoke Row 23 (WS, even): Half double crochet across. (157 hdc)
Yoke Row 24 (RS, increase): Work increase. (165 sc)
Yoke Row 25 (WS, even): Half double crochet across. (165 hdc)
Yoke Row 26 (RS, increase): Work increase. (173 sc)
Yoke Row 27 (WS, even): Half double crochet across. (173 hdc)
Yoke Row 28 (RS, increase): Work increase. (181 sc)
Yoke Row 29 (WS, even): Half double crochet across. (181 hdc)
Your yoke should measure approximately 4 inches from the top of the neckband to the bottom of the yoke. Now we divide for body and sleeves.
Dividing Row (RS): Chain 1, turn. Single crochet 24 (right front), chain 6 (underarm bridge), skip 24 right sleeve stitches and 1 spine stitch (place the 24 sleeve stitches on scrap yarn), single crochet 1 spine stitch, single crochet 53 (back), single crochet 1 spine stitch, skip 24 left sleeve stitches and 1 spine stitch (place the 24 sleeve stitches on scrap yarn), chain 6 (underarm bridge), single crochet 1 spine stitch, single crochet 24 (left front).
Next Row (WS): Chain 1, turn. Half double crochet in each stitch and each chain across. (115 hdc)
Body Pattern
Continue working alternating sc rows (RS) and hdc rows (WS) with no shaping until the body measures 5.5 inches from the underarm divide, ending with a WS row. The stitch count remains 115 throughout. Then switch to the smaller hook (F-5 / 3.75 mm) for the body border.
Border Row 1 (RS): Chain 1, turn. Single crochet in each stitch across. (115 sc)
Border Row 2 (WS): Chain 1, turn. Single crochet in the back loop only of each stitch across. (115 sc)
Border Row 3 (RS): Chain 1, turn. Single crochet in each stitch across. (115 sc)
Fasten off.
Sleeves Pattern
Make 2 sleeves. Place the 24 held sleeve stitches back on the larger hook and join MC at the centre underarm with a slip stitch.
Round 1 (RS): Chain 1. Single crochet in each of the 24 sleeve stitches, then single crochet in each of the 6 underarm chain stitches. Join with slip stitch to first sc. (30 sc)
Round 2: Chain 1. Half double crochet in each stitch around. Join. (30 hdc)
Round 3: Chain 1. Single crochet in each stitch around. Join. (30 sc)
Round 4: Chain 1. Half double crochet around. Join. (30 hdc)
Rounds 5 through 10: Continue alternating sc and hdc rounds. (30 sts each round)
Round 11 (decrease): Chain 1. Sc2tog, single crochet to last 2 stitches, sc2tog. Join. (28 sc)
Round 12: Half double crochet around. Join. (28 hdc)
Rounds 13 through 18: Work even in alternating rounds. (28 sts)
Round 19 (decrease): Sc2tog, single crochet to last 2 stitches, sc2tog. Join. (26 sc)
Round 20: Half double crochet around. Join. (26 hdc)
Rounds 21 through 24: Work even. (26 sts)
For the cuff border, switch to the smaller hook.
Cuff Round 1: Single crochet around. Join. (26 sc)
Cuff Round 2: Single crochet in the back loop only around. Join. (26 sc)
Cuff Round 3: Single crochet around. Join. (26 sc)
Fasten off and weave in ends.
Front Band Pattern
With the right side facing and the smaller hook, join MC at the bottom right front corner. Pick up and single crochet evenly along the right front edge, across the back neckband, and down the left front edge — pick up approximately 3 stitches for every 4 rows along vertical edges and 1 stitch in each stitch across the back neck. The estimated pickup is 54 stitches up the right front, 25 stitches across the back neck, and 54 stitches down the left front, for 133 stitches total.
Band Row 1 (WS): Chain 1, turn. Single crochet in each stitch across. (133 sc)
Band Row 2 (RS, buttonhole row): Chain 1, turn. Single crochet 1, [chain 2, skip 2 stitches, single crochet 7] repeat 5 more times, chain 2, skip 2 stitches, single crochet across the remaining stitches. (6 buttonholes made)
Band Row 3 (WS): Chain 1, turn. Single crochet in each stitch and 2 sc in each chain-2 space across. (133 sc)
Band Row 4 (RS): Single crochet across. (133 sc)
Band Row 5 (WS): Single crochet in the back loop only across. (133 sc)
Band Row 6 (RS): Single crochet across. (133 sc)
Band Row 7 (WS): Single crochet across. (133 sc)
Band Row 8 (RS): Single crochet across. (133 sc)
Fasten off. Fold the band to the wrong side at the BLO ridge and whipstitch it in place.
Duck Applique Pattern
Use the E-4 / 3.50 mm hook for all the applique pieces. Start with the duck body in CC1 (white), with a magic ring.
Body Round 1: 6 sc in MR. Pull the ring closed. (6 sc)
Body Round 2: 2 sc in each stitch around. (12 sc)
Body Round 3: (Sc 1, 2 sc in next st) 6 times. (18 sc)
Body Round 4: (Sc 2, 2 sc in next st) 6 times. (24 sc)
Body Rounds 5 and 6: Single crochet around. (24 sc)
Body Round 7: (Sc 2, sc2tog) 6 times. (18 sc)
Flatten the piece with the magic ring at the top centre. Slip stitch across the open bottom edge to close it into a half-circle. Fasten off with a 12-inch tail. Now the head, also in CC1, with a magic ring.
Head Round 1: 6 sc in MR. (6 sc)
Head Round 2: 2 sc in each stitch around. (12 sc)
Head Round 3: (Sc 1, 2 sc in next st) 6 times. (18 sc)
Head Rounds 4 and 5: Single crochet around. (18 sc)
Slip stitch to close. Fasten off with a 10-inch tail. For the beak in CC2 (orange), make a magic ring.
Beak Round 1: 4 sc in MR. (4 sc)
Beak Round 2: 2 sc in each stitch around. (8 sc)
Slip stitch to close and fasten off with a tail. Embroider the eye as a small French knot or satin stitch dot with black yarn. For the feet, use CC2 and the F-5 hook to surface slip stitch three short lines radiating from a central point, directly on the sweater at the base of where the duck will sit. Make 2 feet, spaced about 0.5 inch apart.
Finishing & Assembly
Sew the head to the top of the body, overlapping slightly, then sew the beak to the front of the head. Block the sweater first: soak it in cool water for 20 minutes, gently press out the excess water in a towel without wringing, lay it flat on blocking mats, pin to the finished measurements, and let it dry completely. Then sew the buttons to the left front band, aligning with the buttonholes and sewing through all layers for security, and sew the assembled duck to the lower right front of the sweater, about 1 inch above the hem.
Tips and Sizing
For 12 to 18 months: add 2 additional yoke increase rows before dividing for the sleeves, add 2 inches to the body length, and 0.5 inch to the sleeve length. For 0 to 3 months: remove 3 yoke increase rows, reduce the body length by 1.5 inches, and reduce the sleeve length by 1 inch.
For care, hand wash in cool water with gentle soap, or machine wash on delicate in a mesh bag if you used superwash or acrylic yarn. Lay flat to dry, and do not tumble dry.

Sunny Yellow Duckling Baby Sweater Free Crochet Pattern
Materials
Steps
- Work the neckband in sc with a BLO fold ridge
- Work the raglan yoke with increases every RS row up to 181 sts
- Divide for body and sleeves with underarm chain bridges
- Work the body even to 5.5 inches and add the border
- Work both sleeves in the round with gentle decreases and cuffs
- Work the front band with 6 buttonholes
- Crochet the duck body, head and beak, and surface-stitch the feet
- Block, sew on the buttons, and sew the duck to the front
- Keep a locking marker in each raglan spine stitch and move it up every row
- The chain 1 at the start of a row never counts as a stitch
- Block the sweater before sewing on buttons and the duck
- Work the duck feet as surface slip stitches right onto the sweater


