Blush Pink Ruffle Baby Dress Set Free Crochet Pattern
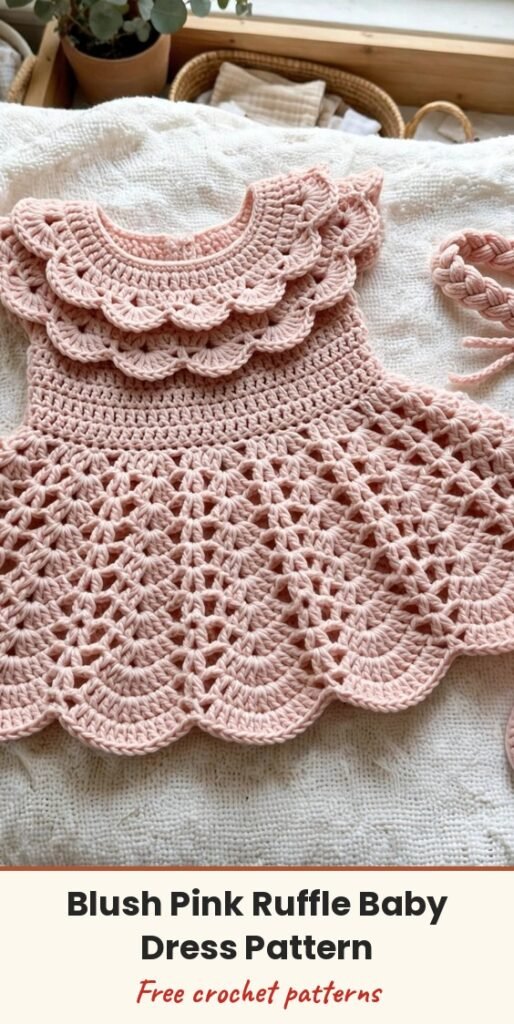
Table of Contents
Oh, this set just melts me! A blush pink dress with a twirly fan skirt and a cloud of a collar, tiny Mary Jane booties with bows, and a braided headband to match. It is the sweetest handmade gift for a brand new baby girl.
We will crochet the dress from the neckline down in rounds, add a crisp white waistband, then make the booties and the simple braided headband. Each piece is small and quick, so the whole set comes together beautifully over a weekend.
The dress is written for newborn to 3 months, with a chest of 14 to 15 inches and a length of about 13 inches.
Materials
- 350 yards DK weight yarn in blush pink or dusty rose
- 30 yards DK weight yarn in white or cream
- US E-4 / 3.5mm crochet hook
- US F-5 / 3.75mm crochet hook (optional, for the skirt)
- 18 inches of white satin ribbon, 1/4 inch wide
- 2 small pearl buttons (optional, decorative only)
- Yarn needle with a large eye
- Stitch markers
- Scissors
- Measuring tape
Abbreviations
- ch: chain
- sl st: slip stitch
- sc: single crochet
- hdc: half double crochet
- dc: double crochet
- sc2tog: single crochet 2 together
- st(s): stitch or stitches
- rep: repeat
- sk: skip
- RS: right side
- WS: wrong side
- beg: beginning
- sp: space
Special Stitches
- Fan stitch: 5 dc worked into the same stitch or space.
- Shell stitch: (2 dc, ch 1, 2 dc) worked into the same stitch or space.
- Scallop: 5 dc worked into a single stitch, used for hems and collar edges.
Gauge & Size
- Finished size: newborn to 3 months; dress chest 14 to 15 inches, length approximately 13 inches; bootie sole approximately 3.5 inches; headband approximately 15 inches circumference
- Gauge: 18 stitches and 20 rows = 4 inches in single crochet with the 3.5mm hook; 16 dc and 9 rows = 4 inches in double crochet
- Construction: dress worked top-down in rounds (yoke, waistband, fan skirt, layered ruffle collar), booties worked from an oval sole, headband braided from crocheted strands
- Skill level: Intermediate beginner
Dress Yoke Pattern
Using blush pink and the 3.5mm hook, ch 60. Join with sl st to first ch to form a ring, being careful not to twist.
Rnd 1: Ch 1, sc in each ch around. Join with sl st to first sc. (60 sc)
Rnd 2: Ch 2 (does not count as dc), dc in each st around. Join with sl st to first dc. (60 dc)
Rnd 3: Ch 2, (dc in next 9 sts, 2 dc in next st) rep around. Join. (66 dc)
Rnd 4: Ch 2, dc in each st around. Join. (66 dc)
Rnd 5: Ch 2, (dc in next 10 sts, 2 dc in next st) rep around. Join. (72 dc)
Rnd 6: Ch 2, dc in each st around. Join. (72 dc)
Rnd 7: Ch 2, (dc in next 11 sts, 2 dc in next st) rep around. Join. (78 dc)
Rnd 8: Ch 2, dc in each st around. Join. (78 dc)
Rnd 9: Ch 2, (dc in next 12 sts, 2 dc in next st) rep around. Join. (84 dc)
Rnd 10: Ch 2, dc in each st around. Join. (84 dc)
Rnd 11: Ch 2, (dc in next 13 sts, 2 dc in next st) rep around. Join. (90 dc)
Rnd 12: Ch 2, dc in each st around. Join. (90 dc)
Rnd 13: Ch 2, (dc in next 14 sts, 2 dc in next st) rep around. Join. (96 dc)
Rnd 14: Ch 2, dc in each st around. Join. (96 dc)
The yoke should measure approximately 3.5 inches from the neckline.
Rnd 15 (divide for armholes): Ch 2, dc in next 24 sts (right back and right sleeve area), ch 4, skip next 24 sts (sleeve), dc in next 24 sts (front), ch 4, skip next 24 sts (sleeve). Join with sl st to first dc. The body opening now consists of 48 dc plus 8 ch.
Rnd 16: Ch 1, sc in each dc and each ch around. Join with sl st to first sc. (56 sc)
Rnd 17: Ch 1, (sc in next 13 sts, 2 sc in next st) rep around. Join. (60 sc)
Rnd 18: Ch 1, sc in each st around. Join. (60 sc)
Rnd 19: Ch 1, (sc in next 11 sts, 2 sc in next st) rep around 5 times. Join. (65 sc)
Rnd 20: Ch 1, sc in each st around. Join. (65 sc)
Rnd 21: Ch 1, (sc in next 12 sts, 2 sc in next st) rep around 5 times. Join. (70 sc)
Rnd 22 (waistband): Join white yarn with sl st. Ch 1, sc in each st around. Join with sl st to first sc. (70 sc)
Rnd 23: With white, ch 1, sc in each st around. Join. (70 sc)
Rnd 24: Change back to blush pink. Ch 1, sc in each st around. Join with sl st to first sc. (70 sc)
The bodice now measures approximately 5.5 inches from neckline to waistband. Weave in the white tails securely on the WS.
Dress Skirt Pattern
You may switch to the 3.75mm hook here for a softer drape.
Rnd 25: Ch 3 (counts as dc), 4 dc in same st (fan made), sk 2 sts, sc in next st, (sk 2 sts, 5 dc in next st, sk 2 sts, sc in next st) rep around. Join with sl st to top of beg ch-3. (10 fans, 10 sc)
Rnd 26: Sl st in next 2 dc to reach the centre dc of first fan. Ch 1, sc in centre dc of first fan, ch 3, (sc in centre dc of next fan, ch 3) rep around. Join with sl st to first sc.
Rnd 27: Ch 3, 4 dc in first ch-3 sp, sc in next sc, (5 dc in next ch-3 sp, sc in next sc) rep around. Join with sl st.
Rnd 28: Rep Rnd 26.
Rnd 29: Rep Rnd 27.
Rnds 30 through 42: Continue alternating Rnd 26 (arch round) and Rnd 27 (fan round), ending with a fan round on Rnd 41 and an arch round on Rnd 42. The skirt gains gentle flare as the fans stack. After Rnd 42, the skirt measures approximately 6.5 inches below the waistband. If you want a longer skirt, add pairs of Rnd 26 and Rnd 27 before continuing.
Rnd 43: Ch 1, sc in each sc and 3 sc in each ch-3 sp around. Join with sl st to first sc. (70 sc)
Rnd 44 (scallop hem): Ch 1, sc in first st, (sk 1 st, 5 dc in next st, sk 1 st, sc in next st) rep around. Join with sl st to first sc. Fasten off and weave in ends. (Approximately 35 scallops depending on final positioning)
The dress length should now be approximately 13 inches from neckline to hem.
Dress Collar Pattern
The collar is worked directly into the neckline foundation chain. With RS facing and blush pink, join yarn at the centre back of the neckline with sl st.
Rnd 1 (outer layer base): Ch 2, dc in each ch around the neckline. Join with sl st to first dc. (90 dc working into the original 60 ch plus picked-up sts around the full neckline edge)
Rnd 2: Ch 2, (2 dc in next st, dc in next st) rep around. Join. (135 dc)
Rnd 3: Ch 2, (2 dc in next st, dc in next 2 sts) rep around. Join. (180 dc)
Rnd 4: Ch 2, (2 dc in next st, dc in next 5 sts) rep around. Join. (210 dc)
Rnd 5: Ch 1, sc in each st around. Join with sl st to first sc. (210 sc)
Rnd 6 (scallop edge): Ch 1, sc in first st, (sk 1 st, 5 dc in next st, sk 1 st, sc in next st) rep around. Join with sl st to first sc. Fasten off. (Approximately 105 scallops)
The outer collar now flares dramatically like a ruffle. Shape it flat with your fingers, folding it outward over the yoke.
Inner collar layer: join yarn at the neckline on the inside edge, one row below Rnd 1, with RS facing outward.
Rnd 1: Ch 2, dc in each st around. Join. (90 dc)
Rnd 2 (scallop edge): Ch 1, sc in first st, (sk 1 st, 5 dc in next st, sk 1 st, sc in next st) rep around. Join with sl st to first sc. Fasten off and weave in ends. (Approximately 45 scallops)
The inner scallop peeks out beneath the outer ruffle for a layered look.
Booties Pattern (Make 2)
Using blush pink and the 3.5mm hook, ch 12.
Rnd 1 (sole): Sc in 2nd ch from hook, sc in next 9 ch, 3 sc in last ch. Working along the opposite side of the foundation ch, sc in next 9 ch, 2 sc in last ch (same ch as first sc). Join with sl st to first sc. (26 sc)
Rnd 2: Ch 1, 2 sc in first st, sc in next 9 sts, 2 sc in next st, sc in next st, 2 sc in next st, sc in next 9 sts, 2 sc in next st, sc in next st. Join with sl st to first sc. (32 sc)
Rnd 3: Ch 1, sc in back loop only of each st around. Join with sl st. (32 sc)
Rnd 4: Ch 1, sc in each st around. Join with sl st. (32 sc)
Rnd 5 (toe shaping): Ch 1, sc in next 10 sts, (sc2tog) 6 times across the toe, sc in next 10 sts. Join with sl st. (26 sc)
Rnd 6: Ch 1, sc in next 10 sts, (sc2tog) 3 times, sc in next 10 sts. Join with sl st. (23 sc)
Rnd 7: Ch 1, sc in next 10 sts, sc2tog, sc in next 11 sts. Join with sl st. (22 sc)
Rnd 8: Ch 1, sc in each st around. Join with sl st. (22 sc, or 21 sts if your toe shaping settled at 21)
Rnd 9 (cuff): Ch 2, dc in each st around. Join with sl st to first dc. (21 dc)
Rnd 10: Ch 2, dc in each st around. Join with sl st. (21 dc)
Rnd 11 (scallop cuff edge): Ch 1, sc in first st, (sk 1 st, 5 dc in next st, sk 1 st, sc in next st) rep around. Join with sl st to first sc. Fasten off and weave in ends.
Strap: ch 20. Sc in 2nd ch from hook and in each ch across (19 sc). Fasten off, leaving a long tail. Position the strap across the front of the bootie, just below the cuff, and sew both ends to the sides of the bootie. Add a tiny bow at the centre of the strap: ch 8, sc in 2nd ch from hook and across (7 sc), fasten off, wrap the centre tightly with yarn three times, knot on the underside, and sew the bow onto the strap.
Headband Pattern
Make 6 strands. For each strand, using blush pink, ch 55 (approximately 12 inches). Sc in 2nd ch from hook and in each ch across (54 sc). Fasten off.
Gather the 6 strands together and divide them into 3 groups of 2 strands. Braid the groups together in a standard three-strand braid until the braid measures approximately 15 inches when gently stretched, or the baby’s head circumference minus 1 inch.
Secure both ends by wrapping white yarn tightly around them 5 to 6 times and knotting firmly on the underside. Join the two ends together with the yarn needle, stitching through both wrapped ends to form a circle. Trim any uneven strand tails.
For the bow, using white yarn, ch 16. Row 1: Sc in 2nd ch from hook and in each ch across. Turn. (15 sc) Rows 2 through 6: Ch 1, sc in each st across. Turn. (15 sc) Fasten off, leaving a 12 inch tail. Wrap the tail tightly around the centre of the rectangle 6 to 8 times to cinch it into a bow shape, knot securely on the back, and sew the bow over the headband join to hide it. Weave in all ends.
Finishing & Assembly
Thread the ribbon through the white waistband: weave it in and out of the stitches of Rnd 23 around the full waist, then tie a small bow at the centre front. Trim the ribbon ends at an angle and seal them with a tiny dot of clear fabric glue if you wish, or leave them natural.
If you are adding the pearl buttons, sew one to the centre front of the waistband and one at the collar join. These are decorative only. Please remove them before the garment is worn, or skip them entirely for a newborn.
Weave in all ends. To block, lay the dress flat on a towel, shape the skirt fans into even arcs and the collar ruffles into gentle waves, pin the scallop hems open, spritz lightly with water and leave to dry completely. Steam the booties briefly over a small rolled towel to shape them, and let the headband rest unblocked so the braid keeps its spring.
Tips
For a 3 to 6 month size, add 2 increase rounds to the yoke following the same logic (reaches about 108 dc), divide with ch 6 at the armholes, and add 4 extra skirt rounds. The bootie sole grows by 2 chains (ch 14 to start).
Keep your collar increases evenly spaced with stitch markers, because the drama of this collar comes from its fullness.
Check button and bow attachments before every wear, and hand wash the set gently in cool water, drying it flat to protect the fans and scallops.
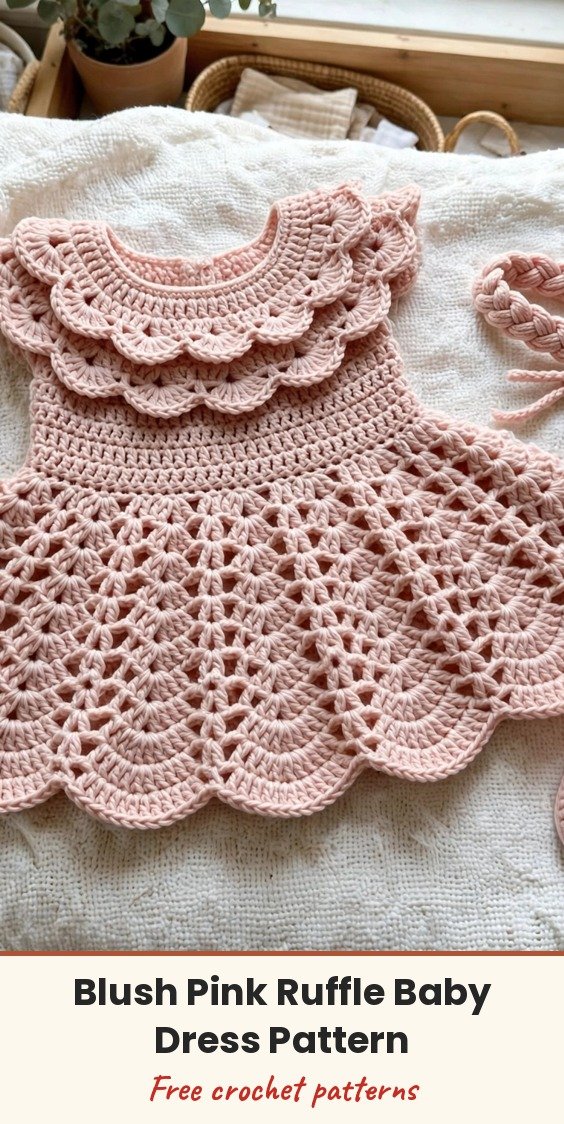
Blush Pink Ruffle Baby Dress Set Free Crochet Pattern
Materials
Steps
- Work the dress yoke in rounds, increasing to 96 dc
- Divide for the armholes and build the body to the white waistband
- Work the fan skirt and scalloped hem to Rnd 44
- Work the double-layer ruffle collar around the neckline
- Make two booties from oval soles with straps and bows
- Make six strands, braid the headband and add the white bow
- Thread the ribbon through the waistband
- Block the dress and shape the booties
- Mark collar increase rounds so the ruffle fullness stays even
- Use the larger hook for the skirt if you want extra drape
- Check bow and button attachments before every wear
- Dry flat to protect the fans and scallops