Cream Boho Cable Stitch Crop Top Free Crochet Pattern
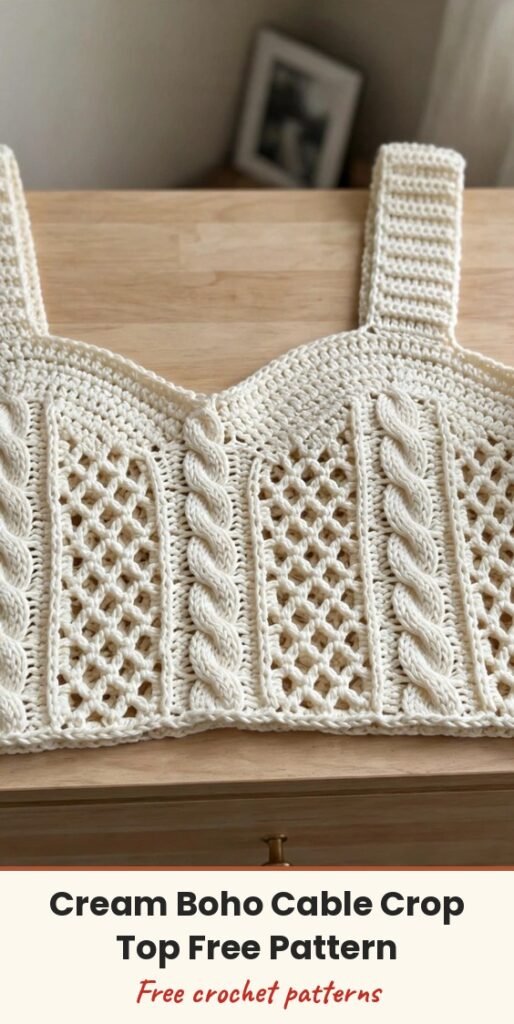
Table of Contents
This cream boho cable stitch crop top is the one I reach for when I want something that looks boutique-made but feels completely doable at my own kitchen table. The front is full of gorgeous texture — little cable crosses and diamond lace panels — while the back is a clean, stretchy rib, so it is interesting to make and easy to wear.
I love that there is no cable needle involved at all. The crosses are worked with front post stitches using a clever chain-space method, and once you have done a couple you will fall into the rhythm. The wide ribbed straps stay put, the sweetheart neckline is so flattering, and the deep ribbed hem band hugs the waist beautifully.
We will work the front and back panels flat, shape the armholes and neckline, then seam everything together and finish with the hem bands. It is written for a size Small/Medium with a finished bust of 34 inches, and I have included the sizing tips at the end if you need a different fit.
Materials
- 500 to 600 yards of DK weight yarn in cream, 100 percent cotton or a cotton blend for the best stitch definition
- 4.0mm (US G-6) crochet hook
- Yarn needle for seaming and weaving in ends
- At least 6 stitch markers
- Measuring tape
- Blocking mat and pins or blocking wires
Abbreviations
- ch: chain
- sl st: slip stitch
- sc: single crochet
- hdc: half double crochet
- dc: double crochet
- BLO: back loop only
- sk: skip
- sp: space
- st/sts: stitch / stitches
- RS: right side
- WS: wrong side
- rep: repeat
- beg: beginning
- rem: remaining
- sc2tog: single crochet two together
- FPdc: front post double crochet
- BPdc: back post double crochet
- CL: cable cross
- DM: diamond motif
Special Stitches
- Front Post Double Crochet (FPdc): yarn over, insert your hook from front to back to front around the post of the indicated stitch in the row below, yarn over and pull up a loop, yarn over and pull through 2 loops, yarn over and pull through the remaining 2 loops. The stitch sits on the front face of the fabric, creating a raised ridge.
- Back Post Double Crochet (BPdc): yarn over, insert your hook from back to front to back around the post of the indicated stitch in the row below, then complete it as a standard double crochet. The stitch recedes to the back, creating a valley beside the FPdc columns.
- Cable Cross (CL): a right-leaning four-stitch cable worked without a cable needle. Skip the next 2 stitches, FPdc around the 3rd stitch, FPdc around the 4th stitch, then working back over the two FPdc you just made, FPdc around the 1st skipped stitch and FPdc around the 2nd skipped stitch. You have worked 4 FPdc total, and the front pair crosses over the back pair to the right.
- Back Loop Only Rib (BLO Rib): on every row, insert your hook into the back loop only of each stitch. This creates a stretchy, vertically ridged fabric that mimics knit ribbing.
Gauge & Size
- Finished size: size Small/Medium, finished bust 34 inches (86 cm), crop length from underarm to hem approximately 10 inches (25.5 cm), full length from top of shoulder strap to hem approximately 16 inches (40.5 cm)
- Gauge: 20 stitches and 22 rows = 4 inches (10 cm) in the main cable panel stitch pattern, blocked; 18 stitches and 22 rows = 4 inches (10 cm) in back loop only single crochet rib, blocked
- Construction: front and back panels worked flat and seamed, hem bands worked lengthwise and attached, straps are ribbed extensions of the body panels
- Skill level: Intermediate
Hem Bands (Make 2)
Make one hem band for the front and one for the back. The bands are worked lengthwise in short rows, then attached to the main body at the end.
Foundation: Ch 13.
Row 1: Sc in 2nd ch from hook and in each ch across. Turn. (12 sc)
Row 2: Ch 1, turn. Sc in BLO of each st across. (12 sc)
Repeat Row 2 until the band measures 17 inches (43 cm) slightly stretched. This gives approximately 86 stitches along the long edge when attached at gauge.
Fasten off and set aside. Make a second identical band.
Back Panel Pattern
The back is a simple BLO ribbed rectangle with shoulder strap extensions — much easier than the front, I promise!
Foundation: Ch 87.
Row 1 (RS): Sc in 2nd ch from hook and in each ch across. Turn. (86 sc)
Rows 2 to 54: Ch 1, turn. Sc in BLO of each st across. (86 sc)
After Row 54, the back body measures approximately 10 inches (25.5 cm) tall, not including the hem band.
Row 55 (armhole shaping): Ch 1, turn. Sl st across first 5 sts. Ch 1, sc in BLO of next 76 sts. Leave last 5 sts unworked. Turn. (76 sc)
Rows 56 to 60: Ch 1, turn. Sc2tog over first 2 sts. Sc in BLO to last 2 sts. Sc2tog. Turn. After each row you will have 74, 72, 70, 68, then 66 sc respectively. (66 sc after Row 60)
Rows 61 to 96: Ch 1, turn. Sc in BLO of each st across. (66 sc)
Left Back Strap — Row 97: Ch 1, turn. Sc in BLO of first 18 sts. Turn. Leave remaining sts unworked. (18 sc)
Rows 98 to 122: Ch 1, turn. Sc in BLO of each st across. (18 sc)
Fasten off, leaving a 12-inch tail for seaming.
Right Back Strap: skip the center 30 sts of Row 96 and rejoin yarn at the next st.
Row 97: Ch 1, sc in BLO of next 18 sts. Turn. (18 sc)
Rows 98 to 122: Ch 1, turn. Sc in BLO of each st across. (18 sc)
Fasten off, leaving a 12-inch tail for seaming.
Diamond Panel
The diamond motif is worked over 10 stitches and 8 rows, using chain spaces and careful dc placement. These rows are worked as part of the front panel wherever the pattern says to work the Diamond Panel.
Diamond Row 1 (RS): Dc in each of next 4 sts, ch 1, sk 1, dc in next st, ch 1, sk 1, dc in each of next 2 sts. (10 sts with 2 ch-1 sps embedded)
Diamond Row 2 (WS): Dc in first 3 sts, ch 1, sk 1, dc in ch-1 sp, dc in next dc, dc in ch-1 sp, ch 1, sk 1, dc in each of next 2 sts. (10 positions)
Diamond Row 3 (RS): Dc in first 2 sts, ch 1, sk 1, dc in ch-1 sp, dc in next 3 sts, dc in ch-1 sp, ch 1, sk 1, dc in last st. (10 positions, diamond widest)
Diamond Row 4 (WS): Dc in first st, ch 1, sk 1, dc in ch-1 sp, dc in next 5 sts, dc in ch-1 sp, ch 1, sk 1. (10 positions)
Diamond Row 5 (RS): Ch 1, sk 1, dc in ch-1 sp, dc in next 5 sts, dc in ch-1 sp, ch 1, sk 1, dc in last st. (10 positions, diamond closing)
Diamond Row 6 (WS): Dc in first 2 sts, dc in ch-1 sp, ch 1, sk 1, dc in next 3 sts, ch 1, sk 1, dc in ch-1 sp, dc in last 2 sts. (10 positions)
Diamond Row 7 (RS): Dc in first 3 sts, dc in ch-1 sp, ch 1, sk 1, dc in next dc, ch 1, sk 1, dc in ch-1 sp, dc in last 3 sts. (10 positions)
Diamond Row 8 (WS): Dc in all 10 sts, closing the diamond. (10 dc)
Repeat Diamond Rows 1 to 8 for the pattern throughout the front panel.
Cable Columns
Each cable column is 4 stitches wide. On RS rows where the cable is not crossed, work FPdc around each of the 4 cable post sts. On RS cable rows — every 4th RS row, specifically Rows 3, 7, 11, 15, 19, 23, 27, 31, 35, 39, 43, 47 and 51 — work a CL over the 4 sts. On all WS rows, work BPdc around each of the 4 cable post sts.
Front Panel Pattern
The stitch layout from left to right on RS rows is: 2 edge stitches, 4-st cable, 2 BPdc, 10-st diamond panel, 2 BPdc, and this pattern continues across the row. On WS rows, the FPdc from RS rows become BPdc and vice versa, to keep the raised columns looking right. Turning chains do not count as stitches: ch 1 for sc rows and ch 2 for dc rows.
Foundation: Ch 87.
Row 1 (RS): Sc in 2nd ch from hook and in each ch across. Turn. (86 sc)
Row 2 (WS): Ch 1, turn. Sc in each st across. Turn. (86 sc)
Row 3 (RS, establish pattern): Ch 2, turn. Dc in first 2 sts (edge). CL over next 4 sts. BPdc in next 2 sts. Work Diamond Row 1 over next 10 sts. BPdc in next 2 sts. CL over next 4 sts. BPdc in next 2 sts. Work Diamond Row 1 over next 10 sts. BPdc in next 2 sts. CL over next 4 sts. BPdc in next 2 sts. Work Diamond Row 1 over next 10 sts. BPdc in next 2 sts. CL over next 4 sts. BPdc in next 2 sts. Work Diamond Row 1 over next 10 sts. BPdc in next 2 sts. CL over next 4 sts. Dc in last 2 sts (edge). Turn. (86 sts)
Row 4 (WS): Ch 2, turn. Dc in first 2 sts (edge). BPdc in next 4 sts. FPdc in next 2 sts. Work Diamond Row 2 over next 10 sts. FPdc in next 2 sts. BPdc in next 4 sts. FPdc in next 2 sts. Work Diamond Row 2 over next 10 sts. FPdc in next 2 sts. BPdc in next 4 sts. FPdc in next 2 sts. Work Diamond Row 2 over next 10 sts. FPdc in next 2 sts. BPdc in next 4 sts. FPdc in next 2 sts. Work Diamond Row 2 over next 10 sts. FPdc in next 2 sts. BPdc in next 4 sts. Dc in last 2 sts (edge). Turn. (86 sts)
Rows 5 to 54: Continue in pattern as established, working Diamond Rows 1 to 8 in rotation and working a CL on every 4th RS row. On all other RS rows, work FPdc over the cable columns. On all WS rows, work BPdc over the cable columns. Work until the front body measures 54 rows total. (86 sts)
Row 55 (armhole shaping): Ch 1, turn. Sl st across first 5 sts. Ch 1, work in pattern across next 76 sts. Leave last 5 sts unworked. Turn. (76 sts)
Rows 56 to 60: Ch 1, turn. Sc2tog over first 2 sts. Work in pattern to last 2 sts. Sc2tog. Turn. (66 sts after Row 60)
Rows 61 to 76: Continue in pattern with no further side shaping. (66 sts)
Sweetheart Neckline
Now we divide at the center and work the left and right cups separately to shape that pretty sweetheart neckline.
Left Cup — Row 77: Work in pattern across first 33 sts. Turn. Leave remaining 33 sts on hold. (33 sts)
Row 78: Ch 1, turn. Sc2tog at neck edge. Work in pattern to end. (32 sts)
Row 79: Work in pattern to last 2 sts at neck edge. Sc2tog. (31 sts)
Row 80: Sc2tog at neck edge. Work in pattern to end. (30 sts)
Row 81: Work in pattern to last 2 sts. Sc2tog. (29 sts)
Row 82: Sc2tog. Work in pattern to end. (28 sts)
Row 83: Work in pattern to last 2 sts. Sc2tog. (27 sts)
Row 84: Sc2tog. Work in pattern to end. (26 sts)
Row 85: Work in pattern to last 2 sts. Sc2tog. (25 sts)
Row 86: Sc2tog. Work in pattern to end. (24 sts)
Rows 87 to 96: Work even in pattern, with no more neckline decreases. (24 sts)
Left Front Strap — Row 97: Work in pattern across outer 18 sts. Turn. (18 sts)
Rows 98 to 122: Work even in pattern. (18 sts)
Fasten off, leaving a 12-inch tail.
Right Cup: rejoin yarn at the center 33 sts with RS facing, beginning at the center.
Row 77: Work in pattern across 33 sts. Turn. (33 sts)
Row 78: Work in pattern to last 2 sts. Sc2tog at neck edge. (32 sts)
Row 79: Sc2tog. Work in pattern to end. (31 sts)
Row 80: Work in pattern to last 2 sts. Sc2tog. (30 sts)
Row 81: Sc2tog. Work in pattern to end. (29 sts)
Row 82: Work in pattern to last 2 sts. Sc2tog. (28 sts)
Row 83: Sc2tog. Work in pattern to end. (27 sts)
Row 84: Work in pattern to last 2 sts. Sc2tog. (26 sts)
Row 85: Sc2tog. Work in pattern to end. (25 sts)
Row 86: Work in pattern to last 2 sts. Sc2tog. (24 sts)
Rows 87 to 96: Work even. (24 sts)
Right Front Strap — Row 97: Work in pattern across outer 18 sts. Turn. (18 sts)
Rows 98 to 122: Work even in pattern. (18 sts)
Fasten off, leaving a 12-inch tail.
Finishing & Assembly
For the shoulder seams, hold the front left strap and back left strap with wrong sides together. Using your yarn needle and a whip stitch or mattress stitch, seam the 18 sts across the top edge together. Repeat for the front right strap and back right strap.
For the side seams, place the front and back panels with wrong sides together and seam from the hem edge upward to the armhole edge.
To attach the hem bands, pin one hem band to the bottom edge of the front body with wrong sides together, distributing the ribbing evenly — the long edge of the band aligns with the foundation chain edge of the body. Whip stitch or sc seam through both layers. Repeat for the back hem band.
For the neckline finish, with RS facing, join yarn at the right strap top corner. Work one row of sc evenly around the entire neckline opening, including across the sweetheart dip at center front and across the back top edge between the straps, working approximately 1 sc per row end and 1 sc per stitch along horizontal edges. At the V-dip of the sweetheart center, work sc3tog over the 3 center sts to keep the pointed shape. Sl st to first sc to close. Fasten off and weave in the end.
At each underarm, work one round of sc evenly around the armhole opening. Sl st to first sc. Fasten off and weave in ends.
Tips
To adjust the width, remember the main panel repeat is 18 stitches per unit. Add or remove complete units of 18 sts to go up or down a size — each 18-st unit adds approximately 3.6 inches (9 cm) to the total bust circumference.
To adjust the length, add or remove even-numbered rows from the straight body section (Rows 3 to 54) before the armhole shaping. Every 11 rows adds approximately 2 inches (5 cm).
Wet blocking is strongly recommended for this top. Soak the finished garment in cool water for 20 minutes, press out the excess water in a towel without wringing, then lay it flat, pin to the finished measurements, and allow to dry fully. Blocking opens the diamond motifs, evens the tension, and sets that sweetheart neckline curve beautifully.
For care, machine wash cold on a gentle cycle if using cotton, lay flat to dry, and do not iron directly on the cable sections.
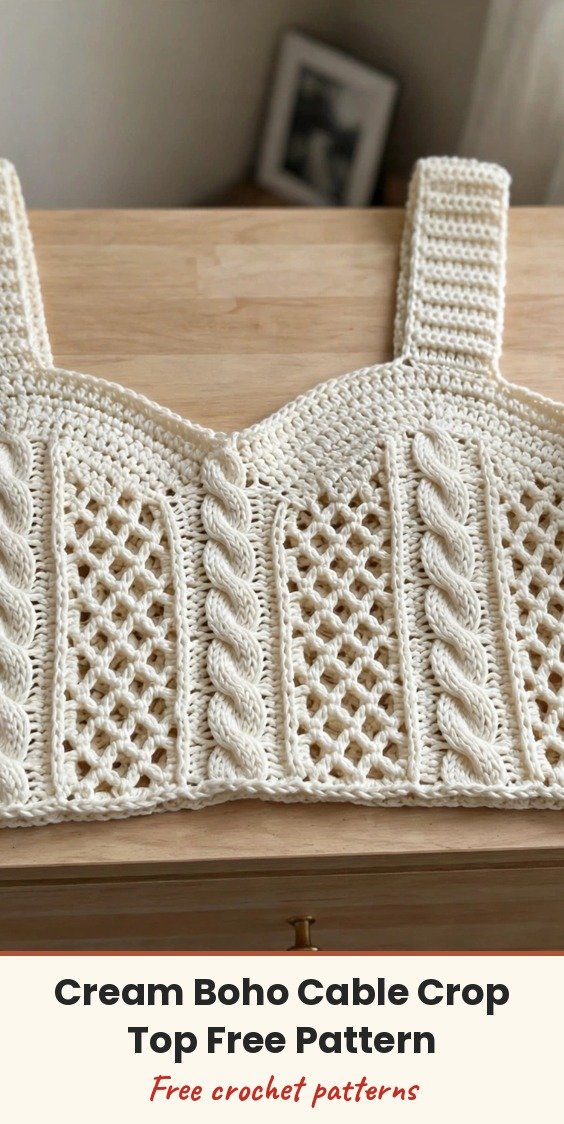
Cream Boho Cable Stitch Crop Top Free Crochet Pattern
Materials
Steps
- Work 2 ribbed hem bands lengthwise in BLO single crochet
- Work the back panel in BLO rib to Row 54, shape armholes to 66 sts, then work both back straps
- Work the front panel in the cable and diamond pattern to Row 54
- Shape the front armholes to 66 sts and work straight to Row 76
- Divide for the sweetheart neckline and shape each cup from 33 sts down to 24 sts
- Work both front straps to Row 122
- Seam shoulders and sides, attach the hem bands, and finish the neckline and armholes with sc edging
- Block the finished top to measurements
- Swatch and block before you start - gauge is mandatory for this fitted garment
- Mark the right side with a locking stitch marker so the post stitch columns stay consistent
- Adjust width in full 18-stitch panel units, about 3.6 inches per unit
- Wet block at the end to open the diamond motifs and set the sweetheart neckline