Lavender Ruffle Top & Butterfly Shorts Pattern

Table of Contents
This lavender ruffle top and butterfly shorts set looks like it came straight from a boutique, but I promise it is far more approachable than it appears! The whole set uses basic stitches you probably already know: single crochet forms the foundation, double crochet creates every single ruffle, and the sweet 3D butterflies are just tiny circles with a few clever folds.
The secret is the construction order. For the top, we build a simple bodice tube first, then go back and add the pretty ruffle tiers into the front loops we left behind — one layer at a time, no complicated shaping. The shorts are worked in the round from the waistband down, with a stretchy elastic waist, a simple body, a scalloped hem on each leg, and little crocheted butterflies sewn onto the white fabric.
The pattern includes three sizes — 12-18 months, 2T and 3T — and stitch counts are written as 12-18 months (2T, 3T) throughout. Thin spaghetti straps attach at the front of the top and can cross or tie at the back. If you can chain, single crochet and double crochet, you can absolutely make this set.
Materials
- Yarn A (Lavender): approximately 280 (320, 370) yards / 256 (293, 338) metres light worsted / DK weight (CYCA 3) yarn
- Yarn B (White): approximately 320 (380, 440) yards / 293 (347, 402) metres light worsted / DK weight (CYCA 3) yarn
- Yarn C (Butterfly colours): small amounts in soft pink, lilac and mauve, approximately 15 yards / 14 metres of each colour
- US E-4 / 3.5 mm crochet hook for the main fabric
- US D-3 / 3.25 mm crochet hook for the butterflies and fine detail work
- Yarn needle / tapestry needle
- At least 6 stitch markers
- Scissors
- Elastic, 0.5 in / 1.25 cm wide, cut to 16 (17.5, 19) in / 40.5 (44.5, 48.5) cm for the shorts waistband
- Safety pins for elastic threading
- Rust-proof straight pins for blocking
Abbreviations
- beg: beginning
- BLO: back loop only
- ch: chain
- ch-sp: chain space
- dc: double crochet
- FLO: front loop only
- hdc: half double crochet
- pm: place marker
- rem: remaining
- rep: repeat
- rnd: round
- RS: right side
- sc: single crochet
- sc2tog: single crochet 2 together (decrease)
- sk: skip
- sl st: slip stitch
- sp: space
- st(s): stitch(es)
- WS: wrong side
- yo: yarn over
Special Stitches
- Fan stitch (shell stitch): work 5 double crochet stitches into the same stitch or space. This creates a fan-shaped shell, and one fan counts as 5 dc. For the ruffle tiers, the fan stitch round is always worked into the front loops only of the designated foundation round below: slip stitch into the first stitch, chain 3 (this counts as your first dc), work 4 more dc into the same stitch for your first fan, skip 2 stitches, slip stitch into the next stitch, skip 2 stitches, work 5 dc into the next stitch, and repeat around, joining with a slip stitch to the top of the beginning ch-3. The foundation must have a stitch count divisible by 6 for the fan pattern to work evenly.
- Scallop edging: join yarn with a slip stitch, chain 1, single crochet in the first stitch, skip 1 stitch, work 5 dc into the next stitch, skip 1 stitch, single crochet into the next stitch, and repeat around, joining with a slip stitch to the first sc.
Gauge & Size
- Finished size: top chest circumference 18 in / 46 cm (20 in / 51 cm, 22 in / 56 cm); top length from shoulder to hem 10 in / 25.5 cm (11 in / 28 cm, 12 in / 30.5 cm)
- Shorts: waist unstretched 16 in / 40.5 cm (17.5 in / 44.5 cm, 19 in / 48.5 cm); length from waist to hem 8 in / 20.5 cm (9 in / 23 cm, 10 in / 25.5 cm)
- Gauge: 20 stitches x 24 rows = 4 in / 10 cm in single crochet with the US E-4 / 3.5 mm hook, blocked. In fan stitch pattern, one 5-dc fan + 1 ch-1 space = approximately 1 in / 2.5 cm wide. Getting gauge right is essential for this fitted garment
- Construction: top bodice worked in joined rounds with ruffle tiers added into front loops; shorts worked in joined rounds from a flat-worked waistband
- Skill level: Intermediate — the stitches are basic, but precise placement matters for the ruffles
3D Butterfly Applique Pattern
Make 5 (5, 6) butterflies total, varying the colours as desired. Each butterfly has upper wings, lower wings and a body centre, and finishes at approximately 1.5 in / 3.8 cm across. Use the butterfly colours and the D-3 / 3.25 mm hook.
Upper Wings Round 1: Ch 4. Join to form a ring. Ch 3 (counts as dc). Work 2 dc in ring. Ch 2. Work 3 dc in ring. Ch 2. Work 3 dc in ring. Ch 2. Work 3 dc in ring. Ch 2. Join with sl st to top of ch-3. (12 dc, 4 ch-2 spaces)
Upper Wings Round 2: Sl st into next dc. Sl st into ch-2 sp. Ch 3. Work 4 dc in same ch-2 sp. Ch 1. Work 5 dc in next ch-2 sp. Leave remaining stitches unworked. Fasten off. (10 dc, 1 ch-1 sp)
Lower Wings: Join yarn with sl st into the third ch-2 sp of Round 1. Work 5 dc in same ch-2 sp. Ch 1. Work 5 dc in next (fourth) ch-2 sp. Fasten off. (10 dc, 1 ch-1 sp)
Body Centre: With a contrasting or matching colour, ch 8. Sc across. Fasten off. Fold in half and pinch the centre gently to create a body, then sew through the centre to cinch.
To assemble each butterfly, pinch the wings at the centre ring, wrap the body piece around the centre, and sew through all layers to join the upper and lower wings at the centre. Flatten the wings slightly.
Ruffle Top Bodice Base Pattern
The bodice base is your structural foundation, worked in joined rounds of single crochet using Yarn A (lavender). You do not turn your work, and the right side always faces you. The ruffle tiers will attach to Rounds 2, 4 and 6 of this base later, so place a stitch marker on each of those rounds.
Foundation: Size 12-18 months: ch 91. Size 2T: ch 103. Size 3T: ch 109. Join with sl st to first ch, being careful not to twist. This gives you 90 (102, 108) working stitches, divisible by 6 to support the fan stitch repeats.
Round 1 (RS): Ch 1. Sc in each ch around. Join with sl st to first sc. (90, 102, 108 sc)
Round 2: Ch 1. Sc in each st around. Join with sl st to first sc. Place a stitch marker on this round — this is your Tier 3 anchor round (bottom ruffle). (90, 102, 108 sc)
Round 3: Ch 1. Sc in each st around. Join with sl st to first sc. (90, 102, 108 sc)
Round 4: Ch 1. Sc in each st around. Join with sl st to first sc. Place a stitch marker on this round — this is your Tier 2 anchor round (middle ruffle). (90, 102, 108 sc)
Round 5: Ch 1. Sc in each st around. Join with sl st to first sc. (90, 102, 108 sc)
Round 6: Ch 1. Sc in each st around. Join with sl st to first sc. Place a stitch marker on this round — this is your Tier 1 anchor round (top ruffle). (90, 102, 108 sc)
Rounds 7–9: Ch 1. Sc in each st around. Join with sl st to first sc. (90, 102, 108 sc)
After Round 9, your bodice base tube should measure approximately 3 in / 7.5 cm tall and 18 in / 46 cm in circumference. If your measurement differs by more than 0.5 in / 1.25 cm, check your gauge now.
Round 10: Ch 1. Working in BLO, sc in each st around. Join with sl st to first sc. (90, 102, 108 sc)
This BLO round creates a visual fold line at the top of the bodice, and the front loops are left free for the upper edge.
Round 11 (Neckline and Strap Setup): Ch 1. Sc across first 42 (48, 51) sts. Ch 6 (strap base right side). Skip 6 sts. Sc across next 42 (48, 51) sts. Ch 6 (strap base left side). Skip 6 sts. Join with sl st to first sc. (84, 96, 102 sc + 2 ch-6 strap loops)
The 6 skipped stitches on each side form the underarm gap, and the ch-6 bridges this gap.
Round 12: Ch 1. Sc around, working sc in each sc and 6 sc over each ch-6 bridge. Join with sl st to first sc. (96, 108, 114 sc)
Round 13: Ch 1. Sc in each st around. Join with sl st to first sc. (96, 108, 114 sc)
Fasten off, leaving a 12-in / 30.5-cm tail for later finishing. Your bodice base is now complete.
Ruffle Tiers Pattern
Work the three ruffles from bottom to top: Tier 3 first (largest), then Tier 2, then Tier 1. Each tier has two rounds — a fan round, then a second round worked by slip stitching through each fan top and working 5 dc into each slip stitch anchor of the previous round.
Tier 3 (Bottom Ruffle): Join Yarn A with sl st into any front loop of Round 2.
Ruffle Round 3A: Ch 3 (counts as dc). Work 4 dc in same FLO st (first fan complete). Skip 2 FLO sts. Sl st in next FLO st. Skip 2 FLO sts. Work 5 dc in next FLO st. Repeat around. Join with sl st to top of beginning ch-3. (15, 17, 18 fans)
Ruffle Round 3B: Without turning, sl st into each dc of the first fan from the previous round (4 sl sts). Then work 5 dc in the top of the sl st anchor from the previous round. Continue working 5 dc into each sl st anchor of the previous round, with sl sts travelling through each fan top between. Join with sl st. (15, 17, 18 fans)
Fasten off Yarn A and weave in ends. Tier 3 should measure approximately 1.5 in / 3.8 cm tall.
Tier 2 (Middle Ruffle): Join Yarn A with sl st into any front loop of Round 4.
Ruffle Round 2A: Ch 3 (counts as dc). Work 4 dc in same FLO st. Skip 2 FLO sts. Sl st in next FLO st. Skip 2 FLO sts. Work 5 dc in next FLO st. Repeat around. Join with sl st to top of beginning ch-3. (15, 17, 18 fans)
Ruffle Round 2B: Same as Ruffle Round 3B above. (15, 17, 18 fans)
Fasten off and weave in ends.
Tier 1 (Top Ruffle): Join Yarn A with sl st into any front loop of Round 6.
Ruffle Round 1A: Ch 3 (counts as dc). Work 4 dc in same FLO st. Skip 2 FLO sts. Sl st in next FLO st. Skip 2 FLO sts. Work 5 dc in next FLO st. Repeat around. Join with sl st to top of beginning ch-3. (15, 17, 18 fans)
Ruffle Round 1B: Same method as the previous tiers. (15, 17, 18 fans)
Fasten off and weave in ends. With all three tiers attached, the ruffle section should measure approximately 3 in / 7.5 cm in height, with the ruffles draping downward.
Top Edge Ruffle & Straps
Join Yarn A with sl st into any front loop of Round 12.
Top Ruffle Round A: Ch 3 (counts as dc). Work 4 dc in same FLO st. Skip 2 FLO sts. Sl st in next FLO st. Skip 2 FLO sts. Work 5 dc in next FLO st. Repeat around. Join with sl st to top of beginning ch-3. (16, 18, 19 fans)
Top Ruffle Round B: Same as the previous ruffle second round method. (16, 18, 19 fans)
Fasten off and weave in ends.
Straps: Each strap is a simple chain cord reinforced with slip stitches. With Yarn A and the E-4 hook, ch 55 (60, 65).
Strap Row 1: Sl st in each ch back to start. Fasten off, leaving a 12-in tail. (54, 59, 64 sl sts)
Make 2 straps. For the front, pin one end of each strap to the left and right underarm ch-6 bridge area at Round 11, approximately 2 in / 5 cm apart at centre front, and sew securely with the tail. For the back, cross the straps at centre back and sew the free ends to the opposite side, or attach both straight for a non-crossing style. Adjust the length as needed before sewing.
Butterfly Shorts Waistband Pattern
The waistband is worked flat in rows using Yarn B (white), then seamed to form a tube that the elastic threads through. Start with ch 17.
Row 1: Hdc in 3rd ch from hook and in each ch across. Ch 2, turn. (15 hdc)
Rows 2–80 (90, 96): Hdc in each st across. Ch 2, turn. At the end of the last row, do not turn.
The waistband is a long horizontal strip — 80 rows creates approximately 16 in / 40.5 cm for size 12-18 months. Seam the short ends together with a yarn needle using mattress stitch to create your waistband tube ring. Thread the elastic through the waistband tube using a safety pin, overlap the elastic ends by 0.5 in / 1.25 cm, and sew them together securely.
Butterfly Shorts Body Pattern
Join Yarn B to any seam point of the waistband with sl st, working along one long edge.
Setup Round: Ch 1. Work 90 (102, 108) sc evenly around the bottom edge of the waistband. Join with sl st to first sc. (90, 102, 108 sc)
Rounds 1–10 (12, 14): Ch 1. Sc in each st around. Join with sl st to first sc. (90, 102, 108 sc per round)
After these rounds, the shorts body below the waistband should measure approximately 3 in / 7.5 cm (3.5 in / 9 cm, 4 in / 10 cm).
Shorts Legs Pattern
Mark the midpoint of the round to identify the front and back halves. Front half: stitches 1–45 (51, 54). Back half: stitches 46–90 (52–102, 55–108).
Left Leg Round 1: Join Yarn B with sl st at stitch 1. Ch 1. Sc in first 45 (51, 54) sts. Ch 4 (crotch bridge). Join with sl st to first sc. (45, 51, 54 sc + 4 ch)
Left Leg Round 2: Ch 1. Sc in each sc and 4 sc over the ch-4 bridge. Join with sl st to first sc. (49, 55, 58 sc)
Left Leg Round 3: Ch 1. Sc2tog 1 (1, 4) time(s) evenly spaced. Sc in each remaining st. Join with sl st to first sc. (48, 54, 54 sc)
Left Leg Rounds 4–8 (10, 12): Ch 1. Sc in each st around. Join with sl st to first sc. (48, 54, 54 sc)
Left Leg Scallop Hem: Ch 1. Sc in first st. Skip 2 sts. 5 dc in next st. Skip 2 sts. Sc in next st. Repeat around. Join with sl st to first sc. Fasten off. (8, 9, 9 scallops)
Weave in ends.
Right Leg Round 1: Rejoin Yarn B with sl st at stitch 46 (one stitch past the left leg’s last stitch). Ch 1. Sc in next 45 (51, 54) sts. Work 4 sc along the underside of the ch-4 bridge already made. Join with sl st to first sc. (49, 55, 58 sc)
Right Leg Round 2: Ch 1. Sc in each st around. Join with sl st to first sc. (49, 55, 58 sc)
Right Leg Round 3: Ch 1. Sc2tog 1 (1, 4) time(s) evenly spaced. Sc in remaining sts. Join with sl st to first sc. (48, 54, 54 sc)
Right Leg Rounds 4–8 (10, 12): Ch 1. Sc in each st around. Join with sl st to first sc. (48, 54, 54 sc)
Right Leg Scallop Hem: Same as the left leg. (8, 9, 9 scallops)
Fasten off and weave in ends. The completed shorts should measure approximately 8 in / 20.5 cm (9 in / 23 cm, 10 in / 25.5 cm) from waistband top to the lowest scallop point.
Finishing & Assembly
Block all pieces before assembling. This is particularly important for the ruffles, which tend to curl before blocking — pin them gently to encourage them to lay flat and fan out beautifully.
Make 5 (5, 6) butterflies following the 3D Butterfly Applique pattern above. Pretty colour combinations to try: pink upper wings with lilac lower wings and a mauve body; lilac upper wings with pink lower wings and a lavender body; mauve upper wings with lavender lower wings and a pink body; pink upper and lower wings with a lilac body; lilac upper and lower wings with a mauve body.
Scatter the butterflies across the front and back of the shorts body below the waistband — at least 3 butterflies on the front panel and 2 on the back, and for size 3T with 6 butterflies, add a third to the back panel. Pin them in place before sewing, then sew securely around the centre body of each butterfly, leaving the wing edges free for that lovely 3D effect. Tack the wing tips lightly if needed.
Weave in all remaining ends securely. For garments that will be washed frequently, weave each tail at least 1 inch in each direction. Give everything a final steam or light press, being careful not to flatten the 3D butterfly wings.
Tips
Stitch markers are your best friends in this project. Use them to mark round beginnings and move them up as you work — and do not skip the gauge swatch, because even one stitch per 4 inches changes the finished chest measurement by 1 to 1.5 inches.
To lengthen the top, add rounds between Round 9 and Round 10 in the bodice base — every 2 additional rounds adds approximately 0.33 in / 0.85 cm. To lengthen the shorts, add rounds to the body section before the crotch separation; each round adds approximately 0.17 in / 0.43 cm.
To size up beyond 3T, add 6 stitches (one fan repeat) to the bodice foundation chain and one stitch repeat group to the shorts foundation, and lengthen each section by 2 additional rounds per size increment. To size down to 6-12 months, subtract 6 stitches from the bodice foundation (84 sc base) and shorten all length sections by 2 rounds each.
For the strap length, measure from the front bodice over the child’s shoulder to the back, and add 4 in / 10 cm for adjustment room before you settle on your strap chain count.
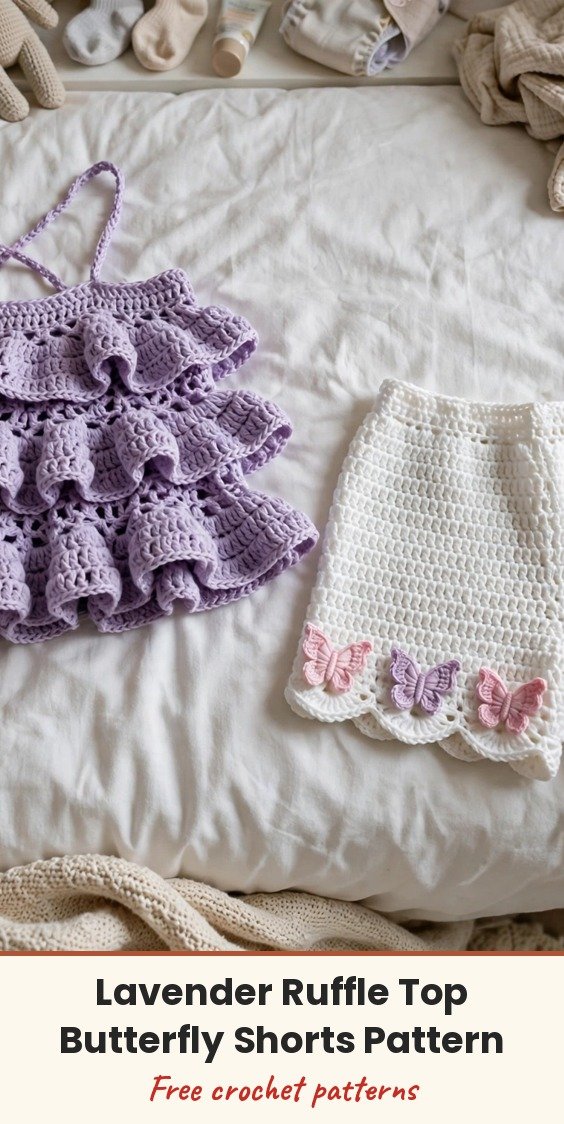
Lavender Ruffle Top & Butterfly Shorts Pattern
Materials
Steps
- Work the bodice base in joined sc rounds to Round 13, marking Rounds 2, 4 and 6
- Add the three ruffle tiers into the front loops of the marked rounds, then the top edge ruffle
- Make 2 chain straps and sew them on, crossed or straight at the back
- Work the shorts waistband flat, seam it into a tube and thread the elastic
- Work the shorts body in rounds, then split into two legs with scalloped hems
- Crochet 5 (5, 6) 3D butterfly appliques and sew them onto the shorts
- Block everything and weave in all ends
- Do not skip the gauge swatch — one stitch per 4 inches changes the chest by 1 to 1.5 inches
- Block the ruffles before assembly so they lay flat and fan out
- Sew butterflies around the centre body only, leaving the wings free for a 3D effect


