Monochrome Neutral Granny Tote Bag Free Crochet Pattern

Table of Contents
I have such a weakness for a gorgeous everyday bag, and this monochrome neutral granny tote checks every single box! It is roomy enough for farmers market hauls, sturdy enough for beach days, and pretty enough that I actually want to carry it everywhere.
We will work this structured tote in the round from the bottom up. It starts with a flat rectangular base, then a dense granny cluster section at the bottom — so your keys will not fall through — and an open granny mesh section at the top that keeps the bag lightweight. The whole palette is warm neutrals: cream, taupe, tan, warm grey, charcoal and chocolate brown, which gives it that effortlessly chic look that goes with literally everything.
The handles are braided cords attached at the upper rim, the top edge is reinforced with rounds of single crochet and slip stitch, and the finishing touch is a layered tassel charm clipped to one handle. This pattern is rated intermediate, but if you are a confident beginner who has tackled basic stitches and colour changes, you can absolutely complete it with a little patience.
Materials
- Colour A (Cream / natural white): approximately 320 yards / 293 metres worsted weight (Category 4) 100% cotton yarn
- Colour B (Warm taupe / light tan): approximately 150 yards / 137 metres worsted weight 100% cotton yarn
- Colour C (Warm medium grey / silver): approximately 80 yards / 73 metres worsted weight 100% cotton yarn
- Colour D (Warm dark taupe / mushroom): approximately 100 yards / 91 metres worsted weight 100% cotton yarn
- Colour E (Charcoal grey): approximately 80 yards / 73 metres worsted weight 100% cotton yarn
- Colour F (Chocolate brown / dark brown): approximately 80 yards / 73 metres worsted weight 100% cotton yarn
- US H-8 / 5.0 mm crochet hook for the bag body
- US G-6 / 4.0 mm crochet hook for the base and tight foundation rounds
- Yarn needle for weaving in ends
- Scissors
- At least 4 locking stitch markers
- 1 swivel clip or lobster clasp in antique brass or gold tone, approximately 3/4 inch / 2 cm
- Optional: 3 yards / 2.75 metres of 5 mm cotton macrame cord in natural, for braided handles in place of yarn strands
Abbreviations
- ch: chain
- sl st: slip stitch
- sc: single crochet
- dc: double crochet
- hdc: half double crochet
- sp: space
- ch-sp: chain space
- rep: repeat
- beg: beginning
- sk: skip
- st: stitch
- sts: stitches
- RS: right side
- WS: wrong side
- PM: place marker
- rnd: round
- rem: remaining
- yo: yarn over
- tog: together
- granny cl: granny cluster (see Special Stitches)
- join: join with slip stitch unless otherwise stated
Special Stitches
- Granny cluster (granny cl): yarn over, insert hook into the indicated stitch or space, yarn over, pull up a loop, yarn over, pull through 2 loops on hook (one half-finished dc). Repeat twice more in the same stitch or space so you have three half-finished dc on your hook, then yarn over and pull through all 4 loops on hook. Each granny cl counts as one cluster unit. In open mesh rounds, clusters are separated by ch-1 or ch-2 spaces; in dense cluster rounds, clusters sit side by side with only a ch-1 between pairs.
- Standing double crochet: make a slip knot with the new yarn and place it on your hook, yarn over, insert hook into the indicated stitch or space, yarn over, pull up a loop, yarn over, pull through 2 loops, yarn over, pull through the remaining 2 loops. This counts as the first dc of the round and lets you join a new colour without a slip stitch join.
Gauge & Size
- Finished size: approximately 14 inches / 35.5 cm wide, 13 inches / 33 cm tall from base to top rim (not including handles), 5 inches / 12.5 cm deep, with a handle drop of approximately 10 inches / 25.5 cm
- Gauge: with the H-8 / 5.0 mm hook and worsted weight cotton, 1 granny cluster group (3 dc, ch 1) = approximately 1 inch / 2.5 cm wide, 4 rounds of granny mesh = approximately 2.5 inches / 6.4 cm tall, and 14 sc x 16 rows = 4 inches / 10 cm in single crochet. For the base worked in sc, 16 sc x 18 rows = 4 inches / 10 cm. Work a gauge swatch before beginning the body
- Construction: flat sc base, joined into an oval, then dense cluster rounds, transition rounds, open mesh rounds and a striped top edging, finished with braided handles and a tassel charm
- Skill level: Intermediate
- Stitch counts in the body rounds refer to cluster groups, not individual dc — one cluster group = 1 granny cl + ch-1. Change colours at the end of the last stitch before the new colour begins: work the last stitch of the current colour until 2 loops remain on the hook, then draw the new colour through to complete the stitch
Base Pattern
The base is worked flat in rows of sc and forms a rectangle approximately 14 inches / 35.5 cm long by 5 inches / 12.5 cm wide. Use Colour A (cream) and the H-8 / 5.0 mm hook throughout the base. Start with ch 57.
Row 1 (RS): Sc in 2nd ch from hook and in each ch across. Turn. (56 sc)
Row 2: Ch 1, sc in each st across. Turn. (56 sc)
Rows 3–18: Repeat Row 2, turning after each row. (56 sc each row)
After Row 18, the base should measure approximately 5 inches / 12.5 cm wide (short dimension) and 14 inches / 35.5 cm long (long dimension). Do not fasten off.
Joining Round Pattern
This joining round picks up stitches along all four edges of the base to create a continuous oval working loop for the body rounds — it sets the stitch count for everything that follows. After Row 18 of the base, do not turn; rotate your work to begin picking up along the long edge, and ch 1 to start.
Along the right long edge (18 row-end edges): sc evenly, working 1 sc in each row end. (18 sc)
Along the starting chain (foundation edge): sc in each of the 56 foundation chain loops. (56 sc)
Along the left long edge (18 row-end edges): sc in each row end. (18 sc)
Along the top of Row 18 (working sts): sc in each of the 56 sts. (56 sc)
Join with sl st to first sc. Do not turn. Place a marker to mark the beginning of the round. Total stitches in the joining round: 18 + 56 + 18 + 56 = 148 sc. This number is divisible by 4 to support the granny cluster repeat — 148 divided by 4 = 37 groups.
Dense Cluster Section Pattern
The lower body is 7 rounds of dense granny cluster work, creating a textured, close-set cluster band in the lower third of the bag. The 148 sc base translates to 37 cluster groups of (granny cl, ch 1) per round. Each cluster is worked into every 4th stitch of the sc round beneath, or into the ch-1 spaces of the round beneath in subsequent cluster rounds.
Round 1 (Colour B, Taupe): Join Colour B in any sc. (Granny cl in same st, ch 1, sk 3 sts) repeat 37 times. Join to top of first granny cl with sl st. (37 clusters, 37 ch-1 sps)
Round 2 (Colour E, Charcoal): Join Colour E. Ch 3 (counts as first dc), 2 dc in same ch-1 sp (completes first granny cl), ch 1. (Granny cl in next ch-1 sp, ch 1) repeat 36 times. Join to top of beginning ch-3 with sl st. (37 clusters, 37 ch-1 sps)
Round 3 (Colour A, Cream): Join Colour A. Repeat Round 2. (37 clusters, 37 ch-1 sps)
Round 4 (Colour D, Mushroom Taupe): Join Colour D. Repeat Round 2. (37 clusters, 37 ch-1 sps)
Round 5 (Colour E, Charcoal): Join Colour E. Repeat Round 2. (37 clusters, 37 ch-1 sps)
Round 6 (Colour B, Taupe): Join Colour B. Repeat Round 2. (37 clusters, 37 ch-1 sps)
Round 7 (Colour A, Cream): Join Colour A. Repeat Round 2. (37 clusters, 37 ch-1 sps)
After Round 7, the dense cluster band should measure approximately 3.5 to 4 inches / 9 to 10 cm tall above the base.
Transition Rounds Pattern
Two rounds of sc re-establish a flat sc foundation to transition into the granny mesh section.
Transition Round 1 (Colour A, Cream): Work 2 sc in each of 37 cluster tops, 2 sc in each of 37 ch-1 sps alternating, placing 1 extra sc at each of 4 corner areas (the two short-side centres and two long-side centres). Target: 148 sc evenly distributed. (148 sc)
Transition Round 2 (Colour B, Taupe): Ch 1. Sc in each sc around. Join. (148 sc)
After the two transition rounds, you are back to 148 sc and the lower body should measure approximately 5 inches / 12.5 cm tall from the base.
Granny Mesh Section Pattern
The upper body is 10 rounds of open granny mesh — that lovely see-through lattice across the upper two-thirds of the bag. In the open mesh, each group is (granny cl, ch 2), and each group occupies one ch-2 sp from the round below.
Mesh Round 1 (Colour A, Cream): Skip first sc, (granny cl in next sc, ch 2, sk 3 sts) repeat 37 times. Join to top of first cluster. (37 clusters, 37 ch-2 sps)
Mesh Round 2 (Colour A, Cream): Sl st into ch-2 sp. Ch 3, 2 dc in same sp, ch 2. (Granny cl in next ch-2 sp, ch 2) repeat 36 times. Join to top of ch-3. (37 clusters, 37 ch-2 sps)
Mesh Round 3 (Colour C, Grey): Join Colour C. Repeat Round 2. (37 clusters, 37 ch-2 sps)
Mesh Round 4 (Colour A, Cream): Repeat Round 2. (37 clusters, 37 ch-2 sps)
Mesh Round 5 (Colour A, Cream): Repeat Round 2. (37 clusters, 37 ch-2 sps)
Mesh Round 6 (Colour B, Taupe): Join Colour B. Repeat Round 2. (37 clusters, 37 ch-2 sps)
Mesh Round 7 (Colour A, Cream): Repeat Round 2. (37 clusters, 37 ch-2 sps)
Mesh Round 8 (Colour A, Cream): Repeat Round 2. (37 clusters, 37 ch-2 sps)
Mesh Round 9 (Colour C, Grey): Join Colour C. Repeat Round 2. (37 clusters, 37 ch-2 sps)
Mesh Round 10 (Colour A, Cream): Repeat Round 2. (37 clusters, 37 ch-2 sps)
After Round 10 of the mesh section, the open mesh band should measure approximately 6.5 to 7 inches / 16.5 to 18 cm tall, and the total bag height should be approximately 11 to 12 inches / 28 to 30.5 cm from the base.
Top Edging Pattern
The top edging creates the dark striped rim at the top of the bag, using Colour F (chocolate brown) and Colour B (taupe) in alternating rounds of sc and sl st.
Prep Round (Colour A, Cream): Sc in each cluster top and in each ch-2 sp. (37 + 37 = 74 sc)
Edging Round 1 (Colour F, Chocolate Brown): Ch 1. Sc in each sc around. Join. (74 sc)
Edging Round 2 (Colour F, Chocolate Brown): Ch 1. Sc in each sc around. Join. (74 sc)
Edging Round 3 (Colour B, Taupe): Ch 1. Sc in each sc around. Join. (74 sc)
Edging Round 4 (Colour F, Chocolate Brown): Sl st in each sc around. Join. Fasten off. (74 sl sts)
The edging should measure approximately 0.75 to 1 inch / 2 to 2.5 cm tall, and the finished bag body before handles should measure approximately 13 inches / 33 cm from base to top rim.
Finishing & Assembly
For the handles: the bag uses two braided handles attached at the top rim, positioned on the front and back walls centred on each long side. Each handle is created from 12 strands of yarn cut to 80 inches / 203 cm each — per handle, 4 strands Colour B, 4 strands Colour D and 4 strands Colour A (or substitute macrame cord as noted in the materials). To mark the placement on the front long side: count 37 sc along the front top edge and mark the centre 12 sts; the left handle base attaches at st 10 from the left edge of the front panel and the right handle base at st 10 from the right edge, creating a handle spanning approximately 4.5 inches / 11.5 cm between attachment points. Repeat the identical placement on the back panel.
To attach the handle strands: hold all 12 strands together and fold at the midpoint to create 24 working ends. Pull the fold through the designated top edging stitch from front to back using a crochet hook or yarn needle, then pull all 24 ends through the fold loop to create a lark’s head mount. Divide the 24 strands into 3 groups of 8 and braid the three groups in a standard 3-strand braid for 10 inches / 25.5 cm. Attach the braid end to the corresponding second attachment point on the same side using another lark’s head mount, threading the ends through the designated stitch and securing with a tight overhand knot on the inside of the bag. Trim the ends to 0.5 inch / 1.3 cm and tuck them inside the bag rim, securing with a few stitches using a yarn needle. Repeat for the second handle on the back panel.
For the tassel charm, you will need approximately 40 strands of Colour A cut to 8 inches / 20.5 cm each, approximately 10 strands of Colour D cut to 8 inches / 20.5 cm, 1 strand of Colour F cut to 30 inches / 76 cm for wrapping, and a small amount of Colour D for the pom ball at the top. For the pom top: wind Colour D around 3 fingers approximately 40 times, slide it off your fingers, tie tightly at the centre with a 12-inch / 30.5 cm strand, cut the loops, and trim to a round shape approximately 1 inch / 2.5 cm in diameter. For the tassel: hold all 40 strands of Colour A and 10 strands of Colour D together and fold at the midpoint. Using Colour F, wrap tightly around all strands approximately 0.75 inch / 2 cm down from the fold to create the tassel neck, knot the wrap yarn securely, thread the wrap ends up through the centre of the tassel top and trim. Trim all tassel strands evenly to your desired length (approximately 4 inches / 10 cm from neck to bottom).
To assemble the charm: thread the pom ball tie ends through the loop at the top of the tassel fold and knot securely so the pom sits directly above the tassel neck. Attach the swivel clip or lobster clasp to a 4-inch / 10 cm chain loop made in Colour A, tie or sew the chain loop to the pom-tassel top, and clip the swivel to the handle attachment point at the front left handle base.
The bag does not require a liner for structural integrity, but for a fully finished look — or to stop small items falling through the open mesh — you can add a fabric liner. Cut two pieces 15 x 14 inches / 38 x 35.5 cm (front and back), two pieces 6 x 14 inches / 15 x 35.5 cm (sides) and one piece 15 x 6 inches / 38 x 15 cm (base panel) from medium-weight cotton or linen in a matching neutral. Sew them into a box shape with 0.5 inch / 1.3 cm seams, insert into the bag, fold the top edge over the top rim, and whipstitch the liner to the inside of the top edging round using coordinating thread.
Wet blocking is strongly recommended for the open granny mesh section. Submerge the completed bag in cool water with a small amount of no-rinse wash or gentle soap and soak for 20 minutes. Gently press (do not wring) to remove excess water, roll in a clean dry towel and press again. Shape the bag over a box, thick book stack or bag form approximately 14 x 5 inches / 35.5 x 12.5 cm, stretch the mesh section outward at the corners to open the ch-2 spaces uniformly, and allow it to dry completely (12 to 24 hours) before removing it from the form.
Weave all ends securely on the interior using a yarn needle, weaving in at least 2 directions for at least 1 inch / 2.5 cm, and trim ends close.
Tips
Cotton is strongly preferred over acrylic for this bag because it holds its shape and provides structure without needing a liner. Avoid fluffy, hairy or loosely spun yarns — they will obscure the open granny mesh squares and the textural cluster sections.
To make the bag wider, work a longer foundation chain in multiples of 4 — each additional 4 chains adds approximately 1 inch / 2.5 cm to the long dimension of the base. Recalculate the cluster groups by dividing the total sc count in the joining round by 4, and always aim for a multiple of 4. To make it taller, add rounds to the granny mesh section in the solid cream area; each additional mesh round adds approximately 0.6 inch / 1.5 cm in height.
For care: machine wash on a gentle or delicate cycle in cool water, using a mesh laundry bag to protect the handles and tassel. Do not tumble dry — reshape and air dry flat or over a bag form. Store the bag stuffed with tissue paper or a small pillow form to maintain its boxy shape between uses.
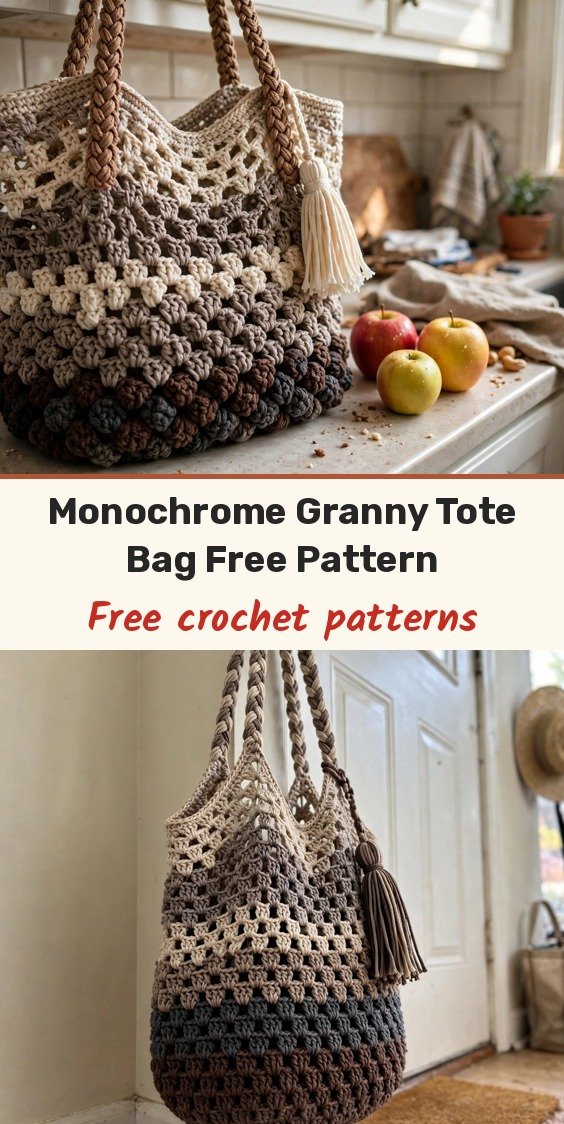
Monochrome Neutral Granny Tote Bag Free Crochet Pattern
Materials
Steps
- Work the flat sc base over 18 rows (56 sc)
- Pick up 148 sc around all four edges in the joining round
- Work 7 dense granny cluster rounds in the neutral colour sequence
- Work 2 transition rounds of sc back to 148 sts
- Work 10 open granny mesh rounds
- Finish the top with the striped sc and slip stitch edging (74 sts)
- Braid and attach the two handles, then make and clip on the tassel charm
- Wet block the bag over a form to open up the mesh
- Use smooth, tightly spun 100% cotton — fluffy yarns hide the mesh and clusters
- Always keep the joining round total divisible by 4 for the cluster repeat
- Add mesh rounds in the solid cream section to make the bag taller


