Christmas Turtle Crochet Pattern – Santa, Gift Box & Tree Amigurumi – DIY Crafts
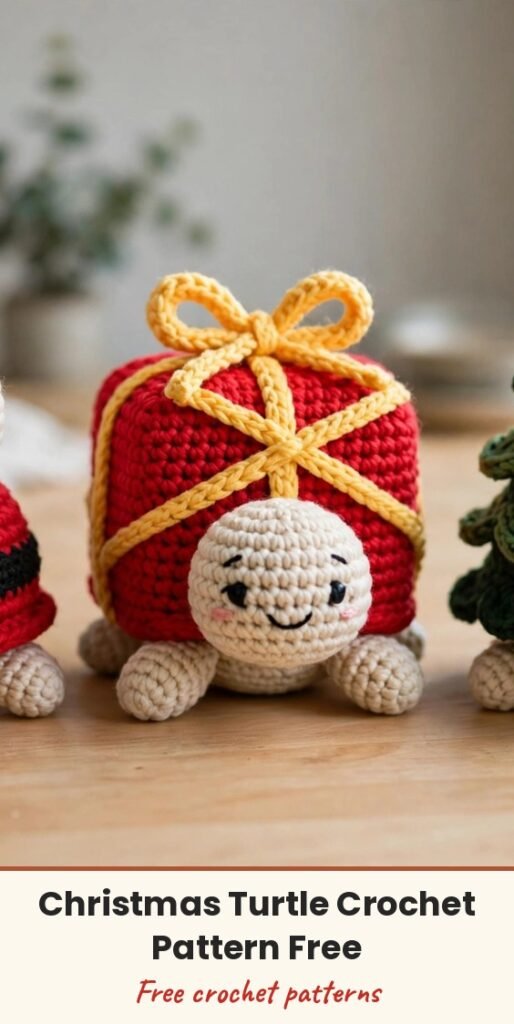
Table of Contents
Oh, these little Christmas turtles just make me smile every single time! You crochet one sweet turtle base, and then the shell decorations completely change its personality, so you can make a Santa turtle, a wrapped gift box turtle, or a Christmas tree turtle from the very same shape.
I love that you get to choose your favourite before you even start. Pick your colours, work the head, fins and shell step by step, and then add the belt, the crossed straps and bow, or the layered tree topper at the end. They are wonderful as shelf decorations and as handmade gifts.
Follow the shared body first, then jump to the finishing section for your chosen version. Let us make a whole festive little family!
Materials
- Yarn for Santa turtle: Beige for head and body, Peach for fins, Red for shell, Black for belt, White for shell trim, Yellow for buckle, Pink for blush
- Yarn for Gift Box turtle: Green for head and body, Dark Green for fins, Red for shell, Yellow for trim, straps and bow, Pink for blush
- Yarn for Christmas Tree turtle: Light Green for head, body and fins, Dark Green for shell, White for trim, Yellow for star, Pink for blush
- Crochet hook sized to match your yarn weight
- 1 pair of safety eyes per turtle
- Stitch marker
- Yarn needle
- Fiberfill stuffing
- Scissors
- Hot glue, for the Christmas Tree turtle layers
Abbreviations
- MR: magic ring
- sc: single crochet
- inc: increase, 2 sc in one stitch
- dec: decrease, invisible decrease using front loops only
- hdc: half double crochet
- dc: double crochet
- sl st: slip stitch
- ch: chain
- FLO: front loop only
- BLO: back loop only
- st/sts: stitch / stitches
Gauge & Size
- Finished size varies with yarn weight and hook size chosen
- Construction: head, 4 fins, upper shell and lower shell worked separately, then sewn together
- Skill level: Easy to Intermediate amigurumi
Head Pattern
Use Beige, Green, or Light Green according to your chosen turtle.
Round 1: 8 sc in a MR. (8 sts)
Round 2: 8 inc. (16 sts)
Round 3: (1 sc, 1 inc) x 8. (24 sts)
Round 4: 24 sc. (24 sts)
Round 5: (2 sc, 1 inc) x 8. (32 sts)
Rounds 6 to 9: 32 sc each round. (32 sts)
Round 10: (2 sc, 1 dec) x 8, working decreases in FLO. (24 sts)
Round 11: (1 sc, 1 dec) x 8. (16 sts)
Round 12: 16 sc. (16 sts)
Insert the safety eyes between Rounds 5 and 6, placing them 13 stitches apart. Stuff the head firmly. Skip the last stitch of Round 12, flatten the opening and crochet across both layers with 7 sc to seal it flat. Ch 1, leave a long tail for sewing. With pink yarn, embroider a small line of blush under each eye spanning 2 stitches.
Fins Pattern
Hind fins, make 2, in Peach, Green, or Light Green.
Round 1: 6 sc in a MR. (6 sts)
Round 2: 6 inc. (12 sts)
Round 3: (1 sc, 1 inc) x 6. (18 sts)
Round 4: (2 sc, 1 inc) x 6. (24 sts)
Round 5: (3 sc, 1 inc) x 6. (30 sts)
Do not stuff. Skip the last stitch, flatten and close across both layers with 14 sc. Ch 1, leave a long tail.
Front fins, make 2: Repeat Rounds 1 to 5 of the hind fins. (30 sts)
Round 6: (4 sc, 1 inc) x 6. (36 sts)
Do not stuff. Skip the last stitch, flatten and close across both layers with 17 sc. Ch 1, leave a long tail.
Shell Pattern
Use Red for Santa and Gift Box turtles, or Dark Green for the Christmas Tree turtle.
Round 1: 8 sc in a MR. (8 sts)
Round 2: 8 inc. (16 sts)
Round 3: (1 sc, 1 inc) x 8. (24 sts)
Round 4: (2 sc, 1 inc) x 8. (32 sts)
Round 5: (3 sc, 1 inc) x 8. (40 sts)
Round 6: 40 sc. (40 sts)
Round 7: (4 sc, 1 inc) x 8. (48 sts)
Round 8: 48 sc. (48 sts)
Round 9: (5 sc, 1 inc) x 8. (56 sts)
Round 10: 56 sc in FLO. On the very last stitch, change colour to White for Santa and Tree, or Yellow for Gift Box. Sl st into the first stitch.
Round 11, shell edge: Ch 2. Mark the unworked back loop of the first stitch of Round 10. In the same stitch as your ch 2, make (1 dc, ch 1, 1 dc). Repeat (1 dc, ch 1, 1 dc) in every stitch around, 56 times total. Sl st to the first st, ch 1, fasten off and weave in ends.
Belly Pattern
Use Peach, Green, or Light Green according to your version.
Round 1: Attach yarn to the marked unworked back loop from Round 10. Ch 1, sc in the same space and in each remaining back loop around. (56 sts)
Round 2: (5 sc, 1 dec) x 8. (48 sts)
Round 3: (4 sc, 1 dec) x 8. (40 sts)
Round 4: (3 sc, 1 dec) x 8. (32 sts)
Round 5: (2 sc, 1 dec) x 8. (24 sts)
Round 6: (1 sc, 1 dec) x 8. (16 sts)
Stuff the body firmly before the final round.
Round 7: 8 dec. (8 sts)
Cut the yarn leaving a tail, weave through the front loops of the 8 remaining stitches, pull tight to close, secure and hide the tail.
Finishing & Assembly
Santa belt: In Black, Ch 23, starting in the 2nd ch from the hook make 22 sc. Ch 1, leave a long tail and cut. Sew the strap across the centre of the shell and embroider a small yellow square in the middle as the buckle.
Gift Box straps: Make 2 straps in Yellow, each Ch 23, starting in the 2nd ch make 22 sc, ch 1 and leave a long tail. Sew the two straps in a cross shape over the shell.
Gift Box bow: In Yellow, Ch 23. Side 1: Starting in the 2nd ch, make [1 sc, 1 hdc in next 2 chs, 1 dc in next 5 chs, 1 hdc in next 2 chs, 1 sc] twice. Side 2: Working down the opposite side, repeat the same sequence twice more. Sl st to the first st, ch 1, cut leaving a very long tail. Fold the sides inward, wrap the tail tightly around the middle 7 to 8 times, and sew to the top centre of the straps.
Christmas Tree top layer: In Light Green, Round 1: 6 sc in MR (6 sts). Round 2: 6 inc (12 sts). Round 3: (1 sc, 1 inc) x 6 (18 sts). Round 4: (2 sc, 1 inc) x 6 (24 sts), change to White on the last stitch, sl st to first st. Round 5 trim: Ch 2, in the same st make (1 hdc, ch 1, 1 hdc), repeat in every stitch around, 24 times, sl st to first st, fasten off.
Christmas Tree middle layer: Rounds 1 to 3 as top layer (18 sts). Round 4: (2 sc, 1 inc) x 6 (24 sts). Round 5: (3 sc, 1 inc) x 6 (30 sts). Round 6: (4 sc, 1 inc) x 6 (36 sts). Round 7: (5 sc, 1 inc) x 6 (42 sts), change to White on the last stitch, sl st to first st. Round 8 trim: Ch 2, in the same st make (1 hdc, ch 1, 1 hdc), repeat in every stitch around, 42 times, sl st, fasten off.
Yellow star: Make a MR, work inside the ring 1 sc, [1 dc, ch 2, 1 dc] x 5, 1 sc. Pull tight, sl st to the first sc, fasten off.
Assembly: Sew the flattened 7-stitch edge of the head between the upper and lower shell. Place the front fins about 3 stitches from the head, sewing between Rounds 1 and 2 of the lower shell across 3 stitches, curve facing forward. Place the hind fins about 8 stitches from the front fins and sew the same way. For the tree version, lightly stuff the undersides of the tree layers, glue around the inner edges, press onto the shell, and glue the star to the peak.
Tips
Decide which turtle version you are making before Round 10 of the shell, because the trim colour changes there.
Keep the front and hind fins in separate piles, the front fins have one extra round and are larger.
Stuff the head and body firmly so the turtle holds its rounded shape.
Check head placement from the front before finishing sewing, so it sits upright and centred.

Christmas Turtle Crochet Pattern – Santa, Gift Box & Tree Amigurumi – DIY Crafts
Materials
Steps
- Crochet and stuff the head, add eyes and blush
- Make 2 hind fins and 2 front fins
- Crochet the upper shell and decorative edge
- Work the lower shell belly and stuff the body
- Make belt, straps and bow, or tree layers and star
- Sew head and fins to the body
- Add the version decorations to finish
- Choose your version before shell Round 10 for the trim colour
- Keep front and hind fins separate, front fins are larger
- Stuff firmly before the final belly decrease round
- Use the long sewing tails on head and fins to anchor pieces securely


