Christmas Poinsettia Table Runner Free Crochet Pattern
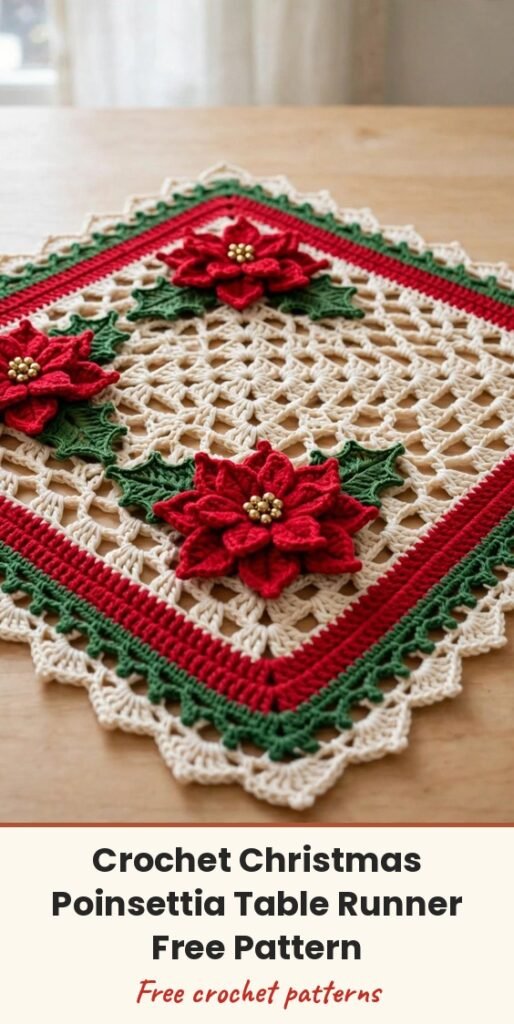
Table of Contents
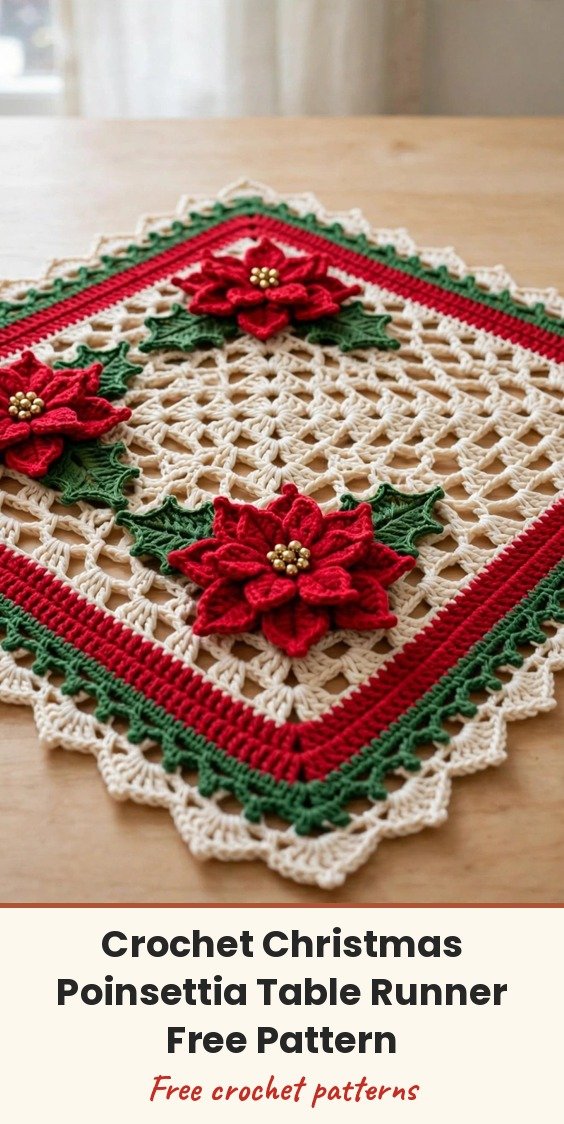
If there is one piece that makes a Christmas table feel instantly special, it is this poinsettia topper. I am Amy, and I love a project that looks like a showpiece but is really just a friendly rhythm of double crochet, shells, and picots. This square topper is worked from the center outward, finished with layered borders, and then dressed up with three-dimensional poinsettia appliques sewn on at the end.
The mesh center uses basic double crochet and chain spaces. The borders add color and texture through a bold red stripe, a green picot frame, and a cream scalloped lace edge. The poinsettias are worked separately, petal by petal, so you can make them at the sofa in the evenings and assemble everything at the end. If you can double crochet and follow a rhythm, you can absolutely make this.
Placed on your table rotated 45 degrees, one corner points toward you like a diamond. The large poinsettia sits at the center, two medium blooms sit at the left and right corners, and two smaller blooms anchor the front and back corners, with holly leaves and berry clusters completing each grouping.
Materials
- 400 yards worsted weight yarn in cream (Color A)
- 150 yards worsted weight yarn in red (Color B)
- 120 yards worsted weight yarn in green (Color C)
- 15 yards worsted weight yarn in gold/yellow (Color D), or 6-strand embroidery floss
- US G-6 (4.0 mm) crochet hook for base and borders
- US F-5 (3.75 mm) crochet hook for poinsettia petals and leaves (optional)
- Tapestry needle
- Stitch markers, at least 8
- Small gold seed beads, approximately 40 to 50 (or substitute French knots)
- Sewing needle and matching thread
- Rust-proof blocking pins
- Spray starch or blocking solution
- Scissors
Abbreviations
- beg = beginning
- BLO = back loop only
- ch = chain
- ch-sp = chain space
- dc = double crochet
- dc2tog = double crochet two together
- hdc = half double crochet
- lp = loop
- MR = magic ring
- pm = place marker
- rep = repeat
- rs = right side
- sc = single crochet
- sk = skip
- sl st = slip stitch
- sp = space
- st(s) = stitch(es)
- tr = treble crochet
- ws = wrong side
- yo = yarn over
Special Stitches
- Shell stitch (shell): Work 5 dc all into the same stitch or space.
- Picot: Chain 3, then slip stitch into the first chain made (the chain closest to the hook).
- V-stitch (V-st): Work (1 dc, ch 2, 1 dc) all into the same stitch or space.
Gauge & Size
- Gauge with Color A and G-6 hook: 16 dc and 8 rows = 4 inches in standard double crochet fabric
- Mesh gauge: one mesh unit (1 dc, ch 1, 1 dc over 3 stitches) measures approximately 0.75 inches wide; four mesh rows measure approximately 2 inches tall
- Finished size: 20 inches square, sitting on point like a diamond
- Pattern notes: The base is worked from the center outward in joined rounds; do not turn. Join each round with a slip stitch and keep the right side facing you throughout.
- Corner increases are worked as (dc, ch 2, dc) groups into each corner ch-2 space every round.
- When changing colors at the end of a round, draw the new color through the final slip stitch join.
- The ch 3 at the start of a dc round counts as 1 dc throughout; the ch 1 at the start of sc rounds does not count as a stitch.
- All poinsettias, leaves, and berry clusters are made separately and sewn on after blocking.
Mesh Center
Work with Color A and the G-6 hook.
Round 1: Make a magic ring. Ch 4 (counts as 1 dc + ch 1). Work 2 dc into ring, ch 2. (Work 2 dc into ring, ch 1, 2 dc into ring, ch 2) 3 times. Work 1 dc into ring, sl st to join to 3rd chain of starting ch-4. Pull magic ring closed. (12 dc, 4 ch-2 corner spaces, 4 ch-1 side spaces)
Round 2: Sl st into the first ch-1 sp. Ch 4 (counts as dc + ch 1). Dc in same ch-1 sp. Ch 1. In the corner ch-2 sp: work (2 dc, ch 2, 2 dc). Ch 1. (Dc, ch 1, dc) in next ch-1 sp. Ch 1. Work corner (2 dc, ch 2, 2 dc) in next corner ch-2 sp. Ch 1. Rep from ( to ) 2 more times, ending with a corner group, ch 1. Sl st to join. (4 V-sts on sides, 4 corner groups; 24 dc total)
Round 3: Sl st to ch-1 sp. Ch 4 (dc + ch 1). Dc in same sp. Ch 1. Dc in next ch-1 sp. Ch 1. Corner (2 dc, ch 2, 2 dc) in corner ch-2 sp. Ch 1. (Dc in next ch-1 sp, ch 1) across each side until you reach each corner, working corner group in each corner ch-2 sp. Sl st to join. (32 dc total after Round 3)
Rounds 4 through 22: Continue in the established mesh pattern: work (dc, ch 1) in each ch-1 sp along each side, and (2 dc, ch 2, 2 dc) in each corner ch-2 sp, with ch 1 separating each group. Sl st to join each round.
Checkpoint after Round 22: The center square should measure approximately 13.5 to 14 inches from edge to edge. Each side has 22 dc-ch units plus 4 corner groups, approximately 96 dc total around the perimeter.
Fasten off Color A. Weave in ends.
Inner Border
Join Color B with a sl st to any corner ch-2 sp.
Round 23: Ch 3 (counts as dc). Work 1 dc in same corner sp. Ch 1. Work 1 dc in each dc and 1 dc in each ch-1 sp along the side (this fills in the mesh to create a solid stripe). At each corner ch-2 sp, work (2 dc, ch 2, 2 dc). Continue across all four sides. Sl st to top of beg ch-3 to join. (47 dc per side, approximately 204 dc total)
Round 24: Ch 3. 1 dc in each dc across each side. Corner (2 dc, ch 2, 2 dc) in each corner ch-2 sp. Sl st to join. (204 dc)
Round 25: Repeat Round 24. (204 dc)
After Round 25, you have a 3-row solid red stripe border. Fasten off Color B.
Inner Green Frame
Join Color C to any corner ch-2 sp.
Round 26: Ch 1 (does not count as st). Work 1 sc in same corner sp, ch 3 (first picot made by: ch 3, sl st to first ch of this ch-3 just made), then sc in same corner sp. Continue: sc in each dc across side. At each corner ch-2 sp, work (sc, picot, sc). Sl st to first sc to join. (196 sc plus 4 picots)
Fasten off Color C.
Round 27: Join Color C to the sc immediately after any corner picot. Ch 1. Sc across the entire round, placing 1 sc in each sc, 3 sc into each picot loop, and (sc, ch 2, sc) at each corner. Sl st to first sc to join. (204 sc plus 4 corner ch-2 sps)
Fasten off Color C.
Outer Lace Edging
Join Color A to any corner ch-2 sp.
Round 28: Ch 3 (counts as dc). Work 4 more dc in same corner sp (shell made). Ch 2. Sk 3 sc. (Shell of 5 dc in next sc, ch 2, sk 3 sc) repeat across each side. At each corner ch-2 sp, work (shell, ch 3, shell). Continue all the way around. Sl st to top of beg ch-3 to join. (Approximately 52 shells total)
Round 29: Sl st to center dc of first shell. Ch 1. Sc in same st. Ch 5. (Sc in center dc of next shell, ch 5) repeat across all shells, working (sc, ch 5, sc) at the ch-3 corner space between corner shells. Sl st to first sc to join.
Round 30: Sl st into first ch-5 arch. Ch 1. In each ch-5 arch work: (3 sc, picot, 3 sc). At each corner arch work (3 sc, picot, 3 sc, picot, 3 sc). Sl st to first sc to join.
Fasten off Color A. Weave in all ends. The piece should now measure approximately 19.5 to 20.5 inches from straight edge to straight edge.
Poinsettia Petals
Large petal (make 8 for the large poinsettia):
Step 1: Chain 12.
Step 2: Starting in the 4th chain from the hook, work 1 dc in each of the next 3 chains. (4 dc)
Step 3: Work 2 dc in each of the next 2 chains. (4 dc)
Step 4: Work 1 hdc in the next chain, 1 sc in the next chain, 1 sl st in the last chain. You are now at the tip.
Step 5: Rotate work and continue along the opposite side of the foundation chain.
Step 6: Work 1 sc in first foundation ch bump, 1 hdc in next, 2 dc in each of the next 2 bumps, 1 dc in each of the next 3 bumps, sl st to the base chain. Fasten off leaving a tail for sewing.
Medium petal (make 5 for the large poinsettia top layer, 6 for each medium poinsettia):
Step 1: Chain 10.
Step 2: Starting in the 4th chain from the hook, work 1 dc in each of next 2 chains, 2 dc in each of next 2 chains, 1 hdc in next chain, 1 sc in next chain, sl st in last chain.
Step 3: Rotate and work back: 1 sc, 1 hdc, 2 dc in each of next 2 bumps, 1 dc in each of next 2 bumps, sl st to base. Fasten off.
Small petal (make 5 for each medium poinsettia top layer, 5 for each small poinsettia):
Step 1: Chain 8.
Step 2: Starting in the 4th chain from the hook, work 1 dc in next chain, 2 dc in next 2 chains, 1 hdc in next, sl st in last chain.
Step 3: Rotate and work back: 1 hdc, 2 dc in each of next 2 bumps, 1 dc in next bump, sl st to base. Fasten off.
Poinsettia Centers and Assembly
Center disc for the large poinsettia: With Color D, make a magic ring. Ch 1, work 10 sc into ring, sl st to first sc to join. Pull ring closed. (10 sc)
Ch 1, work 2 sc in each sc around, sl st to join. (20 sc)
Sl st in each sc around. Fasten off. Sew 10 to 12 gold seed beads to the top surface.
Assembling the large poinsettia: Arrange 8 large petals in a circle with bases meeting at center. Sew bases together using whip stitch, fanning into an even star. Place 5 medium petals on top, centering one between every other pair of large petals. Sew the gold disc center on top.
Medium poinsettia (make 2): Make 6 medium petals and 5 small petals. For the center disc, work only Round 1 (10 sc). Attach 6 to 8 beads. Layer and sew as above.
Small poinsettia (make 2): Make 5 small petals. No second layer. For the center, make a magic ring, work 8 sc into ring, sl st to join. Attach 4 to 6 beads. Arrange petals into a star and attach center.
Holly Leaves and Berries
Holly leaf (make 12 total in Color C):
Step 1: With Color C, make a magic ring.
Step 2: Ch 1, work 2 sc into ring, pull ring closed. (2 sc)
Step 3: Ch 13, starting in the 4th chain from hook work: 1 dc, 1 tr, 1 dc, (ch 1, sl st) into next ch to form a point, 1 dc, 1 tr, 1 dc, 1 hdc, 1 sc, sl st into remaining ch sts to reach the base ring, sl st into ring to anchor.
Step 4: Turn and work the second ridge along the other side of the chain: sl st, 1 sc, 1 hdc, 1 dc, 1 tr, 1 dc, (ch 1, sl st) for point, 1 dc, 1 tr, 1 dc, sl st back to ring.
Step 5: Fasten off leaving a long tail.
Berry cluster (make 5 in Color B): For each berry, make a magic ring, ch 1, work 6 sc into ring, sl st to join and pull ring closed, sl st through all stitches on top to puff up. Make 3 berries per cluster. Sew the 3 berries together at their bases.
Finishing & Assembly
Block the base first. Pin it flat, measuring all four sides. Use spray starch for acrylic or wet block for wool. Allow to dry completely before sewing appliques.
Orient the square on point so a corner faces you. Mark the four inner border corners and the center with stitch markers.
Position the large poinsettia at the exact center. Tuck 2 holly leaves under the left and right petal edges. Place a berry cluster beside the flower. Pin everything.
Position one medium poinsettia at the left inner border corner and one at the right inner border corner. Add 2 holly leaves and a berry cluster to each.
Position one small poinsettia at the front corner (nearest you) and one at the back corner. Add leaves and berries.
Sew each applique using a tapestry needle and matching yarn. Stitch through petal bases into the fabric below with small, even stitches that do not show on the right side.
Tips
- Check that your red and green yarns are colorfast before wet blocking — bleeding onto cream is heartbreaking.
- Avoid textured or thick-and-thin yarns; they obscure the mesh pattern.
- Take your time with the applique placement. Step back and look at the arrangement before you sew.
- For acrylic, machine wash on a gentle cycle in cold water and tumble dry low or lay flat; do not iron directly on the flowers. For superwash wool, hand wash cool and lay flat to dry.
- Store flat or rolled around a cardboard tube. Do not fold on the poinsettias.
Christmas Poinsettia Table Runner Free Crochet Pattern
Materials
Steps
- Work the cream mesh center in joined rounds
- Add the solid red inner border
- Work the green picot frame
- Add the cream scalloped lace edging
- Crochet the poinsettia petals and centers
- Make holly leaves and berry clusters
- Block the base flat
- Sew the flowers, leaves and berries in place
- Check red and green yarns are colorfast before wet blocking so they do not bleed onto the cream
- Avoid textured or thick-and-thin yarns, which hide the mesh pattern
- Pin all the appliques and step back to check the arrangement before sewing anything down


