Free Crochet Christmas Tree Pattern: Step-by-Step Beginner Guide
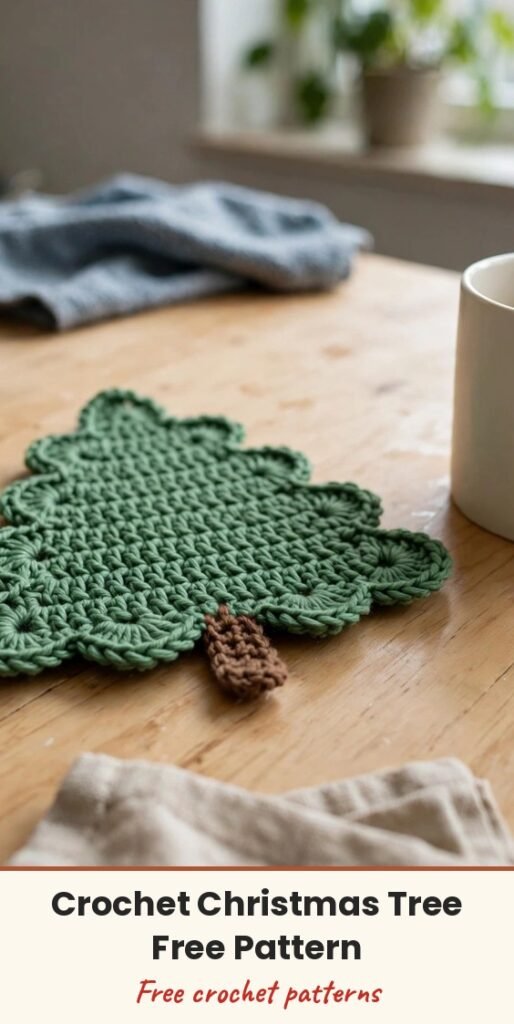
Table of Contents
Hi, I am Amy, and this little flat crochet Christmas tree is one of my favourite last-minute makes. It works up in rows with simple half double crochet, finishes with a sweet scalloped edge, and uses so little yarn that one tree costs next to nothing to make.
I love these pinned to gift wrap, stitched onto a cardigan, strung together as a garland, or hung on the tree itself. Change the green for soft pink, rusty red, or a light spring green and the same little tree works for other seasons too.
If you are new to crochet, do not worry. Every row is written out below, and the shape grows slowly and predictably, so you can count as you go and watch the tree appear.
Materials
- Light or medium-light yarn in green for the tree, plus a small amount in a contrasting colour for the stem
- 3.5 mm crochet hook
- Scissors
- Tapestry needle
- Felt, optional, for a star on top
Abbreviations
- ch: chain
- hdc: half double crochet
- dc: double crochet
- sl st: slip stitch
- st: stitch
Gauge & Size
- Gauge: not critical for this flat decoration
- Size: a small flat tree ornament, sized by your yarn and hook
- Tip from the source: use thicker yarn and a bigger hook if you are a beginner and want a larger, easier tree
Christmas Tree Pattern
Round 1: Start with a slip knot and then chain 2. Work 2 half double crochet into the chain next to the hook (not the one on the hook). Chain 1 and turn the pattern.
Round 2: Work 2 half double crochet into each chain stitch (there should be 2 stitches). Chain 1 and turn the pattern.
Round 3: Work 1 hdc into the next stitch, 2 hdc into the next 2 chain stitches, and 1 hdc into the last (4th stitch). Chain 1 and turn the pattern.
Round 4: Work 1 hdc into each chain stitch for round 4. Chain 1 and turn to start round 5.
Round 5: Work 1 hdc, 2 hdc, 1 hdc, 1 hdc, 2 hdc, 1 hdc into the chain stitches for round 5. Chain 1 and turn the pattern.
Round 6: Work 1 hdc into each stitch for round 6. Chain 1 and turn the pattern.
Round 7: Work 1 hdc into the first chain, 2 hdc into the next, and 1 hdc into each of the next stitches until there are 2 stitches left. Work 2 hdc into the next and 1 hdc into the last chain stitch to complete round 7. Chain 1 and turn the pattern.
Round 8: Work 1 hdc into each stitch, except the 3rd and the 10th stitch; work 2 hdc into them. Chain 1 and turn the pattern.
Scalloped Border
Skip the 1st chain, and work 3 dc into the next (2nd) chain.
Work a slip stitch into the next (3rd) chain, and then skip the 4th chain stitch.
Continue this process until the round ends. You should have a total of 4 scallops.
End the tree part with a slip stitch.
Stem
Cut off the extra thread and stitch the remaining end at the backside of the pattern using a tapestry needle or crochet hook.
Start the stem with a slip stitch and insert the stitch through the last stitch of the 2nd scallop. Chain 1, counting this as a hdc.
Work 1 dc into the next 2 stitches and 1 hdc into the 4th stitch.
For round 2 of the stem, work 1 chain stitch into each stitch. Slip stitch and secure the end of the yarn to complete the crochet Christmas tree.
Finishing & Assembly
Weave in the remaining end on the back of the tree so the front stays neat.
Add a crochet star on top of the tree, or simply cut out a star shape from felt and glue it on the top.
Use your finished trees to make a garland or a mobile, embroider one to a cardigan, or hang them as ornaments.
Tips
Use thicker yarn and a bigger hook if you are a beginner.
Follow the pattern carefully, and count stitches for each round.
Do not forget to turn the pattern every time you finish a round or row.
Always keep extra yarn at the end after doing the last slip stitch.
Use a tapestry needle or crochet hook to tuck and stitch the remaining end of the yarn on the backside of the pattern.

Free Crochet Christmas Tree Pattern: Step-by-Step Beginner Guide
Materials
Steps
- Chain 2 and work Round 1 with 2 hdc
- Work Rounds 2 to 4, increasing as written
- Work Rounds 5 to 8 to finish the tree shape
- Add the scalloped border for 4 scallops
- Work the stem in 2 rounds
- Weave in ends on the back
- Add a felt or crochet star on top
- Use thicker yarn and a bigger hook if you are a beginner
- Count stitches for each round
- Turn the work at the end of every round
- Keep extra yarn after the last slip stitch for weaving in


