Easy Crochet Gingerbread Man Pattern For Christmas Tree Ornaments
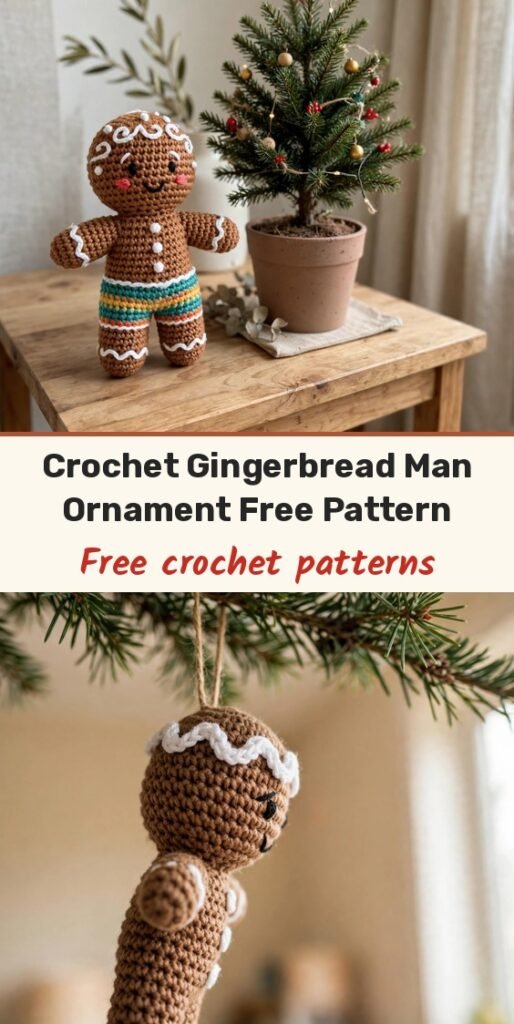
Table of Contents
Hi, I am Amy, and could this little gingerbread fellow be any cuter? He is a small amigurumi gingerbread boy, about as tall as your hand, with white icing details, tiny buttons, and the sweetest little shorts, made to hang on the tree or tuck into a gift.
The head and body are worked as one piece in the round, then you add the shorts, legs, and arms, and finish with icing edging and a swirl of white garland across his head. The stitches are simple, the stuffing is minimal, and every round is counted for you.
He is rated beginner to lower intermediate here: if you are comfortable with single crochet in the round and basic increases and decreases, you will have a grand time with this one. Let us make him!
Materials
- Worsted weight yarn in brown for the body
- White yarn for the icing details
- Accent colours of your choice for the shorts and buttons
- 2.5 to 3.0 mm crochet hook
- Polyester fiberfill stuffing
- 6 mm safety eyes, 1 pair
- Yarn needle for assembly and embroidery
- Stitch marker
- Scissors
Abbreviations
- MR: magic ring
- CH: chain
- SC: single crochet
- DC: double crochet
- SL ST: slip stitch
- INC: increase, 2 SC in one stitch
- DEC: decrease, SC2TOG
- BLO: back loop only
Special Stitches
- Knot or button stitch: an embroidered French knot for the buttons. Wrap the yarn around the needle 3 to 4 times, insert the needle, and pull through to form a knot
Gauge & Size
- Gauge is not critical, but stitches should be tight enough that stuffing does not show through
- Finished height: approximately 14 to 15 cm (5.5 to 6 inches)
- Finished width: approximately 6 to 7 cm (2.5 to 3 inches)
- Work in a closed spiral unless otherwise directed, and use a stitch marker to track your rounds
- Place the safety eyes before closing the head
Head and Body
Round 1: MR, 6 SC. (6)
Round 2: 6 INC. (12)
Round 3: 1 SC, place marker, then 3 INC (stitches 6, 7, and 8), 3 SC, 3 INC, 2 SC. (18)
Round 4: 1 SC, (1 SC, 1 INC) 3 times, 3 SC, (1 SC, 1 INC) 3 times, 2 SC. (24)
Round 5: 4 SC, 3 INC, 9 SC, 3 INC, 5 SC. (30)
Rounds 6 to 12: SC in each stitch around. (30)
Round 13: 5 SC, 3 DEC, 9 SC, 3 DEC, 4 SC. (24)
Before Round 14: Flatten the head and mark between Rounds 9 and 10 for eye placement. Insert the safety eyes, 6 stitches apart.
Round 14: 2 SC, 4 DEC, 4 SC, 4 DEC, 2 SC. (16)
Round 15: (2 SC, DEC) 4 times. (12)
Stuff the head firmly.
Round 16: Working in BLO, 6 DEC. (6)
Fasten off and weave in the yarn end.
Shorts
Attach the accent (shorts) colour to the front loops of Round 16.
Waistband round: CH 2 (does not count as a DC), work 1 DC in the same stitch, 1 DC in the next stitch, and INC (2 DC in the next stitch) around, ending with 18 DC. SL ST to join.
Shorts row 2: CH 2, (5 DC, INC) 3 times. SL ST to join. (21)
Shorts row 3: CH 2, (6 DC, INC) 3 times. SL ST to join. (24)
Button detail: With white yarn and a needle, embroider a French knot button in the first DC round. Make a second button in the next desired round and knot it securely inside the fabric.
First leg opening, Row 1: Working in BLO, CH 2, work 1 DC in the same stitch and in the next 13 stitches. (14) SL ST to join and fasten off.
Second leg opening: Count 14 from the start point, attach the yarn, and repeat the step above for another 14 DC. SL ST and fasten off to divide for the legs.
Row 2, each leg: CH 2, 13 DC around. (13) SL ST to join and fasten off.
Icing edging: Attach white yarn to the shorts hem or sleeves and work SL ST, CH 1, SL ST in the next stitch around for the icing detail.
Arms
Make 2.
Round 1: MR, 4 SC. (4)
Round 2: 1 SC, 3 SC in the next stitch, 1 SC, 3 SC in the next stitch. (8)
Round 3: 2 SC, INC, 3 SC, INC, 1 SC. (10)
Round 4: Change to white and work 10 SC. End the white and change back to brown. (10)
Round 5: 5 DEC. (5)
Cut the yarn, leaving a long tail. With a needle, weave the tail through the front loops, pull to close, then CH 7 with the remaining tail for the arm loop.
Legs
Make 2.
Round 1: MR, 6 SC. (6)
Round 2: 1 SC, INC, repeated around. (10)
Round 3: 2 SC, INC, INC, 3 SC, INC, INC, 1 SC. (14)
Round 4: 14 SC. (14)
Round 5: Change to white and work 14 SC. Do not fasten off. (14)
Round 6: Switch back to brown and work 7 DEC. (7)
Cut a long tail and stuff lightly if desired. Weave the tail through the front loops, pull to close, then CH 17 with the remaining tail for the leg loop.
Head Garland
With white yarn, CH 30. Fasten off. Thread the chain around the head as a decorative swirl of icing.
Finishing & Assembly
Attach the arms between the last round of the head and the first round of the body, and secure them well.
Attach the legs through the bottom, emerging where desired.
Sew or tie on the head garland and the buttons.
Weave in all loose ends. Your finished gingerbread boy measures approximately 14 to 15 cm tall.
Tips
Use a stitch marker on every round; with amigurumi, losing your place is much more annoying than marking it.
Change colours cleanly and weave the ends inside the work as you go, so there is almost no finishing left at the end.
Only a little stuffing is needed, and the limbs need little to none, so do not overstuff or the seams will strain.
Add a hanging loop at the top of the head garland if you plan to hang him on the tree.

Easy Crochet Gingerbread Man Pattern For Christmas Tree Ornaments
Materials
Steps
- Work the head and body in the round from 6 to 30 stitches
- Insert the safety eyes and decrease down to close the head
- Add the shorts waistband and two shorts rows to 24 stitches
- Divide and finish the two leg openings
- Make two arms and two legs with white icing rounds
- Chain 30 in white for the head garland
- Assemble the arms, legs, garland and buttons
- Use a stitch marker on every amigurumi round
- Insert the safety eyes before closing the head
- Keep stitches tight so stuffing does not show
- Stuff the head firmly and the limbs only lightly


