Easy Crochet Christmas Tree Ornament Pattern for Beginners
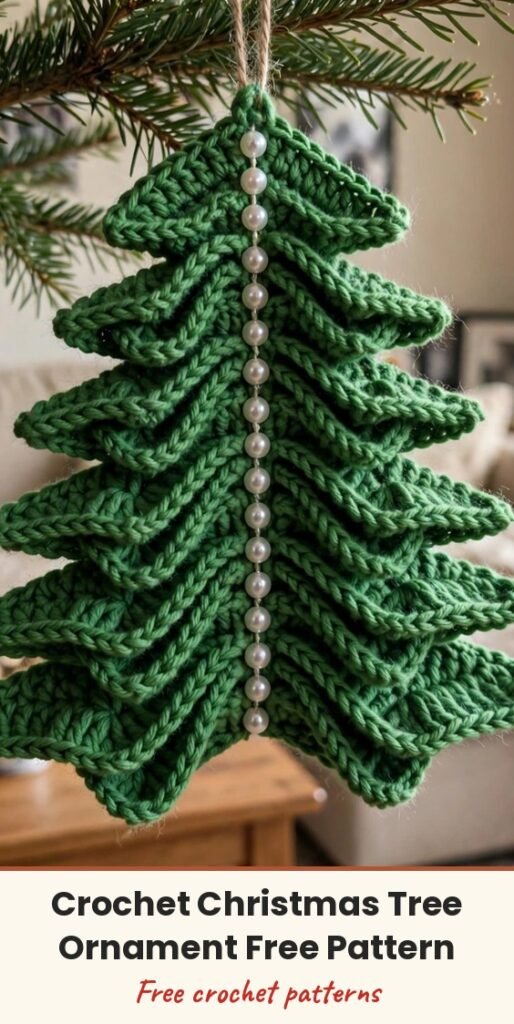
Table of Contents
Hi, I am Amy, and I love a clever little make like this one. You crochet one simple strip of half double crochet, fold it back and forth like an accordion, thread beads through the middle, and suddenly you have a sweet tiered Christmas tree ornament.
Because the crochet part is just one row, this is a wonderful beginner project and a great one to make in multiples. A whole set in different greens, or even sparkly yarn, looks beautiful on the tree and makes thoughtful handmade gifts tucked onto parcels.
The beads become the baubles, and the thinner yarn you thread through the centre holds everything together and forms the hanging loop at the top. Simple, pretty, and so satisfying to shape.
Materials
- Thicker cotton yarn, for a 3 to 4 mm hook, for the body of the tree
- Thinner cotton yarn, for a 2 to 3 mm hook, for assembling and adding beads
- 3.5 mm crochet hook
- Yarn needle, for sewing and weaving in ends
- Scissors
- Decorative beads or pearls, for the ornaments on the tree
Abbreviations
- ch: chain
- hdc: half double crochet
- sl st: slip stitch
- st(s): stitch(es)
- yo: yarn over
Special Stitches
- Half double crochet (hdc): yarn over, insert the hook into the stitch indicated, yarn over again and pull through the stitch (3 loops on hook), yarn over once more and pull through all 3 loops on the hook.
Gauge & Size
- Skill level: beginner-friendly, US crochet terms
- Gauge: not critical, but aim for uniform stitches
- Finished size: approximately 6 to 7 inches tall and 4 to 5 inches wide
- Size can be adjusted by changing the chain length or the folded row sizes
Christmas Tree Strip
Foundation chain: Make a slip knot and ch 61.
Row 1: Skip the first 2 chains. Work 1 hdc in the 3rd chain from the hook, then work 1 hdc into each remaining chain across. At the end you should have 60 hdc.
Finish: Ch 1, fasten off, and secure your yarn tail.
Lay the completed strip on a flat surface, ready to fold into the tree shape.
Want to watch the folding and beading come together? Here is the video tutorial for this ornament:
Folding the Tree
Fold the strip backward and forward like an accordion, in a zigzag manner, to form a series of rows stacked in a triangle shape.
As a general guide for arranging the folded rows, work from the widest bottom tier to the narrow top.
- Bottom folded row: 10 to 11 stitches
- Next folded row: 9 to 10 stitches
- Next folded row: 7 to 8 stitches
It is okay for the stitch count to vary slightly. Adjust the folds for symmetry as needed. This folding creates the tiers of the Christmas tree.
Finishing & Assembly
Thread the thinner yarn onto a darning needle. Starting at the bottom layers of the folded tree, insert the needle through the centre of all the folds.
Add a bead or pearl to the needle before moving to the next layer. Insert the needle through the next layer, adding a bead on the way, and continue stacking until you reach the top layer.
Work the needle back down through the layers following the same path you used to go up, so the beads stay stable and aligned.
Leave a small loop at the top of the peak for hanging.
Pull the yarn tightly to bring the layers together and create the cone shape. Leave extra yarn at the bottom and tie a secure knot, then add a second knot over the first. Trim the excess yarn at the bottom, leaving a slight tail if needed.
To stop the tree unfolding, use a yarn needle with yarn in the same colour as the tree and sew through the side edges of the folds to secure the layers. Hide the ends neatly within the folds.
Check the alignment and stability of the beads, smooth out the rows, and your ornament is ready to hang.
Tips
Use metallic or glitter yarn to add sparkle to the tree.
Mix bead colours and sizes for a more festive, decorated look.
Make the ornament larger or smaller by adjusting the starting chain length and the size of each folded tier.
The finished tree also looks lovely attached to gift packaging instead of hung on the tree.

Easy Crochet Christmas Tree Ornament Pattern for Beginners
Materials
Steps
- Chain 61 and work one row of half double crochet for 60 hdc
- Fasten off and lay the strip flat
- Fold the strip accordion-style into stacked triangle tiers
- Thread thinner yarn up through the centre, adding a bead at each layer
- Thread back down to lock the beads, leaving a hanging loop at the top
- Pull tight, knot securely at the base and trim
- Sew through the side edges of the folds to hold the shape
- Gauge is not critical, but keep stitches uniform for tidy tiers
- It is fine if folded tiers vary by a stitch or two; adjust for symmetry
- Use metallic or glitter yarn for extra sparkle
- Change the starting chain length to make larger or smaller ornaments


