Dusty Rose Kitty Face Tote Bag Free Crochet Pattern
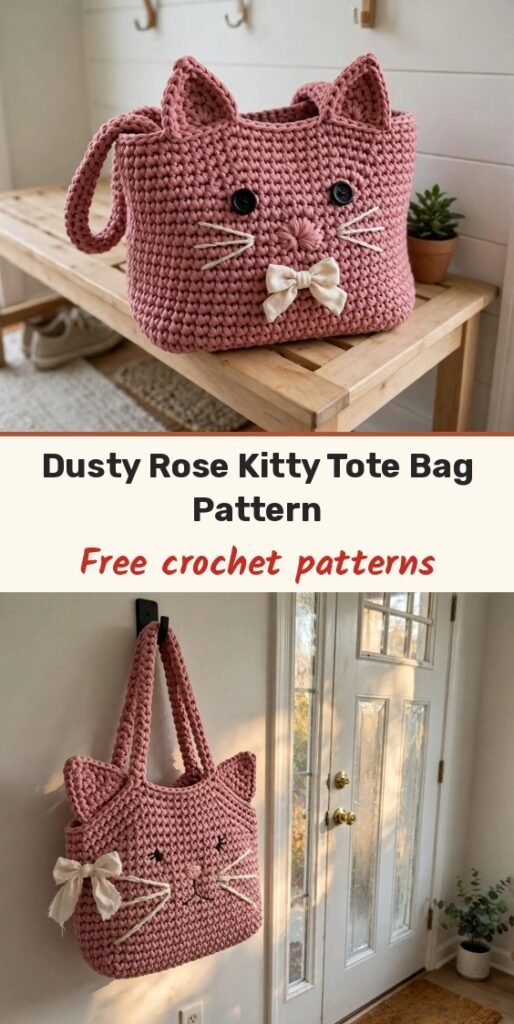
Table of Contents
Time to dig into that stash for the chunky cotton yarn you have been saving, because this dusty rose kitty face tote bag is exactly the project it has been waiting for! It is equal parts functional and whimsical: roomy enough for your current project, a water bottle, your phone and whatever else life throws at you, with the sweetest cat face that makes people stop and ask where you got it.
We will work in continuous rounds from the bottom up, in single crochet throughout, so the sturdy fabric holds its shape beautifully with no floppy sides. The ears are shaped with short rows at the top, the rose gold ring hardware adds a polished touch, and there is a little cream bow by the ear to finish it off.
If you can single crochet in a spiral and you are not afraid of a little sewing, you have absolutely got this. Let us make the cutest tote ever!
Materials
- Approximately 250 yards of bulky weight cotton rope yarn or t-shirt yarn (size 5) in dusty rose (main colour)
- Approximately 15 yards of cream yarn for the bow (accent colour)
- Approximately 10 yards of dark rose/burgundy yarn for the nose and whiskers (detail colour)
- 8mm (L/11) crochet hook for the main bag
- 5mm (H/8) crochet hook for the bow
- 2 rose gold O-rings, 1.5 inch (38mm) diameter
- 2 black safety eyes or buttons, 18mm
- Tapestry needle
- Stitch marker
- Scissors
- Pins for assembly
- Optional: fabric for lining and a magnetic snap closure
Abbreviations
- ch: chain
- sl st: slip stitch
- sc: single crochet
- inc: increase, work 2 single crochet into the same stitch
- dec: decrease, invisible decrease
- BLO: back loop only
- st/sts: stitch / stitches
Gauge & Size
- Gauge: 10 sc and 10 rows = 4 inches in single crochet with the 8mm hook and bulky cotton yarn; gauge matters here because the bag needs to be sturdy enough to hold its shape
- Finished size: approximately 14 inches wide at the widest point including ears, 11 inches tall from base to top edge (not including handles), about 4 inches deep at the base, with a handle drop of approximately 7 inches
- Construction: oval base and body worked in continuous rounds without joining, ears shaped with short rows, tube handles attached through O-rings; work tightly for a dense, structured fabric
- Skill level: Intermediate
Bag Base Pattern
The base is an oval worked in continuous rounds with dusty rose yarn and the 8mm hook. Use a stitch marker to track where each round begins, moving it up as you go.
Foundation: Ch 15.
Round 1: Starting in 2nd ch from hook, sc in each of next 13 ch, 3 sc in last ch (this is your turn). Working along the opposite side of the foundation chain, sc in each of next 12 ch, 2 sc in last ch. Place a marker. (30 sts)
Round 2: Inc in first st, sc in next 12 sts, inc in next 3 sts, sc in next 12 sts, inc in next 2 sts. (36 sts)
Round 3: Sc in first st, inc in next st, sc in next 12 sts, (sc 1, inc) 3 times, sc in next 12 sts, (sc 1, inc) 2 times. (42 sts)
Round 4: Sc in next 2 sts, inc in next st, sc in next 12 sts, (sc 2, inc) 3 times, sc in next 12 sts, (sc 2, inc) 2 times. (48 sts)
Round 5: Sc in next 3 sts, inc in next st, sc in next 12 sts, (sc 3, inc) 3 times, sc in next 12 sts, (sc 3, inc) 2 times. (54 sts)
Your base should measure approximately 4 inches by 7 inches. If it is significantly different, check your gauge.
Bag Body Pattern
Now we build the walls, working in the back loop only for one round, then continuing normally.
Round 6: Working in BLO only, sc in each st around. (54 sts)
This creates a nice defined edge where the base meets the walls.
Rounds 7 to 30: Sc in each st around. (54 sts)
That is 24 rounds of straight single crochet, and the body should measure approximately 9 inches tall at this point. Perfect mindless crocheting while you watch your favourite show!
Ear Shaping
Here is where it gets fun! We create the cat ears using short rows on each side of the bag. First, set up the sections: sc 7 sts and place marker A, sc 13 sts and place marker B, sc 14 sts (you are now at the back of the bag), sc 13 sts and place marker C, then sc 7 sts to return to the start. The markers divide the bag into the front left ear section, front centre, back section, back centre and front right ear section.
First Ear (Right Side) Row 1: Sc in next 7 sts, turn. (7 sts)
Row 2: Ch 1, skip first st, sc in next 5 sts, skip last st, turn. (5 sts)
Row 3: Ch 1, skip first st, sc in next 3 sts, skip last st, turn. (3 sts)
Row 4: Ch 1, skip first st, sc in next st, skip last st. (1 st)
Fasten off, leaving a tail to weave in.
Second Ear (Left Side): Rejoin the yarn at marker C on the opposite side. Work Row 1 as for the first ear (7 sts), then repeat Rows 2 to 4 as for the first ear. Fasten off.
Top edge: Rejoin the yarn at the back centre of the bag. Single crochet evenly around the entire top opening, including up and down the sides of each ear, creating a smooth finished edge, working approximately 3 sc along each ear edge. Sl st to first sc and fasten off.
Handle Pattern (Make 2)
Foundation: Ch 6, sl st to first ch to form a ring.
Round 1: Sc 6 into ring. (6 sts)
Rounds 2 to 45: Sc in each st around. (6 sts)
The handle should measure approximately 18 inches long. Adjust the length to your preference by adding or removing rounds. Sl st to next st, fasten off, leaving a long tail for attaching.
Bow Pattern
The bow is optional but so cute! Use cream yarn and the 5mm hook.
Centre piece: Ch 6. Row 1: Sc in 2nd ch from hook and each ch across, turn. (5 sts) Rows 2 to 6: Ch 1, sc in each st across, turn. (5 sts) Fasten off, leaving a long tail.
Bow loops: Ch 20. Row 1: Sc in 2nd ch from hook and each ch across, turn. (19 sts) Rows 2 to 4: Ch 1, sc in each st across, turn. (19 sts) Fasten off, leaving a long tail.
To assemble the bow, fold the longer piece into a bow shape with loops on each side, wrap the centre piece around the middle, and secure it with a few stitches at the back.
Finishing & Assembly
Position the safety eyes approximately 3 inches down from the top edge and about 3.5 inches apart. The exact placement is up to you, so pin buttons in place first to find the look you like best. If using safety eyes, push them through the fabric and secure the backs firmly; if using buttons, sew them on with matching thread or yarn.
For the nose, use dark rose yarn and a tapestry needle to embroider a small triangle centred between and below the eyes, using satin stitch with 5 to 6 horizontal stitches that decrease in length from top to bottom. For the whiskers, embroider 3 whiskers on each side of the nose, each a single long stitch approximately 2 inches long, angling outward and spaced about half an inch apart vertically. As an optional mouth, add a small vertical line from the bottom of the nose down about half an inch, then two small diagonal lines forming a W shape.
To attach the O-rings and handles, position one O-ring at the base of each ear, where the ear meets the body of the bag. Whip stitch around the O-ring with a length of dusty rose yarn to secure it firmly to the bag, since it will bear the weight of whatever you carry. Thread one handle through each O-ring, fold the end of the handle back on itself by about 1 inch, and whip stitch it closed around the ring. Repeat on the other side, making sure both handles are even.
Position the bow near one ear, slightly below and to the side, and stitch it securely in place with cream yarn, hiding your stitches at the back of the bow. Weave in all the ends, taking your time: weave each tail through at least 2 inches of stitches, then double back.
Care: hand wash in cool water with mild detergent, reshape while damp and lay flat to dry. Avoid machine washing, which can stretch the handles and distort the shape.
Tips
Work tightly! A dense fabric is the key to this bag’s structure, so if you tend to crochet loosely, consider going down half a hook size.
If your ears are floppy, block them with fabric stiffener, or insert a small piece of plastic canvas inside each ear for structure. If the bag will not stand up, a fabric lining with interfacing helps a lot.
Cotton rope can relax over time, so if you are worried about the handles stretching, crochet them around a cotton cord core for extra stability.
Want a different mood? Black yarn with gold hardware looks chic, grey with silver rings looks modern, and leaving off the face gives you a sleek cat ear silhouette bag.

Dusty Rose Kitty Face Tote Bag Free Crochet Pattern
Materials
Steps
- Work the oval base in 5 rounds up to 54 sts
- Work the BLO edge round and 24 straight body rounds
- Shape both ears with short rows and finish the top edge
- Make 2 tube handles of 45 rounds each
- Make and assemble the cream bow
- Attach the eyes, embroider the nose and whiskers, then add O-rings, handles and bow
- Work tightly so the bag holds its shape; size down a hook if you crochet loosely
- Pin the eyes in place first to find your favourite face placement
- Whip stitch the O-rings firmly since they carry the bag's weight
- Add a fabric lining with interfacing if the bag needs more structure


