Free Crochet 3-in-1 Lucky Star Water Bottle Holder & Mesh Bag Pattern

Table of Contents
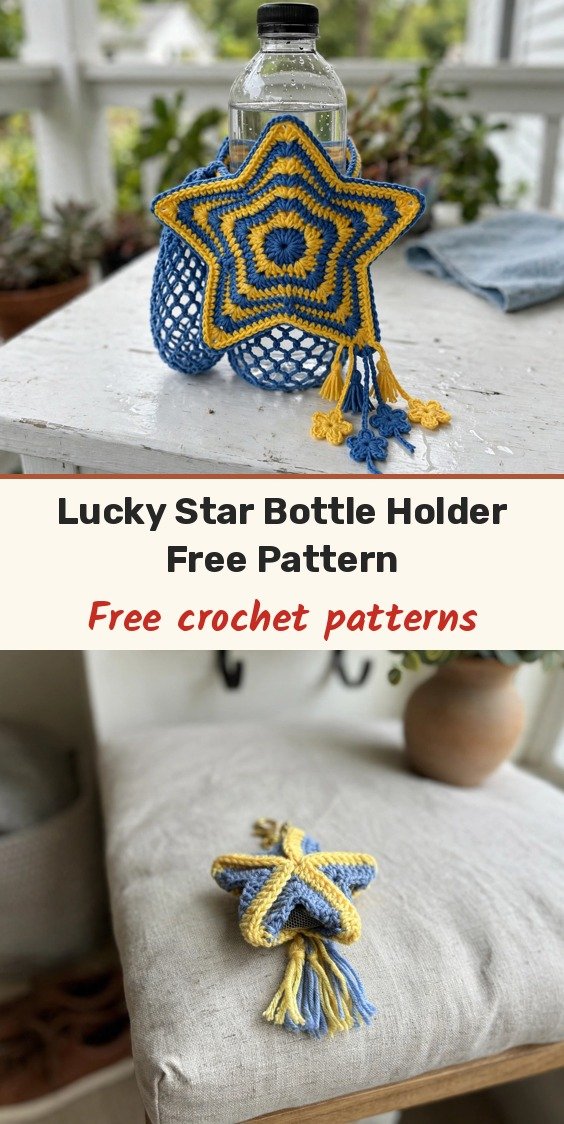
I love a clever make, and this 3-in-1 water bottle holder is one of the cleverest I have ever crocheted! It looks like an elegant 3D lucky star keychain, and when you pull the little charms, a diamond mesh bag pops out that works as a tumbler, cup and bottle cozy.
We will make two identical star panels from the center outward, join them to form a pocket, then crochet the mesh pouch directly onto the opening. The mesh pouch tucks completely inside the star pocket when it is not in use, so the finished piece folds down into a compact star-shaped keychain. The little star and four-leaf clover tassels finish it beautifully.
Materials
- 4-ply cotton yarn in Yellow, Blue, Green, or your preferred colours
- 2.5 mm crochet hook
- Stitch markers
- Tapestry needle
- Scissors
Abbreviations
- MR: magic ring
- ch: chain
- sl st: slip stitch
- sc: single crochet
- dc: double crochet
- bpdc: back post double crochet
- bpdc-dec: back post double crochet decrease (skipping the stitch in the middle)
- sc3tog: single crochet 3 together (decrease)
- sp: space
- st(s): stitch(es)
Special Stitches
- bpdc-dec: Yarn over, insert hook from back to front to back around the post of the dc before the sc, pull up a loop, yarn over and pull through 2 loops. Skip the sc. Yarn over, insert hook around the post of the dc after the sc, pull up a loop, yarn over and pull through 2 loops. Yarn over and pull through all 3 loops on hook.
Gauge & Size
- Finished size: a foldable bottle holder with a star pocket; the mesh pouch is worked to your desired length to fit your water bottle
- Construction: two star panels joined with single crochet, mesh pouch worked in continuous chain-loop rounds, tassels added last
- Skill level: Easy
Star Panels Pattern
Make 2 identical star panels. Work Rounds 1 to 5 for each panel.
Round 1 (Yellow Yarn): Start with a Magic Ring. Ch 3 (this counts as your first dc). Make 2 dc into the ring, then ch 1. This forms your first group. Work 3 dc into the ring, ch 1. Repeat 4 more times for a total of 5 groups. Sl st to the 3rd chain of the beginning ch-3 to join. Fasten off.
Round 2 (Blue Yarn): Attach the Blue yarn in any ch-1 space from the previous round. Ch 3 (counts as 1 dc), make 2 dc in the same sp. Ch 3, then make 3 dc in the same sp. First star point/corner made. In the next ch-1 sp, make (3 dc, ch 3, 3 dc). Repeat 3 more times for a total of 5 corners. Sl st to the 3rd ch of the beginning ch-3 to join. Fasten off.
Round 3 (Yellow Yarn): Attach Yellow yarn in the gap between any two 3-dc groups (on the flat side, not the corner). Ch 1, make 1 sc in the same spot. In the next corner ch-3 sp, make (4 dc, ch 3, 4 dc). Make 1 sc in the gap between the next two 3-dc groups. Repeat around the star. Sl st to the first sc to join. Fasten off.
Round 4 (Blue Yarn): Attach Blue yarn in any corner ch-3 space. Ch 3 (counts as 1 dc), make 2 dc in the same sp. Ch 3, then make 3 dc in the same sp. Make 1 bpdc around the post of each of the next 3 dc. Make a bpdc-dec over the next 2 dc, skipping the sc in the middle. Make 1 bpdc around the post of each of the next 3 dc. In the next corner ch-3 sp, make (3 dc, ch 3, 3 dc), 3 bpdc, 1 bpdc-dec (skipping the sc), 3 bpdc. Repeat around. Sl st to the 3rd ch of the beginning ch-3. Do not fasten off.
Round 5 (Blue Yarn): Ch 1, 1 sc in the same st. Make 1 sc in each of the next 2 sts. In the corner ch-3 sp, make 3 sc. Make 1 sc in each of the next 5 sts. Make an sc3tog over the next 3 sts (the decrease from the previous round and the st on either side). Make 1 sc in each of the next 5 sts. Repeat around. Sl st to the first sc.
Fasten off the first star panel. Make a second star panel following Rounds 1-5, but do not fasten off the second panel.
Joining the Stars
Place the two star panels together with their right sides facing inward (wrong sides facing out).
On your working piece, sl st 2 stitches to reach the corner point. Ch 1 and turn the work.
Single crochet through both pieces to join them. For the first sc, go through both loops of both pieces. For the rest of the stitches, pick up only the front loops (outer loops) of both pieces and join them with single crochets.
Continue crocheting the pieces together along the edges until you reach the next top corner, leaving the top opening unjoined.
Once you reach the opening, continue to sc only along the front loops of the top piece to finish the edge. Sl st to the first sc to join.
Mesh Pouch Pattern
Turn your work so you are crocheting around the opening of the star pouch. Ch 1, sc in the same st.
Mesh setup: Ch 12, skip several stitches and make 1 sc in the middle of the two corners, ch 12, make 1 sc at the next corner point. Repeat this around the opening to create 9 chain loop groups.
Mesh rounds: Ch 12, sc into the middle of the next ch-12 loop from the previous round. Repeat this for several rows until the mesh bag is long enough to fit your water bottle.
Decorative Tassels Pattern
Small Star/Flower Tassel: MR, ch 1. Make 5 sc into the ring. Sl st to the first sc.
Star points: Ch 3. Sl st in the 2nd ch from hook. Sc in the next ch. Sl st into the next st on the body of the MR. Repeat 4 more times to make 5 points.
Sl st 2 more sts to reach a corner, then chain a suitable length (e.g., 20-30 chains). Sl st the end of the chain to a single crochet loop on the bottom of the mesh body. Ch 1 and fasten off.
Large Four-Leaf Clover Tassel: MR. Ch 2, 2 dc into the MR, ch 2, sl st into the MR. Repeat 3 more times for a total of 4 petals.
Chain a suitable length (e.g., 20-30 chains). Sl st the end of the chain to an sc on the bottom of the mesh body. Ch 1 and fasten off.
Finishing & Assembly
Make as many decorative tassels as you like and attach them to the bottom mesh loops.
To fold the bag into a keychain, simply tuck the entire mesh pouch inside the star.
Weave in all loose ends neatly with your tapestry needle.
Tips
Take Round 4 slowly the first time. The back post stitches give the star its lovely raised texture, and the decrease that skips the single crochet is what keeps the points crisp.
Check your bottle against the mesh as you work. A few extra chain-loop rounds are all you need for a taller bottle, so it is easy to customise the length as you go.
Keep your chain cords the same length on matching tassels so the charms hang evenly around the rim of the cozy.
Free Crochet 3-in-1 Lucky Star Water Bottle Holder & Mesh Bag Pattern
Materials
Steps
- Crochet the first star panel in Rounds 1 to 5
- Crochet the second star panel in Rounds 1 to 5
- Join the stars with single crochet, leaving the top open
- Work the mesh pouch in ch-12 loop rounds to desired length
- Make star and clover tassels
- Attach tassels to the bottom mesh loops
- Take Round 4 slowly so the back post texture stays crisp
- Check your bottle height against the mesh as you work
- Keep matching tassel cords the same length so charms hang evenly