Classic Burgundy Wine Elegant Purse Free Crochet Pattern
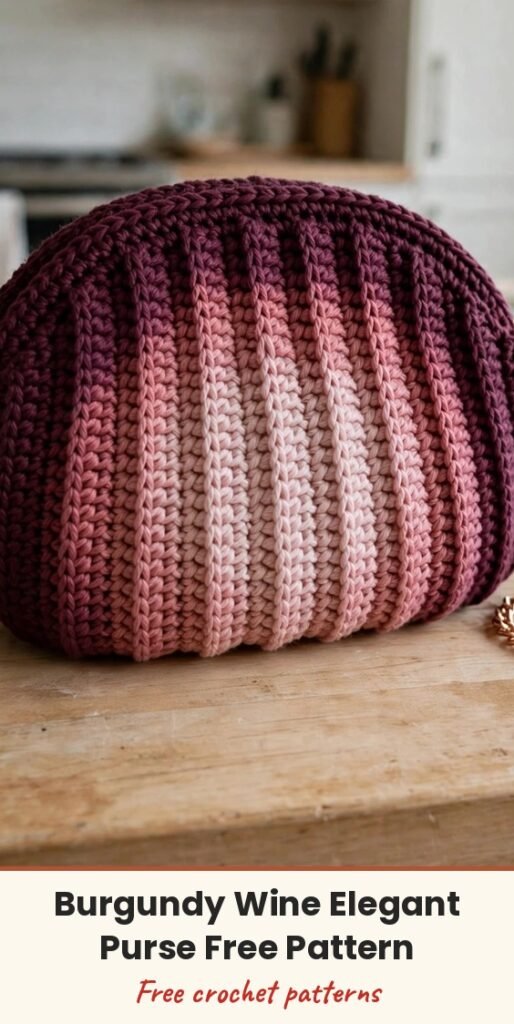
Table of Contents
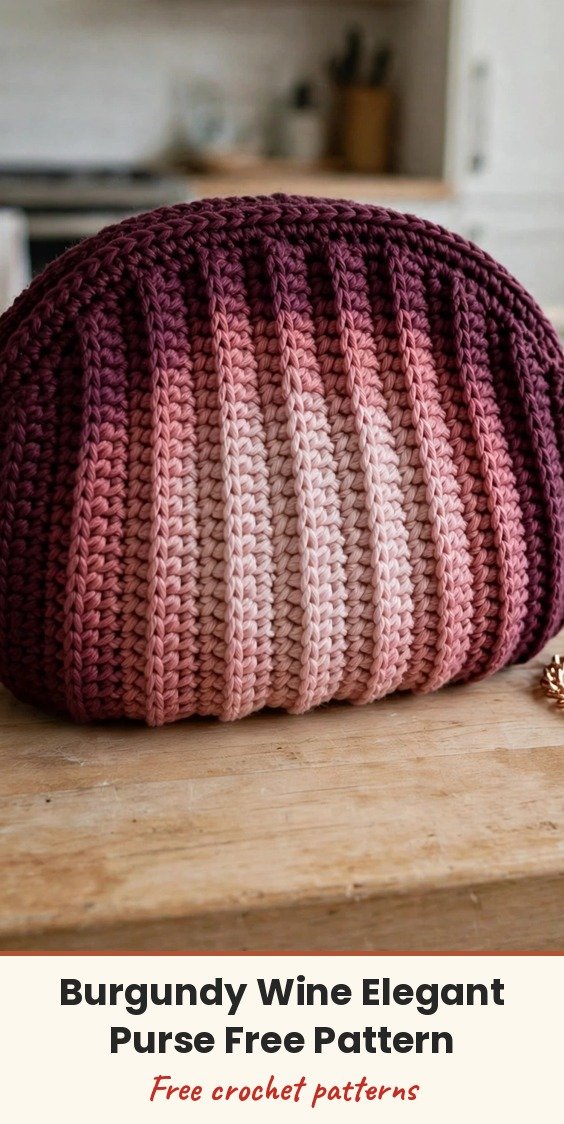
I love a bag that makes people ask where you bought it, and this elegant little purse does exactly that! The rich ombre stripes move from deep burgundy through dusty rose to soft blush pink, and the vertical ribbing gives it such a polished, high-end look.
We will work two flat panels in single crochet through the back loop, change colours for the gradient, then shape the curved bottom, seam the panels together and finish with a pretty chain strap on rose gold hardware. If you can work a single crochet and change colours, you can absolutely make this purse.
It is sized for your everyday essentials at about 10 inches wide and 7.5 inches tall, and cotton yarn helps it hold its lovely rounded shape.
Materials
- 85 yards worsted weight yarn in deep burgundy or wine (Color A)
- 65 yards worsted weight yarn in dusty mauve or antique rose (Color B)
- 50 yards worsted weight yarn in soft blush pink or pale rose (Color C)
- 4.0mm (US G/6) crochet hook
- Tapestry needle for weaving ends and seaming
- 2 or 3 stitch markers
- 2 swivel lobster clasp hooks, rose gold, approximately 1 inch
- 2 D-rings or jump rings for hardware attachment
- 1 chain strap, rose gold, approximately 24 inches
- 1 decorative rose charm or button (optional)
- Fabric for lining (optional but recommended)
Abbreviations
- ch: chain
- sc: single crochet
- sc-blo: single crochet through back loop only
- sl st: slip stitch
- dec: decrease, work two stitches together as one
- st/sts: stitch / stitches
- RS: right side
- WS: wrong side
Special Stitches
- Single crochet through back loop only (sc-blo): work a regular single crochet but insert your hook under only the back loop of the stitch below. This creates the ribbed texture.
- Single crochet decrease (dec): insert hook in first stitch and pull up a loop, insert hook in next stitch and pull up a loop (3 loops on hook), yarn over and pull through all 3 loops.
Gauge & Size
- Finished size: approximately 10 inches wide, 7.5 inches tall and 2 inches deep
- Gauge: 18 stitches and 20 rows = 4 inches in single crochet through back loop only
- Construction: two flat ribbed panels with shaped curved bottoms, seamed together, with a top edging, two hardware tabs and a chain strap
- Skill level: Intermediate Beginner
Panel Pattern (Make 2)
Work each panel flat in rows, changing colours to create the symmetrical ombre: Rows 1 to 8 in Color A, Rows 9 to 14 in Color B, Rows 15 to 22 in Color C, Rows 23 to 28 in Color B, and Rows 29 to 36 in Color A. To change colour cleanly, work the last stitch of the row until you have 2 loops on your hook, then yarn over with the new colour and pull through both loops.
Foundation: With Color A, ch 35.
Row 1 (RS): Sc in 2nd ch from hook and in each ch across. (34 sts)
Row 2: Ch 1, turn. Sc-blo in each st across. (34 sts)
Row 3: Ch 1, turn. Sc-blo in each st across. (34 sts)
Row 4: Ch 1, turn. Sc-blo in each st across. (34 sts)
Row 5: Ch 1, turn. Sc-blo in each st across. (34 sts)
Row 6: Ch 1, turn. Sc-blo in each st across. (34 sts)
Row 7: Ch 1, turn. Sc-blo in each st across. (34 sts)
Row 8: Ch 1, turn. Sc-blo in each st across, changing to Color B on the last yarn over. (34 sts)
Row 9: Ch 1, turn. Sc-blo in each st across. (34 sts)
Row 10: Ch 1, turn. Sc-blo in each st across. (34 sts)
Row 11: Ch 1, turn. Sc-blo in each st across. (34 sts)
Row 12: Ch 1, turn. Sc-blo in each st across. (34 sts)
Row 13: Ch 1, turn. Sc-blo in each st across. (34 sts)
Row 14: Ch 1, turn. Sc-blo in each st across, changing to Color C at the end of the row. (34 sts)
Row 15: Ch 1, turn. Sc-blo in each st across. (34 sts)
Row 16: Ch 1, turn. Sc-blo in each st across. (34 sts)
Row 17: Ch 1, turn. Sc-blo in each st across. (34 sts)
Row 18: Ch 1, turn. Sc-blo in each st across. (34 sts)
Row 19: Ch 1, turn. Sc-blo in each st across. (34 sts)
Row 20: Ch 1, turn. Sc-blo in each st across. (34 sts)
Row 21: Ch 1, turn. Sc-blo in each st across. (34 sts)
Row 22: Ch 1, turn. Sc-blo in each st across, changing to Color B at the end of the row. (34 sts)
Row 23: Ch 1, turn. Sc-blo in each st across. (34 sts)
Row 24: Ch 1, turn. Sc-blo in each st across. (34 sts)
Row 25: Ch 1, turn. Sc-blo in each st across. (34 sts)
Row 26: Ch 1, turn. Sc-blo in each st across. (34 sts)
Row 27: Ch 1, turn. Sc-blo in each st across. (34 sts)
Row 28: Ch 1, turn. Sc-blo in each st across, changing to Color A at the end of the row. (34 sts)
Row 29: Ch 1, turn. Sc-blo in each st across. (34 sts)
Row 30: Ch 1, turn. Sc-blo in each st across. (34 sts)
Row 31: Ch 1, turn. Sc-blo in each st across. (34 sts)
Row 32: Ch 1, turn. Sc-blo in each st across. (34 sts)
Row 33: Ch 1, turn. Sc-blo in each st across. (34 sts)
Row 34: Ch 1, turn. Sc-blo in each st across. (34 sts)
Row 35: Ch 1, turn. Sc-blo in each st across. (34 sts)
Row 36: Ch 1, turn. Sc-blo in each st across. (34 sts)
Fasten off after Row 36. You now have a rectangular panel with vertical stripes and a clearly visible ribbed texture.
Shaping the Curved Bottom
Now we shape the panel to create the rounded purse silhouette, working along the foundation chain edge at the bottom of the panel. With RS facing, join Color A to the first stitch of the foundation edge with a sl st.
Shaping Row 1: Ch 1. Sc in first 4 sts, dec over next 2 sts, sc in next 22 sts, dec over next 2 sts, sc in last 4 sts. (32 sts)
Shaping Row 2: Ch 1, turn. Sc in first 3 sts, dec, sc in next 22 sts, dec, sc in last 3 sts. (30 sts)
Shaping Row 3: Ch 1, turn. Sc in first 2 sts, dec, sc in next 22 sts, dec, sc in last 2 sts. (28 sts)
Shaping Row 4: Ch 1, turn. Sc in first st, dec, sc in next 22 sts, dec, sc in last st. (26 sts)
Shaping Row 5: Ch 1, turn. Dec, sc in next 22 sts, dec. (24 sts)
Fasten off and weave in ends. Repeat the shaping on your second panel.
Top Edging
Join Color A at one side seam with a sl st.
Round 1: Ch 1. Sc evenly around the entire top opening, working through both layers at the seams and into the row ends along each panel. Place a stitch marker at each front corner. Join with sl st to first sc.
Round 2: Ch 1. Sc in each st around. Join with sl st. (Count should be approximately 72 to 76 sts depending on your tension)
Round 3: Ch 1. Sc in each st around. Join with sl st.
Fasten off and weave in all ends.
Hardware Tabs (Make 2)
With Color A, ch 8.
Row 1: Sc in 2nd ch from hook and in each ch across. (7 sts)
Row 2: Ch 1, turn. Sc in each st across. (7 sts)
Row 3: Ch 1, turn. Sc in each st across. (7 sts)
Fasten off, leaving a long tail. Fold each tab in half to create a loop and sew it securely to the inside of the bag at each top corner, so the loop extends slightly above the top edge.
Finishing & Assembly
Place both panels with wrong sides together so the right side of each panel faces outward. Using Color A and your tapestry needle, whip stitch the panels together along the curved bottom edge and up both side edges, leaving the top edge open. Work approximately 1/2 inch up from the curved shaping along each side, then stop, so the top portion of the sides stays open for a wider opening.
Slide a D-ring or jump ring through each tab loop. Attach your lobster clasps to each end of your chain strap, then clip them onto the D-rings.
Position your rose button or charm at the centre front, about 1.5 inches below the top edge, and sew it securely from the inside.
For the optional lining, cut fabric to match your panel shape plus 1/2 inch seam allowance, sew the fabric panels together, fold the top edge under, and hand stitch it inside the bag just below the crochet edging.
Tips
Tension consistency matters here. Try to keep your tension even throughout, especially when changing colours, so your stripes stay uniform.
Weave in ends as you go. With multiple colour changes you will have many tails, and weaving them in before seaming hides them inside the fabric layers.
Lightly steam or wet block each panel before seaming. This evens out the stitches and makes assembly so much easier.
For a different look, try a monochromatic version in all one colour for a minimalist finish, or go bold with contrasting colours like navy and coral.
Classic Burgundy Wine Elegant Purse Free Crochet Pattern
Materials
Steps
- Work the first flat ribbed panel in ombre colour bands to Row 36
- Work the second identical panel
- Shape the curved bottom of each panel in 5 decrease rows
- Seam the two panels together along the bottom and sides
- Work 3 rounds of top edging
- Make 2 hardware tabs and sew them inside the top corners
- Attach D-rings, lobster clasps and the chain strap
- Add the optional charm and lining
- Keep tension even through the colour changes so the stripes stay uniform
- Weave in ends before seaming so tails hide inside the fabric
- Block each panel lightly before seaming for a neat finish
- Cotton or cotton-blend yarn helps the purse hold its shape