Unicorn Magic Baby Dress Set Free Crochet Pattern
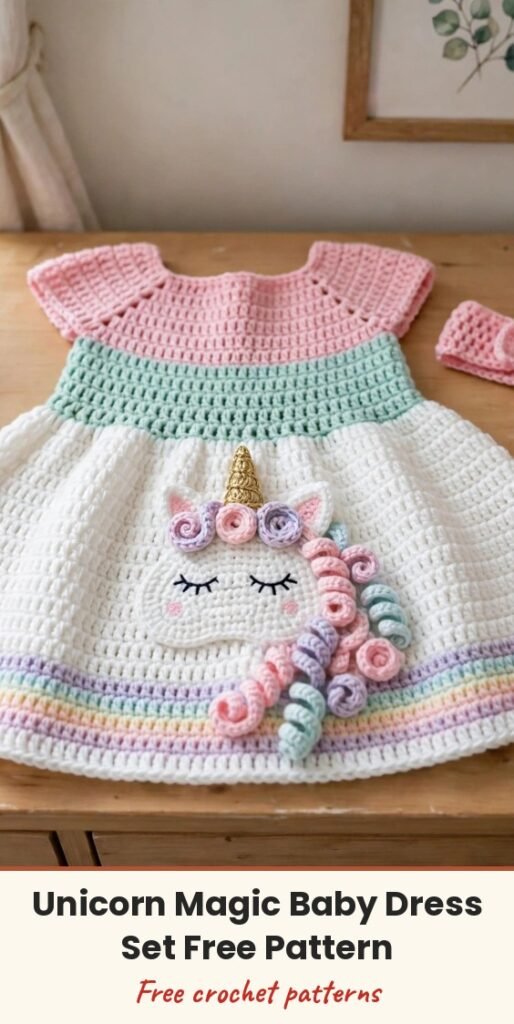
Table of Contents
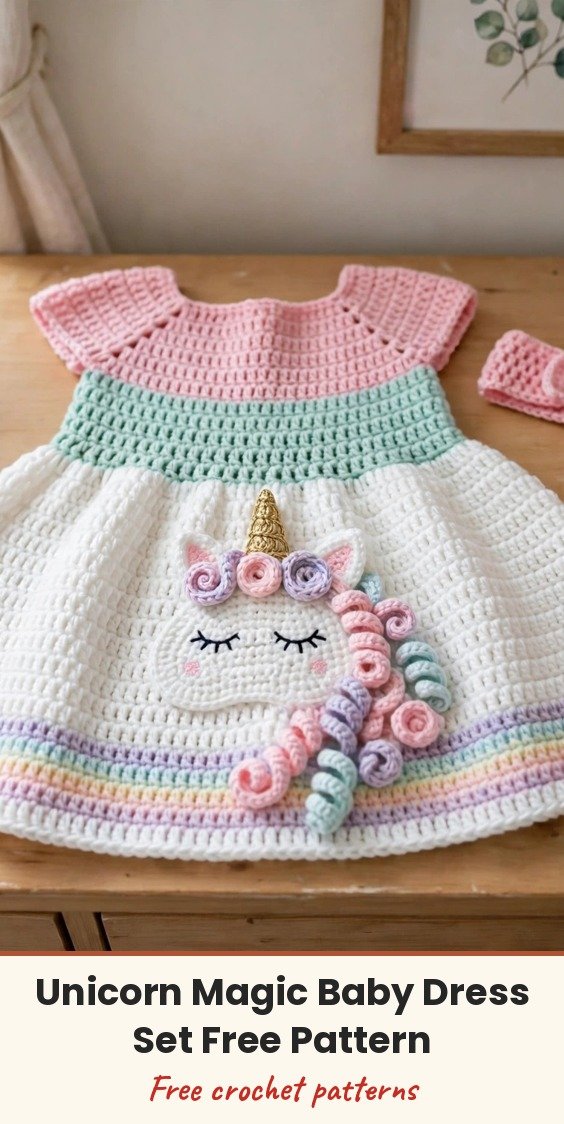
This little unicorn set makes me smile every single time I look at it! We are making a complete three-piece outfit — a dress, a matching headband, and the sweetest tiny booties — all decorated with a sleeping unicorn face, a golden horn, and curly pastel mane strands.
The dress is worked top-down, starting with a flat yoke in pink and mint, then joining in the round for a full A-line skirt with pastel rainbow stripes worked in the back loops so they stand up in pretty ridges. The unicorn face applique is crocheted separately and sewn onto the skirt front, and the whole set is sized for babies of 3 to 6 months.
It is rated intermediate, but please do not let that put you off. If you can work in the round, change colours, and keep an eye on your stitch counts, you can absolutely make this. I will walk you through every piece, one step at a time.
Materials
- Worsted weight yarn, Color A (Mint): approximately 180 yards
- Worsted weight yarn, Color B (Pink): approximately 120 yards
- Worsted weight yarn, Color C (White): approximately 200 yards
- Worsted weight yarn, Color D (Yellow): approximately 15 yards
- Worsted weight yarn, Color E (Pastel Pink/Blush): approximately 15 yards
- Worsted weight yarn, Color F (Lavender): approximately 15 yards
- Worsted weight yarn, Color G (Baby Blue): approximately 15 yards
- Worsted weight yarn, Color H (Gold/Mustard): approximately 20 yards
- Worsted weight yarn, Color I (Pale Yellow): approximately 10 yards
- US G-6 (4.0 mm) crochet hook, for the main construction
- US E-4 (3.5 mm) crochet hook, for applique details
- Yarn needle, for weaving in ends
- 6 to 8 locking stitch markers
- 3 buttons, approximately 3/8 inch diameter
- Sewing needle and thread
- Small amount of black yarn or embroidery floss, for the eyes
- Small amount of pink yarn or embroidery floss, for the cheeks
- Small amount of polyester fiberfill, for stuffing the horn
- Scissors
Abbreviations
- MR: magic circle
- ch: chain
- sc: single crochet
- hdc: half double crochet
- dc: double crochet
- sl st: slip stitch
- BLO: back loop only
- sc2tog: single crochet two together
- inc: increase, work 2 stitches into the same stitch
- st/sts: stitch / stitches
Special Stitches
- Curled Mane Strand: Chain 12. Starting in the second chain from the hook, work 3 sc in each chain across. The strand naturally curls into a spiral. Fasten off, leaving a 6-inch tail for sewing.
Gauge & Size
- Gauge: 16 sc x 18 rows = 4 inches in single crochet, blocked; 18 hdc x 13 rows = 4 inches in half double crochet, blocked
- Finished size: dress fits a 14 to 16 inch chest (approximately 16 inches circumference finished), length from shoulder to hem approximately 13 inches; headband stretches to fit a 13 to 16 inch head circumference; booties have a 3.5 inch sole, fitting 0 to 6 months
- Construction: dress worked top-down, yoke flat then body joined in the round; applique, headband and booties made separately
- Skill level: Intermediate
One pattern note before we start: the chain-1 at the beginning of single crochet rounds does not count as a stitch, and the chain-2 at the beginning of half double crochet rounds does not count as a stitch either.
Dress Yoke Pattern
The yoke starts at the neckline and works down flat, because the dress closes with buttons at the centre back. Using Color B (Pink), chain 42 to begin.
Row 1 (RS): Sc in the second ch from the hook and in each ch across. Turn. (41 sc)
Row 2 (WS): Ch 1, sc in each st across. Turn. (41 sc)
Row 3 (RS): Ch 1, sc in first 3 sts, [2 sc in next st, sc in next 3 sts] 9 times, 2 sc in next st, sc in last st. Turn. (51 sc)
Row 4 (WS): Ch 1, sc in each st across. Turn. (51 sc)
Row 5 (RS): Ch 1, sc in first 3 sts, [2 sc in next st, sc in next 4 sts] 9 times, 2 sc in next st, sc in last 2 sts. Turn. (61 sc)
Row 6 (WS): Ch 1, sc in each st across. Turn. (61 sc)
At the end of Row 6, change to Color A (Mint) on the last stitch.
Row 7 (RS, Color A): Ch 1, sc in first 3 sts, [2 sc in next st, sc in next 5 sts] 9 times, 2 sc in next st, sc in last 2 sts. Turn. (71 sc)
Row 8 (WS, Color A): Ch 1, sc in each st across. Turn. (71 sc)
Row 9 (RS, Color A): Ch 1, sc in first 4 sts, [2 sc in next st, sc in next 6 sts] 9 times, 2 sc in next st, sc in last 2 sts. Turn. (81 sc)
Row 10 (WS, Color A): Ch 1, sc in each st across. Turn. (81 sc)
Row 11 (RS, Color A): Ch 1, sc in first 4 sts, [2 sc in next st, sc in next 7 sts] 9 times, 2 sc in next st, sc in last 2 sts. Turn. (91 sc)
Row 12 (WS, Color A): Ch 1, sc in each st across. Turn. (91 sc)
Your yoke should now measure approximately 2.5 inches tall, and you should have exactly 91 stitches. Now we divide for the body and sleeves: 15 sts left back, 18 sts left sleeve, 25 sts front, 18 sts right sleeve, 15 sts right back.
Row 13 (RS, Division Row, Color A): Ch 1, sc in first 15 sts (left back), ch 4 (underarm bridge), skip 18 sts (left sleeve), sc in next 25 sts (front), ch 4 (underarm bridge), skip 18 sts (right sleeve), sc in last 15 sts (right back). Turn. (55 sc + 8 ch = 63 working positions)
Dress Body and Skirt Pattern
Row 14 (WS, Color A): Ch 1, sc in each sc and each ch across. Turn. (63 sc)
Row 15 (RS, Color A): Ch 1, sc in first 5 sts, [2 sc in next st, sc in next 6 sts] 8 times, 2 sc in next st, sc in last 2 sts. Turn. (72 sc)
Row 16 (WS, Color A): Ch 1, sc in each st across. Turn. (72 sc)
Now we join to work in the round.
Round 17 (Color A): Ch 1, sc in each st around. Join with sl st to first sc. (72 sc)
Round 18 (Color A): Ch 1, sc in each sc around. Join. (72 sc)
Round 19 (Color A): Ch 1, sc in first 4 sts, [2 sc in next st, sc in next 8 sts] 7 times, 2 sc in next st, sc in last 4 sts. Join. (80 sc)
Round 20 (Color A): Ch 1, sc in each sc around. Join. (80 sc)
Round 21 (Color A): Ch 1, sc in each sc around. Join. (80 sc)
At the end of Round 21, change to Color C (White). From the shoulder to here should measure approximately 4.5 inches, and you should have 80 sc. Now the skirt flares out through a series of increase rounds to make that lovely A-line shape.
Round 22 (Color C): Ch 1, sc in first 4 sts, [2 sc in next st, sc in next 9 sts] 7 times, 2 sc in next st, sc in last 5 sts. Join. (88 sc)
Round 23 (Color C): Ch 1, sc in each sc around. Join. (88 sc)
Round 24 (Color C): Ch 1, sc in first 4 sts, [2 sc in next st, sc in next 10 sts] 7 times, 2 sc in next st, sc in last 6 sts. Join. (96 sc)
Round 25 (Color C): Ch 1, sc in each sc around. Join. (96 sc)
Round 26 (Color C): Ch 1, sc in first 5 sts, [2 sc in next st, sc in next 11 sts] 7 times, 2 sc in next st, sc in last 6 sts. Join. (104 sc)
Round 27 (Color C): Ch 1, sc in each sc around. Join. (104 sc)
Round 28 (Color C): Ch 1, sc in first 5 sts, [2 sc in next st, sc in next 12 sts] 7 times, 2 sc in next st, sc in last 7 sts. Join. (112 sc)
Round 29 (Color C): Ch 1, sc in each sc around. Join. (112 sc)
Round 30 (Color C): Ch 1, sc in first 6 sts, [2 sc in next st, sc in next 13 sts] 7 times, 2 sc in next st, sc in last 7 sts. Join. (120 sc)
Rounds 31 to 33 (Color C): Ch 1, sc in each sc around. Join. (120 sc)
Your skirt should measure approximately 4 inches from the yoke join, with 120 sc. Time for my favourite part, the rainbow stripes! Working the first round of each colour in the back loop only creates the raised ridges that define each stripe.
Round 34 (Color E, Blush Pink): Ch 1, working in BLO, sc in each sc around. Join. (120 sc)
Round 35 (Color E): Ch 1, sc in each sc around (both loops). Join. (120 sc)
Cut Color E and join Color D (Yellow).
Round 36 (Color D, Yellow): Ch 1, working in BLO, sc in each sc around. Join. (120 sc)
Round 37 (Color D): Ch 1, sc in each sc around. Join. (120 sc)
Cut Color D and join Color G (Baby Blue).
Round 38 (Color G, Baby Blue): Ch 1, working in BLO, sc in each sc around. Join. (120 sc)
Round 39 (Color G): Ch 1, sc in each sc around. Join. (120 sc)
Cut Color G and join Color F (Lavender).
Round 40 (Color F, Lavender): Ch 1, working in BLO, sc in each sc around. Join. (120 sc)
Round 41 (Color F): Ch 1, sc in each sc around. Join. (120 sc)
Cut Color F and join Color C (White).
Round 42 (Color C): Ch 1, sc in each sc around. Join. (120 sc)
Now the hem edging. Cut Color C and join Color B (Pink).
Round 43 (Color B, Edging): Ch 1, [sc in next st, sk 2 sts, 5 dc in next st, sk 2 sts] 20 times. Join with sl st to first sc. (20 shells)
Fasten off and weave in all ends.
Sleeve Edging and Button Bands
Work both sleeves the same way. Join Color B (Pink) to any sleeve stitch.
Round 1: Ch 1, sc in each of the 18 held sleeve sts, sc in each of the 4 underarm ch sts. Join. (22 sc)
Round 2: Ch 1, sc in each sc around. Join. (22 sc)
Round 3 (Picot Round): Ch 1, [sc in next 2 sts, ch 3, sl st in third ch from hook] 11 times. Join. (22 sts, 11 picots)
Fasten off, and repeat for the second sleeve. For the right back button band (the one with buttonholes), join Color B to the top right-back corner with the right side facing.
Row 1: Ch 1, work 36 sc evenly down the right back edge. Turn. (36 sc)
Row 2: Ch 1, sc in first 3 sts, [ch 1, sk 1 st, sc in next 11 sts] 3 times. Turn. (33 sc + 3 ch-1 spaces)
Row 3: Ch 1, sc in each st and each ch-space across. Turn. (36 sc)
Fasten off. For the left back band, join Color B to the bottom left-back corner and work 3 rows of 36 sc evenly up the edge, then fasten off. Sew the buttons to the left back band, aligned with the buttonholes.
Unicorn Face Applique Pattern
We make the face with Color C (White) and the smaller hook. Let us start with the face oval.
Round 1: MR, work 6 sc in the ring. Pull tight. (6 sc)
Round 2: 2 sc in each sc around. (12 sc)
Round 3: [Sc in next sc, 2 sc in next sc] 6 times. (18 sc)
Round 4: [Sc in next 2 sc, 2 sc in next sc] 6 times. (24 sc)
Round 5: [Sc in next 3 sc, 2 sc in next sc] 6 times. (30 sc)
Round 6: [Sc in next 4 sc, 2 sc in next sc] 6 times. (36 sc)
Round 7: [Sc in next 5 sc, 2 sc in next sc] 6 times. (42 sc)
Round 8: Sc in each sc around. (42 sc)
Fasten off, leaving a 24-inch tail. Now the horn, using Color H (Gold) and the smaller hook.
Round 1: MR, 6 sc in the ring. (6 sc)
Round 2: Sc in each sc around. (6 sc)
Round 3: [Sc in next 2 sc, 2 sc in next sc] twice. (8 sc)
Round 4: Sc in each sc around. (8 sc)
Round 5: [Sc in next 3 sc, 2 sc in next sc] twice. (10 sc)
Round 6: Sc in each sc around. (10 sc)
Round 7: [Sc in next 4 sc, 2 sc in next sc] twice. (12 sc)
Round 8: Sl st in each sc around. Fasten off.
Stuff the horn lightly with fiberfill and sew it to the top centre of the face oval. Now the ears — make 2, using Color C (White) and the smaller hook.
Row 1: Ch 5. Sc in the second ch from the hook, sc in next 2 ch, 3 sc in the last ch. Working back along the opposite side: sc in next 2 sts, 2 sc in the last st. Join with sl st. (10 sc)
Fasten off Color C and join Color B (Pink).
Row 2: Sl st in first 2 sts, sc in next 2 sts, 3 sc in next st, sc in next 2 sts, sl st in last 3 sts. Fasten off.
Sew the ears on each side of the horn, angled outward. With black yarn, embroider two closed crescent eyes in a sleeping expression, approximately 0.5 inch wide, positioned one-third down from the horn. With pink yarn, embroider small circular cheek blushes below and outside each eye.
For the mane, make curled mane strands (see Special Stitches) in these colours: Color F (Lavender) 3 strands, Color G (Baby Blue) 3 strands, Color I (Pale Yellow) 2 strands, Color B (Pink) 2 strands. Arrange them in a cascading cluster beside the horn, layered in a rainbow gradient, and sew each strand securely at its base.
Headband Pattern
Using Color B (Pink) and the main hook, chain 65 and join with a sl st to the first ch, being careful not to twist.
Rounds 1 to 4: Ch 1, sc in each st around. Join. (65 sc)
Fasten off. For the mini horn, work the dress horn pattern through Round 5 only (10 sc), stuff lightly, and sew it to the front centre of the headband. For the mini ears, use a ch 4 base and work the ear pattern, make 2, and attach one on each side of the mini horn.
For the bow: Ch 13. Sc in the second ch from the hook and in each ch across. Turn. (12 sc) Work Rows 2 to 8 in sc. Fasten off. Pinch the centre to form a bow shape, wrap the tail around the centre, and secure. Sew the bow to the headband, to the left of the horn.
Booties Pattern
Make 2 booties. We start with the sole, using Color B (Pink).
Round 1: Ch 10. Work 2 sc in the second ch from the hook, sc in next 7 ch, 4 sc in the last ch. Working back along the opposite side: sc in next 7 sts, 2 sc in the first ch. Join. (22 sc)
Round 2: 2 sc in first sc, sc in next 7 sc, 2 sc in each of next 4 sc, sc in next 7 sc, 2 sc in last sc. Join. (28 sc)
Round 3: Sc in first sc, 2 sc in next sc, sc in next 7 sc, [sc in next sc, 2 sc in next sc] 4 times, sc in next 7 sc, sc in next sc, 2 sc in last sc. Join. (34 sc)
Round 4: Ch 1, working in BLO, sc in each sc around. Join. (34 sc)
Rounds 5 to 6: Ch 1, sc in each sc around. Join. (34 sc)
Round 7: Ch 1, sc in first 10 sc, [sc2tog] 7 times, sc in last 10 sc. Join. (27 sc)
Round 8: Ch 1, sc in first 8 sc, [sc2tog] 5 times, sc in last 9 sc. Join. (22 sc)
Round 9: Ch 1, sc in each sc around. Join. (22 sc)
Round 10: Ch 1, working in BLO, sc in each sc around. Join. (22 sc)
Rounds 11 to 13: Ch 1, sc in each sc around. Join. (22 sc)
Fasten off. Work mini horns just like the headband horns and sew one to the front of each bootie.
Finishing & Assembly
Position the completed face on the skirt front, approximately 2 inches below the yoke join — the horn tip will reach up into the mint bodice section. Pin it in place first, then whipstitch around the entire outer edge. Weave in any remaining ends, sew the buttons on if you have not already, and give the dress a light steam blocking to even out your stitches and help the skirt hold its A-line shape.
Tips for Success
When you switch colours, work your last stitch until 2 loops remain on the hook, then pull the new colour through. This gives you much cleaner transitions, especially on the rainbow stripes.
Stitch markers really are your best friend here. I like to place them at the yoke division points and move them up each round — it makes the divide row so much less stressful.
One safety note from me: the unicorn face applique is sewn flat to the dress, and I recommend embroidering all the facial features rather than using safety eyes on a baby garment. It is just as cute, and much safer for little ones.
Unicorn Magic Baby Dress Set Free Crochet Pattern
Materials
Steps
- Work the flat yoke in pink and mint, increasing to 91 sts
- Divide for body and sleeves and join the body in the round
- Work the A-line skirt with increase rounds to 120 sts
- Add the back-loop rainbow stripe section and shell hem edging
- Work the sleeve edging and both button bands
- Crochet the unicorn face, horn, ears and curled mane strands
- Make the headband with mini horn, ears and bow
- Make the two booties and add mini horns
- Sew the face to the skirt front and sew on the buttons
- Change colour on the last yarn over of the final stitch for clean colour transitions
- Use stitch markers at the yoke division points and move them up each round
- Embroider the facial features instead of using safety eyes on baby garments
- Lightly steam block the finished dress so the skirt holds its A-line shape


