Free Crochet Christmas Baubles Pattern – Easy Handmade Ornaments
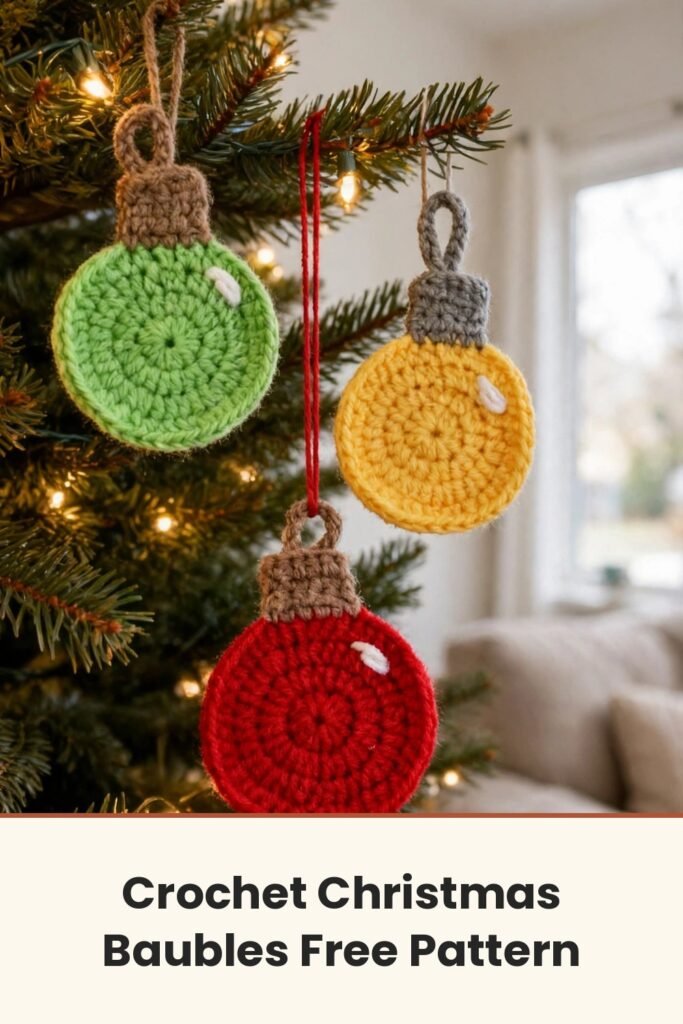
Table of Contents
If you ask me, the very best ornaments on a Christmas tree are the ones somebody made with their own two hands. These little crochet baubles are exactly that kind of ornament: round, cheerful, and so quick that you can finish one in about half an hour with yarn you probably already have in your stash.
The bauble starts as a simple double crochet circle worked in the round, then gets a tiny contrasting cap and a chain loop for hanging. That's honestly all there is to it! It's tagged intermediate only because you work in continuous rounds, but if you have made a magic ring before, you are already more than halfway there.
I love these clustered all over the tree, but they are just as sweet tied on top of a wrapped gift. And since one ornament uses barely an ounce of yarn, they are a perfect scrap-yarn project.
At a glance
- Skill level: Intermediate
- Time: 30 to 45 minutes per bauble
- Cost: Under $5
- Best for: Tree ornaments, gift toppers, and holiday decor
What You Will Need
Yarn
- Worsted-weight yarn: a soft milk cotton or a merino wool blend gives the roundest, plumpest finish
- Scrap yarn from another project is plenty for one ornament
- A second color for the cap if you want it to stand out
Tools
- Crochet hook: 2.5 mm (sized small on purpose, so the stitches stay snug)
- Scissors
- Tapestry needle, for weaving in tails and sewing on the hanging loop
Abbreviations (US Terms)
- CH: chain
- MR: magic ring
- DC: double crochet
- SC: single crochet
- SL ST: slip stitch
There are no special stitches in this pattern — just everyday basics worked in the round.
The Bauble Pattern
The Round Body
Round 1: Make a magic ring and CH 3. The CH 3 counts as your first DC.
Checkpoint: If the magic ring is fighting you today, chain 4 instead and work into that ring — it closes Rounds 1 and 2 exactly the same way.
Round 2: Work 14 DC into the magic ring.
- SL ST into the 3rd chain of the starting CH 3 to close the round. (15 sts)
Round 3: CH 3 to begin.
- Work 2 DC into every stitch around.
- SL ST into the top of the starting CH 3 to close. (30 sts)
Your disc should look noticeably wider and flatter now — that's exactly right.
Round 4: SL ST into the top chain of Round 3's starting CH 3, then CH 3 to begin.
- Work 1 DC in the next stitch.
- Work 2 DC in the following stitch.
- Repeat those two steps all the way around.
- SL ST into the starting chain to close. (45 sts)
Checkpoint: Stitch counts love to drift on this round. Pause every few repeats and make sure you are still landing in the right stitch.
Round 5: CH 3 to begin.
- Work 1 DC into each of the next 2 stitches.
- Work 2 DC into the stitch after that.
- Repeat those two steps all the way around.
- SL ST to close the round. (60 sts)
Fasten off, leaving a tail. Thread the tail onto your tapestry needle and weave it in on the back of the ornament.
The Cap
Switch to your cap color — a contrast color makes the cap pop against the body of the bauble.
Cap row 1: Insert the new yarn through any outer stitch.
- Work 1 SC into each of the next 5 stitches. (5 SC)
Cap rounds: CH 2 and work 1 DC into each stitch of the row.
- Repeat that round one more time.
- SL ST to close.
Fasten off, leaving a long tail. Cut the yarn and draw the tail through to the back side of the bauble.
The Hanging Loop
- Make a slip knot with the same yarn as the cap.
- CH 15 for the hanging loop.
- Leave a long tail and cut the yarn.
Shape the 15 chains into a loop and sew the open ends to the cap of the ornament. Keep your stitching on the back side so it stays hidden, and your bauble is ready to hang!
My Favorite Tips
- A fuzzy or brushed yarn gives the bauble a soft, squishable texture instead of the smoother look of plain cotton or acrylic.
- Keep your tension even all the way around so the bauble comes out round instead of lopsided.
- If you want a firmer, sturdier ornament, give the finished bauble a light coat of fabric stiffener.
Questions I Get About These Baubles
What yarn should I use?
Worsted weight is the safest match for these stitch counts, but the fiber itself is flexible. Skip slippery or very thin yarns — they make the stitches harder to count and the finished shape harder to control. For a plumper bauble, reach for a brushed or blended yarn.
How long does one bauble take?
Most makers finish one in 30 to 45 minutes once the magic ring and double crochet feel comfortable. Budget closer to an hour the very first time through.
Why did my bauble come out lopsided?
Almost always, the stitch count drifted during an increase round. Check that Round 4 and Round 5 repeat evenly all the way around, and crochet every stitch with the same pull. If a round looks off, it is worth unraveling back to the last good round rather than trying to fix it going forward.
Can I make it bigger or smaller?
Yes — change your yarn weight and hook size, not the stitch counts. Bulkier yarn with a bigger hook makes a bigger bauble; finer yarn with a smaller hook shrinks it down, using the exact same rounds either way.
How do I store them after the holidays?
Keep them flat or loosely packed in a soft pouch or box, not piled under heavy decorations, so they hold their shape. A dry spot also keeps natural fibers like cotton and wool from picking up moisture over the off-season.
Make one bauble and I promise you will want to make ten more. Happy stitching, friend!