How to Crochet Mr Celebrating Christmas Miniature Plushie for Holidays
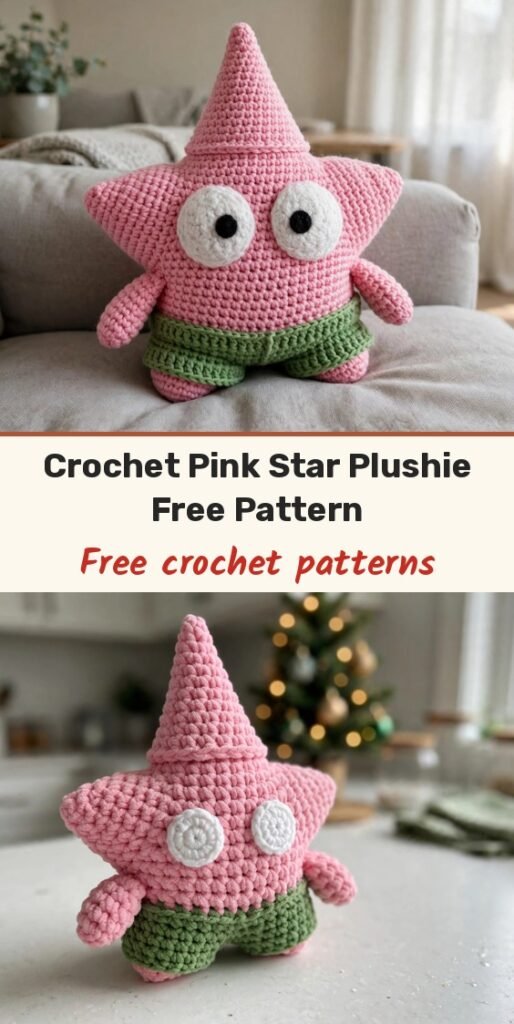
Table of Contents
This chubby little star plushie made me smile the moment I saw him — pink, pointy-headed, and all dressed up for Christmas gifting. I am Amy, and I love a low-sew amigurumi like this one: you crochet the legs, join them, and the body and cone head grow in one piece.
He is worked in soft plush yarn with simple single crochet, increases and decreases, so if you can keep count to 24, you can absolutely make him. He is perfect as a stocking stuffer, a desk buddy, or a sweet handmade gift for kids.
A quick note before we start: the written pattern below covers the plushie body, shorts, arms and eyes in full. Work him exactly as written and he will stand proudly all on his own.
Materials
- Plush / chenille yarn, about 2 mm thick, in pink (body, legs, arms), green (shorts) and white (eyes)
- 2.5 mm crochet hook
- 1 pair small black plastic safety eyes or black beads
- Polyester fiberfill stuffing
- Tapestry / yarn needle
- Stitch marker
- Scissors
- Craft glue (optional, for securing eyes)
- Black thread, for the mouth
Abbreviations
- MR = magic ring
- ch = chain
- sc = single crochet
- inc = increase (2 single crochet in the same stitch)
- dec = decrease (single crochet 2 stitches together)
- sl st = slip stitch
- st(s) = stitch(es)
Gauge & Size
- Gauge: not critical for this plushie; keep stitches tight so stuffing does not show
- Finished size: miniature plushie, sized by your plush yarn and 2.5 mm hook
- Use a stitch marker to track the start of each round
Plushie Pattern
Legs (Make 2, Pink Yarn)
Leg 1, Round 1: Start with a MR. Work 6 sc into the ring. Sl st to the first sc to join. (6 sts)
Leg 1, Round 2: Ch 1. Work 1 sc in each of the 6 sts around. Sl st to join. Fasten off yarn. (6 sts)
Leg 2, Round 1: Start with a MR. Work 6 sc into the ring. Sl st to the first sc to join. (6 sts)
Leg 2, Round 2: Ch 1. Work 1 sc in each of the first 5 sts. On the 6th st, change colour to green yarn. Sl st to the first st to join. Do not cut the green yarn. (6 sts)
Joining Legs and Shorts (Green Yarn)
Round 3: Chain 2. Insert hook into the slip stitch location of Leg 1 to join the two legs together. Work across Leg 1: [1 sc, 1 inc] repeat 3 times across the 6 sts of Leg 1. (9 sts) Work 2 sc along one side of the 2-chain bridge between legs. (2 sts) Work across Leg 2: [1 sc, 1 inc] repeat 3 times across the 6 sts of Leg 2. (9 sts) Work 2 sc along the other side of the 2-chain bridge. (2 sts) Sl st to the first st to join the round. (Total: 22 sts)
Round 4: Ch 1. Work 4 sc, 1 inc, 10 sc, 1 inc, 6 sc. Sl st to the first st to join. (Total: 24 sts)
Round 5: Ch 1. Work 1 sc in each of the 24 sts around. On the 24th st, pull through with pink yarn to switch colour back to pink. Sl st to the first st to join. Cut the green yarn. (24 sts)
Body and Cone Head (Pink Yarn)
Round 6: Ch 1. Work 1 sc in each of the 24 sts around. Sl st to join. (24 sts)
Round 7: Ch 1. Work 4 sc, 1 dec, 10 sc, 1 dec, 6 sc. Sl st to join. (22 sts)
Round 8: Ch 1. Work 4 sc, 1 dec, 9 sc, 1 dec, 5 sc. Sl st to join. (20 sts)
Round 9: Ch 1. Work 3 sc, 1 dec, 8 sc, 1 dec, 5 sc. Sl st to join. (18 sts)
Round 10: Ch 1. Work 3 sc, 1 dec, 7 sc, 1 dec, 4 sc. Sl st to join. (16 sts)
Round 11: Ch 1. Work 2 sc, 1 dec, 7 sc, 1 dec, 3 sc. Sl st to join. (14 sts)
Round 12: Ch 1. Work 2 sc, 1 dec, 6 sc, 1 dec, 2 sc. Sl st to join. (12 sts)
Fasten off, leaving a short yarn tail.
Arms (Make 2, Pink Yarn)
Round 1: Start with a MR. Work 5 sc into the ring. Sl st to the first st to join. (5 sts)
Round 2: Ch 1. Work 1 sc in each of the 5 sts around. Sl st to join. (5 sts)
Round 3: Ch 1. Work 1 sc in each of the 5 sts around. Sl st to join. (5 sts)
Fasten off, leaving a yarn tail for sewing. Do not stuff the arms.
Eyes (Make 2, White Yarn)
Round 1: Start with a MR. Work 6 sc into the ring. Sl st to the first st to join. (6 sts)
Fasten off, leaving a yarn tail for sewing or gluing.
Finishing & Assembly
Fill the legs, shorts and body firmly with fiberfill stuffing.
Thread the pink yarn tail onto a yarn needle. Weave the needle through every second front loop around the top opening (6 total passes), pull the yarn tight to close the pointed cone head smoothly, and weave in the end.
Attach the small black plastic eyes or safety eye pins into the centre of the white eye circles. Glue or sew the two white eyes onto the front upper face of the head.
Sew or glue one arm to each side of the pink body, positioned just below the head level.
Use black thread to stitch a simple curved line for the mouth below the eyes.
Tips
Stuff firmly as you go — plush yarn hides a lot, but an under-stuffed body will flop.
Count the bridge stitches in Round 3 carefully; that round sets the whole body width at 22 sts.
Leave the arms unstuffed so they sit flat against the body when sewn on.

How to Crochet Mr Celebrating Christmas Miniature Plushie for Holidays
Materials
Steps
- Crochet 2 pink legs
- Join legs and work green shorts
- Shape body and cone head with decreases
- Make 2 arms and 2 white eyes
- Stuff, close the head, and assemble
- Keep stitches tight so stuffing does not show
- Count Round 3 carefully — it sets the body at 22 sts
- Do not stuff the arms


