Strawberry Sundae Beanie Free Crochet Pattern
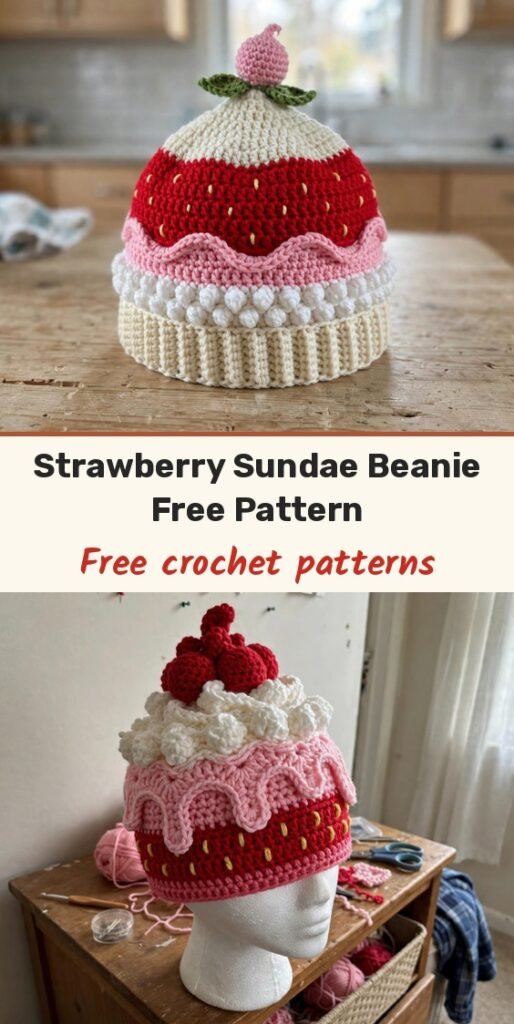
Table of Contents
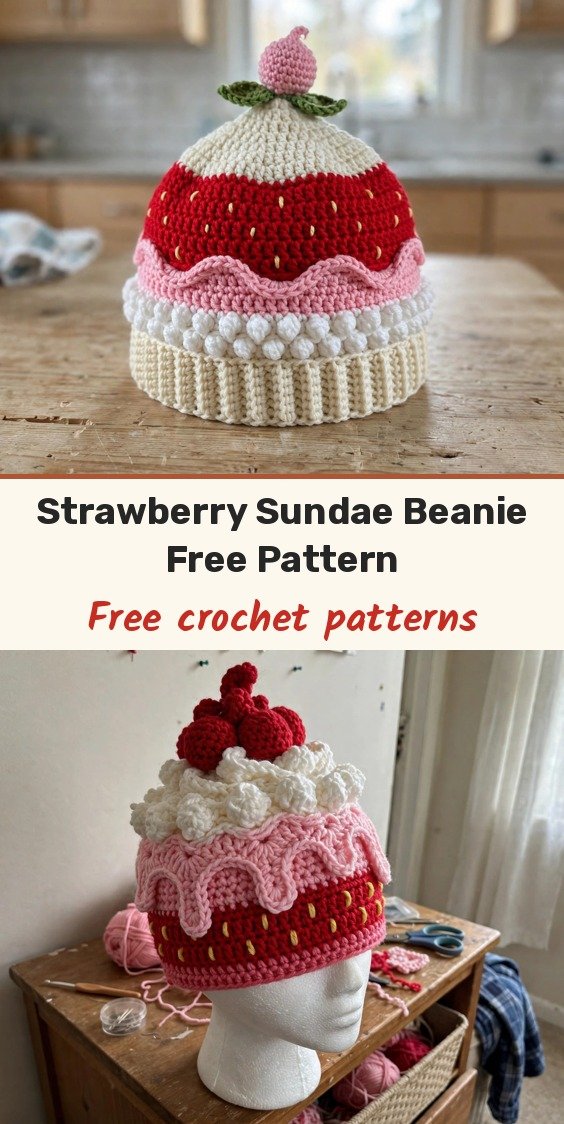
This is the hat that will have everyone asking where you bought it, and I just love that we get to answer, I made it! The Strawberry Sundae Beanie is built like a little dessert in layers: a ribbed cream brim, fluffy white bobble stitches for the whipped cream, a pink frosting band, a bright red strawberry section with embroidered seeds, and a smooth cream dome with a drizzle of sauce, all topped with a cherry pom-pom, stem and leaf included.
The construction is clever without being complicated. We work from the brim up in joined rounds, and every colour zone is fully counted, so the sundae builds itself as you go. The bobble section is worked with the hat inside out so those gorgeous puffs land on the outside, and the surface slip stitch and embroidery details all happen at the end, when the hat itself is done.
It is written for an adult head of 21 to 23 inches, takes about 8 to 12 hours, and sits at a friendly intermediate level. If you can work in rounds, change colours, and make a bobble stitch, you have everything you need. Let us scoop one up.
Materials
- 150 yards worsted weight yarn in cream/off-white (Colour A)
- 80 yards worsted weight yarn in red (Colour B)
- 70 yards worsted weight yarn in white (Colour C)
- 40 yards worsted weight yarn in pink (Colour D)
- 15 yards worsted weight yarn in dark red/burgundy (Colour E)
- 8 yards worsted weight yarn in yellow (Colour F)
- 5 yards worsted weight yarn in brown (Colour G)
- 5 yards worsted weight yarn in green (Colour H)
- 30 yards bulky weight yarn, or doubled worsted, in pink for the pom-pom (Colour I)
- US J-10 (6.0 mm) crochet hook for the main hat
- US G-6 (4.0 mm) crochet hook for the stem and leaf
- Yarn needle
- Scissors
- At least 4 stitch markers
- Pom-pom maker or two cardboard rings, approximately 3 to 3.5 inches (7.5 to 9 cm) in diameter
- Ruler or measuring tape
Abbreviations
- ch: chain
- sl st: slip stitch
- sc: single crochet
- hdc: half double crochet
- dc: double crochet
- sc2tog: single crochet two together
- blo: back loop only
- flo: front loop only
- bo-st: bobble stitch (see Special Stitches)
- MR: magic ring
- st/sts: stitch / stitches
- RS: right side
- WS: wrong side
Special Stitches
- Bobble stitch (bo-st): in one stitch, work 5 incomplete double crochets. Yarn over, insert hook, pull up a loop, yarn over and pull through 2 loops, leaving 2 loops on your hook. Repeat 4 more times in the same stitch until you have 6 loops on your hook, then yarn over and pull through all 6 loops at once. The bobble naturally pushes to the wrong side of the work, which is why we flip the hat inside out for the bobble section.
- Standing single crochet: make a slip knot with the new yarn, insert your hook into the designated stitch, yarn over, pull up a loop, yarn over, and pull through both loops. It gives you a clean colour change without a joining chain.
- Surface slip stitch: hold the yarn behind the fabric. Insert your hook from front to back, draw up a loop, insert the hook at the next point along your line, draw up another loop, and pull it through the first. Continue to draw a chain line across the fabric surface.
- Drip loop detail: while working a surface slip stitch drip line, chain 5 to 7 and slip stitch back into the same point to make the rounded bottom of a drip.
Gauge & Size
- Gauge with J-10 (6.0 mm) hook and worsted weight yarn: 14 sc and 16 rows = 4 inches (10 cm) worked in rounds
- Bobble stitch gauge: 12 bobble stitches and 8 rounds = 4 inches (10 cm)
- Finished size: adult head circumference 21 to 23 inches (53 to 58 cm)
- Finished height: approximately 9.5 inches (24 cm) from brim to crown, not including the pom-pom cherry; the brim adds about 2 inches (5 cm) of ribbed texture at the base
- Construction: ribbed brim worked flat and seamed into a tube, then the body worked bottom-up in joined rounds
- Skill level: Intermediate
Brim
The brim is worked in Colour A (cream) as a flat ribbed rectangle, then seamed into a tube.
Foundation chain: Ch 9.
Row 1: Sc in 2nd ch from hook and in each ch across. Turn. (8 sc)
Row 2: Ch 1, sc in blo of each st across. Turn. (8 sc)
Repeat Row 2 until your piece measures 22 inches (56 cm) from the start. The ribbing compresses naturally, so your unstretched measurement should be approximately 21 to 22 inches (53 to 56 cm).
Fold the strip so the short ends meet. Sl st through both loops to seam the short ends together, creating a tube. Do not cut the yarn.
Rotate the brim so the top long edge faces up.
Pickup round: Work 80 sc evenly around the top edge of the brim. Sl st to the first sc to join. (80 sc)
Place a stitch marker in the first stitch and move it up each round. Checkpoint: your brim tube should measure approximately 2 inches (5 cm) tall, with 80 stitches in your working round.
Lower Hat Body
Keep working in Colour A for a smooth transition to the bobble section.
Round 1: Ch 1, sc in each st around. Sl st to first sc. (80 sc)
Round 2: Ch 1, sc in each st around. Sl st to first sc. (80 sc)
Whipped Cream Bobble Section
Flip your hat inside out before starting this section. The bobbles push away from you as you work, so with the wrong side facing out, they end up on the outside of the finished hat. Join Colour C (white) with a standing sc.
Round 3: Ch 1, (bo-st in first st, sc in next st) around. Sl st to first st. (40 bo-st, 40 sc, 80 sts)
Round 4: Ch 1, sc in each st around. Sl st to first sc. (80 sc)
Round 5: Ch 1, (sc in first st, bo-st in next st) around. Sl st to join. (40 sc, 40 bo-st, 80 sts)
Round 6: Ch 1, sc in each st around. Sl st to first sc. (80 sc)
Round 7: Repeat Round 3. (80 sts)
Round 8: Repeat Round 4. (80 sc)
Round 9: Repeat Round 5. (80 sts)
Round 10: Repeat Round 4. (80 sc)
Turn your hat right side out. Checkpoint: the hat body from the pickup round should measure approximately 3.5 to 4 inches (9 to 10 cm) tall, with 80 stitches.
Pink Frosting Band
Join Colour D (pink) with a standing sc. The drip details are added later during finishing.
Round 11: Ch 1, sc in each st around. Sl st to first sc. (80 sc)
Round 12: Ch 1, sc in each st around. Sl st to first sc. (80 sc)
Strawberry Section
Join Colour B (red) with a standing sc. The yellow seed embroidery is added during finishing.
Round 13: Ch 1, sc in each st around. Sl st to first sc. (80 sc)
Round 14: Ch 1, sc in each st around. Sl st to first sc. (80 sc)
Round 15: Ch 1, sc in each st around. Sl st to first sc. (80 sc)
Round 16: Ch 1, sc in each st around. Sl st to first sc. (80 sc)
Round 17: Ch 1, sc in each st around. Sl st to first sc. (80 sc)
Round 18: Ch 1, sc in each st around. Sl st to first sc. (80 sc)
Checkpoint: the red section should measure approximately 1.5 to 1.75 inches (3.8 to 4.5 cm) tall, and the total hat height should be approximately 5.5 to 6 inches (14 to 15 cm) from the brim pickup edge.
Cream Dome and Crown
Join Colour A (cream) with a standing sc.
Round 19: Ch 1, sc in each st around. Sl st to first sc. (80 sc)
Round 20: Ch 1, sc in each st around. Sl st to first sc. (80 sc)
Round 21: Ch 1, sc in each st around. Sl st to first sc. (80 sc)
Round 22: Ch 1, sc in each st around. Sl st to first sc. (80 sc)
Round 23: Ch 1, (sc in next 8 sts, sc2tog) 8 times. Sl st to first sc. (72 sc)
Round 24: Ch 1, (sc in next 7 sts, sc2tog) 8 times. Sl st to first sc. (64 sc)
Round 25: Ch 1, (sc in next 6 sts, sc2tog) 8 times. Sl st to first sc. (56 sc)
Round 26: Ch 1, (sc in next 5 sts, sc2tog) 8 times. Sl st to first sc. (48 sc)
Round 27: Ch 1, (sc in next 4 sts, sc2tog) 8 times. Sl st to first sc. (40 sc)
Round 28: Ch 1, (sc in next 3 sts, sc2tog) 8 times. Sl st to first sc. (32 sc)
Round 29: Ch 1, (sc in next 2 sts, sc2tog) 8 times. Sl st to first sc. (24 sc)
Round 30: Ch 1, (sc in next st, sc2tog) 8 times. Sl st to first sc. (16 sc)
Round 31: Ch 1, (sc2tog) 8 times. Sl st to first sc. (8 sc)
Cut the yarn, leaving a 10 inch tail. Thread it onto your yarn needle, weave through the remaining 8 stitches, pull tight to close the crown, knot securely, and weave in the end.
Checkpoint: total hat height from the brim pickup edge should be approximately 9 to 9.5 inches (23 to 24 cm).
Finishing & Assembly
Sauce drizzle loops (Colour E, dark red/burgundy): with the right side facing, work surface slip stitches across the cream dome in a radiating pattern, from the crown center outward in curved lines, approximately 8 to 10 lines reaching toward the strawberry band. At the end of each line, chain 4 to 6 and slip stitch back into the same point to make a small loop. This part is worked freehand, so let the lines wander a little.
Pink frosting drips (Colour D): using surface slip stitch, work 7 to 9 drip shapes evenly spaced around the hat where the pink section meets the white bobble section. For each drip, insert your hook at the bottom edge of the pink section, work a surface slip stitch line downward for 3 to 5 stitches into the white section, chain 5 at the base and slip stitch back into the same point for the rounded drip bottom, then work back up with surface slip stitch. Space the drips approximately every 9 to 11 stitches around.
Yellow seed embroidery (Colour F): thread Colour F onto your yarn needle and scatter small horizontal straight stitches, approximately 3 to 4 mm long, randomly across the red strawberry section (Rounds 13 to 18). Aim for 35 to 50 seeds at slight angles for a natural look.
Cherry pom-pom topper: make a pom-pom with Colour I, approximately 2.5 to 3 inches (6.5 to 7.5 cm) in diameter, and leave long tails for attaching.
Stem (Colour G, brown, G-6 hook): make a magic ring, sl st to close, ch 8. Sl st down each chain back to the ring. Fasten off with a long tail.
Leaf (Colour H, green, G-6 hook): ch 6. Sl st into 2nd ch from hook, sc in next ch, hdc in next ch, sc in next ch, sl st into last ch. Fasten off with a long tail.
Attach the stem to the top of the pom-pom by threading its tail through the center and knotting securely. Attach the leaf at the base of the stem. Then attach the finished cherry to the crown by threading the pom-pom tails through the crown closing point, knotting inside the hat, and weaving in the ends.
Weave in all remaining tails throughout the hat.
Tips
Do not skip the swatch. Even one stitch per 4 inches off will change your final hat size, and a sundae hat deserves to fit.
Remember to flip the hat inside out before the bobble section and back again after Round 10. That one flip is the whole secret to bobbles that puff outward.
Work the embroidered seeds at slight angles and vary the spacing a touch. Perfectly even seeds look printed; slightly irregular ones look like a real strawberry.
Hand wash in cool water with mild detergent, squeeze gently without wringing, and lay flat to dry. Store the hat without crushing the pom-pom.
Strawberry Sundae Beanie Free Crochet Pattern
Materials
Steps
- Work the ribbed brim flat (8 sc rows repeated to 22 inches), seam it into a tube and pick up 80 sc
- Work 2 plain cream rounds, then the inside-out bobble section in white, Rounds 3 to 10 at 80 sts
- Work the pink frosting band, Rounds 11 to 12, then the red strawberry section, Rounds 13 to 18
- Work the cream dome, Rounds 19 to 22, then shape the crown in Rounds 23 to 31 down to 8 sts and close
- Add the burgundy surface slip stitch sauce drizzle on the dome
- Add the pink frosting drips where the pink band meets the bobble section
- Embroider 35 to 50 yellow seed stitches across the red section
- Make the cherry pom-pom with stem and leaf and sew it to the crown
- Swatch first: 14 sc and 16 rows = 4 inches with the 6.0 mm hook
- Flip the hat inside out for the bobble rounds so the bobbles puff outward
- Move your round marker up every round to keep the 80-st count honest
- Angle the seed stitches slightly and vary spacing for a natural strawberry look