Blueberry Dream Cropped Cardigan Free Crochet Pattern
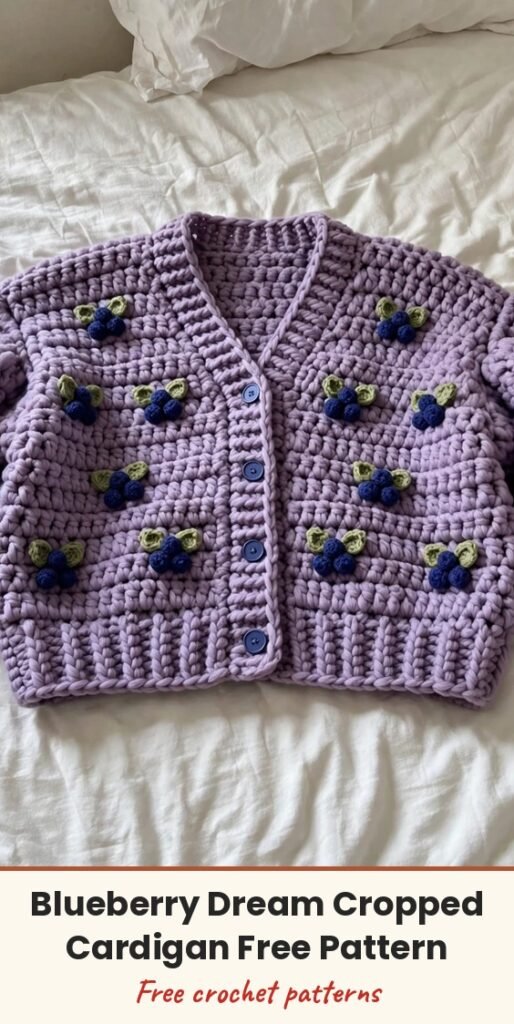
Table of Contents
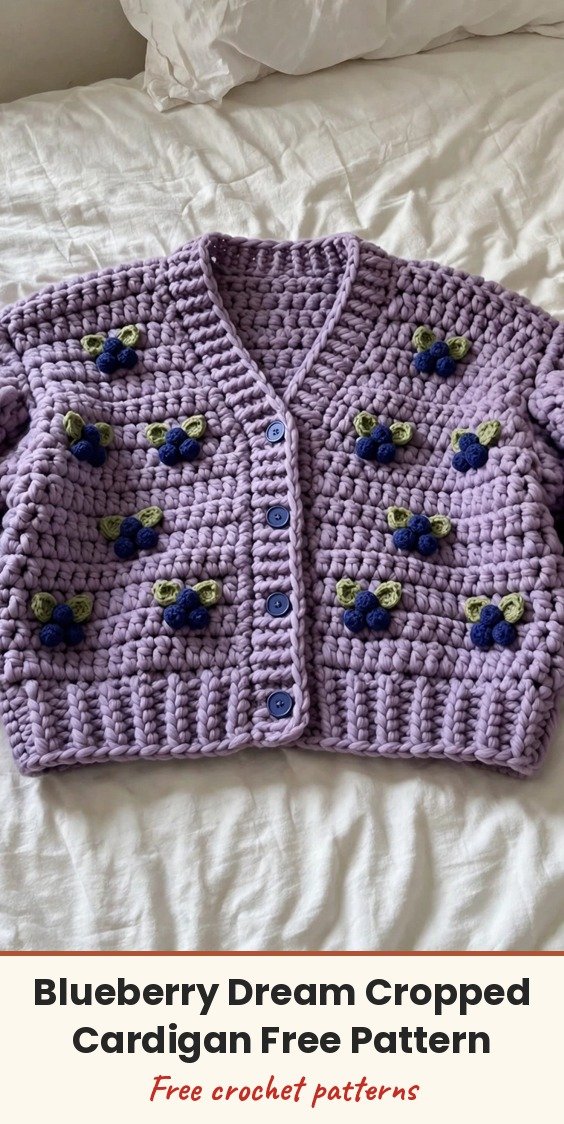
I have been absolutely obsessed with fruit-themed fashion lately, and blueberries deserve their moment! This cropped cardigan combines everything I want in a statement piece: soft lavender chunky yarn, balloon sleeves that billow beautifully, and the cutest little three-dimensional blueberry clusters scattered across the whole thing. It is whimsical without being over the top, and I just love it.
We will work flat pieces for the back, two fronts, and two sleeves, then seam everything together, so there are no complicated top-down yoke calculations to worry about. The blueberries are made separately and sewn on at the end, which means no stressful colorwork while we build the main pieces.
If you can work half double crochet in rows and follow some basic shaping, you have got this. The pattern is written for sizes XS to 2XL, all with 4 to 6 inches of positive ease for a relaxed, boxy fit. Let me walk you through it.
Materials
- Chunky weight (number 5 bulky) yarn in lavender (main color): XS 900 yards (823 meters), S 1000 yards (915 meters), M 1100 yards (1006 meters), L 1200 yards (1097 meters), XL 1300 yards (1189 meters), 2XL 1400 yards (1280 meters)
- Approximately 80 yards (73 meters) worsted weight (number 4) yarn in navy blue, for the blueberry bobbles
- Approximately 20 yards (18 meters) worsted weight (number 4) yarn in green, for the leaves
- US K (6.5 mm) crochet hook (Hook A), for the main cardigan fabric
- US G (4.0 mm) crochet hook (Hook B), for the blueberry berries
- US E (3.5 mm) crochet hook (Hook C), for the leaves
- At least 10 stitch markers
- Yarn needle, for seaming and weaving ends
- Scissors
- 4 buttons, 1 inch (25 mm) diameter, in dusty purple or lavender-gray
- Small amount of polyester fiberfill, for stuffing the berries
- White embroidery floss and embroidery needle, for the star detail on each berry
- Sewing needle and thread matching the buttons
Abbreviations
- ch: chain
- sl st: slip stitch
- hdc: half double crochet
- hdc2tog: half double crochet two together, a decrease
- inc: increase, work 2 hdc in the same stitch
- dec: decrease (hdc2tog)
- BLO: back loop only
- st/sts: stitch / stitches
- RS: right side
- WS: wrong side
- t-ch: turning chain
- MC: main color (lavender)
- CC1: contrast color 1 (navy blue)
- CC2: contrast color 2 (green)
- MR: magic ring
Gauge & Size
- Gauge: with Hook A and MC in half double crochet, 13 hdc x 9 rows = 4 inches x 4 inches (10 cm x 10 cm) after blocking. Make a swatch at least 20 stitches wide and 14 rows tall and block it before measuring
- Finished measurements: bust XS 34 in (86 cm), S 37 in (94 cm), M 40 in (102 cm), L 43 in (109 cm), XL 46 in (117 cm), 2XL 49 in (124 cm); length XS 15 in (38 cm), S 15.5 in (39 cm), M 16 in (41 cm), L 16.5 in (42 cm), XL 17 in (43 cm), 2XL 17.5 in (44 cm). Sleeve length from cuff to underarm is 18 inches for all sizes
- Construction: flat pieces (back, 2 fronts, 2 sleeves) seamed with slip stitch; sizes are listed in order XS (S, M, L, XL, 2XL) and when only one number is given it applies to all sizes. All turning chains in hdc sections count as a stitch: begin each hdc row by chaining 2 and turning, and work the last hdc of each row into the top of the turning ch-2 from the previous row
- Skill level: Intermediate
Back Panel Pattern
Foundation ribbing: Chain 12 for the ribbing strip (all sizes).
Ribbing Row 1 (RS): Hdc in 3rd ch from hook and in each ch across. Turn. (10 hdc)
Ribbing Row 2: Ch 2, hdc in BLO across. Turn. (10 hdc)
Repeat Ribbing Row 2 until the ribbing strip measures: XS 17 in (43 cm), S 18.5 in (47 cm), M 20 in (51 cm), L 21.5 in (55 cm), XL 23 in (58 cm), 2XL 24.5 in (62 cm).
Do not fasten off. Rotate the ribbing strip 90 degrees to work across the long edge.
Row 1 (RS pickup row): Ch 2, work hdc evenly along the long edge of the ribbing strip. (XS 56 hdc, S 61 hdc, M 65 hdc, L 70 hdc, XL 74 hdc, 2XL 79 hdc)
Row 2 (WS): Ch 2, turn, hdc in next st and in each st across, hdc in top of t-ch. (56, 61, 65, 70, 74, 79 sts)
Repeat Row 2, working straight with no shaping, until the back body measures from the top edge of the ribbing strip: XS 9.5 in (24 cm), S 9.5 in (24 cm), M 10 in (25 cm), L 10 in (25 cm), XL 10.5 in (27 cm), 2XL 10.5 in (27 cm).
Armhole Setup Row 1 (RS): Sl st across first 4 (4, 4, 5, 5, 5) sts, ch 2, hdc in each st across to last 4 (4, 4, 5, 5, 5) sts, leave remaining sts unworked. Turn. (48, 53, 57, 60, 64, 69 sts)
Armhole Decrease Row 1 (WS): Ch 2, dec over next 2 sts, hdc across to last 3 sts (before t-ch), dec, hdc in t-ch. Turn. (46, 51, 55, 58, 62, 67 sts)
Armhole Decrease Row 2 (RS): Ch 2, dec over next 2 sts, hdc across to last 3 sts, dec, hdc in t-ch. Turn. (44, 49, 53, 56, 60, 65 sts)
Armhole Decrease Row 3 (WS): Ch 2, dec over next 2 sts, hdc across to last 3 sts, dec, hdc in t-ch. Turn. (42, 47, 51, 54, 58, 63 sts)
Armhole Decrease Row 4 (RS, sizes L, XL, 2XL only): Ch 2, dec over next 2 sts, hdc across to last 3 sts, dec, hdc in t-ch. Turn. (52, 56, 61 sts)
After armhole shaping, stitch counts are: XS 42 sts, S 47 sts, M 51 sts, L 52 sts, XL 56 sts, 2XL 61 sts. Work straight in hdc until the armhole depth measures: XS 5.5 in (14 cm), S 6 in (15 cm), M 6 in (15 cm), L 6.5 in (17 cm), XL 6.5 in (17 cm), 2XL 7 in (18 cm). Fasten off. Mark the center of the top edge for reference.
Right Front Panel Pattern
Foundation ribbing: Chain 12. Work ribbing rows (hdc BLO) exactly as for the back, until the strip measures: XS 8.5 in (22 cm), S 9.5 in (24 cm), M 10 in (25 cm), L 10.5 in (27 cm), XL 11.5 in (29 cm), 2XL 12 in (30 cm).
Row 1 (RS pickup): Rotate 90 degrees and pick up along the long edge. Ch 2, hdc evenly across. (XS 28 hdc, S 31 hdc, M 33 hdc, L 36 hdc, XL 38 hdc, 2XL 40 hdc)
Row 2 (WS): Ch 2, turn, hdc across. (same count)
Work straight until the body measures the same as the back body before armhole shaping. Both the V-neck and armhole shapings now begin at the same time. The V-neck decreases one stitch at the neck edge every RS row.
Right Front Armhole and Neck Setup Row (RS): Sl st across first 4 (4, 4, 5, 5, 5) sts (armhole inset), ch 2, hdc across to last 2 sts before t-ch, dec (neck dec), hdc in t-ch. Turn. (23, 26, 28, 30, 32, 34 sts)
Right Front Armhole Dec Row 1 (WS): Ch 2, hdc across to last 3 sts, dec, hdc in t-ch. Turn. (22, 25, 27, 29, 31, 33 sts)
Right Front Armhole and Neck Dec Row 2 (RS): Ch 2, dec, hdc across to last 3 sts, dec, hdc in t-ch. Turn. (20, 23, 25, 27, 29, 31 sts)
Right Front Armhole Dec Row 3 (WS): Ch 2, hdc across to last 3 sts, dec, hdc in t-ch. Turn. (19, 22, 24, 26, 28, 30 sts)
Right Front Neck Only Dec Row 4 (RS), for XS, S, M: Ch 2, hdc across to last 3 sts, dec, hdc in t-ch. Turn. (18, 21, 23 sts)
Right Front Neck Only Dec Row 4 (RS), for L, XL, 2XL: Ch 2, dec, hdc across to last 3 sts, dec, hdc in t-ch. Turn. (24, 26, 28 sts)
Continue working neck decreases every RS row until only shoulder stitches remain: XS 13 sts, S 14 sts, M 15 sts, L 16 sts, XL 17 sts, 2XL 18 sts. Work straight until the armhole depth matches the back. Fasten off.
Left Front Panel Pattern
Work identically to the right front panel, but mirror the shaping: the armhole inset is at the end of the RS row and the neck decrease is at the beginning of the RS row.
Left Front Armhole and Neck Setup Row (RS): Ch 2, dec (neck dec), hdc across to last 4 (4, 4, 5, 5, 5) sts, leave remaining sts unworked (armhole inset). Turn. (23, 26, 28, 30, 32, 34 sts)
Continue mirroring all shaping with decreases swapped to opposite edges. Fasten off when measurements match the right front.
Sleeve Pattern
Make 2 sleeves. Cuff ribbing: Chain 12.
Ribbing Row 1 (RS): Hdc in 3rd ch from hook and in each ch across. Turn. (10 hdc)
Ribbing Row 2: Ch 2, hdc in BLO across. Turn. (10 hdc)
Repeat Ribbing Row 2 until the cuff strip measures 9 in (23 cm), all sizes. Rotate and pick up along the long edge.
Row 1 (RS pickup): Ch 2, hdc evenly across the long edge of the cuff. (29 hdc, all sizes)
Row 2 (WS): Ch 2, hdc across. (29 sts)
Row 3 (RS): Ch 2, inc, hdc to last 2 sts, inc, hdc in t-ch. (31 sts)
Row 4 (WS): Ch 2, hdc across. (31 sts)
Continue this pattern, increasing 1 st at each end on every RS row: Row 5: 33 sts; Row 7: 35 sts; Row 9: 37 sts; Row 11: 39 sts; Row 13: 41 sts; Row 15: 43 sts; Row 17: 45 sts; Row 19: 47 sts; Row 21: 49 sts; Row 23: 51 sts; Row 25: 53 sts; Row 27: 55 sts; Row 29: 57 sts; Row 30: 57 sts.
Work straight, with no more increases, for 4 more rows, ending at Row 34 with 57 sts.
Sleeve Cap Row 1 (RS): Sl st across first 4 (4, 4, 5, 5, 5) sts, ch 2, hdc across to last 4 (4, 4, 5, 5, 5) sts, leave remaining sts unworked. Turn. (49, 49, 49, 47, 47, 47 sts)
Sleeve Cap Row 2 (WS): Ch 2, dec, hdc to last 3 sts, dec, hdc in t-ch. Turn. (47 sts)
Continue decreasing 2 stitches every row until you reach 15 sts (XS, S, M) or 13 sts (L, XL, 2XL). Fasten off, leaving an 18 inch tail for seaming.
Blueberry Cluster Pattern
Each cluster features 2 to 3 small stuffed berries with leaves, and the clusters are made separately and sewn on after all finishing is complete. Using Hook B and CC1 (navy), work each berry as a small amigurumi ball: start with a magic ring, work single crochet increases to form a sphere, stuff lightly with fiberfill, then decrease to close.
Using Hook C and CC2 (green), chain 6 and work single crochet back along the chain to create each leaf. Attach 2 leaves to each cluster.
Using white embroidery floss, stitch a small 5-pointed star on top of each berry. Arrange the clusters across the body and sleeves, spacing them evenly, and sew securely in place.
Finishing & Assembly
Shoulder seams: Hold the back and right front right sides together and align the shoulder edges. Using a slip stitch seam and MC, seam the right shoulder. Repeat for the left front and left shoulder.
Sleeve insertion: Pin the center of the sleeve cap to the shoulder seam. Pin the underarm corners of the sleeve cap to the corners of the armhole inset, and ease the sleeve cap into the armhole opening evenly. Slip stitch seam around the full armhole. Repeat for the second sleeve.
Side and underarm seams: Fold the cardigan right sides together. Slip stitch seam from the hem ribbing up to the armhole corner, then continue down the sleeve underarm to the cuff ribbing. Repeat for the other side.
Button band and neckline trim: With RS facing and MC, attach yarn at the lower right corner of the right front just above the hem ribbing. Work hdc in BLO up the right front edge, across the back neck, and down the left front edge to create a continuous ribbed band. Space four buttonholes evenly on the right front band, working buttonholes by chaining 2 and skipping 2 stitches where each button will go. Sew the buttons to the left front band opposite the buttonholes.
Sew the blueberry clusters in place as described above. Weave in all ends. Block the finished cardigan by soaking it in cool water, gently squeezing out excess moisture in a towel, and laying flat to dry. This evens out your stitches and helps the garment relax into its final shape.
Tips
Check your gauge. This is a fitted garment, and being off by even half a stitch per inch changes the finished bust measurement by 2 to 3 inches. Ten minutes making a swatch saves hours of heartbreak later.
Use stitch markers generously: mark the first stitch of every row, mark where your decreases go, and mark the center of your back panel.
Try it on as you go. After assembling the body, before the sleeves, slip it on and check the fit; it is much easier to adjust now than after the sleeves are attached.
Customize your blueberry placement: the reference shows clusters scattered evenly, but you can concentrate them more at the bottom, create a diagonal line, or place them however makes you happy. Avoid fluffy or hairy yarns like mohair blends for the main body, since the blueberry texture will disappear against a fuzzy background.
Blueberry Dream Cropped Cardigan Free Crochet Pattern
Materials
Steps
- Work the back panel from ribbing up, with armhole shaping
- Work the two front panels with mirrored V-neck and armhole shaping
- Work the two balloon sleeves from cuff ribbing to shaped caps
- Seam the shoulders, set in the sleeves, and close the side and underarm seams
- Work the button band with 4 buttonholes and sew on the buttons
- Make the blueberry clusters and sew them across the body and sleeves
- Block the finished cardigan flat
- Swatch and block before measuring: 13 hdc x 9 rows = 4 inches
- Mark the first stitch of every row and the center of the back panel
- Try the body on before setting in the sleeves
- Place blueberry clusters evenly, or group them diagonally for a different look