Forest Green Elegant Peplum Crochet Top Free Pattern
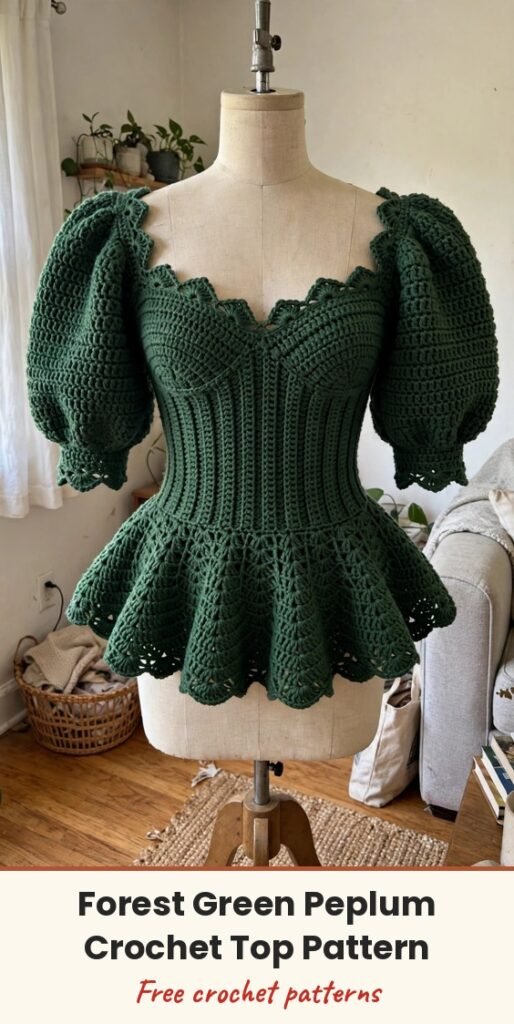
Table of Contents
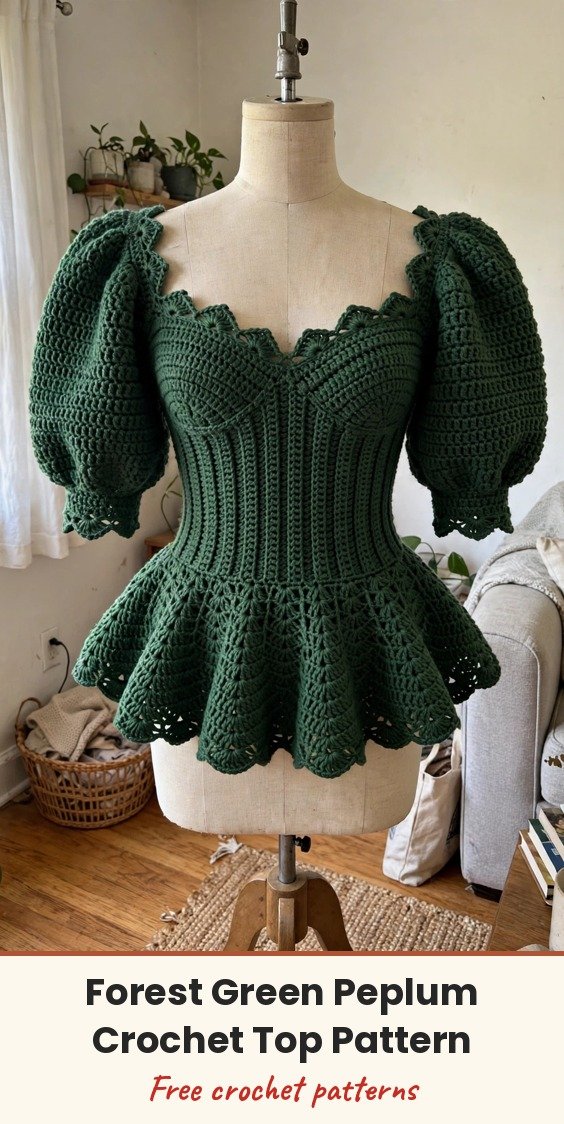
You know that gorgeous skein you have been saving, the one that is too pretty to waste on just anything? This elegant forest green peplum top is the project it has been waiting for! The construction is genuinely fascinating: we work the fitted bodice first, add those dramatic balloon sleeves separately, and finish with a flared peplum skirt that swings beautifully when you move.
The top has a sweetheart neckline with a delicate scalloped edge, balloon sleeves with ruffled cuffs, a fitted bodice, and a show-stopping peplum with an eyelet border. The bodice uses single crochet and half double crochet worked in rows for that ribbed texture running across the fitted section, the peplum gets its flare from strategic increases worked into a shell stitch pattern, and the sleeves are worked in the round with increases at the elbow and gathered elastic at both ends.
I will not pretend otherwise: this is an intermediate to advanced project. But if you have made garments before and you are comfortable with shaping, you can absolutely do this, and I will break it down into manageable pieces that we assemble at the end.
Materials
- DK weight (Category 3) or Light Worsted yarn, cotton blend or bamboo blend recommended for drape, in forest green or your choice: approximately 800 to 1000 yards (730 to 915 meters)
- 4.0mm (US G/6) crochet hook, or size needed for gauge
- Yarn needle, for weaving ends and seaming
- Stitch markers, at least 6
- Measuring tape
- Scissors
- 1/4 inch elastic for sleeve cuffs, approximately 20 inches total
Abbreviations
- ch: chain
- sl st: slip stitch
- sc: single crochet
- hdc: half double crochet
- dc: double crochet
- sc2tog: single crochet 2 together (decrease)
- 2 sc in st: increase, work 2 single crochet stitches into the same stitch
- shell: (2 dc, ch 1, 2 dc) all worked into the same stitch or space
- BLO: back loop only
Gauge & Size
- Gauge: 18 stitches and 20 rows = 4 inches (10 cm) in single crochet. Please check your gauge with a 5-inch swatch, washed and blocked the way you will care for the finished top, because garments absolutely need accurate gauge to fit
- Finished size: Small, fitted bodice. Bust 32 to 34 inches (81 to 86 cm), bodice length 10 inches (25 cm), peplum length 6 inches (15 cm), sleeve length 12 inches (30 cm). For larger sizes, add multiples of your stitch repeat to the foundation chain and adjust sleeve circumference accordingly
- Construction: bodice worked flat in back-loop rows and seamed up the back, sleeves worked separately in the round, peplum worked directly onto the bottom of the bodice, neckline edge and bow added last
- Skill level: Intermediate to Advanced. Turning chains count as stitches unless otherwise noted
Bodice Back Pattern
Foundation: Ch 73.
Row 1: Sc in 2nd ch from hook and in each ch across. Turn. (72 sc)
Row 2: Ch 1, working in back loops only (BLO), sc in each st across. Turn. (72 sc)
Working in the back loop only creates those beautiful horizontal ridges you see in the finished piece. This is what gives the bodice that ribbed, almost smocked appearance.
Rows 3 to 40: Repeat Row 2. (72 sc)
Your back panel should measure approximately 8 inches wide and 10 inches tall at this point.
Row 41: Ch 1, sl st in first 6 sts, ch 1, sc in BLO across next 60 sts, leave remaining 6 sts unworked. Turn. (60 sc)
Row 42: Ch 1, sc2tog, sc in BLO across to last 2 sts, sc2tog. Turn. (58 sc)
Rows 43 to 46: Repeat Row 42. (50 sc after Row 46)
Rows 47 to 50: Ch 1, sc in BLO across. Turn. (50 sc)
Fasten off and weave in ends.
Bodice Front Pattern
Work the same as the Back Panel through Row 40, then shape the armhole and sweetheart neckline.
Row 41: Ch 1, sl st in first 6 sts, ch 1, sc in BLO in next 28 sts. Turn, leaving remaining sts unworked. You are now working the left front. (28 sc)
Row 42: Ch 1, sc2tog, sc in BLO across to last 2 sts, sc2tog. Turn. (26 sc)
Row 43: Ch 1, sc in BLO across to last 2 sts, sc2tog. Turn. (25 sc)
Rows 44 to 50: Continue decreasing 1 st at neck edge every row while keeping armhole edge straight. (18 sc after Row 50)
Fasten off. For the Right Front, skip the centre 8 stitches on Row 41 for the centre front opening. Join yarn and work the right side as a mirror image of the left, reversing all shaping.
Scalloped Neckline Edge: Join yarn at right back shoulder.
Round 1: Ch 1, sc evenly around entire neckline opening, working approximately 3 sc for every 2 row ends. Join with sl st.
Round 2: Ch 1, [sc in next st, skip 1 st, 5 dc in next st (scallop made), skip 1 st]. Repeat around, adjusting as needed for smooth scallops. Join with sl st.
Fasten off.
Bow Tie Detail: Ch 80. Sc in 2nd ch from hook and in each ch across. (79 sc) Fasten off, leaving a long tail. Thread through the centre front neckline and tie in a bow. This sweet detail really finishes the look.
Balloon Sleeves Pattern
Make 2. The sleeves are the showstopper of this top. They puff dramatically at the upper arm and gather at both ends with elastic.
Cuff start: Ch 60. Join with sl st to form a ring, being careful not to twist.
Round 1: Ch 1, sc in each ch around. Join. (60 sc)
Rounds 2 to 4: Ch 1, sc in each st around. Join. (60 sc)
Round 5 (Increase Round): Ch 1, [sc in next 2 sts, 2 sc in next st]. Repeat around. Join. (80 sc)
Rounds 6 to 10: Ch 3 (counts as dc), dc in each st around. Join. (80 dc)
Round 11 (Increase Round): Ch 3, [dc in next 3 sts, 2 dc in next st]. Repeat around. Join. (100 dc)
Rounds 12 to 20: Ch 3, dc in each st around. Join. (100 dc)
Round 21 (Increase Round): Ch 3, [dc in next 4 sts, 2 dc in next st]. Repeat around. Join. (120 dc)
Rounds 22 to 28: Ch 3, dc in each st around. Join. (120 dc)
This creates the balloon effect. Your sleeve should be puffing out beautifully now!
Round 29 (Decrease Round): Ch 3, [dc in next 4 sts, dc2tog]. Repeat around. Join. (100 dc)
Round 30: Ch 3, [dc in next 3 sts, dc2tog]. Repeat around. Join. (80 dc)
Rounds 31 to 33: Ch 1, sc in each st around. Join. (80 sc)
Round 34 (Gathering Round): Ch 1, [sc in next st, skip 1 st]. Repeat around. Join. (40 sc)
Fasten off, leaving a long tail for seaming.
Ruffle Edge at Shoulder: Join yarn at gathering round.
Round 1: Ch 1, 2 sc in each st around. Join. (80 sc)
Round 2: Ch 1, [sc, skip 1, 5 dc in next st, skip 1]. Repeat around. Join.
Fasten off.
Peplum Skirt Pattern
The peplum is worked directly onto the bottom edge of the joined bodice. With right side facing, join yarn at centre back seam along the bottom edge of the bodice.
Round 1: Ch 1, sc evenly around entire bottom edge, working approximately 144 sc total (adjust to a multiple of 6). Join. (144 sc)
Round 2: Ch 3 (counts as dc), dc in each st around. Join. (144 dc)
Round 3 (Increase Round): Ch 3, [dc in next 2 sts, 2 dc in next st]. Repeat around. Join. (192 dc)
Rounds 4 to 6: Ch 3, dc in each st around. Join. (192 dc)
Round 7 (Shell Pattern Begins): Ch 3, dc in same st, [skip 2 sts, shell in next st, skip 2 sts, dc in next st]. Repeat around, ending with shell, skip 2, join.
Rounds 8 to 12: Continue shell pattern, working shells into the ch-1 space of previous shells and dc between shells.
Round 13 (Eyelet Border): Ch 4 (counts as dc plus ch 1), [skip 1 st, dc in next st, ch 1]. Repeat around. Join.
Round 14: Ch 1, sc in each dc and ch-1 space around. Join.
Fasten off.
Finishing & Assembly
Seam the bodice: with right sides together, whip stitch or mattress stitch the back seam closed. Attach the sleeves: pin the gathered top edge of each sleeve to the armhole opening, easing fullness evenly, and whip stitch in place. Thread the elastic: using a yarn needle, thread 1/4 inch elastic through the cuff gathering rounds, adjust to fit comfortably around your arm and secure. Weave in all ends, taking your time, because a garment this beautiful deserves tidy finishing. Wet block your finished top, pinning the peplum to encourage the flare and shaping the sleeves, and let it dry completely.
Tips
Choose a yarn with good drape for this top. Stiff acrylic will not give you that beautiful flow in the peplum and sleeves, so look for cotton, bamboo or Tencel blends, or a soft mercerized cotton.
Try the top on as you go, especially before you commit to the peplum rounds. Small fit checks along the way save a lot of unpicking later.
This off-shoulder style is perfect for special occasions and date nights, and it pairs beautifully with high-waisted skirts, fitted pants, or over a simple slip dress as a statement overlay. The forest green is gorgeous, and it would look equally striking in ivory or champagne, deep burgundy, or classic black.
Forest Green Elegant Peplum Crochet Top Free Pattern
Materials
Steps
- Crochet the bodice back panel in back-loop sc to Row 50 with armhole shaping
- Work the front panel with sweetheart neckline shaping on both sides
- Add the scalloped neckline edge and the chain bow tie
- Crochet two balloon sleeves in the round, increasing to 120 sts then gathering to 40 sts
- Add the shoulder ruffle edge to each sleeve
- Seam the bodice and attach the sleeves
- Work the peplum onto the bodice bottom, increasing to 192 dc, then shells and an eyelet border
- Thread elastic through the sleeve cuffs and wet block
- Gauge really matters on garments, so swatch, wash and block before you start
- Use a yarn with real drape or the peplum and sleeves will not flow
- Pin the gathered sleeve tops into the armholes and ease the fullness evenly before stitching


