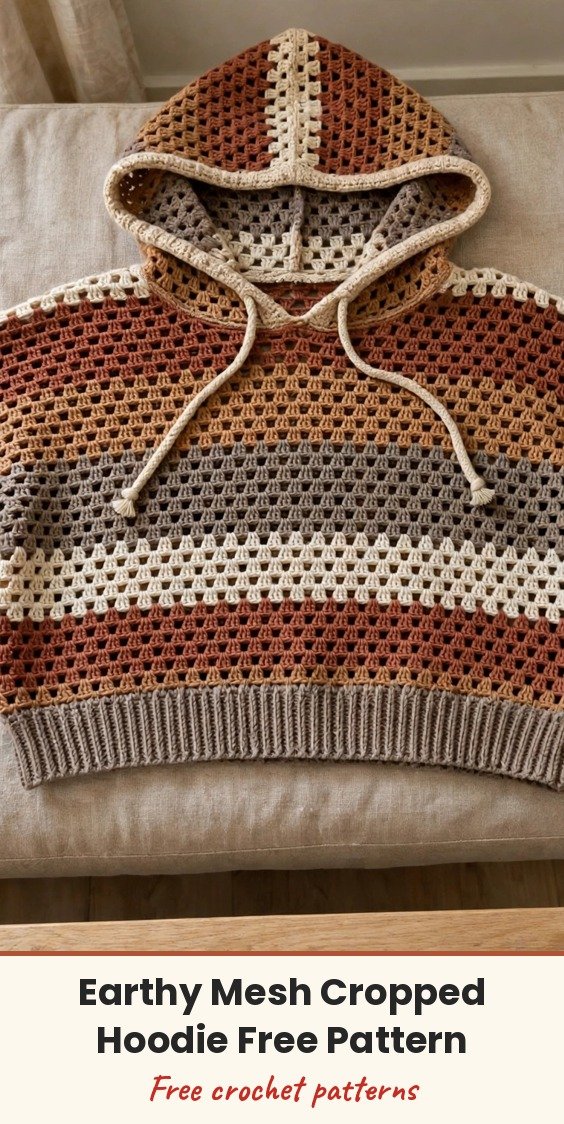
Earthy Neutral Mesh Cropped Hoodie Free Crochet Pattern
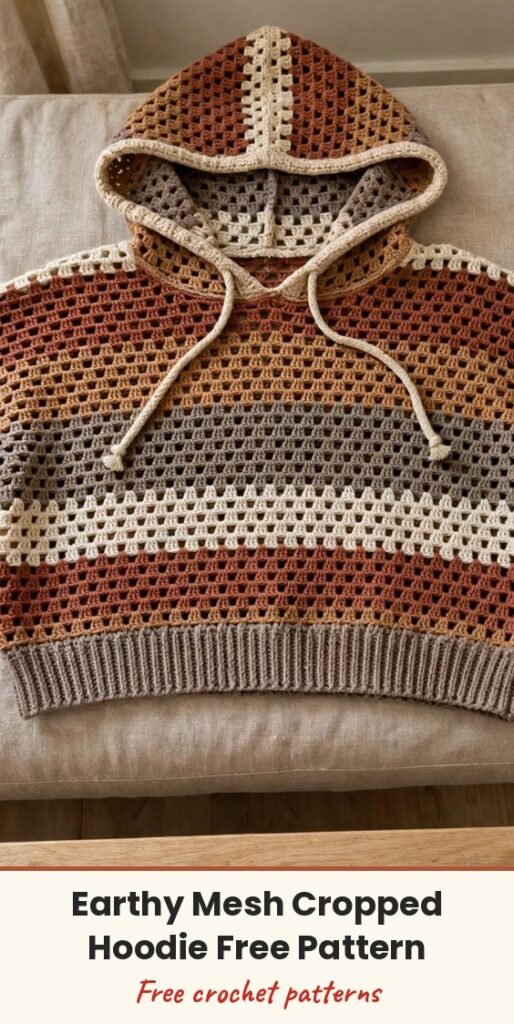
Table of Contents
Last fall I pulled out my favourite hoodie and found it had shrunk in the wash, so I did what we do: I made a better one! This earthy neutral cropped hoodie combines classic granny stitch with modern construction, and the colours shift from burnt terracotta through caramel and taupe into soft cream in the prettiest gradient.
The granny mesh makes an airy, breathable fabric that is just right for layering on transitional weather days. The silhouette is relaxed and slightly oversized, cropped to sit just above the natural waist so it pairs beautifully with high-waisted jeans, and the ribbed cuffs and hem band give it that polished, store-bought finish.
It is written for size Small/Medium (finished bust 40 inches, designed for a 32 to 38 inch bust with positive ease), with notes at the end for other sizes. Plan for approximately 25 to 40 hours at an intermediate level, and I suggest working the body one week, the sleeves the next, then the yoke and hood.
Materials
- Approximately 280 yards worsted weight yarn in burnt terracotta / rust (Color A)
- Approximately 200 yards worsted weight yarn in warm caramel / tan (Color B)
- Approximately 200 yards worsted weight yarn in warm taupe / gray-brown (Color C)
- Approximately 300 yards worsted weight yarn in cream / off-white (Color D)
- Approximately 200 yards worsted weight yarn in medium brown / mushroom (Color E)
- Approximately 100 yards worsted weight yarn in dusty rose-taupe (Color F, used mainly on sleeves and cuffs)
- US J-10 / 6.0mm crochet hook for the main body and hood
- US I-9 / 5.5mm crochet hook for ribbed cuffs and hem band
- At least 8 stitch markers
- Tapestry needle for weaving in ends
- Scissors
- Approximately 60 inches (152 cm) of Color D yarn or coordinating cotton cord for the drawstring
- Blocking mats and pins
Abbreviations
- ch: chain
- ch-sp: chain space
- sc: single crochet
- dc: double crochet
- GC: granny cluster (see Special Stitches)
- sl st: slip stitch
- sk: skip
- pm: place marker
- st/sts: stitch / stitches
- RS: right side
- WS: wrong side
Special Stitches
- Granny Cluster (GC): work 3 dc into the same stitch or space. This is the building block of the whole hoodie.
- Granny Mesh Round: each round begins with ch 3 (counts as first dc of the first GC), then 2 dc into the same space to complete the first GC, then (ch 1, GC into next ch-sp) around, ending with ch 1 and a sl st to the top of the beginning ch-3.
- Granny Mesh Row (for the hood): RS row: ch 4 (counts as dc plus ch 1), turn, GC into first ch-sp, (ch 1, GC into next ch-sp) across to last ch-sp, ch 1, dc into top of turning chain, turn. WS row: ch 3 (counts as first dc), turn, 2 dc into first ch-sp (completes first GC), (ch 1, GC into next ch-sp) across, dc into top of turning chain, turn.
- Single Crochet Ribbing: ch the required stitches, sc in second ch from hook and each ch across, then for every following row ch 1 and sc in the back loop only of each sc across, turning each row.
Gauge & Size
- Finished size: Small/Medium, finished bust 40 inches (for 32 to 38 inch bust with 4 to 6 inches positive ease); hem to underarm 9 inches; hem to shoulder approximately 16 inches; sleeve cuff to underarm 14 inches; hood 11 inches tall by 12 inches wide
- Gauge: granny mesh in the round, 3 granny clusters by 4 rounds = 4 inches; ribbing, 14 sc = 4 inches with the smaller hook
- Construction: ribbed hem band first, body worked in the round from the hem up, sleeves worked separately, then joined and worked flat for the raglan yoke, hood worked flat from the neckline
- Skill level: Intermediate
Ribbed Hem Band
The hem band is a long rectangle of single crochet ribbing, seamed into a tube. Using the smaller hook and Color A, ch 9.
Row 1: Sc in second ch from hook and in each ch across. Turn. (8 sc)
Rows 2 onward: Ch 1, sc in the back loop only of each sc across. Turn. (8 sc per row)
Continue in ribbing until the band measures 40 inches (102 cm) long, approximately 140 rows. Seam the short ends together using mattress stitch or slip stitch to form a tube, and set it aside.
Body Pattern
The body is a seamless tube worked in the round into the top edge of the hem band. Stripe sequence for the body: Rounds 1 to 4 Color A, Rounds 5 to 6 Color B, Rounds 7 to 8 Color C, Rounds 9 to 12 Color D, Rounds 13 to 14 Color C, Rounds 15 to 16 Color B, Rounds 17 to 20 Color A. With the larger hook and Color A, join yarn to the seam point of the hem band.
Setup Round: Work 60 sc evenly around the top edge of the ribbed hem band. Join with sl st. Do not turn. (60 sc)
Check that count before you continue: 60 sc gives exactly 10 GC units per round.
Round 1 (Color A): Ch 3 (counts as first dc of first GC here and throughout the body rounds), 2 dc in same st as join (first GC complete). (Ch 1, sk 2 sc, GC in next sc) 9 times. Ch 1, sk 2 sc, sl st to top of beginning ch-3 to join. (10 GC, 10 ch-1 sps)
Round 2 (Color A): Sl st into next ch-1 sp. Ch 3, 2 dc in same ch-1 sp (first GC). (Ch 1, GC in next ch-1 sp) 9 times. Ch 1, sl st to top of beginning ch-3. (10 GC, 10 ch-1 sps)
Round 3 (Color A): Sl st into next ch-1 sp. Ch 3, 2 dc in same ch-1 sp. (Ch 1, GC in next ch-1 sp) 9 times. Ch 1, sl st to top of beginning ch-3. (10 GC, 10 ch-1 sps)
Round 4 (Color A): Sl st into next ch-1 sp. Ch 3, 2 dc in same ch-1 sp. (Ch 1, GC in next ch-1 sp) 9 times. Ch 1, sl st to top of beginning ch-3. (10 GC, 10 ch-1 sps)
Round 5 (Color B): Join Color B with sl st into any ch-1 sp. Ch 3, 2 dc in same sp. (Ch 1, GC in next ch-1 sp) 9 times. Ch 1, sl st to top of beginning ch-3. (10 GC, 10 ch-1 sps)
Round 6 (Color B): Sl st into next ch-1 sp. Ch 3, 2 dc in same ch-1 sp. (Ch 1, GC in next ch-1 sp) 9 times. Ch 1, sl st to top of beginning ch-3. (10 GC, 10 ch-1 sps)
Round 7 (Color C): Join Color C and work as Round 2. (10 GC, 10 ch-1 sps)
Round 8 (Color C): Sl st into next ch-1 sp. Ch 3, 2 dc in same ch-1 sp. (Ch 1, GC in next ch-1 sp) 9 times. Ch 1, sl st to top of beginning ch-3. (10 GC, 10 ch-1 sps)
Round 9 (Color D): Join Color D and work as Round 2. (10 GC, 10 ch-1 sps)
Round 10 (Color D): Sl st into next ch-1 sp. Ch 3, 2 dc in same ch-1 sp. (Ch 1, GC in next ch-1 sp) 9 times. Ch 1, sl st to top of beginning ch-3. (10 GC, 10 ch-1 sps)
Round 11 (Color D): Sl st into next ch-1 sp. Ch 3, 2 dc in same ch-1 sp. (Ch 1, GC in next ch-1 sp) 9 times. Ch 1, sl st to top of beginning ch-3. (10 GC, 10 ch-1 sps)
Round 12 (Color D): Sl st into next ch-1 sp. Ch 3, 2 dc in same ch-1 sp. (Ch 1, GC in next ch-1 sp) 9 times. Ch 1, sl st to top of beginning ch-3. (10 GC, 10 ch-1 sps)
Round 13 (Color C): Join Color C and work as Round 2. (10 GC, 10 ch-1 sps)
Round 14 (Color C): Sl st into next ch-1 sp. Ch 3, 2 dc in same ch-1 sp. (Ch 1, GC in next ch-1 sp) 9 times. Ch 1, sl st to top of beginning ch-3. (10 GC, 10 ch-1 sps)
Round 15 (Color B): Join Color B and work as Round 2. (10 GC, 10 ch-1 sps)
Round 16 (Color B): Sl st into next ch-1 sp. Ch 3, 2 dc in same ch-1 sp. (Ch 1, GC in next ch-1 sp) 9 times. Ch 1, sl st to top of beginning ch-3. (10 GC, 10 ch-1 sps)
Round 17 (Color A): Join Color A and work as Round 2. (10 GC, 10 ch-1 sps)
Round 18 (Color A): Sl st into next ch-1 sp. Ch 3, 2 dc in same ch-1 sp. (Ch 1, GC in next ch-1 sp) 9 times. Ch 1, sl st to top of beginning ch-3. (10 GC, 10 ch-1 sps)
Round 19 (Color A): Sl st into next ch-1 sp. Ch 3, 2 dc in same ch-1 sp. (Ch 1, GC in next ch-1 sp) 9 times. Ch 1, sl st to top of beginning ch-3. (10 GC, 10 ch-1 sps)
Round 20 (Color A): Sl st into next ch-1 sp. Ch 3, 2 dc in same ch-1 sp. (Ch 1, GC in next ch-1 sp) 9 times. Ch 1, sl st to top of beginning ch-3. (10 GC, 10 ch-1 sps)
After Round 20 the body tube should measure approximately 9 inches tall from the base of the mesh, with a circumference of approximately 40 inches. Do not cut the yarn.
Now divide for the yoke: the front and back each claim 5 GC units. Mark the ch-1 space between GC 5 and GC 6 as the first underarm (left side as worn) and the ch-1 space between GC 10 and GC 1 as the second underarm (right side as worn). Set the body aside and work the sleeves.
Sleeve Pattern
Make 2. Sleeve stripe sequence: Rounds 1 to 4 Color A, Rounds 5 to 6 Color B, Rounds 7 to 8 Color E, Rounds 9 to 10 Color C, Rounds 11 to 14 Color D. First the cuff: using the smaller hook and Color A, ch 9.
Cuff Row 1: Sc in second ch from hook and in each ch across. Turn. (8 sc)
Cuff Rows 2 onward: Ch 1, sc in the back loop only across. Turn. (8 sc per row)
Work the cuff until it measures 8 inches (20.5 cm) long, approximately 28 rows. Seam the short ends together to form a tube and set it aside.
With the larger hook and Color A, join yarn to the seam of the cuff tube.
Sleeve Setup Round: Work 36 sc evenly around the top edge of the cuff. Join with sl st. Do not turn. (36 sc)
Those 36 sc set up exactly 6 GC per round, so verify the count before you go on.
Sleeve Round 1 (Color A): Ch 3, 2 dc in same st. (Ch 1, sk 2 sc, GC in next sc) 5 times. Ch 1, sk 2 sc, sl st to top of beginning ch-3. (6 GC, 6 ch-1 sps)
Sleeve Round 2 (Color A): Sl st into first ch-1 sp. Ch 3, 2 dc in same sp. (Ch 1, GC in next ch-1 sp) 5 times. Ch 1, sl st to top of beginning ch-3. (6 GC, 6 ch-1 sps)
Sleeve Round 3 (Color A): Sl st into first ch-1 sp. Ch 3, 2 dc in same sp. (Ch 1, GC in next ch-1 sp) 5 times. Ch 1, sl st to top of beginning ch-3. (6 GC, 6 ch-1 sps)
Sleeve Round 4 (Color A): Sl st into first ch-1 sp. Ch 3, 2 dc in same sp. (Ch 1, GC in next ch-1 sp) 5 times. Ch 1, sl st to top of beginning ch-3. (6 GC, 6 ch-1 sps)
To increase a sleeve round by 1 GC unit, work 2 GC (with a ch 1 between them) into one ch-1 sp to create an extra unit.
Sleeve Round 5 (Color B, increase): Join Color B. Sl st into first ch-1 sp. Ch 3, 2 dc in same sp, ch 1, GC in same sp (2 GC worked into the first ch-1 sp, adding 1 GC). (Ch 1, GC in next ch-1 sp) 5 times. Ch 1, sl st to top of beginning ch-3. (7 GC, 7 ch-1 sps)
Sleeve Round 6 (Color B): Sl st into first ch-1 sp. Ch 3, 2 dc in same sp. (Ch 1, GC in next ch-1 sp) 6 times. Ch 1, sl st to top of beginning ch-3. (7 GC, 7 ch-1 sps)
Sleeve Round 7 (Color E, increase): Join Color E. Work the increase as in Round 5, placing the increase into the first ch-1 sp. (8 GC, 8 ch-1 sps)
Sleeve Round 8 (Color E): Sl st into first ch-1 sp. Ch 3, 2 dc in same sp. (Ch 1, GC in next ch-1 sp) 7 times. Ch 1, sl st to top of beginning ch-3. (8 GC, 8 ch-1 sps)
Sleeve Round 9 (Color C): Join Color C. Work as Sleeve Round 2 with no increase. (8 GC, 8 ch-1 sps)
Sleeve Round 10 (Color C): Sl st into first ch-1 sp. Ch 3, 2 dc in same sp. (Ch 1, GC in next ch-1 sp) 7 times. Ch 1, sl st to top of beginning ch-3. (8 GC, 8 ch-1 sps)
Sleeve Round 11 (Color D): Join Color D. Work as Sleeve Round 2 with no increase. (8 GC, 8 ch-1 sps)
Sleeve Round 12 (Color D): Sl st into first ch-1 sp. Ch 3, 2 dc in same sp. (Ch 1, GC in next ch-1 sp) 7 times. Ch 1, sl st to top of beginning ch-3. (8 GC, 8 ch-1 sps)
Sleeve Round 13 (Color D): Sl st into first ch-1 sp. Ch 3, 2 dc in same sp. (Ch 1, GC in next ch-1 sp) 7 times. Ch 1, sl st to top of beginning ch-3. (8 GC, 8 ch-1 sps)
Sleeve Round 14 (Color D): Sl st into first ch-1 sp. Ch 3, 2 dc in same sp. (Ch 1, GC in next ch-1 sp) 7 times. Ch 1, sl st to top of beginning ch-3. (8 GC, 8 ch-1 sps)
The sleeve should measure approximately 14 inches from the top of the cuff ribbing, with a top circumference of approximately 13.5 inches. Do not fasten off. Repeat for the second sleeve.
Yoke Pattern
Now we join the sleeves to the body and work the yoke flat in rows. The body has 10 GC and each sleeve has 8 GC, so the join is 5 (front) + 8 (right sleeve) + 5 (back) + 8 (left sleeve) = 26 GC. At the underarm joins we skip 1 ch-1 sp from the body on each side and 1 ch-1 sp from each sleeve on each side, giving an adjusted yoke start of 22 GC worked across after the first decrease row. Yoke colours: Rows 1 and 2 Color A, Rows 3 and 4 Color B, Rows 5 and 6 Color C, Rows 7 through 10 Color D. The 4 raglan decrease points sit between right front and right sleeve, right sleeve and back, back and left sleeve, and left sleeve and right front: mark those 4 ch-1 spaces.
Yoke Row 1 (RS, Color A): With the larger hook, starting at the right front underarm join point, work across the front: GC into each of the 5 front body ch-1 sps with ch 1 between each, ch 1 to bridge at the underarm. Work across the right sleeve: GC into each of the 8 sleeve ch-1 sps with ch 1 between each, ch 1 to bridge. Work across the back: GC into each of the 5 back body ch-1 sps, ch 1 between each, ch 1 to bridge. Work across the left sleeve: GC into each of the 8 sleeve ch-1 sps, ch 1 between each. End with ch 1, dc into top of starting ch to close. Turn. (26 GC, 26 ch-1 sps)
Yoke Row 2 (WS, Color A, no decrease): Ch 4 (counts as dc and ch-1), turn. (GC into next ch-1 sp, ch 1) across, dc into top of turning ch. Turn. (26 GC, 26 ch-1 sps)
Yoke Row 3 (RS, Color B, decrease row): Ch 4, turn. Work across, skipping the ch-1 sp at each of the 4 raglan marker points. (22 GC, 22 ch-1 sps)
Yoke Row 4 (WS, Color B, no decrease): Ch 4, turn. (GC into next ch-1 sp, ch 1) across, dc into top of turning ch. (22 GC, 22 ch-1 sps)
Yoke Row 5 (RS, Color C, decrease row): Work across, skipping the ch-1 sp at each of the 4 raglan points. (18 GC, 18 ch-1 sps)
Yoke Row 6 (WS, Color C, no decrease): Ch 4, turn. (GC into next ch-1 sp, ch 1) across, dc into top of turning ch. (18 GC, 18 ch-1 sps)
Yoke Row 7 (RS, Color D, decrease row): Work across, skipping the ch-1 sp at each of the 4 raglan points. (14 GC, 14 ch-1 sps)
Yoke Row 8 (WS, Color D, no decrease): Ch 4, turn. (GC into next ch-1 sp, ch 1) across, dc into top of turning ch. (14 GC, 14 ch-1 sps)
Yoke Row 9 (RS, Color D, decrease row): Work across, skipping the ch-1 sp at each of the 4 raglan points. (10 GC, 10 ch-1 sps)
Yoke Row 10 (WS, Color D, no decrease): Ch 4, turn. (GC into next ch-1 sp, ch 1) across, dc into top of turning ch. (10 GC, 10 ch-1 sps)
After Yoke Row 10 the neckline opening should span approximately 12 inches across with 10 GC units, and the yoke should measure approximately 7 inches from the underarm join.
Hood Pattern
The hood is worked flat in Color D with the larger hook, starting from the neckline.
Hood Foundation Row: Working across the top neckline edge, sc evenly into every available stitch and ch-sp across, approximately 60 sc. Turn. (60 sc)
Hood Row 1 (RS): Ch 3, 2 dc in same st (first GC). (Ch 1, sk 2 sc, GC in next sc) 9 times. Ch 1, dc in last sc. Turn. (10 GC, 10 ch-1 sps)
Hood Row 2 (WS): Ch 4 (counts as dc and ch-1). (GC in next ch-1 sp, ch 1) 9 times. GC in last ch-1 sp, dc into top of turning ch. Turn. (10 GC, 10 ch-1 sps)
Hood Rows 3 through 16: Alternate the RS and WS granny mesh rows as established, in Color D throughout. (10 GC, 10 ch-1 sps each row)
At Hood Row 16 the hood should be a rectangle approximately 20 inches wide (flat, double thickness) and 11 inches tall.
Hood Seam: Fold the hood in half along the top edge, aligning the last row with itself, and seam across the top using sl st through both layers on the WS. Turn RS out.
Hood Edging: With Color D and the larger hook, work 1 round of sc evenly around the entire front opening edge of the hood, approximately 1 sc per dc and 1 sc per ch-1 sp. Join with sl st. Fasten off.
Drawstring Channel: On the RS, at approximately 1 inch down from the front opening edge, work surface slip stitches across the front edge on each side to create a channel line, or weave the drawstring in and out of the existing ch-1 spaces just inside the hood edge with a tapestry needle. Thread the 60 inch cord or Color D chain through the channel and knot each end.
Finishing & Assembly
Weave in all yarn ends securely on the WS, working ends back and forth through the structure of the granny mesh rather than looping around single chains.
Seam the underarms closed: with WS together, align the body underarm ch-1 sp with the sleeve underarm ch-1 sp and join with sl st through both layers, working 3 to 4 stitches to secure each side.
Wet block the finished hoodie: soak in cool water for 20 minutes, press out excess water in a towel, lay flat and pin to the finished measurements, and allow to dry completely (24 to 48 hours) before unpinning.
Tips
Gauge really matters on a wearable like this, so swatch first. If your clusters come out too big, go down a hook size; too small, go up.
Change colours only at the beginning of a round or row, carry unused yarn loosely up the inside when it will be reused within 2 rounds, and cut and rejoin for longer gaps.
To size up to a 42 to 46 inch bust, lengthen the hem band to 44 inches and work the setup round to 66 sc (11 GC per round), and add 1 GC unit to each sleeve top. To size down for a 30 to 34 inch bust, shorten the band to 36 inches and work 54 sc (9 GC), with sleeve tops reduced to 7 GC.
To lengthen the body, add extra granny mesh rounds before the underarm divide; every 2 rounds adds approximately 1 inch. For acrylic, machine wash cold on gentle and lay flat to dry; for wool, hand wash cool and handle gently.
Earthy Neutral Mesh Cropped Hoodie Free Crochet Pattern
Materials
Steps
- Work the ribbed hem band to 40 inches and seam it into a tube
- Work the striped granny mesh body in the round, 20 rounds of 10 clusters
- Make two ribbed cuffs and work the sleeves up to 8 clusters
- Join sleeves to body and work the raglan yoke down to 10 clusters
- Work the hood flat for 16 rows and seam the top
- Add hood edging and thread the drawstring
- Seam the underarms, weave in ends and wet block
- Swatch the granny mesh first: 3 clusters by 4 rounds should measure 4 inches
- Verify the 60 sc setup round, as it sets the 10-cluster body count
- Mark the 4 raglan points before starting the yoke decrease rows
- Block aggressively to open up the mesh and set the stitch definition


