Daisy Garden Tote Free Crochet Pattern

Table of Contents
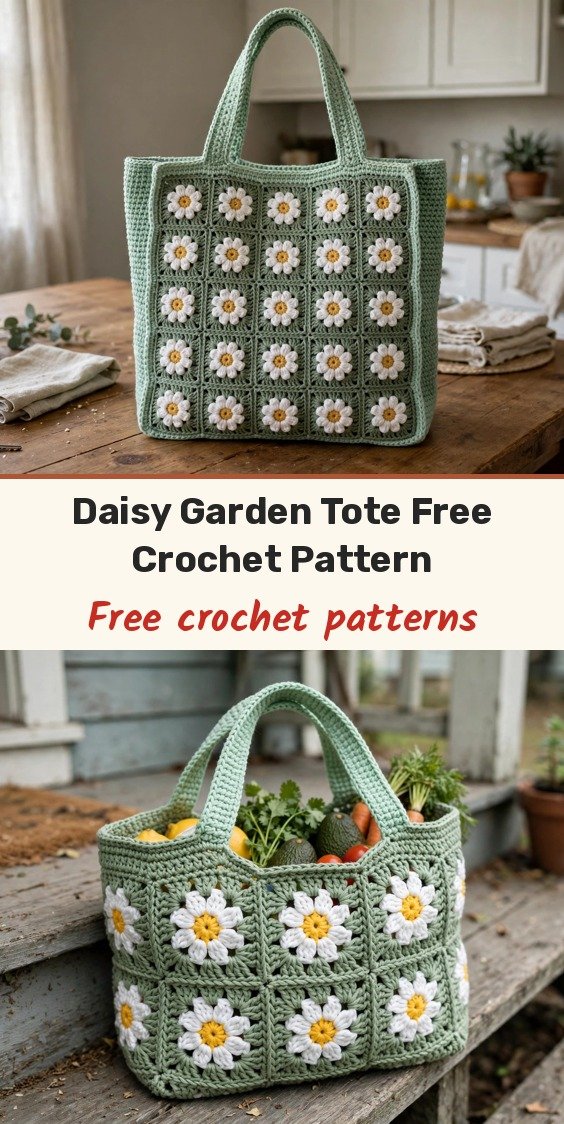
I pulled this design out of my project notebook and fell in love with it all over again! This Daisy Garden Tote combines twenty-five puffy three-dimensional daisy squares on the front with a clean, simple back panel, so it feels like carrying a little garden wherever you go.
Each square is small and portable, so we can stitch a few while watching TV or waiting at appointments — before you know it, you have a whole garden ready to assemble. The finished tote is roomy enough for grocery runs, beach days, or hauling your current work-in-progress.
This one is perfect for confident beginners who can work basic stitches in the round and join granny squares. We will make the daisy squares, join them into a front panel, crochet the back and gusset, then assemble everything together.
Materials
- Medium weight cotton yarn, mint green (main colour): approximately 330 yards
- Medium weight cotton yarn, white for petals: approximately 90 yards
- Medium weight cotton yarn, golden yellow for centres: approximately 45 yards
- Medium weight cotton yarn, sage green for square edging: approximately 120 yards
- 4.0 mm (US G/6) crochet hook
- Tapestry needle or yarn needle
- Stitch markers
- Scissors
- Optional: cotton cord, approximately 1 inch wide, for firmer handles
Abbreviations
- ch: chain
- sl st: slip stitch
- sc: single crochet
- hdc: half double crochet
- dc: double crochet
- tr: treble crochet
- st/sts: stitch / stitches
- sp: space
Special Stitches
- Daisy petal: ch 3, (tr, ch 1, tr) in same stitch, ch 3, sl st in same stitch. Worked entirely into one stitch of the yellow centre, this forms one raised petal.
- Picot: ch 3, sl st into the first of those 3 chains.
- Magic ring: an adjustable loop to start the yellow centre; work your stitches into the ring, then pull the tail tight to close the hole completely.
- Invisible join: cut yarn leaving a tail, thread the tail through your tapestry needle, and sew under the V of the first stitch in the round for a smooth closure.
Gauge & Size
- Finished size: 12 inches wide by 13 inches tall by 3 inches deep; 12 to 16 hours to complete
- Gauge: one finished daisy square measures about 2.4 inches across with a 4.0 mm hook; in hdc fabric, 16 stitches by 12 rows = 4 inches
- Construction: 25 daisy squares joined 5 by 5 for the front, plain hdc back panel and gusset strip, tubular handles
- Skill level: Easy
Daisy Square Pattern
Make 25 squares. Each square is worked in the round in three colour stages: a yellow centre, raised white petals, then a sage green square frame. The turning ch-2 at the start of an hdc row does not count as a stitch unless noted, and the daisy petals sit on top of the square — work them slightly loosely so they pop up nicely.
Round 1: With golden yellow, make a magic ring. Ch 1. Work 8 sc into the ring. Pull the ring tight to close the hole. Join with sl st to the first sc. (8 sc)
Round 2: Join white to any sc with a sl st. In each sc around, work one petal: ch 3, (tr, ch 1, tr) in same sc, ch 3, sl st in same sc, sl st in next sc. Repeat this petal sequence in all 8 stitches around. Fasten off white. (8 petals)
Round 3: Join sage green behind the petals in any petal tip (the ch-1 space at the top of a petal). Corner: (2 dc, ch 2, 2 dc) in this petal tip. Ch 1. Side: 2 dc in next petal tip. Ch 1. Repeat the pattern (corner, ch 1, side, ch 1) around all 8 petals. (24 dc, 4 corner spaces)
Round 4: Join sage green in any corner ch-2 space. In each corner space: (2 dc, ch 2, 2 dc). Along each side: ch 1, 2 dc in next ch-1 sp, ch 1, 2 dc in next ch-1 sp, ch 1. Continue around, working corners and sides. Join with sl st to the first dc. Fasten off, leaving a long tail for joining later. (32 dc, 4 corners)
Before joining, lay your squares out in a 5 by 5 grid to make sure the colours and petals sit evenly. This becomes your front panel.
Joining the Front Panel
Join the 25 squares into a 5 by 5 panel using the whip stitch method through back loops only, which keeps the seam soft and flat so the daisies stay raised.
Place two squares with right sides together. Using sage green and a tapestry needle, whip stitch through the back loops across one edge, matching stitch for stitch — you will have about 14 stitches per side.
Join 5 squares side by side into a horizontal row. Make 5 rows total.
Lay the 5 rows in order from top to bottom and whip stitch them together the same way, lining up every corner so the grid stays square. Weave in all join tails on the wrong side as you go.
Back Panel Pattern
With mint green, ch 49.
Row 1: Hdc in 2nd ch from hook and each ch across. Turn. (48 hdc)
Rows 2 through 36: Ch 2, hdc in each st across. Turn. (48 hdc)
Fasten off. Your back panel should measure approximately 12 inches by 12 inches.
Gusset Pattern
With mint green, ch 13.
Row 1: Hdc in 2nd ch from hook and each ch across. Turn. (12 hdc)
Rows 2 through 108: Ch 2, hdc in each st across. Turn. (12 hdc)
Fasten off. The strip should measure approximately 3 inches wide by 36 inches long.
Top Edging Pattern
Round 1: Join mint green at a top side seam. Work an even round of sc around the entire top opening, keeping your stitch count a multiple of 4. Join with sl st. (approximately 120 sc)
Round 2 (Picot Scallop): Ch 1. Sc in next 3 sc, picot (ch 3, sl st in first ch). Repeat around. Join and fasten off. (30 picots)
Handles Pattern
Make 2. With mint green, ch 6. Sl st to first ch to form a ring.
Round 1: Sc in each ch around. (6 sc)
Rounds 2 through 110: Sc in each st around, working in a continuous spiral. Do not join rounds. (6 sc)
The tube should measure approximately 22 inches. Fasten off, leaving a long tail for attaching. For extra body, you can crochet around a length of cotton cord.
Finishing & Assembly
With mint green and your tapestry needle, pin the gusset around the front panel, starting at one top corner, going down one side, across the base, and up the other side. Whip stitch the gusset to the front panel, easing gently around the two base corners, then attach the back panel to the open edge of the gusset the same way, leaving the top of the bag open.
Position one handle end on the front of the bag, about 3 inches in from each side seam, just below the picot edge. Push each end through to the inside and stitch firmly through several stitches to secure. Repeat with the second handle on the back panel so both handles line up.
Weave in every remaining end on the wrong side and trim closely. Turn the bag inside out and gently steam block the seams flat, avoiding pressing directly on the raised daisies. Reshape the base into a flat rectangle and let dry fully before using.
Tips
Block your squares before joining — even a light steam helps them lie flat and makes matching edges much easier.
For extra puffy petals, use a hook half a size smaller for the white petal round only, so the tighter petals stand up taller.
Cotton has almost no stretch, which is why I love it here: your handles will not sag under the weight of groceries or library books.
For care, hand wash in cool water with mild soap, press out water by rolling in a towel, and lay flat to dry away from high heat and direct sunlight.
Daisy Garden Tote Free Crochet Pattern
Materials
Steps
- Make 25 daisy squares in 4 rounds each
- Whip stitch squares into a 5 by 5 front panel
- Work the plain hdc back panel and long gusset strip
- Seam gusset between front and back panels
- Add the picot scallop top edging
- Make 2 tubular handles and stitch them on
- Weave in ends and steam block the seams
- Block squares before joining for flat, even seams
- Use a half-size smaller hook for puffier petals
- Weave in join tails as you go to avoid a pile of ends
- Cotton yarn keeps handles from stretching under weight


