Lavender Dream Baby Romper Set Free Crochet Pattern
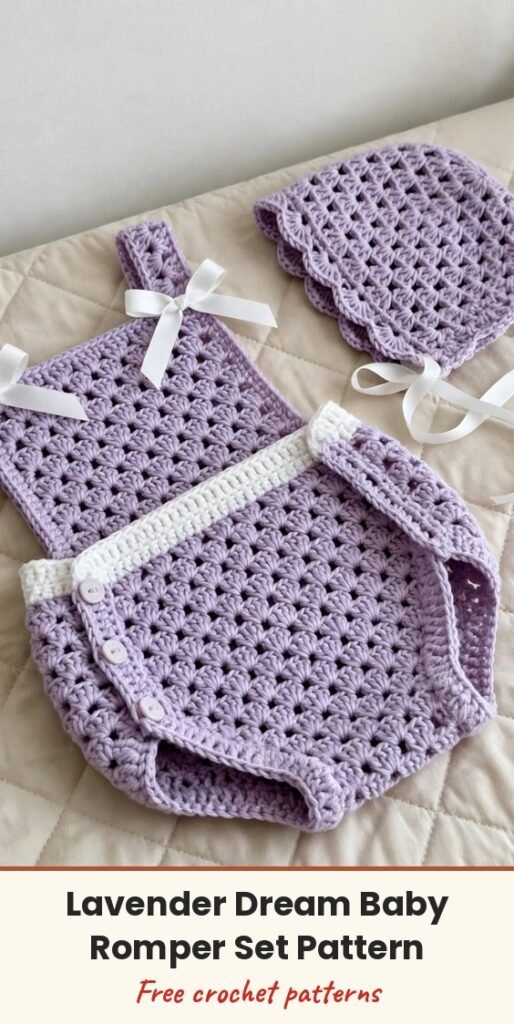
Table of Contents
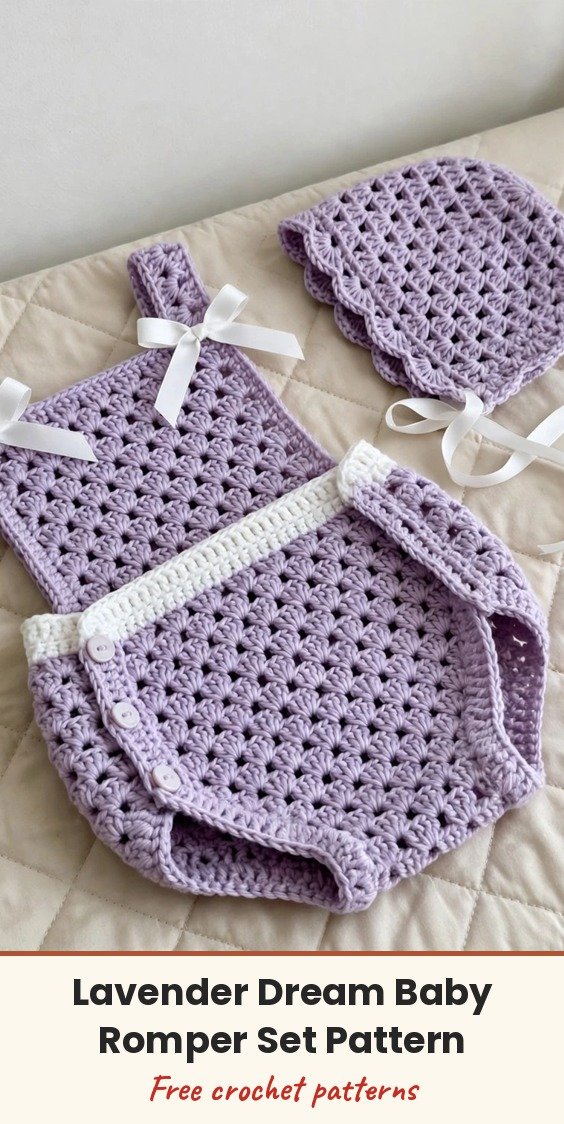
This little lavender romper set makes me smile every time I look at it, because it looks so fancy and heirloom, yet it is built from stitches you probably already know! The romper has a beautiful shell lattice body that forms a soft diamond texture, a crisp white waistband, and adjustable shoulder straps finished with sweet ribbon bows, and it comes with a matching bonnet worked from the crown outward.
I love this set for baby shower gifts and newborn photos. It is sized for 3 to 6 months, and if you can double crochet and single crochet, you already have the building blocks. The shell is simply five double crochets worked into one stitch, repeated over and over until that gorgeous texture appears.
We will work the romper flat in front and back panels, seam the sides, add the straps, and then crochet the bonnet in joined rounds. Take your time, check your counts at the end of each row, and trust the rhythm once it settles in.
Materials
- 350 to 400 yards light worsted weight (DK / weight 3) yarn in lavender (main colour)
- 100 to 120 yards same weight yarn in white (contrast colour)
- US E-4 (3.5mm) crochet hook
- Tapestry needle for seaming and weaving in ends
- 3 pearl shank buttons or snap buttons, about 10 to 12mm, for the crotch closure
- 2 lengths of white satin ribbon, about 18 inches each, for shoulder bows (or crochet the bows below)
- At least 6 stitch markers
- Small amount of polyester sewing thread and a sewing needle for the buttons
- Rustproof pins for blocking
Abbreviations
- MC: main colour (lavender)
- CC: contrast colour (white)
- ch: chain
- ch-sp: chain space
- sc: single crochet
- dc: double crochet
- sl st: slip stitch
- sk: skip
- st/sts: stitch / stitches
- RS: right side
- WS: wrong side
Special Stitches
- Shell: work 5 dc all into the same stitch or chain space. In the shell lattice pattern each shell sits inside the V shape of the shell below it, creating the diamond texture.
- Scallop edging: insert hook into the stitch, pull up a loop, sc in the same stitch, ch 2, 2 dc in the same stitch, sl st into the next stitch. Repeat across for a continuous scalloped border.
- Crochet bow (optional): chain 12, sc in the 2nd ch from the hook and in each ch across (11 sc). Fasten off leaving a 12 inch tail, pinch the centre of the strip, wrap the tail around the pinched centre 4 times, pull tight, and sew the bow to the shoulder strap.
Gauge & Size
- Finished size: romper chest about 16 inches around and about 12 inches from top of bodice to crotch closure; bonnet fits a head circumference of 15 to 16 inches (size 3 to 6 months)
- Gauge: one shell lattice repeat (4 stitches wide) is about 1 inch; 6 rows of shell lattice are about 2 inches, after blocking
- Construction: romper worked flat in front and back panels and seamed; bonnet worked in joined rounds from the crown
- Skill level: Intermediate
Romper Front Panel
With MC, chain 42.
Foundation Row (WS): Sc in the 2nd ch from the hook and in each ch across, turn. (41 sc)
Row 1 (RS): Ch 3, 2 dc in the first sc (half shell), sk 1 sc, sc in the next sc, sk 1 sc, (5 dc in the next sc, sk 1 sc, sc in the next sc, sk 1 sc) 9 times, 3 dc in the last sc (half shell), turn. (9 shells + 2 half shells + 10 sc)
Row 2 (WS): Ch 1, sc in the first 3 dc (half shell), ch 2, sk sc, (sc in each of the 5 dc of the shell, ch 2, sk sc) 9 times, sc in the last 3 dc of the final half shell, turn. (30 sc + 10 ch-2 sps)
Row 3 (RS): Ch 3, 2 dc in the first sc, sk 2 sc, sc in the ch-2 sp, sk 2 sc, (5 dc in the centre sc of the 5 sc group, sk 2 sc, sc in the ch-2 sp, sk 2 sc) 9 times, 3 dc in the last sc, turn. (9 shells + 2 half shells + 10 sc)
Rows 2 and 3 form the repeating 2-row pattern. Continue the repeat and work Row 2 and Row 3 two more times (Rows 4, 5, 6 and 7), ending after a Row 3 (RS row). The bodice should now measure about 2.5 inches from the foundation edge.
Waistband
Waistband Row 1 (WS): Attach CC with a sl st at the right edge. Ch 1, sc in each dc and sc across the top of the last shell row, turn. (61 sc)
Waistband Row 2 (RS): Ch 1, sc in each sc across, turn. (61 sc)
Waistband Row 3 (WS): Ch 1, sc in each sc across, turn. (61 sc)
Fasten off CC and rejoin MC. The front panel should now measure about 3.5 inches from the foundation edge and about 10.25 inches wide.
Front Bubble Body
Body Foundation Row (RS): Rejoin MC on the RS. Working into the 61 sc of the final waistband row, ch 3, 2 dc in the first sc, sk 1 sc, sc in the next sc, sk 1 sc, (5 dc in the next sc, sk 1 sc, sc in the next sc, sk 1 sc) 14 times, 3 dc in the last sc, turn. (14 shells + 2 half shells + 15 sc)
Body Row 2 (WS): Ch 1, sc in the first 3 dc (half shell), ch 2, sk sc, (sc in each of the 5 dc of the shell, ch 2, sk sc) 14 times, sc in the last 3 dc of the final half shell, turn. (45 sc + 15 ch-2 sps)
Body Row 3 (RS): Ch 3, 2 dc in the first sc, sk 2 sc, sc in the ch-2 sp, sk 2 sc, (5 dc in the centre sc of the 5 sc group, sk 2 sc, sc in the ch-2 sp, sk 2 sc) 14 times, 3 dc in the last sc, turn. (14 shells + 2 half shells + 15 sc)
Continue working Body Row 2 and Body Row 3 alternately for 8 more rows (4 more complete 2-row repeats), ending after a RS shell row. The bubble body should now measure about 5.5 inches from the waistband.
Leg Opening Shaping
Leg Shaping Setup Row (WS): Ch 1, sc in each dc and sc across the last RS row, converting the shell row to a flat sc row, turn. (61 sc)
Leg Shaping Row 1 (RS): Sl st across the first 10 sc. Ch 3, 2 dc in the same sc as the last sl st (half shell), sk 1 sc, sc in the next sc, sk 1 sc, (5 dc in the next sc, sk 1 sc, sc in the next sc, sk 1 sc) 9 times, 3 dc in the next sc (half shell). Leave the last 10 sc unworked, turn. (9 full shells + 2 half shells across the centre 41 sc)
Leg Shaping Row 2 (WS): Ch 1, sc in the first 3 dc (half shell), ch 2, sk sc, (sc in each of the 5 dc of the shell, ch 2, sk sc) 9 times, sc in the last 3 dc of the final half shell, turn. (30 sc + 10 ch-2 sps)
Leg Shaping Row 3 (RS): Ch 3, 2 dc in the first sc, sk 2 sc, sc in the ch-2 sp, sk 2 sc, (5 dc in the centre sc of the 5 sc group, sk 2 sc, sc in the ch-2 sp, sk 2 sc) 9 times, 3 dc in the last sc, turn. (9 shells + 2 half shells)
Leg Shaping Row 4 (WS): Work 1 more alignment row, the same as Leg Shaping Row 2, turn.
Crotch Row (RS): Ch 1, sc across every sc and work 1 sc into each ch-2 sp, turn. (40 sc)
Work 2 more rows of sc for the crotch placket. (40 sc each row)
Fasten off MC, leaving a 12 inch tail for seaming. The front panel should measure about 12 inches from the foundation chain to the bottom of the crotch placket.
Romper Back Panel
The back panel is worked identically to the front panel through every section: bodice, waistband, bubble body, leg shaping and crotch placket. Work all rows exactly as for the front, then fasten off leaving a 12 inch tail. The back bodice does not receive bow embellishments, and the back crotch placket carries the button loops while the front carries the buttons. You may substitute sew-on snaps if you prefer.
Shoulder Straps
Make 2. With MC, chain 7.
Row 1: Sc in the 2nd ch from the hook and in each ch across, turn. (6 sc)
Rows 2 to 26: Ch 1, sc in each sc across, turn. (6 sc each row)
Fasten off, leaving a 12 inch tail for attachment. Each strap should measure about 6.5 inches long. You can add or remove rows to adjust the fit, about 0.5 inch for every 2 rows.
Bonnet Pattern
With MC, make a magic ring (or chain 4 and join with a sl st to form a ring).
Round 1: Ch 3 (counts as dc), 11 dc in the ring, join with a sl st to the top of the ch-3. (12 dc)
Round 2: Ch 3, dc in the same st, 2 dc in each dc around, join with a sl st to the top of the ch-3. (24 dc)
Round 3: Ch 3, dc in the same st, dc in the next dc, (2 dc in the next dc, dc in the next dc) around, join with a sl st to the top of the ch-3. (36 dc)
Round 4: Ch 3, dc in the same st, dc in the next 2 dc, (2 dc in the next dc, dc in the next 2 dc) around, join with a sl st to the top of the ch-3. (48 dc)
Round 5: Ch 3, dc in the same st, dc in the next 3 dc, (2 dc in the next dc, dc in the next 3 dc) around, join with a sl st to the top of the ch-3. (60 dc)
Continue increasing by 12 dc each round, in the same established pattern, until the crown measures about 5 inches in diameter.
Bonnet body: Work even in dc for 6 rounds without increases, joining at the end of each round with a sl st to the top of the ch-3.
Brim: With CC, work the scallop edging around the face opening of the bonnet: insert hook, sc, ch 2, 2 dc in the same st, sk 1 st, sl st in the next st, repeat around.
Tie strings (make 2): With MC, chain 60. Sl st in the 2nd ch from the hook and in each ch across. Fasten off. Attach one tie string to each side of the bonnet face opening.
Finishing & Assembly
Place the front and back panels with right sides together and, using your tapestry needle and the long tails, whip stitch or mattress stitch the side seams from underarm to leg opening on both sides. Seam the crotch placket partially, leaving the centre open for the button closure.
Position the straps at the front bodice corners, about 1 inch from each side edge, and sew them securely. Cross the straps at the back and attach them to the back bodice corners, or attach them straight for adjustable button placement.
With CC, work scallop edging around both leg openings and across the top of the bodice front. Tie the white satin ribbon into small bows and tack them onto the shoulder straps at the front, or use the crocheted bows instead. Sew the 3 pearl buttons to the back crotch placket and make ch-3 button loops on the front placket during a final edging pass, or use snap fasteners.
Wet block both pieces by soaking them in lukewarm water for 15 minutes, gently squeezing out the excess water, and pinning them to the finished dimensions on a blocking mat. Let them dry completely before wearing.
Tips
Gauge really matters on this little garment, so do swatch and block your swatch before you start. Even half a stitch per inch will make the romper noticeably too big or too small.
Count at the end of every shell row. The lattice is unforgiving of a missed stitch, and one small error will throw the shells out of alignment.
To size down for 0 to 3 months, reduce the foundation chain by 4 stitches (one shell repeat) and work 2 fewer rows in the bubble body. To size up for 6 to 12 months, add 4 stitches to the foundation chain, work 2 to 4 additional bubble body rows, and add 4 rows to the strap length.
Try the romper on the baby, or on a similar sized doll, before you sew the straps down permanently, so the placement and length sit just right.
Lavender Dream Baby Romper Set Free Crochet Pattern
Materials
Steps
- Work the romper front panel: bodice in shell lattice, white waistband, bubble body and leg shaping
- Work the back panel identically to the front
- Crochet 2 shoulder straps
- Crochet the bonnet crown in joined dc rounds, then work the body, brim and tie strings
- Seam the sides and crotch placket and attach the straps
- Add scallop edging, bows and buttons, then block both pieces
- Swatch and block before starting, gauge is critical for baby sizing
- Count stitches at the end of every shell row to keep the lattice aligned
- Adjust strap length by about 0.5 inch for every 2 rows added or removed
- Try the romper on before sewing the straps down permanently


