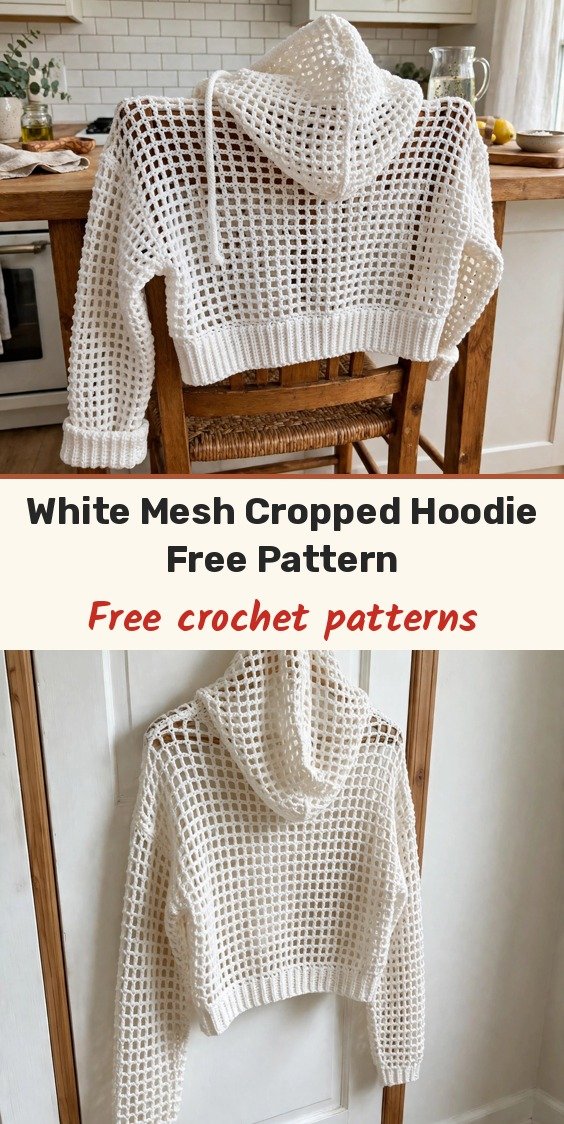
Monochrome White Mesh Cropped Hoodie Free Crochet Pattern

Table of Contents
I call this one my cloud hoodie, because that is exactly how it feels to wear! It has everything we love about a hoodie — the hood, the drawstring, the cosy shape — but worked in a light, airy square mesh that layers beautifully over a tee, a dress, or even a swimsuit at the beach.
We will work flat panels for the back, front and sleeves, seam the shoulders and sides, set in the sleeves, then pick up stitches around the neckline for the hood. The mesh itself is wonderfully simple and repetitive, and all the stitch counts in this pattern are given in mesh squares — just count the chain-2 spaces across a row. Sizes S (M, L, XL) are written in that order throughout.
Materials
- 900 (1000, 1100, 1250) yards of DK weight yarn in white or off-white, smooth cotton or cotton blend recommended
- 5.0mm crochet hook, for the main fabric
- 4.0mm crochet hook, for the ribbing
- Yarn needle, for seaming and weaving in ends
- Stitch markers, at least 8
- Measuring tape
- Scissors
- 1.5 yards of white braided or twisted cotton cord, about 3/8 inch diameter, for the drawstring
- Safety pin or large blunt needle, to thread the drawstring
Abbreviations
- ch: chain
- ch-sp: chain space
- dc: double crochet
- hdc: half double crochet
- sc: single crochet
- sk: skip
- sl st: slip stitch
- BLO: back loop only
- RS: right side
- WS: wrong side
- st/sts: stitch / stitches
Special Stitches
- Square Mesh Stitch: Row 1 (RS): Dc in the 7th chain from the hook (counts as dc, ch-2 space, dc), (ch 2, sk 2 ch, dc in the next ch) across, turn. Row 2: Ch 5 (counts as dc plus ch-2 space), sk the first ch-2 space, dc in the next dc, (ch 2, dc in the next dc) across, working the last dc into the 3rd chain of the turning chain, turn. Row 2 is the pattern row, repeated throughout. The repeat is a multiple of 3 stitches plus 1.
- Ribbing: Row 1: Sc in the 2nd chain from the hook and in each chain across, turn. Row 2: Ch 1, sc in BLO of each sc across, turn. Repeat Row 2 for the ribbed texture.
Gauge & Size
- Finished bust: 34 (38, 42, 46) inches, with 2 to 3 inches of ease; total length 17 (17.5, 18, 18.5) inches; sleeve length 18 (18.5, 19, 19.5) inches
- Gauge: 4 mesh squares = 4 inches and 5 rows of mesh = 4 inches with the 5.0mm hook; ribbing 10 sc and 10 rows = 2 inches with the 4.0mm hook
- Construction: flat panels seamed, set-in sleeves, hood picked up from the neckline
- Skill level: Intermediate
Back Panel Pattern
With the 5.0mm hook, chain 58 (64, 70, 76).
Foundation Row (RS): Dc in the 7th chain from the hook, (ch 2, sk 2 ch, dc in the next ch) across, turn. (18 (20, 22, 24) mesh squares)
Rows 1 to 13 (14, 15, 16): Work even in Square Mesh Stitch, repeating Row 2 of the mesh pattern. (18 (20, 22, 24) mesh squares)
The piece should measure approximately 11 (11.5, 12, 12.5) inches from the foundation, and 17 (19, 21, 23) inches wide.
Armhole Row: Sl st across the first 3 mesh squares (into the dc post, into the ch-2 space, into the next dc post, into the ch-2 space, into the next dc post), ch 5, work in mesh pattern across until 3 mesh squares remain, turn, leaving the remaining squares unworked. (12 (14, 16, 18) mesh squares)
Armhole Rows: Work even in mesh stitch for 8 (9, 10, 11) rows in total over the armhole section, ending with 12 (14, 16, 18) mesh squares and an armhole depth of approximately 6 inches.
Total panel height from foundation to shoulder edge should be 17 (17.5, 18, 18.5) inches. Fasten off, weave in ends and set aside.
Front Panel Pattern
Work exactly as the Back Panel through the end of the armhole shaping rows. Do not fasten off.
Left Shoulder Row 1: Ch 5, work in mesh pattern across the first 4 (5, 6, 7) mesh squares only, turn. (4 (5, 6, 7) mesh squares)
Left Shoulder Row 2: Work even across, turn. (4 (5, 6, 7) mesh squares)
Fasten off.
Right Shoulder: Rejoin the yarn at the 5th (6th, 7th, 8th) mesh square from the right edge of the front panel.
Right Shoulder Row 1: Ch 5, work in mesh pattern to the end, turn. (4 (5, 6, 7) mesh squares)
Right Shoulder Row 2: Work even across, turn. (4 (5, 6, 7) mesh squares)
Fasten off. The centre neck opening is 4 mesh squares wide for all sizes.
Sleeve Pattern (Make 2)
With the 5.0mm hook, chain 34 (34, 37, 40).
Foundation Row (RS): Dc in the 7th chain from the hook, (ch 2, sk 2 ch, dc in the next ch) across, turn. (10 (10, 11, 12) mesh squares)
Rows 1 to 3: Work even. (10 (10, 11, 12) mesh squares)
Row 4 (increase row): Ch 5, dc in the first ch-2 space (increase made at the beginning of the row), work in mesh across to the last dc, then (ch 2, dc in the top of the last dc, ch 2, dc in the 3rd chain of the turning chain) for the end increase, turn. (12 (12, 13, 14) mesh squares)
Continue working 3 rows even followed by 1 increase row until the sleeve reaches 18 (20, 22, 24) mesh squares: size S needs 5 increase rows and 23 rows in total, size M 5 increase rows and 23 rows, size L 6 increase rows and 27 rows, size XL 6 increase rows and 27 rows.
The sleeve should measure approximately 18 (18.5, 19, 19.5) inches long and 17 (19, 21, 23) inches wide at the top edge.
Sleeve Cap Row 1: Sl st across the first 3 mesh squares, ch 5, work in mesh pattern across until 3 mesh squares remain, turn, leaving the remaining squares unworked. (12 (14, 16, 18) mesh squares)
Sleeve Cap Rows 2 to 6: Work even. Fasten off, leaving a 24 inch tail for seaming.
Hood Pattern
With the 5.0mm hook and RS facing, join the yarn at the right shoulder seam.
Hood Foundation Row: Starting at the right front shoulder edge, work (dc, ch 2) into each dc post and ch-2 space along the neckline edge, across the right shoulder, the back neck and the left shoulder, ending with 20 mesh squares across. Turn.
Hood Rows 1 to 15: Work even in Square Mesh Stitch. After Row 15 the hood height measures approximately 12 inches.
Fold the hood in half with the right side facing inward and seam the top of the hood with a whipstitch or surface slip stitch through both layers. Fasten off and turn the hood right side out.
Hood Edging Row 1: With the 5.0mm hook and RS facing, join the yarn at the bottom right corner of the hood opening. Ch 1, sc evenly up the right front edge of the hood opening, across the face-framing edge, and back down the left front edge to the bottom left corner, working approximately 1 sc per dc post and 1 sc per ch-2 space. Turn.
Hood Edging Row 2: Ch 1, sc in BLO of each sc across, turn.
Hood Edging Row 3: Ch 1, sc in BLO of each sc across. Fasten off.
Drawstring: Thread the cotton cord through the chain-2 spaces along the hood foundation row, starting at the right front opening and exiting at the left front opening. Pull the cord to even lengths on each side and knot both ends.
Hem Band & Cuffs
Hem Band Round 1: With the 4.0mm hook, join the yarn at any side seam along the lower foundation edge. Ch 1, sc evenly around the entire lower hem edge, working 1 sc into each skipped ch-2 space base and 1 sc into each dc base, for approximately 68 (76, 84, 92) sc. Sl st to the first sc to join.
Ribbing Row 1: Ch 10, sc in the 2nd chain from the hook and in each chain across (9 sc), sl st into the next sc of the hem edge to anchor, turn.
Ribbing Row 2: Ch 1, sc in BLO across all 9 sc, turn.
Ribbing Row 3: Ch 1, sc in BLO across the 9 sc, sl st into the next sc of the hem edge, turn.
Repeat Rows 2 and 3 until all the hem edge stitches have been used — 68 (76, 84, 92) anchor points in total — then seam the short ends of the ribbing strip together. The band is approximately 1.5 inches tall.
Cuffs (make 2): With the 4.0mm hook, chain 7.
Cuff Row 1: Sc in the 2nd chain from the hook and in each chain across, turn. (6 sc)
Cuff Rows 2 to 68 (68, 76, 76): Ch 1, sc in BLO across, turn. (6 sc each row)
Seam the short ends of the cuff strip together to form a tube, then whipstitch the cuff to the lower edge of the sleeve, pinning the cuff seam to the sleeve underarm seam and distributing the mesh edge evenly.
Finishing & Assembly
Block both body panels before seaming. Align the back and front panels with right sides together and seam the shoulders on each side, across 4 (5, 6, 7) mesh squares. Then fold the joined panels so the side edges align and seam the sides from the lower edge up to the armhole, leaving the armholes open.
Set in the sleeves: pin each sleeve cap into the armhole with right sides together, easing any fullness evenly, and whipstitch all the way around. Fold each sleeve with right sides together and seam from the cuff edge to the underarm point.
Weave in all ends securely on the wrong side, drawing each end through at least 5 or 6 stitches so the open mesh cannot pull loose. Wet block the finished hoodie, pinning it flat to the finished measurements, and let it dry completely.
Tips
Do not skip the gauge swatch — with a garment like this, even half a stitch per inch changes the fit. Block your swatch the way you plan to block the hoodie.
When you count mesh, count the chain-2 spaces, not the individual chains or dc posts. That number is your mesh square count for the row.
Take your time with the seaming and pin everything first. A few minutes of pinning saves a lot of unpicking later!
Machine wash cold on gentle in a mesh laundry bag and lay flat to dry — never hang it wet, as the mesh will stretch under its own weight.
Monochrome White Mesh Cropped Hoodie Free Crochet Pattern
Materials
Steps
- Work the back panel in square mesh to the armholes and shape them
- Work the front panel and shape the neckline shoulders
- Work 2 sleeves in mesh with increase rows and shape the caps
- Seam the shoulders and sides, then set in the sleeves
- Pick up the hood around the neckline and work 15 mesh rows
- Seam the hood top and add the ribbed hood edging and drawstring
- Work the hem ribbing band around the lower edge
- Make 2 ribbed cuffs and attach them to the sleeves
- Count mesh squares (chain-2 spaces), not individual stitches
- Block the panels before seaming
- Weave ends through at least 5 or 6 stitches so the open mesh cannot pull loose
- Lay flat to dry, never hang the wet hoodie