Sunset Ombre Butterfly Free Crochet Pattern

Table of Contents
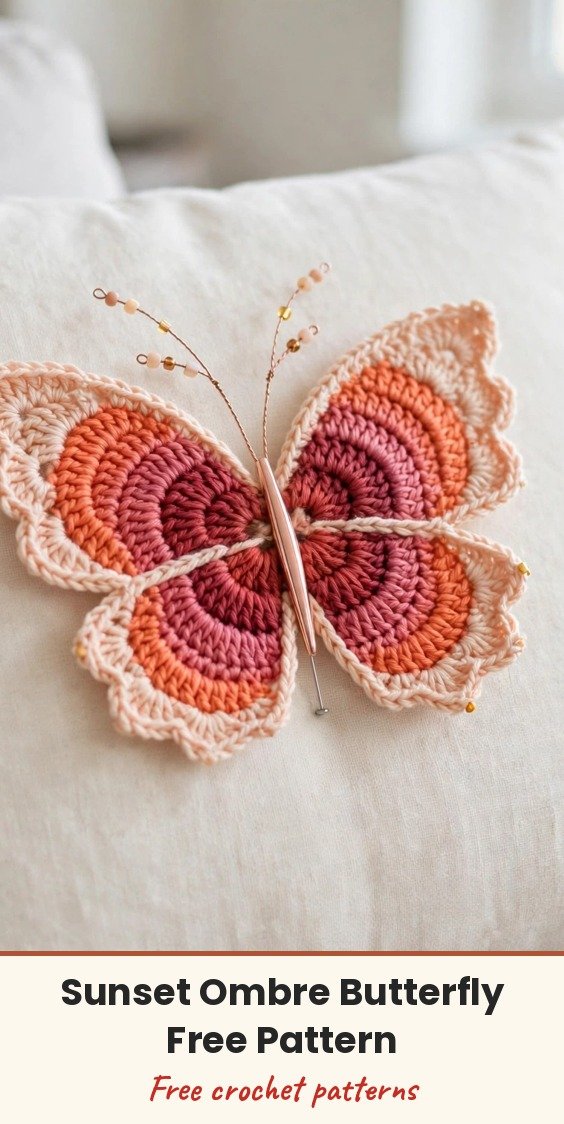
Crocheted butterflies look so delicate and fancy, but I promise you, this one is really just simple flat circles in the round! We will crochet six little pieces, two upper outer wings, two lower outer wings and two coral-to-rose ombre inner motifs, then layer them onto a rose gold hair pen or brooch body and finish with rhinestone trim and curled wire antennae.
I love that the ombre effect comes from simple colour changes, not complicated colourwork. The finished butterfly measures about 3.5 inches wide by 2.75 inches tall with the wings spread flat, and about 4.5 inches tall including the antennae, so it sits right in the palm of your hand.
It makes a gorgeous hair accessory, brooch or little ornamental keepsake. The stitches themselves are basic, but we will keep careful stitch counts and take our time with the finishing, and I will give you checkpoints along the way so every piece lies flat and neat.
Materials
- 25 yards sport weight (size 2) yarn in light peach (Yarn A)
- 15 yards sport weight yarn in coral orange (Yarn B)
- 8 yards sport weight yarn in deep rose or dusty pink (Yarn C)
- US B-1 (2.25mm) crochet hook
- 1 rose gold decorative hair pen or brooch pin body, about 3 to 3.5 inches long
- About 14 inches of rhinestone chain trim in rose gold or crystal
- About 10 inches of copper or rose gold craft wire, 22 gauge, for the antennae
- 2 small round beads or rhinestone caps for the antenna tips (optional)
- Tapestry needle, sewing needle and matching thread or jewellery glue
- Scissors
- 4 stitch markers
Abbreviations
- ch: chain
- sl st: slip stitch
- sc: single crochet
- dc: double crochet
- hdc: half double crochet
- st/sts: stitch / stitches
- ch-sp: chain space
- MR: magic ring
- inc: increase, 2 sc in the same stitch
- rep: repeat
- rnd: round
- RS: right side
- FO: fasten off
Special Stitches
- Invisible decrease: insert your hook into the front loop only of the next stitch, then into the front loop only of the following stitch, yarn over and draw through both front loops, then yarn over and draw through both loops to complete.
- Granny circle round: work groups of 3 dc separated by ch-1 spaces into the chain spaces of the previous round, making a circular, slightly textured medallion.
- Standing stitch join: make a slip knot with the new colour and hold it on your hook, insert the hook into the specified stitch, yarn over with the new colour, draw up a loop, yarn over and complete as an sc or dc as instructed. This counts as the first stitch of the round and avoids a visible join.
Gauge & Size
- Finished size: about 3.5 inches wide by 2.75 inches tall with wings flat, about 4.5 inches tall including antennae
- Gauge: 5 rounds of sc in the round measure about 1 inch in diameter with Yarn A; or 22 sc by 24 rows equals 4 by 4 inches in flat single crochet
- Construction: 6 small motifs worked in joined rounds, blocked, layered and attached to a metal pen body with trims
- Skill level: Intermediate
Inner Wing Motif Pattern
Make 2. Each motif measures about 1.5 inches in diameter. All rounds are joined rounds, the right side faces outward throughout, and stitch counts appear at the end of every round. With Yarn B (coral orange), create a magic ring.
Round 1: Ch 3 (counts as the first dc here and throughout the inner motif), work 11 dc into the magic ring, pull the ring closed, and sl st into the top of the beginning ch-3 to join. (12 dc)
Round 2: Ch 3, dc in the same st as the join, work 2 dc in each remaining dc around, and sl st into the top of the beginning ch-3 to join. (24 dc)
Round 3: Ch 3, dc in the same st as the join, dc in the next dc, (2 dc in the next dc, dc in the next dc) repeat around, and sl st into the top of the beginning ch-3 to join. (36 dc)
Round 4: Change to Yarn C (deep rose) and join with a standing sc. Sc in each dc around, and sl st into the first sc to join. (36 sc)
Round 5: Ch 1, sc in the same st, (ch 1, skip 1 sc, sc in the next sc) repeat around, and sl st into the first sc to join. (18 sc, 18 ch-1 spaces)
Round 6: Sl st into the first ch-1 sp. Ch 3, work 2 dc into the same ch-1 sp, ch 1, (3 dc in the next ch-1 sp, ch 1) repeat around, and sl st into the top of the beginning ch-3 to join. (18 groups of 3 dc, 18 ch-1 spaces)
Your motif should be a flat, ruffled-edge circle about 1.5 inches across. Fasten off Yarn C, leaving a 6 inch tail, and weave in the magic ring tail tightly.
Upper Outer Wing Pattern
Make 2, entirely in Yarn A (peach). Each finished wing measures about 1.75 inches in diameter. With Yarn A, create a magic ring.
Round 1: Ch 1, work 6 sc into the magic ring, pull the ring closed, and sl st into the first sc to join. (6 sc)
Round 2: Ch 1, work 2 sc in each sc around, and sl st into the first sc to join. (12 sc)
Round 3: Ch 1, (2 sc in the next sc, sc in the next sc) repeat around, and sl st into the first sc to join. (18 sc)
Round 4: Ch 1, (2 sc in the next sc, sc in the next 2 sc) repeat around, and sl st into the first sc to join. (24 sc)
Round 5: Ch 1, (2 sc in the next sc, sc in the next 3 sc) repeat around, and sl st into the first sc to join. (30 sc)
Round 6: Ch 1, (2 sc in the next sc, sc in the next 4 sc) repeat around, and sl st into the first sc to join. (36 sc)
Round 7: Ch 1, (2 sc in the next sc, sc in the next 5 sc) repeat around, and sl st into the first sc to join. (42 sc)
Round 8 (scallop edge): Ch 1, sc in the same st, (skip 2 sc, 5 dc in the next sc, skip 2 sc, sc in the next sc) repeat around, ending with a sl st into the first sc to join. (7 scallops)
Fasten off Yarn A, leaving a 10 inch tail for assembly.
Lower Outer Wing Pattern
Make 2, entirely in Yarn A. The lower wings are slightly smaller, about 1.5 inches in diameter. With Yarn A, create a magic ring.
Round 1: Ch 1, work 6 sc into the magic ring, pull the ring closed, and sl st into the first sc to join. (6 sc)
Round 2: Ch 1, work 2 sc in each sc around, and sl st into the first sc to join. (12 sc)
Round 3: Ch 1, (2 sc in the next sc, sc in the next sc) repeat around, and sl st into the first sc to join. (18 sc)
Round 4: Ch 1, (2 sc in the next sc, sc in the next 2 sc) repeat around, and sl st into the first sc to join. (24 sc)
Round 5: Ch 1, (2 sc in the next sc, sc in the next 3 sc) repeat around, and sl st into the first sc to join. (30 sc)
Round 6: Ch 1, (2 sc in the next sc, sc in the next 4 sc) repeat around, and sl st into the first sc to join. (36 sc)
Round 7 (scallop edge): Ch 1, sc in the same st, (skip 2 sc, 5 dc in the next sc, skip 2 sc, sc in the next sc) repeat around, ending with a sl st into the first sc to join. (6 scallops)
Fasten off Yarn A, leaving a 10 inch tail for assembly.
Finishing & Assembly
Block all six pieces first: lightly dampen each one, pin it flat on a foam blocking board, and let it dry completely. This little step makes the wings lie smooth and pretty.
Position one inner motif on one upper outer wing with right sides facing up, centred so the scalloped peach border shows around the edge. Using the long tail from the inner motif and a tapestry needle, whipstitch the motif to the wing with small, tight stitches, and repeat for the second upper wing. The lower wings stay as plain peach scalloped circles.
Take one assembled upper wing and one lower wing and hold them together at the inner edge, with the lower wing angled slightly downward. Using Yarn A, whipstitch the inner edges together for about 0.5 inches at the centre join to make one wing unit, and repeat for the other side. Then hold the left and right wing units together with right sides facing outward and stitch through all layers at the centre joint for 4 to 6 stitches to lock them together at the spine.
Position the joined wings against the pen body, with the pointed tail below the lower wings and the antennae above the upper wings. Wrap Yarn A through the crochet fabric and around the pen shaft 6 to 8 times, knot securely at the back, and weave the tail into the wings.
For the rhinestone trim, cut two pieces about 5 to 5.5 inches each and one piece about 2 to 2.5 inches. Hand stitch or glue the longer pieces along the border where the inner motif meets the outer wing, following the circular outline, and attach the shorter length along the visible part of the pen body.
For the antennae, if your pen does not have built-in wire antennae, cut two 5 inch lengths of 22 gauge wire, curl one end of each into a small spiral with round-nose pliers, thread a small bead onto the curled end and crimp it closed. Insert the straight ends into the crochet fabric at the centre spine, angling each wire outward, and secure with a dab of adhesive.
Tips
Use a tightly spun sport weight cotton or cotton blend. Fuzzy or textured yarns will hide the stitch definition and fight with the sparkly trims.
If a wing cups, your tension is a little tight, so move up half a hook size. If it ruffles dramatically, move down half a size and try again.
For a larger butterfly, use DK weight yarn with a US E-4 (3.5mm) hook and add two increase rounds to each wing before the scallop edge, for a finished size of about 5.5 inches wide. For a smaller one, work only 5 rounds of the upper wing and 4 rounds of the lower wing before the scallop edge.
Spot clean only once the embellishments are attached, dabbing gently with a damp cloth, and store your butterfly flat or hanging so the wings keep their shape.
Sunset Ombre Butterfly Free Crochet Pattern
Materials
Steps
- Crochet 2 ombre inner wing motifs in 6 rounds each
- Crochet 2 upper outer wings in peach with a scallop edge
- Crochet 2 smaller lower outer wings with a scallop edge
- Block all 6 pieces flat
- Whipstitch the inner motifs onto the upper wings
- Join the wing units together at the spine
- Attach the wings to the pen body and add rhinestone trim and wire antennae
- Keep tension even so the small circles lie flat
- Block every piece before assembling for a smooth finish
- Leave at least 6 inch tails on every piece for seaming
- Spot clean only after the embellishments are attached