Ocean Jellyfish Crochet Market Bag Free Pattern
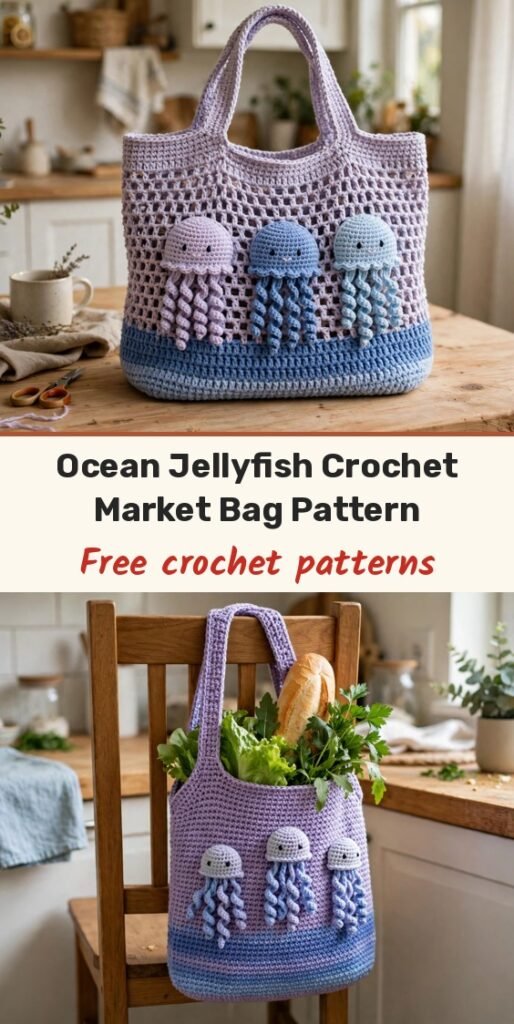
Table of Contents
This ocean jellyfish market bag is my favourite kind of project: a sturdy, relaxing bag body first, then the fun decorating! Three little jellyfish with curly tentacles seem to float right across the fabric, over a gentle gradient that runs from deep ocean blue at the bottom up to soft lavender at the top.
The bag measures approximately 14 inches wide by 15 inches tall (not including handles), so it is perfect for market trips, library runs or carrying your latest yarn haul, and the straps are long enough to throw over your shoulder comfortably.
We will work the bag body from the bottom up in joined rounds, crochet two handles, then make the three jellyfish and some little bubbles separately and sew everything on. The appliqué work looks impressive but breaks down into very manageable pieces, I promise.
Materials
- Worsted weight yarn (category 4), Main Color light lavender / dusty purple: approximately 300 yards
- Color A medium blue: approximately 75 yards
- Color B light blue / aqua: approximately 50 yards
- Color C white: approximately 40 yards
- Color D pink / mauve: approximately 30 yards
- Color E light purple: approximately 30 yards
- Color F multicolor pastel: approximately 20 yards
- 5.0 mm (US H/8) crochet hook for the bag body
- 4.0 mm (US G/6) crochet hook for the jellyfish appliqués
- Tapestry needle
- Scissors
- Stitch markers
- 6 small safety eyes, 6 mm (2 per jellyfish)
- Small amount of fiberfill stuffing for the jellyfish heads
Abbreviations
- ch: chain
- sl st: slip stitch
- sc: single crochet
- hdc: half double crochet
- dc: double crochet
- inc: increase, work 2 stitches into the same stitch
- dec: invisible decrease, insert hook through the front loops only of the next 2 stitches, yarn over, pull through both, yarn over, pull through both loops
- FLO: front loop only
- BLO: back loop only
- MR: magic ring
- st/sts: stitch / stitches
Gauge & Size
- Finished size: approximately 14 inches wide by 15 inches tall, not including handles
- Gauge: 15 sc by 17 rows = 4 inches with the 5.0 mm hook and worsted cotton. Gauge matters here, you want a tight, sturdy fabric that will not let small items fall through; if your stitches look loose or holey, go down a hook size
- Construction: bag body worked bottom-up in joined rounds, handles worked flat and sewn on, jellyfish and bubbles made separately and appliquéd on
- Skill level: Intermediate (confident beginners who have made amigurumi will do fine)
Bag Body
The base is worked flat first, then we work around all four edges to start the sides. Use the Main Color (lavender) and the 5.0 mm hook.
Base Row 1: Ch 41. Sc in 2nd ch from hook and in each ch across. (40 sc)
Base Rows 2 to 15: Ch 1, turn. Sc in each st across. (40 sc)
You now have a rectangular base measuring approximately 10 inches by 4 inches.
Round 1: Ch 1, do not turn. Working around the entire perimeter of the base, work 40 sc across the short end, 15 sc along the long side, 40 sc across the other short end, and 15 sc along the remaining long side. Sl st to first sc to join. (110 sc)
Place a stitch marker at the beginning of your round.
Rounds 2 to 8: Ch 1, sc in each st around, sl st to join. (110 sc)
At the end of Round 8, change to Color A (medium blue) in the last pull-through of your slip stitch join.
Rounds 9 to 12 (Color A): Ch 1, sc in each st around, sl st to join. (110 sc)
At the end of Round 12, change to Color B (light blue).
Rounds 13 to 15 (Color B): Ch 1, sc in each st around, sl st to join. (110 sc)
At the end of Round 15, change back to the Main Color (lavender).
Rounds 16 to 45 (Main Color): Ch 1, sc in each st around, sl st to join. (110 sc)
Your bag body should now measure approximately 12 inches tall from the base.
Round 46: Ch 1, sc in BLO of each st around, sl st to join. (110 sc) This creates a nice ridge that defines the top edge.
Rounds 47 and 48: Ch 1, sc in each st around, sl st to join. (110 sc)
Round 49 (decorative round): Ch 1, (sc in next 3 sts, ch 2, skip 2 sts) repeat around, adjusting the last repeat as needed to end evenly. Sl st to join.
Round 50: Ch 1, sc in each sc and 2 sc in each ch-2 space around. Sl st to join.
Fasten off the Main Color.
Handles
Make 2, using the Main Color and the 5.0 mm hook.
Row 1: Ch 71. Sc in 2nd ch from hook and in each ch across. (70 sc)
Rows 2 to 4: Ch 1, turn. Sc in each st across. (70 sc)
Fasten off, leaving a long tail for sewing. Position each handle approximately 15 stitches in from each side edge of the bag opening, pin in place, then whip stitch securely with your tapestry needle. I go over the stitches twice for extra durability on a bag that will carry weight.
Large Jellyfish
Use Color D (pink) and the 4.0 mm hook for the head.
Round 1: Magic ring, 6 sc into ring. Pull tight. (6 sc)
Round 2: Inc in each st around. (12 sc)
Round 3: (Sc 1, inc) repeat around. (18 sc)
Round 4: (Sc 2, inc) repeat around. (24 sc)
Round 5: (Sc 3, inc) repeat around. (30 sc)
Rounds 6 to 8: Sc in each st around. (30 sc)
Insert the safety eyes between Rounds 5 and 6, approximately 6 stitches apart, and add a small amount of fiberfill.
Round 9: (Sc 3, dec) repeat around. (24 sc)
Round 10: Sc in BLO of each st around. (24 sc) This creates the ridge at the bottom of the head.
Round 11: Sc in each st around. Sl st to join. Fasten off.
Tentacles, make 6 to 8 per jellyfish: Ch 25. Starting in 2nd ch from hook, sl st in each ch back to the beginning. This creates a curly, spiraling tentacle. For variety, make some tentacles longer (ch 30) and some shorter (ch 18). Attach the tentacles evenly around the bottom edge of the head with your tapestry needle.
Medium & Small Jellyfish
Medium jellyfish (in Color E): follow the large jellyfish instructions but stop increasing at Round 4 (24 sc). Work Rounds 5 to 7 even, then work the decrease round (sc 3, dec) around, the BLO ridge round, and one final even round before fastening off, and finish with tentacles and safety eyes the same way.
Small jellyfish (in Color F): follow the large jellyfish instructions but stop increasing at Round 3 (18 sc). Work Rounds 4 to 6 even, then decrease, work the BLO ridge and the final round, and add tentacles and eyes the same way.
Bubbles & Waves
Small bubble: with Color C (white) and the 4.0 mm hook, magic ring, 6 sc, sl st to join. Fasten off.
Medium bubble: magic ring, 8 sc, sl st to join. Fasten off.
Make 8 to 10 bubbles in various sizes to scatter across the bag around your jellyfish.
Optional wave detail: hold white yarn behind the bag body at the colour change line between Color A and Color B. Insert your hook through the fabric, pull up a loop, then chain stitch along the surface in a gentle wave pattern, creating 3 to 4 wave peaks across each side of the bag. Fasten off and weave the ends in securely on the inside.
Finishing & Assembly
Lay your bag flat. Position the large jellyfish in the center, the medium jellyfish on the left and the small jellyfish on the right, with the bottoms of the heads sitting just above the wave line. Pin everything in place and step back to check the arrangement before you sew.
Using matching yarn colours and your tapestry needle, whip stitch around the edges of each jellyfish head. Take your time here: secure stitching keeps your appliqués in place through many washes. Attach the bubbles with a few small stitches through their centers.
Weave in all remaining ends on the inside of the bag. For a market bag that will carry weight, weave ends back and forth through several stitches rather than just snipping them short.
Tips
Tension consistency is everything with this bag. Keep your stitches even throughout, especially when changing colours, or the fabric will come out wavy.
Blocking the finished bag lightly with steam can even out small irregularities and help the bag hold its shape beautifully.
Want it your own way? Change the jellyfish colours to match your favourite palette, add a little starfish or fish, or size the bag down for a child’s library bag. A simple cotton lining adds extra durability if you carry heavier shopping.

Ocean Jellyfish Crochet Market Bag Free Pattern
Materials
Steps
- Crochet the rectangular base, 40 sc by 15 rows
- Work around the perimeter and build the body in joined rounds to Round 50 with the blue gradient bands
- Make two flat handles and whip stitch them to the bag opening
- Crochet the large jellyfish head to 30 sts with curly chain tentacles
- Make the medium and small jellyfish the same way with fewer increase rounds
- Crochet 8 to 10 white bubbles in two sizes
- Pin the jellyfish and bubbles in place and whip stitch them onto the bag
- Keep tension even through the colour changes so the body fabric stays flat
- Go over the handle stitching twice, this bag is made to carry weight
- Weave ends back and forth through several stitches inside the bag for security


