Ocean Blue Baby Romper Set Free Crochet Pattern
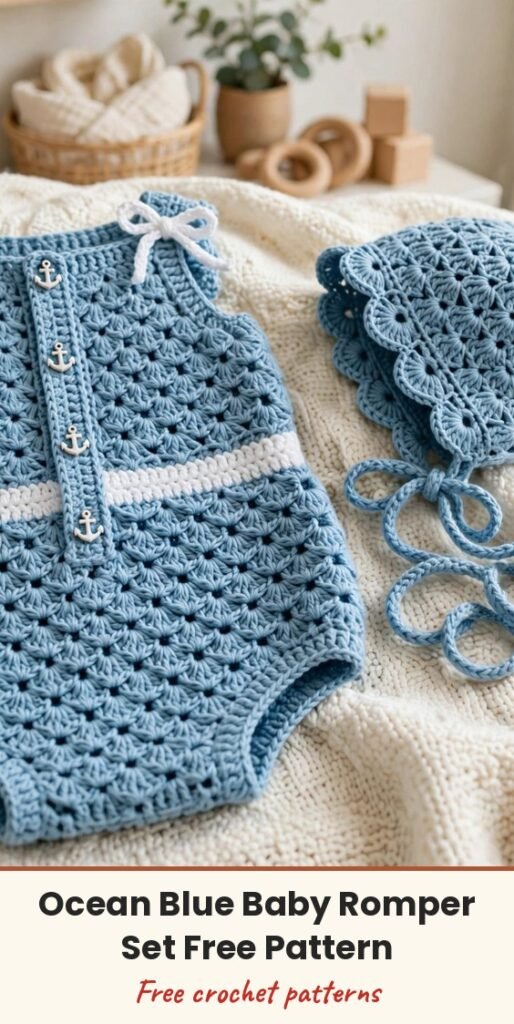
Table of Contents
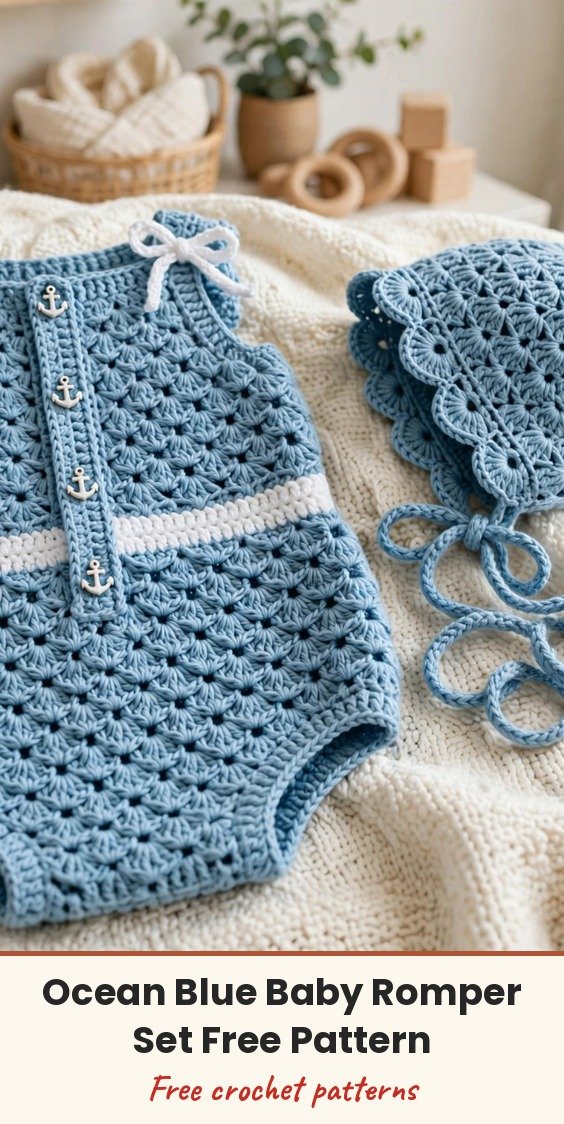
I love a baby set that looks like it came straight out of a vintage photograph, and this ocean blue romper set does exactly that! We will make a bubble-style romper with a textured shell stitch bodice, a crisp white waistband stripe, little bows at the shoulders, scalloped picot edges at the leg openings, and three sweet anchor buttons at the crotch, plus a matching bonnet with a shell stitch brim and long tie strings.
The soft light blue with white accents photographs beautifully and works for any baby, so it is a wonderful choice for a baby shower gift, a coming-home outfit, or a special portrait. The pattern is written for three sizes: newborn (0 to 3 months), 3 to 6 months, and 6 to 12 months. Instructions are written for the smallest size, with changes for the larger sizes in parentheses.
Plan for roughly 12 to 18 hours for the complete set. It is an intermediate project, but if you have finished a garment before and can read stitch counts, you can absolutely do this, and I will walk you through every section.
Materials
- Light blue DK weight yarn (Main Color), approximately 280 (320 / 370) yards
- White DK weight yarn (Contrast Color), approximately 80 (95 / 110) yards
- US G-6 / 4.0mm crochet hook
- 3 decorative anchor shank buttons, approximately 15mm
- At least 6 stitch markers
- Yarn needle for weaving in ends
- Sewing needle and coordinating thread for the buttons
- Scissors
- Rust-proof straight pins for blocking
Abbreviations
- MC: main color (light blue)
- CC: contrast color (white)
- ch: chain
- ch-sp: chain space
- sc: single crochet
- dc: double crochet
- sc2tog: single crochet two together
- sl st: slip stitch
- sk: skip
- pm: place marker
- rep: repeat
- RS: right side
- WS: wrong side
- st/sts: stitch / stitches
Special Stitches
- Shell Stitch: 5 dc worked into the same stitch or space. The pattern alternates shell rows with single crochet linking rows. On a shell row (RS), ch 3 (counts as first dc), 2 dc in the first st for a half shell, sk 2 sts, sc in next st, sk 2 sts, 5 dc in next st, repeating across and ending with sk 2, sc in next st, sk 2, 3 dc in the last st for a half shell. On a single crochet row (WS), ch 1, turn, sc in first dc, then (ch 2, sk 2 dc, sc in next sc, ch 2, sk 2 dc, sc in center dc of shell) across, ending with sc in the top of the turning chain.
- Picot Scallop Edging: join yarn, sc in first st, ch 3, sl st in the first ch of the ch-3 (picot made), sc in next st, sk 1 st, and repeat around.
- Crochet Bow (make 2): with CC, ch 16, sl st in first ch to form a ring, sc around the ring for 2 rounds (32 sc per round), sl st to join. Cut yarn leaving a 12 inch tail, pinch the oval in the center, wrap the tail tightly around the pinch 6 times, knot securely on the back, and use the remaining tail to sew the bow to the strap base.
Gauge & Size
- Finished sizes: newborn chest 14 inches, length shoulder to crotch 11 inches, bonnet 13.5 inches; 3 to 6 months chest 16 inches, length 12.5 inches, bonnet 14.5 inches; 6 to 12 months chest 18 inches, length 13.5 inches, bonnet 15.5 inches
- Gauge: in shell stitch, blocked, 1 shell repeat (6 sts wide) = 1.25 inches and 6 rows = 2 inches; in single crochet, 18 sc and 20 rows = 4 inches
- Construction: romper worked flat in front and back panels with straps, crotch flaps and button closure; bonnet worked in joined rounds from the crown
- Skill level: Intermediate
Romper Front Panel
With MC, ch 40 (46 / 52).
Row 1 (RS, Shell Row): Dc in 4th ch from hook (counts as first dc of half shell), dc in same ch, sk 2 ch, sc in next ch, sk 2 ch, 5 dc in next ch. Rep sk 2, sc, sk 2, 5 dc shell across to last 4 ch, sk 2 ch, sc in next ch, sk 1 ch, 3 dc in last ch. (38 / 44 / 50 foundation sts, forming 6 / 7 / 8 shells with half shells at each edge)
Row 2 (WS, SC Linking Row): Ch 1, turn. Sc in first dc, (ch 2, sk 2 dc, sc in next sc, ch 2, sk 2 dc, sc in center dc of shell) across, ending sc in top of turning ch. (13 / 15 / 17 sc, 12 / 14 / 16 ch-2 sps)
Row 3 (RS, Shell Row): Ch 3, turn. 2 dc in first sc (half shell), sk ch-2 sp, sc in next sc, sk ch-2 sp, 5 dc in next sc. Rep sk ch-2 sp, sc in sc, sk ch-2 sp, 5 dc in next sc across, ending sk ch-2 sp, sc in last sc before final ch-2 sp, sk ch-2 sp, 3 dc in last sc. (38 / 44 / 50 sts)
Rows 4 through 16 (18 / 20): Continue alternating Row 2 and Row 3 until you have completed 8 (9 / 10) total Shell Rows and 8 (9 / 10) total SC Linking Rows from the foundation, ending after a SC Linking Row (WS). Your piece should measure approximately 5 inches (5.5 / 6 inches) from the foundation edge.
Waistband Stripe
Row Waist-1 (RS): Join CC with a sl st in the first st of the working edge. Ch 1. Sc across all sts of the SC Linking Row, working into the sc sts and into the center of each ch-2 sp. (38 / 44 / 50 sc)
Row Waist-2 (WS, Picot Trim): Ch 1, turn. Sl st in first sc, (ch 3, sl st in first ch of ch-3 just made, sl st in next sc) across. Fasten off CC. (19 / 22 / 25 picots)
Upper Bodice & Straps
Reattach MC with RS facing at the right edge of the waistband.
Row Bodice-1 (RS, Shell Row): Ch 3. Work a Shell Row into the sc sts of Row Waist-1, treating each sc as the foundation stitch: half shell in first st, (sk 2, sc in next st, sk 2, 5 dc in next st) across, ending with a half shell in the last st. (38 / 44 / 50 sts)
Continue alternating SC Linking Row and Shell Row for 6 (7 / 8) more rows, ending after a Shell Row (RS). The full front bodice panel should now measure approximately 8.5 inches (9.5 / 10.5 inches) from foundation chain to working edge.
Now divide for the neckline. Each strap zone is 6 stitches wide, and the center 26 (32 / 38) stitches are left open for the neckline.
Left Strap Row 1 (RS): Work across the first 6 sts only in Shell Row pattern (half shell, sk 2, sc in next st, sk 2, half shell). (6 sts)
Left Strap Row 2 (WS): Ch 1, turn. Sc, ch 2, sc, ch 2, sc. (3 sc, 2 ch-2 sps)
Left Strap Rows 3 through 8: Continue alternating for 3 more complete Shell Row and SC Linking Row pairs. (6 sts per row)
Fasten off, leaving a 12 inch tail for seaming. For the right strap, skip the center 26 (32 / 38) sts, rejoin MC, and work the same as the left strap rows 1 through 8. Fasten off with a 12 inch tail.
Romper Back Panel
Work the back panel exactly as the front panel through Bodice-1 and the following alternating rows, with two changes: the back has no neckline opening, and we add 3 extra sc rows at the top for a slightly higher back.
Row BackExt-1 (WS): Ch 1, turn. Sc across all 38 (44 / 50) sts. (38 / 44 / 50 sc)
Row BackExt-2 (RS): Ch 1, turn. Sc across. (38 / 44 / 50 sc)
Row BackExt-3 (WS): Ch 1, turn. Sc across. (38 / 44 / 50 sc)
Back Left Strap: Work identically to the Front Left Strap across the first 6 sts for 8 rows. Fasten off with a 12 inch tail.
Back Right Strap: Skip the center 26 (32 / 38) sts. Work identically to the Front Right Strap across the final 6 sts for 8 rows. Fasten off with a 12 inch tail.
Crotch Flaps & Buttons
Front Crotch Flap: With MC, working into the foundation chain of the Front Panel, pick up and sc across the bottom 10 center sts of the foundation chain. (10 sc)
Row CF-1 (WS): Ch 1, turn. Sc across. (10 sc)
Row CF-2 (RS): Ch 1, turn. Sc across. (10 sc)
Row CF-3 (WS): Ch 1, turn. Sc across. (10 sc)
Do not fasten off yet. Work Picot Scallop Edging across the bottom of the flap, then fasten off. Sew 3 anchor buttons evenly spaced across Row CF-3 using a sewing needle and thread.
Back Crotch Flap: Work identically to the Front Crotch Flap with 10 sc for 3 rows. On Row BF-3, create 3 button loops evenly spaced: at each button loop position, ch 4, sk 2 sts, sl st in next st. Work Picot Scallop Edging along the bottom and fasten off.
Bonnet Pattern
The bonnet is worked in joined rounds from the crown outward, with MC.
Round 1: Make a magic ring. Ch 2 (does not count as st). 8 sc in ring. Join with sl st to first sc. (8 sc)
Round 2: Ch 2. 2 sc in each sc around. Join. (16 sc)
Round 3: Ch 2. (Sc in next sc, 2 sc in next sc) around. Join. (24 sc)
Round 4: Ch 2. (Sc in next 2 sc, 2 sc in next sc) around. Join. (32 sc)
Round 5: Ch 2. (Sc in next 3 sc, 2 sc in next sc) around. Join. (40 sc)
Round 6: Ch 2. (Sc in next 4 sc, 2 sc in next sc) around. Join. (48 sc)
For 0 to 3 months, stop increasing here and go to the Bonnet Body. (48 sc)
Round 7 (3 to 6 and 6 to 12 months only): Ch 2. (Sc in next 5 sc, 2 sc in next sc) around. Join. (56 sc)
For 3 to 6 months, stop increasing here and go to the Bonnet Body. (56 sc)
Round 8 (6 to 12 months only): Ch 2. (Sc in next 6 sc, 2 sc in next sc) around. Join. (64 sc)
Bonnet Body: Work even (no increases) in sc joined rounds for 10 (11 / 12) rounds. (48 / 56 / 64 sc per round)
Bonnet Brim & Ties
The brim is worked flat across only the front half of the bonnet, the front 24 (28 / 32) sts.
Brim Row 1 (RS, Shell Row): Ch 3. Work a shell row across the front 24 (28 / 32) sts. Turn. (24 / 28 / 32 sts)
Brim Row 2 (WS, SC Linking Row): Ch 1. Work an sc linking row. Turn.
Brim Row 3 (RS, Shell Row): Ch 3. Work a shell row. Turn. (24 / 28 / 32 sts)
Brim Edging: With CC, work Picot Scallop Edging across the outer edge of the brim. Fasten off CC.
Tie Strings: With MC, make two chains each 12 inches long (approximately 50 ch). Attach one chain with a sl st to each lower corner of the bonnet brim. Fasten off and weave in ends.
Finishing & Assembly
Block both romper panels flat to the finished measurements and let them dry completely.
With RS together, seam the left side of the front to the left side of the back using whip stitch or mattress stitch, matching rows carefully, from the bottom of the bodice up to the armhole. Repeat for the right side, then turn RS out.
Align the front left strap RS to the back left strap WS and seam the strap tops together with a flat overcast stitch using the yarn tails. Repeat for the right strap.
Work Picot Scallop Edging around each leg opening: with CC and RS facing, join yarn at the side seam of one leg opening, work sc and picots evenly around, join with sl st, and fasten off. Repeat for the second leg opening.
Attach the front crotch flap to the back crotch flap by overlapping front over back and buttoning through the loops.
Make 2 crochet bows and sew one to the RS of each shoulder strap, centered at the junction between the strap and the upper bodice front. Weave in all yarn ends securely, working ends in at least two directions for safety in baby garments.
To block the finished set, handwash in cool water with gentle detergent, press out excess water in a towel without wringing, and pin flat to measurements until completely dry.
Tips
Please do not skip the gauge swatch on this one. It is a fitted garment for a tiny human, and being even half a stitch off per inch can shift the finished piece by a size or two.
Choose a machine-washable, soft yarn with good stitch definition. Fuzzy or novelty yarns will hide that lovely shell texture.
Take your time with the construction and block your pieces before seaming. If your first shell row feels awkward, do not worry, by row three your hands will know exactly what to do.
For care, machine wash cold on a gentle cycle in a mesh laundry bag and lay flat to dry. Check all buttons before each use to make sure they are still firmly attached, and use the set under supervision because of the button embellishments.
Ocean Blue Baby Romper Set Free Crochet Pattern
Materials
Steps
- Work the front panel in shell stitch and single crochet rows
- Add the white waistband stripe with picot trim
- Work the upper bodice and shape the two front straps
- Work the back panel with extra rows and straps
- Make the crotch flaps, sew on 3 anchor buttons and work the button loops
- Crochet the bonnet crown in joined rounds up to 48 (56 / 64) sts
- Work the bonnet body, shell stitch brim, picot edging and tie strings
- Block, seam the panels and straps, add leg opening edging and sew on the two bows
- Make a blocked gauge swatch first, as small gauge changes shift the baby size
- Block both panels flat before seaming for neat joins
- Work yarn ends in at least two directions so they stay secure on a baby garment
- Check the anchor buttons before each use to be sure they are firmly attached


