Cutest Crochet Chicken Drawstring Pouch Free Pattern Idea
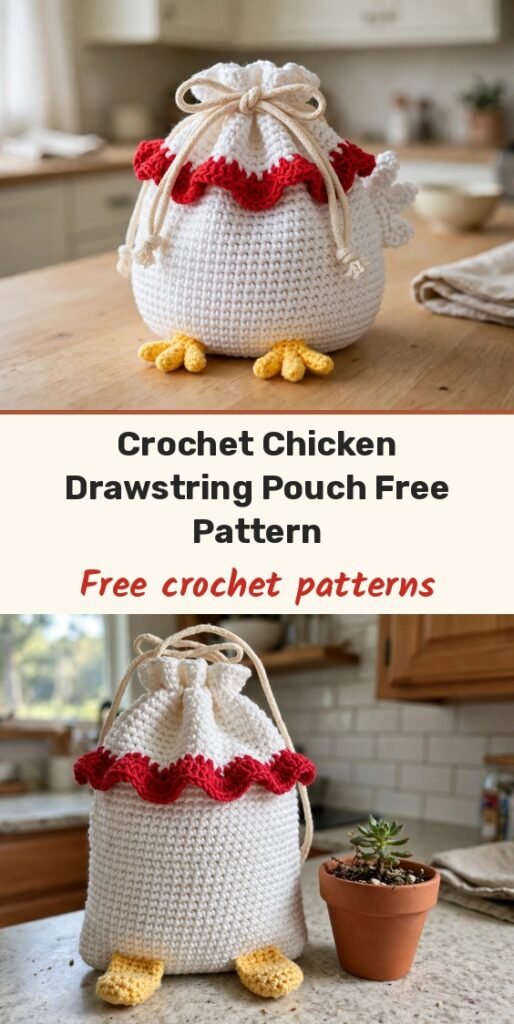
Table of Contents
This little chicken drawstring pouch makes me smile every single time I look at it! We will crochet a simple round pouch in double crochet, add a red scallop ruffle near the top, thread in two drawstring cords, and finish with the sweetest little yellow chicken feet.
It is a perfect beginner-friendly project because it uses simple stitches and easy repeats, and it works up quickly. Use your pouch for jewellery, coins, earbuds, lip balm, hair ties, or small gifts, or make a whole flock of them as adorable handmade gift bags.
Materials
- Medium / worsted weight cotton or acrylic yarn in a main color for the pouch
- Red yarn for the scallop ruffle round
- Yellow yarn for the feet
- Black yarn or embroidery thread (optional, for eyes and mouth)
- 4mm to 5mm crochet hook, matched to your yarn for a firm fabric
- Scissors
- Yarn needle for weaving in ends and sewing details
- Stitch marker (optional)
Abbreviations
- ch: chain
- sl st: slip stitch
- sc: single crochet
- dc: double crochet
- inc: increase, 2 stitches in the same stitch
- st/sts: stitch / stitches
Gauge & Size
- Finished size: a small drawstring pouch sized for jewellery, coins, cosmetics and other small essentials, built on a 48-stitch body
- Construction: circular base worked in increasing double crochet rounds, straight body rounds, a scallop ruffle round, two woven drawstring cords, and two separately made feet tied on
- Skill level: Beginner
Pouch Base Pattern
Make a magic ring. If you prefer, you can chain 4 and slip stitch into the first chain to form a ring instead.
Round 1: Ch 3 (counts as first dc), work 11 dc into the magic ring. Pull the tail to close the ring tightly and join with sl st into the top of the starting ch-3. (12 dc)
Round 2: Ch 3, work 1 dc in the same stitch, then work 2 dc in each stitch around. Join with sl st into the top of ch-3. (24 dc)
Round 3: Ch 3, (1 dc in the next stitch, inc in the next stitch) repeat around. Join with sl st into ch-3. (36 dc)
Round 4: Ch 3, (1 dc in each of the next 2 stitches, inc in the next stitch) repeat around. Join with sl st. (48 dc)
Pouch Body Pattern
Round 5: Ch 3, work 1 dc in each stitch around with no increases. Join with sl st. (48 dc)
Round 6: Ch 3, work 1 dc in each stitch around. Join with sl st. (48 dc)
Round 7: Ch 3, work 1 dc in each stitch around. Join with sl st. (48 dc)
Round 8: Ch 3, work 1 dc in each stitch around. Join with sl st. (48 dc)
Round 9: Ch 3, work 1 dc in each stitch around. Join with sl st. (48 dc)
Round 10: Ch 3, work 1 dc in each stitch around. Join with sl st. (48 dc)
Round 11: Ch 3, work 1 dc in each stitch around. Join with sl st. (48 dc)
Round 12: Ch 3, work 1 dc in each stitch around. Join with sl st. (48 dc)
Round 13: Ch 3, work 1 dc in each stitch around. Join with a final sl st. (48 dc)
That gives you 13 rounds in total from the beginning: rounds 1 to 4 for the base and 9 body rounds for the sides.
Scallop Ruffle Round
At the end of the last body round, change to red yarn by pulling the red yarn through the joining loop.
Scallop Round: Ch 1 (counts as an sc in this round). Repeat the following 12 times: sc in the first stitch, skip 1 stitch, work 7 dc into the next stitch (big scallop made), skip 1 stitch. After the last scallop, join with sl st to the first red stitch. (12 scallops, 48 sts used)
Cut the red yarn and secure the ends with knots. This scallop round is the cute ruffle collar that gives the pouch its chicken character.
Drawstring Cords
The pouch closes with two separate drawstrings, each made of chains, woven in opposite directions.
Cord (make 2): With the main color, make a slip knot and crochet 100 chains. Fasten off.
Insert String 1: Fold the pouch flat to find the weaving path, then weave the string through the stitches near the top, bringing it out after 3 stitches and back in after 3 stitches, all the way around. Bring both ends to the same place and tie them together, not too tight.
Insert String 2: Start at the same opening area and weave the same way, but on the opposite over-and-under path so the strings sit on different tracks. Tie the ends together.
Now you can close your pouch by pulling both drawstrings outward. There is no special hole round to work, the cords simply weave through the gaps between the stitches above the scallop area.
Chicken Feet Pattern
The feet are made separately in yellow yarn, then tied onto the pouch. Make 2.
Row 1: Ch 7, work 6 sc starting in the 2nd chain from the hook. (6 sc)
Toes: Make the following toe 3 times: ch 4, work 3 sc starting in the 2nd chain from the hook, sl st back into the base area to attach.
Fasten off and leave tails for tying. Choose the back seam line as the back of the chicken, and attach the feet on the front bottom area by tying the tails in secure knots on the inside.
Finishing & Assembly
Weave in all ends with your yarn needle, in the main color, red and yellow. Tighten and secure all knots, especially on the foot attachments, and gently stretch the base circle and smooth the sides to shape the pouch.
If you like, embroider a little face with black yarn or embroidery thread: two small eyes and a tiny mouth on the front of the pouch.
For a firmer top edge, you can add 1 round of sc around in the main color before adding the drawstrings, but the classic finish goes straight from the scallops to the cords.
Tips
Count your stitches and rounds as you go. The flat base depends on consistent increases, so check your 12, 24, 36 and 48 stitch rounds.
Close the magic ring tightly at the start, or small items could slip out through a loose center hole.
Do not skip the second drawstring. Two strings make the pouch close smoothly from both sides.
To make the pouch bigger, add one more increase round to the base and a few more body rounds. For a smaller pouch, stop after fewer body rounds.

Cutest Crochet Chicken Drawstring Pouch Free Pattern Idea
Materials
Steps
- Work a magic ring with 12 dc for the base center
- Increase the base through 24, 36 and 48 dc rounds
- Work 9 straight body rounds to Round 13
- Add the red scallop ruffle round with 12 scallops
- Make two 100-chain drawstring cords and weave them in opposite directions
- Crochet two yellow feet with three toes each and tie them on
- Weave in ends and embroider an optional face
- Check the stitch count at the end of every increase round: 12, 24, 36, then 48
- Pull the magic ring fully closed so small items cannot slip out
- Weave the two drawstrings on opposite tracks so the pouch closes evenly
- Tie the feet on with tight knots on the inside of the pouch


