Rose Garden Crochet Tote Free Crochet Pattern
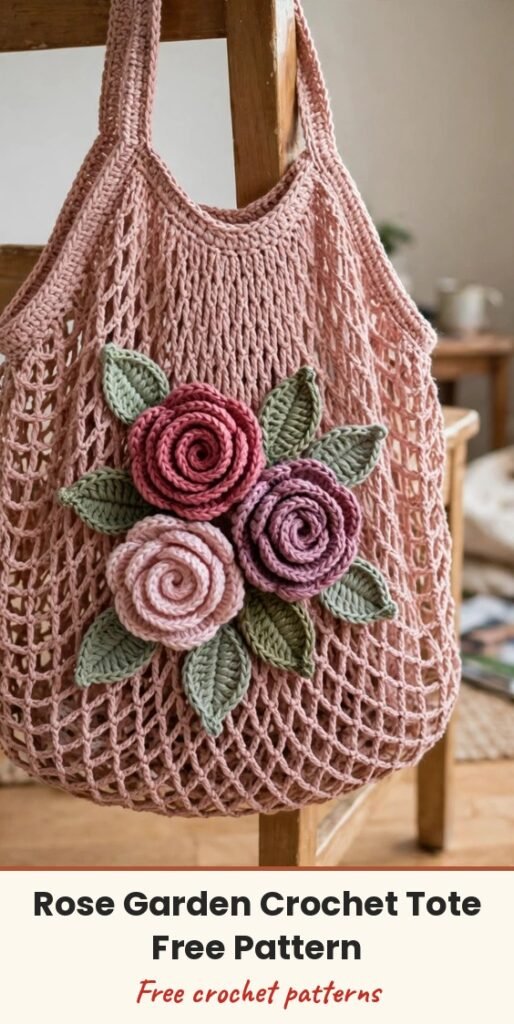
Table of Contents
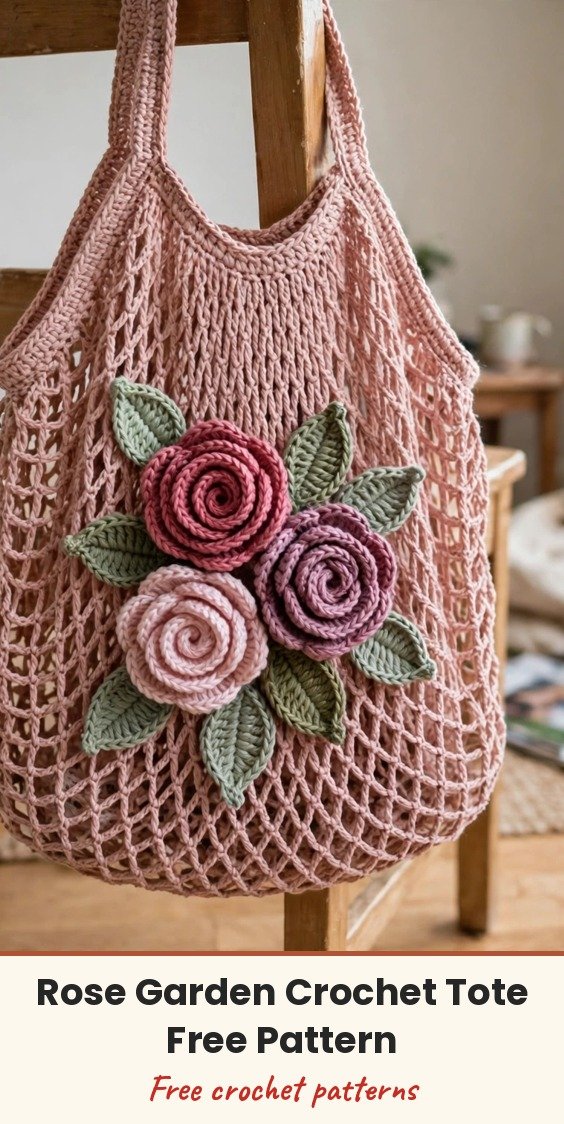
This rose garden tote is the pretty one I reach for on market days! We will build a light, airy mesh market bag on a flat oval base, add strong folded shoulder straps, and finish it with a cluster of dimensional spiral roses and leaves sewn onto the front.
The mesh folds down to almost nothing in your purse but expands to hold produce, library books, or craft supplies, and the cotton yarn is machine washable. The roses look intricate, but each one is simply a ruffled double crochet strip rolled into a spiral, and once you make your first one the rest go quickly.
Plan for 12 to 18 hours at an intermediate level. Most of it is relaxing, repetitive mesh rounds, which makes this a lovely evening project.
Materials
- Approximately 550 yards worsted weight 100 percent cotton yarn in dusty blush pink (Main Color)
- Approximately 30 yards cotton yarn in deep dusty rose (Rose Color A)
- Approximately 25 yards cotton yarn in medium mauve pink (Rose Color B)
- Approximately 25 yards cotton yarn in pale blush white (Rose Color C)
- Approximately 35 yards cotton yarn in sage green (Leaf Color)
- US H/8 (5.0mm) crochet hook for the bag body and straps
- US G/6 (4.0mm) crochet hook for the roses and leaves
- Yarn needle with a blunt tip and large eye
- Scissors
- 4 to 6 locking stitch markers
- Measuring tape
Abbreviations
- MC: main color
- ch: chain
- ch-sp: chain space
- sc: single crochet
- dc: double crochet
- hdc: half double crochet
- sc2tog: single crochet two together
- sl st: slip stitch
- sk: skip
- pm: place marker
- st/sts: stitch / stitches
- RS: right side
Special Stitches
- Mesh Stitch Unit: 1 sc into the designated stitch or space, ch 2, skip 2 stitches or the next ch-2 space. In rounds, sc into each sc of the previous round and ch 2 over each ch-2 space to make the open square grid.
- Standing Single Crochet: make a slip knot on the hook, insert the hook into the designated stitch, yarn over and pull up a loop, yarn over and draw through both loops. Used when joining a new color neatly.
- Spiral Rose: with the smaller hook and a rose color, ch 36. Working back along the chain, work 3 dc into the 4th chain from the hook, then 3 dc into each remaining chain across to make a long ruffled strip. Roll the strip tightly from one end with the ruffle facing outward, thread a yarn needle with the tail, and weave through the flat bottom of the rose, stitching the layers together to secure the spiral. Leave a long tail for attaching.
- Leaf: with the smaller hook and Leaf Color, ch 10. Row 1: sc into 2nd ch from hook, hdc into next ch, dc into next 5 ch, hdc into next ch, sc into last ch. Working along the opposite side of the foundation chain: sc into next ch, hdc into next ch, dc into next 5 ch, hdc into next ch, sc into last ch, sl st to first sc to close. Fasten off, leaving a long tail for sewing. Each leaf is approximately 1.75 inches long.
Gauge & Size
- Finished size: bag body approximately 14 inches wide by 13 inches tall excluding straps, about 5 inches deep at the widest point; straps approximately 24 inches each, a drop of about 12 inches
- Gauge: with H/8 hook and MC, mesh pattern 14 mesh stitches and 10 mesh rows = 4 inches; base in single crochet 16 sc and 18 rows = 4 inches
- Construction: flat oval base in continuous rounds, mesh body in joined rounds, two folded and seamed straps, floral appliques made separately and sewn on
- Skill level: Intermediate
Oval Base Pattern
The base is worked in continuous rounds. Do not join. Use a marker to track the start of each round, and move the end markers up each round. With MC and the H/8 hook, ch 22.
Round 1: Sc into 2nd ch from hook, sc into each of next 19 ch (20 sc across), work 3 sc into the last ch. Rotate and sc along the opposite side of the foundation chain: sc into each of next 20 ch, work 2 sc into the same stitch as your very first sc. Do not join. Pm in first st. (45 sc)
Round 2: 2 sc into first st, sc into next 20 sts, 2 sc into next st, 2 sc into next st, sc into next 20 sts, 2 sc into last st. (49 sc)
Round 3: 2 sc into first st, sc into next 21 sts, (2 sc into next st) 3 times, sc into next 21 sts, (2 sc into next st) 2 times. (55 sc)
Round 4: 2 sc into first st, sc into next 22 sts, (2 sc into next st) 4 times, sc into next 22 sts, (2 sc into next st) 3 times. (63 sc)
Round 5: Sc into first st, sc into next 24 sts, (2 sc into next st) 4 times, sc into next 24 sts, (2 sc into next st) 4 times, sc into last st. (71 sc)
Round 6: Sc into first st, sc into next 26 sts, (2 sc into next st) 4 times, sc into next 26 sts, (2 sc into next st) 3 times, sc into last st. (78 sc)
Round 7: Sc evenly around without increasing. (78 sc)
The oval base should measure approximately 10 inches long by 4.5 inches wide. Sl st into the next stitch to prepare for the body. Do not fasten off. Your base should be firm and flat, with no cupping or buckling.
Mesh Body Pattern
The mesh body is worked in joined rounds. Join each round with a sl st, then ch 1 to begin the next round; the ch 1 does not count as a stitch. Stitch counts for mesh rounds count the sc posts, which equal the number of mesh units. Our 78 sc base gives 26 mesh units.
Round 1 (Mesh Setup Round): Ch 1, sc into same st as sl st, ch 2, sk next 2 sts, (sc into next st, ch 2, sk next 2 sts) around, sl st to first sc. (26 sc posts; 26 ch-2 spaces)
Round 2: Ch 1, sc into same sc, ch 2, (sc into next sc, ch 2) around, sl st to first sc. (26 sc posts; 26 ch-2 spaces)
Round 3: Ch 1, sc into same sc, ch 2, (sc into next sc, ch 2) around, sl st to first sc. (26 sc posts; 26 ch-2 spaces)
Round 4: Ch 1, sc into same sc, ch 2, (sc into next sc, ch 2) around, sl st to first sc. (26 sc posts; 26 ch-2 spaces)
Round 5: Ch 1, sc into same sc, ch 2, (sc into next sc, ch 2) around, sl st to first sc. (26 sc posts; 26 ch-2 spaces)
Round 6: Ch 1, sc into same sc, ch 2, (sc into next sc, ch 2) around, sl st to first sc. (26 sc posts; 26 ch-2 spaces)
Round 7: Ch 1, sc into same sc, ch 2, (sc into next sc, ch 2) around, sl st to first sc. (26 sc posts; 26 ch-2 spaces)
Round 8: Ch 1, sc into same sc, ch 2, (sc into next sc, ch 2) around, sl st to first sc. (26 sc posts; 26 ch-2 spaces)
Round 9: Ch 1, sc into same sc, ch 2, (sc into next sc, ch 2) around, sl st to first sc. (26 sc posts; 26 ch-2 spaces)
Round 10: Ch 1, sc into same sc, ch 2, (sc into next sc, ch 2) around, sl st to first sc. (26 sc posts; 26 ch-2 spaces)
Round 11: Ch 1, sc into same sc, ch 2, (sc into next sc, ch 2) around, sl st to first sc. (26 sc posts; 26 ch-2 spaces)
Round 12: Ch 1, sc into same sc, ch 2, (sc into next sc, ch 2) around, sl st to first sc. (26 sc posts; 26 ch-2 spaces)
Round 13: Ch 1, sc into same sc, ch 2, (sc into next sc, ch 2) around, sl st to first sc. (26 sc posts; 26 ch-2 spaces)
Round 14: Ch 1, sc into same sc, ch 2, (sc into next sc, ch 2) around, sl st to first sc. (26 sc posts; 26 ch-2 spaces)
Round 15: Ch 1, sc into same sc, ch 2, (sc into next sc, ch 2) around, sl st to first sc. (26 sc posts; 26 ch-2 spaces)
Round 16: Ch 1, sc into same sc, ch 2, (sc into next sc, ch 2) around, sl st to first sc. (26 sc posts; 26 ch-2 spaces)
Round 17: Ch 1, sc into same sc, ch 2, (sc into next sc, ch 2) around, sl st to first sc. (26 sc posts; 26 ch-2 spaces)
Round 18: Ch 1, sc into same sc, ch 2, (sc into next sc, ch 2) around, sl st to first sc. (26 sc posts; 26 ch-2 spaces)
Round 19: Ch 1, sc into same sc, ch 2, (sc into next sc, ch 2) around, sl st to first sc. (26 sc posts; 26 ch-2 spaces)
Round 20: Ch 1, sc into same sc, ch 2, (sc into next sc, ch 2) around, sl st to first sc. (26 sc posts; 26 ch-2 spaces)
After Round 20, the bag should measure approximately 10 inches in total height from the base. The next two rounds are optional transition decrease rounds for a slightly narrower opening. Skip them and go straight to Round 23 if you prefer a straight-sided bag.
Round 21 (optional): Ch 1, sc into same sc, ch 2, (sc into next sc, ch 2) 11 times, sc2tog over the next sc and the sc after the next ch-2 space (insert hook into the sc, skip the ch-2 sp, insert hook into the following sc), ch 2, (sc into next sc, ch 2) 12 times, sc2tog as before, ch 2, sl st to first sc. (24 sc posts; 24 ch-2 spaces)
Round 22 (optional): Ch 1, sc into same sc, ch 2, (sc into next sc, ch 2) around, sl st to first sc. (24 sc posts; 24 ch-2 spaces)
Round 23 (Top Reinforcement Round): Ch 1. Working into both the sc posts and the ch-2 spaces of the previous mesh round, sc into each sc post and 2 sc into each ch-2 space around. Sl st to first sc. (78 sc if coming from 26-post mesh; 72 sc if coming from 24-post mesh after the taper)
Round 24 (Top Edge): Ch 1, sc into each sc around, sl st to first sc. (78 sc)
Fasten off, leaving a 12 inch tail for weaving in. The top edge should feel notably firmer than the mesh body, and the finished body should measure approximately 13 inches tall and 14 inches wide laid flat.
Shoulder Straps
Make 2. Each strap is a long sc rectangle folded lengthwise and seamed for durability, finishing at approximately 0.75 inch wide and 24 inches long before attachment. With MC and the H/8 hook, ch 90.
Row 1: Sc into 2nd ch from hook, sc into each ch across. Turn. (89 sc)
Row 2: Ch 1, sc into each sc across. Turn. (89 sc)
Row 3: Ch 1, sc into each sc across. Turn. (89 sc)
Row 4: Ch 1, sc into each sc across. Do not turn. Fasten off, leaving a 24 inch tail. (89 sc)
Fold the strap in half lengthwise so the two long edges meet, and whipstitch the long edges together firmly with the long tail. Make the second strap the same way.
To attach, position one strap on the front of the bag with each end at the top edge, approximately 3 inches in from the side edges, overlapping the top edge by approximately 1.5 inches folded to the inside. Sew each end securely to the inside top edge with a box stitch, then sew an X across the box for maximum strength. Repeat for the second strap on the back, mirroring the front exactly.
Roses & Leaves
Using the smaller G/6 hook and the Spiral Rose and Leaf instructions in Special Stitches, make 2 roses in deep dusty rose (Color A), 2 roses in medium mauve pink (Color B), 1 rose in pale blush white (Color C), and 6 leaves in sage green. Finished roses are approximately 1.75 to 2 inches across.
For the cluster, lay the bag flat with the front facing up. Position the cluster on the lower left quadrant of the front, roughly from 3 inches up from the base to 8 inches up, and from the center toward the left edge. Arrange one large Color A rose at the center, one Color B rose slightly above and to the right, the pale Color C rose at the upper right, one Color B rose at the lower left, and one Color A rose at the lower center, tucking a leaf between and behind each pair of roses with the tips pointing outward.
Sew each rose to the bag by stitching through the flat base of the rose and catching the mesh bars underneath, making several passes so the roses do not flop forward. Sew the leaves along their center veins.
Finishing & Assembly
Weave in all yarn ends securely, working tails back and forth through multiple stitches so they cannot pull out.
To block, fill the bag with plastic bags or crumpled paper to shape it, lightly mist the whole bag with cool water, pat the base flat and pull the mesh panels gently so the squares are even. Let it dry completely in a ventilated area, approximately 24 hours. Do not pin stretch aggressively.
If you like, add a fabric lining: cut cotton canvas or quilting cotton using the blocked bag as a template, sew it into a bag shape with the top open, fold the top seam allowance under, and slip stitch it to the inside of the bag just below the reinforced top border.
Tips
Choose a smooth, plied cotton with good stitch definition. Fuzzy or halo yarns will hide the mesh and flatten the rose texture.
Make all the flowers and leaves with the smaller hook. They will feel slightly stiff, and that is exactly what helps them stand away from the bag as dimensional appliques.
To make a smaller bag (about 11 by 10 inches), start the base with ch 16 and work 5 increase rounds, then work 14 mesh rounds. For a larger market tote (about 17 by 15 inches), start with ch 28, work 8 increase rounds to 96 sc, and work 25 mesh rounds, with strap chains increased to ch 110.
For care, machine wash on a gentle cycle in cool water and lay flat to dry. Store the bag stuffed with tissue paper to help it hold its shape.
Rose Garden Crochet Tote Free Crochet Pattern
Materials
Steps
- Work the flat oval base in continuous sc rounds up to 78 sts
- Work 20 mesh body rounds of 26 mesh units
- Work the optional taper rounds and the reinforced top edge
- Make two 89-stitch sc straps, fold and seam them, and sew them to the bag
- Crochet 5 spiral roses and 6 leaves with the smaller hook
- Arrange and sew the floral cluster onto the front of the bag
- Weave in ends and block the bag stuffed to shape
- Keep the base rounds marked at both oval ends so the increases stay even
- Use the smaller hook for roses and leaves so the appliques stand up from the mesh
- Sew strap ends with a box stitch plus an X for maximum strength
- Block the bag stuffed with bags or paper so the mesh squares dry even


