Cream White Bridal Crochet Lace Dress Free Pattern

Table of Contents
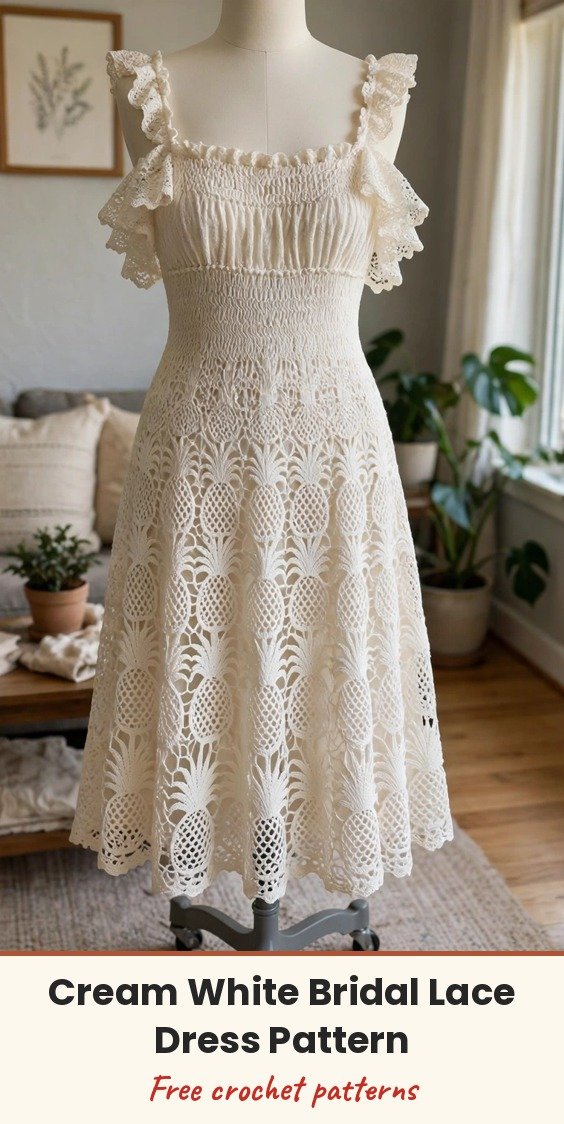
I have always dreamed of making something truly show-stopping, and this cream white bridal lace dress is exactly that project! With its smocked bodice, sweeping pineapple lace skirt, and romantic flutter ruffle straps, it is the kind of heirloom piece that gets gasps when you walk into the room.
We will build it in three sections: a fitted bodice worked flat and seamed into a tube, a pineapple lace skirt worked in the round from the waist down through four tiers, and two ruffled shoulder straps we attach at the very end. It is an advanced pattern worked in fine size 10 crochet cotton thread, so take your time and enjoy every tier.
The finished dress fits a size Small/Medium with a 32 to 34 inch bust and a 26 to 28 inch waist, and the total length from bodice top to hem is about 48 inches. Plan for 80 to 120 hours of stitching plus 12 to 24 hours for blocking — a real labor of love, and worth every hour.
Materials
- 3,500 yards size 10 crochet cotton thread (bedspread weight) in cream white, about 10 balls of 350 yards
- Steel crochet hook size 6 (1.80mm) for the bodice
- Steel crochet hook size 7 (1.65mm) for the skirt
- 8 stitch markers
- Tapestry needle for weaving in ends
- At least 50 rustproof blocking pins and blocking mats
- Spray bottle with water, or a bowl for wet blocking
- 2 lengths of 0.25 inch (6mm) satin ribbon, 18 inches (46cm) each, in cream or ivory (optional, for strap structure)
- Sewing needle and matching thread for attaching the ribbon
Abbreviations
- ch: chain
- sc: single crochet
- FPsc: front post single crochet
- BPsc: back post single crochet
- hdc: half double crochet
- dc: double crochet
- dc2tog: double crochet two together
- sl st: slip stitch
- ch-sp: chain space
- st/sts: stitch / stitches
- RS: right side
- WS: wrong side
Special Stitches
- Smocking Stitch: worked over 2 rows. Row A (RS): work across in sc. Row B (WS): ch 1, turn, and alternate FPsc and BPsc across, working the post stitches around the post of the sc two rows below. This creates the elastic ribbed bodice texture.
- Pineapple Base Arch: ch 5, then sl st into the designated stitch or space to form a loop arch where a pineapple cluster is built.
- Pineapple Cluster: work into a chain space or arch: 7 dc, ch 1, 7 dc (14 dc total with a ch-1 center).
- Pineapple Decrease: on each row above the base, work into the ch-1 space at the pineapple center: 6 dc, ch 1, 6 dc, then 5 dc, ch 1, 5 dc on the next row, decreasing until you reach 1 dc, ch 1, 1 dc, then close the tip with dc2tog.
- Fan Shell: work 5 dc into the same stitch or space.
- Scallop Edging: work (sc, hdc, 5 dc, hdc, sc) all into the same stitch or designated space.
- Ruffle Stitch: Round 1: sc evenly around the strap attachment edge. Round 2: in each sc, work (sc, ch 2, sc). Round 3: in each ch-2 space, work (sc, hdc, dc, hdc, sc).
- Chain Arch Connector: ch 5, skip the specified number of stitches, sc into the next designated stitch or space.
Gauge & Size
- Finished size: midi dress, size Small/Medium, 32 to 34 inch bust, 26 to 28 inch waist, about 48 inches total length
- Bodice gauge (size 6 hook, smocking stitch): 18 stitches and 10 rows = 2 inches (5cm)
- Skirt gauge (size 7 hook, pineapple lace after blocking): one pineapple repeat unit (14 stitches wide at base) = 1.75 inches (4.5cm); one repeat unit height = 2.25 inches (5.7cm)
- Construction: bodice worked flat and seamed, skirt worked in the round from the waist down in four pineapple tiers, straps worked separately and attached
- Skill level: Advanced
Bodice Pattern
The bodice is worked flat in the smocking stitch and forms a tube when seamed. Using the size 6 (1.80mm) hook, chain 290. This gives a working row of 288 sc plus 2 turning chain stitches, about 32 inches (81cm) around at gauge.
Row 1 (RS): Sc in 2nd ch from hook and in each ch across. Turn. (288 sc)
Row 2 (WS): Ch 1, turn. FPsc in next st, BPsc in next st; repeat across. (288 sts)
Row 3 (RS): Ch 1, turn. BPsc in next st, FPsc in next st; repeat across. (288 sts)
Rows 4 to 36: Continue alternating Rows 2 and 3 in the smocking stitch pattern. After blocking, the bodice should measure approximately 7 inches (18cm) tall and 32 inches (81cm) wide before seaming. The smocking gathers the fabric, so unstretched it measures about 26 inches at the waist and stretches to 32 to 34 inches at the bust.
Row 37 (WS, waist edging): Ch 1, turn. Sc evenly across the bottom edge, working 1 sc in each stitch. (288 sc)
Do not fasten off yet. For the seaming, fold the bodice with right sides together and whip stitch or mattress stitch the side edge (Rows 1 through 36) together with a tapestry needle. Fasten off, weave in ends, and turn right side out. The bottom open edge of Row 37 (288 sc) connects to the skirt.
Skirt Pattern: Tier 1
With RS facing and the size 7 (1.65mm) hook, join yarn to any stitch in Row 37, the bottom waist edge of the bodice. Chain 3 at the beginning of a dc round counts as the first dc throughout the skirt, and all rounds are joined with a slip stitch.
Round 1 (setup): Work 12 pineapple arch groups evenly around. Each group is: sc in next 2 sts, ch 5, sk 2 sts, sc in next st, ch 5, sk 2 sts, sc in next st, ch 5, sk 2 sts, sc in next 2 sts. Sl st to first sc to join. (12 pineapple arch groups, 36 ch-5 arches)
Round 2: In each ch-5 arch around, work (sc, ch 3, 7 dc, ch 1, 7 dc, ch 3, sc). Between groups, work ch 5, sk any connector sts, sc into next sc between groups, ch 5. Sl st to join. (12 pineapple clusters)
Round 3: In ch-3 sp before pineapple: sc, ch 3. In pineapple cluster: sk first dc, dc in each of next 6 dc, ch 1, dc in each of next 6 dc, sk last dc. In ch-3 sp after pineapple: ch 3, sc. In connector ch-5 arch: sc, ch 5, sc. Repeat 11 more times. Sl st to join. (12 clusters, 12 dc each)
Round 4: In ch-3 sp: sc, ch 3. In pineapple: sk first dc, dc in next 5 dc, ch 1, dc in next 5 dc. In ch-3 sp: ch 3, sc. In connector arch: ch 5, sc, ch 5. Repeat around. Sl st to join. (12 clusters, 10 dc each)
Round 5: In ch-3 sp: sc, ch 3. In pineapple: sk first dc, dc in next 4 dc, ch 1, dc in next 4 dc. In ch-3 sp: ch 3, sc. In connector arches: (sc, ch 5, sc) in first arch, (sc, ch 5, sc) in second arch. Repeat around. Sl st to join. (12 clusters, 8 dc each)
Round 6: In ch-3 sp: sc, ch 3. In pineapple: sk first dc, dc in next 3 dc, ch 1, dc in next 3 dc. In ch-3 sp: ch 3, sc. Work connector arch sections in the connector arches. Repeat around. Sl st to join. (12 clusters, 6 dc each)
Round 7: In ch-3 sp: sc, ch 3. In pineapple: sk first dc, dc in next 2 dc, ch 1, dc in next 2 dc. In ch-3 sp: ch 3, sc. Work connectors in the connector arches. Repeat around. Sl st to join. (12 clusters, 4 dc each)
Round 8: In ch-3 sp: sc, ch 3. In pineapple: dc2tog over first 2 dc, ch 1, dc2tog over next 2 dc. In ch-3 sp: ch 3, sc. Work connectors. Repeat around. Sl st to join. (12 clusters closing to tips)
Round 9 (expansion setup): Sc into the ch-1 sp at the pineapple tip. Ch 5, sc into next connector arch sp. Ch 5, sc into next connector arch sp. Ch 5, sc back into the same pineapple tip ch-1 sp. Ch 5, working into the connector arch between this pineapple and the next, sc. Repeat around. Sl st to join. (24 new ch-5 foundation arches)
Skirt Pattern: Tier 2
Tier 2 uses the same pineapple construction as Tier 1, now worked over 24 pineapple positions.
Round 10: In each ch-5 arch around, work (sc, ch 3, 7 dc, ch 1, 7 dc, ch 3, sc). Between pineapples, work connector arches as established. Sl st to join. (24 pineapple clusters)
Round 11: Work the pineapple decrease sequence as in Round 3, over 24 clusters. (12 dc per cluster)
Round 12: Work as Round 4 over 24 clusters. (10 dc per cluster)
Round 13: Work as Round 5 over 24 clusters. (8 dc per cluster)
Round 14: Work as Round 6 over 24 clusters. (6 dc per cluster)
Round 15: Work as Round 7 over 24 clusters. (4 dc per cluster)
Round 16: Work as Round 8 over 24 clusters. (2 dc groups per cluster)
Round 17: Work the expansion setup as in Round 9, but maintain 24 units. Sl st to join. (24 ch-5 arches)
Skirt Pattern: Tier 3
Round 18: In each ch-5 arch, work (sc, ch 3, 7 dc, ch 1, 7 dc, ch 3, sc). Between clusters, work ch 7 connector arches, slightly longer to build skirt width. Sl st to join. (24 clusters)
Round 19: Work the pineapple decrease sequence. (12 dc per cluster, 24 clusters)
Round 20: Continue the decrease sequence. (10 dc per cluster)
Round 21: Continue the decrease sequence. (8 dc per cluster)
Round 22: Continue the decrease sequence. (6 dc per cluster)
Round 23: Continue the decrease sequence. (4 dc per cluster)
Round 24 (tip closing): Work dc2tog, ch 1, dc2tog at each pineapple tip. Between tips, work ch 5, 5 dc fan shell into the connector arch center, ch 5. Sl st to join. (24 closed tips, 24 fan shells)
Skirt Pattern: Tier 4
In Tier 4, new pineapple arches launch from the spaces on either side of each fan shell as well as from the pineapple tips, creating the dramatic A-line flare with 48 smaller pineapple positions.
Round 25: Sc into a closed pineapple tip from Tier 3. Ch 5, sc into ch-5 sp before the fan shell. In the fan shell, ch 3, sk 2 dc, sc into the center (3rd) dc of the fan shell, ch 3. Ch 5, sc into ch-5 sp after the fan shell. Ch 5, sc into next closed pineapple tip. Repeat around. Sl st to join. (48 pineapple foundation arches, 48 connector arches)
Round 26: In each of the 48 designated arches, work (sc, ch 2, 5 dc, ch 1, 5 dc, ch 2, sc). In each of the 48 connector arches, work ch 5, sc, ch 5. Sl st to join. (48 small pineapple clusters)
Round 27: Work the small pineapple decrease: sk first dc, 4 dc, ch 1, 4 dc in each cluster. (8 dc per cluster, 48 clusters)
Round 28: Continue the decrease. (6 dc per cluster)
Round 29: Continue the decrease. (4 dc per cluster)
Round 30: Work dc2tog, ch 1, dc2tog in each cluster. (2 dc groups per cluster, 48 clusters)
Round 31: Sc into each tip ch-1 sp, ch 5 between tips. Sl st to join. (48 tips closed, 48 connector arches)
Round 32: In each connector arch, work a fan shell of 5 dc. Sc between fan shells. Sl st to join. (48 fan shells)
Round 33: Working into each fan shell, ch 3, sc into the center dc of the fan shell, ch 3, sc into the next sc between shells. Sl st to join. (48 arches)
Scallop Hem
Round 34: In each arch from Round 33, work (sc, ch 3, dc, ch 3, sc). Ch 3 between arches. Sl st to join.
Round 35: Into each ch-3 center space from Round 34, work (sc, hdc, dc, hdc, dc, hdc, dc, hdc, sc) for a 9-stitch scallop. Sl st into the base of the sc at the start of the scallop to tack gently, then sc between scallops into the ch-3 bridge. Repeat around the entire hem. Sl st to join. Fasten off. (48 scallops)
Shoulder Straps with Flutter Ruffles
Make 2 identical straps. Each strap has a narrow support cord and a ruffle band that creates the flutter effect.
Strap Cord: Chain 100 (approximately 12 to 13 inches unstretched).
Row 1: Sc in 2nd ch from hook and in each ch across. (99 sc)
Fasten off, leaving a 12-inch tail for attachment, and set aside.
Ruffle Band: Chain 25.
Row 1: Sc in 2nd ch from hook and in each ch across. (24 sc)
Row 2: Ch 1, turn. In each sc, work (sc, ch 2, sc). (48 ch-2 spaces)
Row 3: Ch 1, turn. In each ch-2 sp, work (sc, hdc, dc, hdc, sc). (48 ruffle units, 240 stitches)
Fasten off, leaving a 10-inch tail. Fold the ruffle band in half along its length so the ruffled edge fans out on both sides like wings, and whip stitch the center fold to the top of the strap cord at its midpoint.
Finishing & Assembly
Position each strap at the front top edge of the bodice, approximately 3 to 4 inches (7.5 to 10cm) in from each side edge. Using the long tails and a tapestry needle, sew the strap cord securely to the inside top edge of the bodice with at least 1 inch (2.5cm) of attachment, repeat at the back top edge, and trim any excess. If you are using the ribbon reinforcement, thread the ribbon through the strap cord chain openings and secure the ribbon ends to the bodice interior with a sewing needle and thread.
Weave all yarn ends on the wrong side, running each tail through at least 4 to 5 stitches in multiple directions, and do not cut ends shorter than 0.5 inch (1.25cm).
Blocking is essential for this dress. Soak the whole dress in cool or lukewarm water for 20 to 30 minutes, lift it carefully supporting its full weight, and roll it in a clean dry towel to remove excess water without twisting. Lay it flat on blocking mats, pin the 48 scallop hem points outward first, pin the side seam and top bodice edges straight, and open each pineapple fan with pins so the arch spaces are clearly visible. Allow 12 to 24 hours to dry completely before moving it.
Tips
Block your gauge swatch before measuring. Cotton thread grows after blocking, and your dress will not fit correctly if you skip this.
For a larger bust (36 to 38 inches), increase the foundation chain to 324 stitches and begin the skirt with 13 or 14 pineapple repeats instead of 12. For a smaller bust (28 to 30 inches), decrease the foundation chain to 252 stitches and begin with 10 pineapple repeats.
For a shorter knee-length dress, work the scallop hem directly after Tier 3 (Round 24) and omit Tier 4. For a longer maxi length, add a fifth full pineapple tier over 48 positions after Tier 4 before the hem.
If your pineapples look tight and do not open into a fan shape, go up half a hook size. If they are loose and floppy, go down half a hook size.
Cream White Bridal Crochet Lace Dress Free Pattern
Materials
Steps
- Work the bodice flat in smocking stitch for 37 rows and seam it into a tube
- Work skirt Tier 1 in Rounds 1 to 9, growing 12 pineapple clusters and expanding to 24 arches
- Work Tier 2 in Rounds 10 to 17 over 24 clusters
- Work Tier 3 in Rounds 18 to 24 with fan shells between the closed tips
- Work Tier 4 in Rounds 25 to 33 over 48 small pineapples
- Finish the hem with the scallop Rounds 34 and 35 (48 scallops)
- Make 2 strap cords and 2 ruffle bands and join them into flutter straps
- Sew the straps to the bodice and wet block the dress for 12 to 24 hours
- Block your swatch before measuring because cotton thread grows after blocking
- Pin the 48 scallop points outward first when blocking the finished dress
- Keep the finished bodice nearby when you start the skirt joining round so the waist edge stays even


