Sunshine Yellow Baby Romper Set Free Crochet Pattern
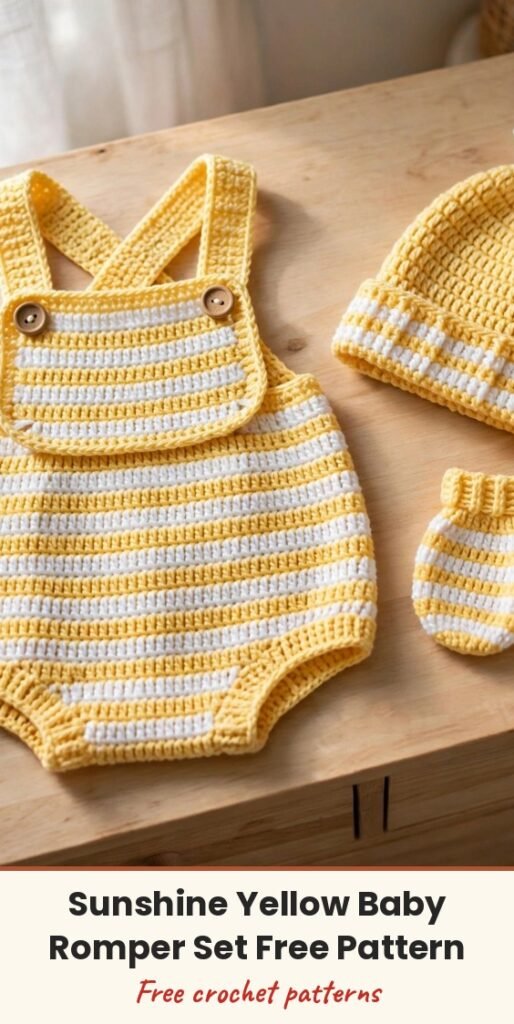
Table of Contents
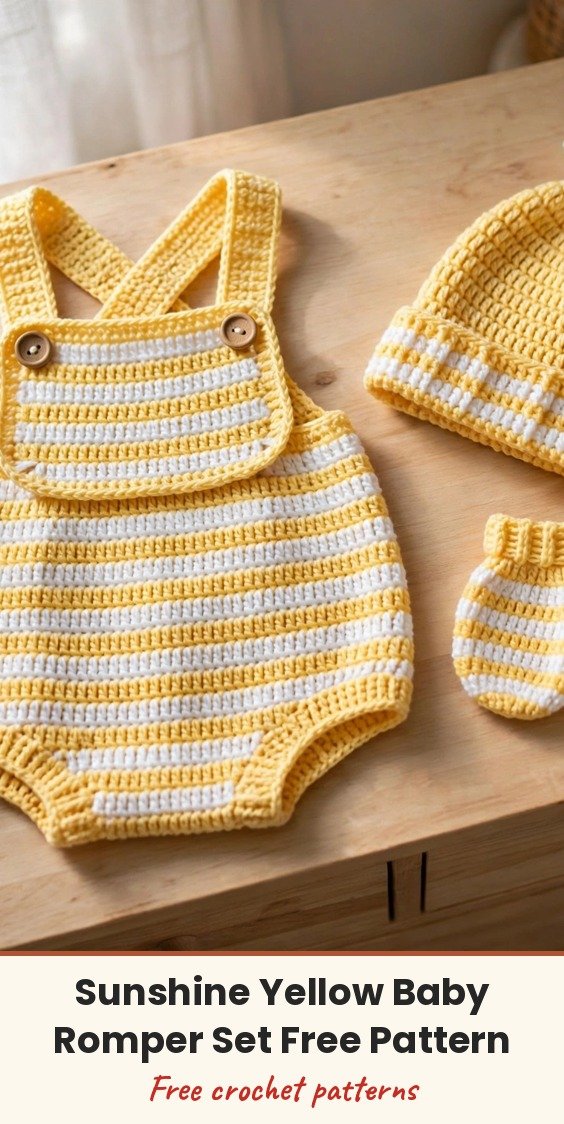
I love a baby set that feels like pure sunshine, and this one always makes me smile! We will crochet bib-front overalls in cheerful yellow and white stripes, then finish the gift with a matching beanie topped with a fluffy pom-pom and a pair of tiny thumbless mittens.
The construction is such fun. We start with the flat bib, then pick up stitches around all four edges to build the romper body in joined rounds. A clever crotch bridge splits the body into two little legs, and the stripes carry right down to the ribbed ankle cuffs.
This is an intermediate set, so it helps if you are comfortable working in the round, changing colours cleanly and following stitch counts. Take it section by section with me and you will be just fine. The finished romper fits newborn to 3 months.
Materials
- Approximately 280 yards worsted weight yarn (category 4) in yellow, Color A
- Approximately 180 yards worsted weight yarn (category 4) in white or cream, Color B
- US size J / 6.0 mm crochet hook, or size needed to obtain gauge
- 4 to 6 locking stitch markers
- Yarn needle for weaving in ends
- Scissors
- 2 wooden buttons, approximately 3/4 inch diameter
- Sewing needle and coordinating thread for attaching buttons
- Pom-pom maker or two cardboard circles, approximately 2 inch diameter
Abbreviations
- ch: chain
- sl st: slip stitch
- sc: single crochet
- sc2tog: single crochet two together
- hdc: half double crochet
- dc: double crochet
- st/sts: stitch / stitches
- blo: back loop only
- pm: place marker
- RS: right side
- WS: wrong side
- rnd/rnds: round / rounds
- inc: increase, work 2 sc in the same stitch
- dec: decrease, sc2tog
Special Stitches
- Back loop only ribbing: work each sc into the back loop only of the stitch. Ch 1, sc in blo of each stitch across, turn, and repeat to create stretchy ridged fabric for the cuffs and hat brim.
- Invisible join: cut the yarn leaving a 6-inch tail, thread it on a yarn needle, insert the needle under both loops of the first stitch of the round from front to back, then back into the centre of the last stitch from front to back, and pull snug for a nearly seamless finish.
- Stripe colour change: work the last sc of the round until two loops remain on your hook, drop the current colour to the wrong side, pick up the new colour and pull it through both loops to complete the stitch. Carry a colour loosely up the inside when its next stripe is only a few rounds away.
Gauge & Size
- Gauge: 14 sc = 4 inches and 16 rows or rounds of sc = 4 inches with US size J / 6.0 mm hook and worsted weight yarn
- Romper finished size, 0 to 3 months: overall length approximately 17 inches, chest circumference approximately 16 inches, bib approximately 6.5 inches wide by 4.5 inches tall, leg length approximately 6 inches, leg circumference approximately 8 inches
- Hat finished size: circumference approximately 14 inches, height approximately 6 inches excluding pom-pom
- Mittens finished size: length approximately 3.5 inches, circumference approximately 5 inches
- Construction: bib worked flat, body worked in joined rounds with a 2 rounds Color A, 2 rounds Color B stripe sequence, legs separated at the crotch, hat brim and mitten cuffs worked flat in blo ribbing and seamed into rings
- Skill level: Intermediate
Bib Front Pattern
The bib is worked flat in rows using Color A only. The body of the romper is worked in joined rounds, not spirals: slip stitch to the first sc, ch 1, then begin the next round in the first stitch. The ch 1 does not count as a stitch, and stitch counts appear at the end of every row and round.
Foundation: Ch 24.
Row 1 (RS): Sc in second ch from hook and in each ch across. Turn. (23 sc)
Row 2: Ch 1, sc in each st across. Turn. (23 sc)
Rows 3 to 18: Repeat Row 2 sixteen more times. (23 sc each row)
After Row 18 your bib should measure approximately 4.5 inches tall and 6.5 inches wide. Do not fasten off.
Romper Body Pattern
Now we work around the perimeter of the bib to create the body. This is the lovely moment where the flat piece turns into a tube!
Round 1: With RS of bib facing, work 18 sc evenly down the right side edge of the bib (approximately 1 sc per row, skipping every 3rd row edge to keep the fabric flat). Ch 28 to form the back of the romper. Work 18 sc evenly up the left side edge of the bib. Sl st to first sc to join. Ch 1. (64 sc total around the body: 18 + 28 ch + 18)
Round 2: Sc in each st and each ch around. Join. Ch 1. (64 sc)
Round 3: Sc in each st around. Join with Color A. Ch 1. (64 sc)
Round 4: Change to Color B. Sc in each st around. Join. Ch 1. (64 sc)
Round 5: Sc in each st around. Join with Color B. Ch 1. (64 sc)
Round 6: Change to Color A. Sc in each st around. Join. Ch 1. (64 sc)
Round 7: Sc in each st around. Join with Color A. Ch 1. (64 sc)
Round 8: Change to Color B. Sc in each st around. Join. Ch 1. (64 sc)
Round 9: Sc in each st around. Join with Color B. Ch 1. (64 sc)
Round 10: Change to Color A. Sc in each st around. Join. Ch 1. (64 sc)
Round 11: Sc in each st around. Join. Ch 1. (64 sc)
Round 12: Change to Color B. Sc in each st around. Join. Ch 1. (64 sc)
Round 13: Sc in each st around. Join. Ch 1. (64 sc)
Round 14: Change to Color A. Sc in each st around. Join. Ch 1. (64 sc)
Round 15: Sc in each st around. Join. Ch 1. (64 sc)
Checkpoint: your body tube should measure approximately 4 inches from the base of the bib joining round.
Crotch Shaping Pattern
Round 16: Change to Color B. (Sc2tog, sc in next 6 sts) repeat 8 times. Join. Ch 1. (56 sc)
Round 17: Sc in each st around. Join. Ch 1. (56 sc)
For the crotch division, mark stitch 1 and stitch 29 with locking markers. We will divide the 56 stitches into two legs of 28 stitches each.
First Leg Pattern
With Color A, continuing the stripe sequence, work across the first 28 sts only. Ch 4, then join to the first stitch of the same leg to form a small crotch bridge.
Round 1: Sc in each of the 28 leg sts, then sc in each of the 4 ch sts. Join. Ch 1. (32 sc)
Round 2: Sc in each st around. Join with Color A. Ch 1. (32 sc)
Round 3: Change to Color B. Sc in each st around. Join. Ch 1. (32 sc)
Round 4: Sc in each st around. Join. Ch 1. (32 sc)
Round 5: Change to Color A. Sc in each st around. Join. Ch 1. (32 sc)
Round 6: Sc in each st around. Join. Ch 1. (32 sc)
Round 7: Change to Color B. Sc in each st around. Join. Ch 1. (32 sc)
Round 8: Sc in each st around. Join. Ch 1. (32 sc)
Round 9: Change to Color A. (Sc2tog, sc in next 6 sts) repeat 4 times. Join. Ch 1. (28 sc)
Round 10: Sc in each st around. Join. Ch 1. (28 sc)
Round 11: Change to Color B. Sc in each st around. Join. Ch 1. (28 sc)
Round 12: Sc in each st around. Join. Ch 1. (28 sc)
Round 13: Change to Color A. Sc in each st around. Join. Ch 1. (28 sc)
Round 14: Sc in each st around. Join. Ch 1. (28 sc)
Ankle cuff: cut a separate length of Color A and ch 7.
Cuff Row 1: Sc in second ch from hook and in each ch across. Turn. (6 sc)
Cuff Rows 2 to 28: Ch 1, sc in blo of each st across. Turn. (6 sc)
Seam the short ends together to form a ring. Attach the cuff to the leg opening by sewing with a yarn needle and whip stitch, or work a sc joining round through both edges. Fasten off and weave in all ends on the first leg.
Second Leg Pattern
Rejoin Color A to stitch 29, the marked stitch, and work across the remaining 28 stitches. Ch 4, joining to the crotch bridge.
Round 1: Sc in each of the 28 leg sts, then sc in each of the 4 ch sts. Join. Ch 1. (32 sc)
Work Rounds 2 to 14 exactly as for the first leg, matching the stripe colours, then work the ankle cuff exactly as for the first leg.
Shoulder Straps Pattern
Make 2 straps. With Color A, ch 5.
Row 1: Sc in second ch from hook and in each ch across. Turn. (4 sc)
Rows 2 to 10: Ch 1, sc in each st across. Turn. (4 sc)
Fasten off, leaving a 12-inch sewing tail. Attach one end of each strap to the top corners of the bib front, leaving approximately 2 stitches of margin from each side edge. Bring each strap over the shoulder and sew a button through the free end and through the back panel to secure it.
Beanie Hat Pattern
We make the brim flat in Color B first, seam it into a ring, then work the dome in a continuous spiral in Color A.
Brim Row 1: With Color B, ch 9. Sc in second ch from hook and in each ch across. Turn. (8 sc)
Brim Rows 2 to 50: Ch 1, sc in blo of each st across. Turn. (8 sc)
Seam the two short ends together to form a ring.
Dome set-up: with Color A, attach yarn to any seam stitch of the brim ring. Work 49 sc evenly around the top inner edge. Join with sl st to first sc. Place a stitch marker.
Adjustment Round: Sc in each of the first 47 sts, sc2tog over the last 2 sts. (48 sc)
Rounds 1 to 8: Sc in each st around. (48 sc)
Round 9: (Sc in next 6 sts, sc2tog) repeat 6 times. (42 sc)
Round 10: (Sc in next 5 sts, sc2tog) repeat 6 times. (36 sc)
Round 11: (Sc in next 4 sts, sc2tog) repeat 6 times. (30 sc)
Round 12: (Sc in next 3 sts, sc2tog) repeat 6 times. (24 sc)
Round 13: (Sc in next 2 sts, sc2tog) repeat 6 times. (18 sc)
Round 14: (Sc in next st, sc2tog) repeat 6 times. (12 sc)
Round 15: (Sc2tog) repeat 6 times. (6 sc)
Fasten off. Draw the tail through the front loop of each remaining 6 stitches, pull tight to close, knot and weave in.
Pom-pom: using Color B, make a pom-pom approximately 2 inches in diameter. Attach it to the crown by threading the tie through the closed opening and knotting securely inside.
Mittens Pattern
Make 2 mittens. They have no thumb opening, which is just right for newborn to 3 months. The cuff is solid Color B, and the body follows the same 2 rounds Color A, 2 rounds Color B stripe sequence.
Cuff Row 1: With Color B, ch 9. Sc in second ch from hook and in each ch across. Turn. (8 sc)
Cuff Rows 2 to 18: Ch 1, sc in blo of each st across. Turn. (8 sc)
Seam the short ends together to form a ring.
Body set-up: attach Color A to any seam stitch of the cuff. Work 18 sc evenly around the top inner edge. Join with sl st to first sc. Ch 1. (18 sc)
Round 1: Sc in each st around. Join. Ch 1. (18 sc)
Round 2: Change to Color B. Sc in each st around. Join. Ch 1. (18 sc)
Round 3: Sc in each st around. Join. Ch 1. (18 sc)
Round 4: Change to Color A. Sc in each st around. Join. Ch 1. (18 sc)
Round 5: Sc in each st around. Join. Ch 1. (18 sc)
Round 6: Change to Color B. Sc in each st around. Join. Ch 1. (18 sc)
Round 7: Sc in each st around. Join. Ch 1. (18 sc)
Round 8: Change to Color A. (Sc in next 4 sts, sc2tog) repeat 3 times. Join. Ch 1. (15 sc)
Round 9: (Sc in next 3 sts, sc2tog) repeat 3 times. Join. Ch 1. (12 sc)
Round 10: (Sc in next 2 sts, sc2tog) repeat 3 times. Join. Ch 1. (9 sc)
Round 11: (Sc in next st, sc2tog) repeat 3 times. Join. Ch 1. (6 sc)
Fasten off. Draw the tail through the front loops of the remaining 6 stitches, pull tight, knot and weave in.
Finishing & Assembly
Weave in all yarn ends on the wrong side of the romper, paying special attention to the colour-change joins. Weave these at least 1 inch in two different directions so nothing can work loose.
Attach the wooden buttons using sewing thread and a needle, stitching through all layers securely, and always check the buttons before each wear to make sure they are still firmly attached.
For the hat, weave in all ends and make sure the pom-pom is knotted securely, because little hands love to tug. For the mittens, weave in all ends and check that each cuff seam lies flat and smooth.
Acrylic does not need blocking, but for extra-neat stitches you can soak each piece in cool water for 10 minutes, squeeze gently without wringing, roll in a clean towel, then pin to the finished measurements and leave to dry completely.
Tips
For 3 to 6 months, add 8 stitches to the bib foundation for 31 stitches instead of 23, add 4 stitches to the back chain for 32 instead of 28 to give a 76-stitch body, and add 4 rounds to each leg and 4 rounds to the hat dome before the crown shaping. Increase the brim ribbing to 60 rows.
For 6 to 9 months, add 12 stitches to the bib foundation for 35 stitches and add 6 stitches to the back chain for 34 instead of 28, then adjust the 86-stitch body to 84 stitches with a decrease round. Add 6 rounds to each leg and 6 rounds to the hat dome.
For a preemie size, simply switch to a 5.0 mm hook and keep the same stitch counts for a proportionally smaller set.
The whole set takes roughly 14 to 20 hours in total: the romper is the biggest piece at about 10 to 14 hours, and the hat and mittens together add another 4 to 6 hours. Machine wash cold on a gentle cycle in a mesh laundry bag and lay flat to dry.
Sunshine Yellow Baby Romper Set Free Crochet Pattern
Materials
Steps
- Crochet the flat bib front in Color A
- Work around the bib edges and build the striped body in joined rounds to 64 sts
- Shape the crotch and divide the body into two 28-stitch legs
- Work each leg with its ribbed ankle cuff
- Make two shoulder straps and sew on the wooden buttons
- Crochet the ribbed hat brim, work the dome and add the pom-pom
- Crochet two ribbed-cuff mittens and shape the tops
- Weave in all ends and check the buttons are secure
- Do not skip the gauge swatch, this is a fitted garment and gauge matters
- Change colours on the last pull-through of the final stitch for clean stripes
- Carry a stripe colour loosely up the inside when it returns in a few rounds
- Check the wooden buttons are firmly attached before every wear


