Coral Sunset Granny Square Maxi Dress Free Crochet Pattern
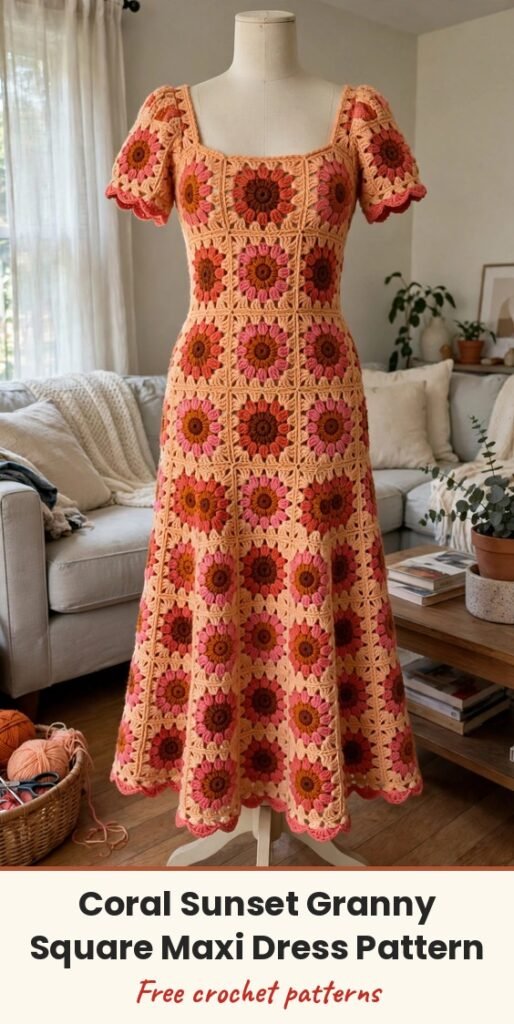
Table of Contents
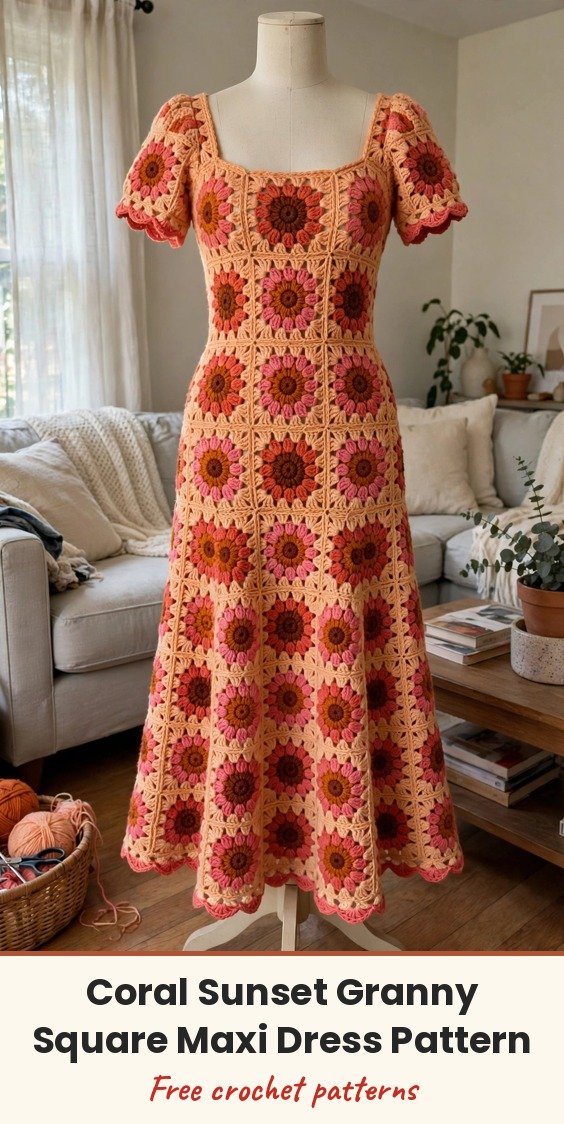
I had such a clear picture in my mind for this dress: vintage at heart, completely fresh in person, and built entirely from the classic granny square! We will crochet sunflower squares in burnt orange, coral pink and warm peach, then join them as we go into flat panels.
Each square has a burnt orange sunflower-style centre, a ring of coral pink petals, and a warm peach square body. The panels come together into a fitted bodice, gentle A-line skirt, sweet puffed sleeves and scalloped borders at the neckline, cuffs and hem.
This is an intermediate to advanced project, and a happy marathon rather than a sprint: a size Medium takes around 130 to 150 squares plus half-square fill-ins. Instructions are written for Size M, with changes for XS, S, L, XL and 2XL given in parentheses in that order. When only one number appears, it applies to all sizes.
Materials
- Approximately 400 (440, 480, 520, 560, 640) yards DK weight yarn (CYCA 3) in burnt orange, Color A
- Approximately 600 (660, 720, 780, 840, 960) yards DK weight yarn (CYCA 3) in coral pink, Color B
- Approximately 900 (990, 1080, 1170, 1260, 1440) yards DK weight yarn (CYCA 3) in warm peach, Color C
- US size G-6 / 4.0 mm crochet hook, for squares and body
- US size F-5 / 3.75 mm crochet hook, for neckline and cuff borders
- Yarn needle for weaving in ends
- At least 12 stitch markers
- Rust-proof blocking pins and blocking mats
- Measuring tape
- Optional: 3 to 5 small buttons, approximately 0.5 in / 12 mm diameter, for the back closure loops
- Optional: lining fabric for opacity
Abbreviations
- approx: approximately
- beg: beginning
- BLO: back loop only
- ch: chain
- ch-sp: chain space
- cont: continue
- dc: double crochet
- dc2tog: double crochet two together
- FLO: front loop only
- hdc: half double crochet
- JAYG: join as you go
- lp/lps: loop / loops
- MC: main color, Color C warm peach in this pattern
- MR: magic ring
- rem: remaining
- rep: repeat
- rnd: round
- RS: right side
- sc: single crochet
- sk: skip
- sl st: slip stitch
- sp/sps: space / spaces
- ss: same stitch
- st/sts: stitch / stitches
- WS: wrong side
- yo: yarn over
Special Stitches
- Sunflower Granny Square (SGS): the signature motif of the dress, worked in 4 rounds using 3 colours and measuring 4 in x 4 in / 10 cm x 10 cm after blocking. The full round-by-round instructions are in the Sunflower Square Pattern section below.
- Join As You Go (JAYG): when assembling squares, work the last round of each new square while joining it to the adjacent finished squares. On the sides being joined, replace the corner ch-2 with (ch 1, sl st into the corresponding corner ch-2 sp of the adjacent square, ch 1), and replace any ch-1 spaces along the joining side with a sl st into the corresponding ch-1 sp of the adjacent square. Hold the squares with WS facing each other when executing the sl st joins.
- Scallop Shell Border: join Color C (or Color B for contrast) with a sl st into any sc or ch-sp along the edge. Skip 2 sts, work 5 dc all into the next st for a shell, skip 2 sts, sl st into the next st, and rep around the entire edge. Sl st to the first sl st to join and fasten off. Each shell repeat uses 6 stitches, so make sure your edge stitch count is divisible by 6 before beginning the border.
- Half Granny Square (HGS) fill-in triangle: a right-triangle motif half the size of a full square, worked back and forth in rows and used at waist shaping wedges and underarm curves. The full instructions are in the Half Square Pattern section below.
Gauge & Size
- Gauge: 1 completed and blocked granny square = 4 in x 4 in / 10 cm x 10 cm; in double crochet, 18 dc x 9 rows = 4 in x 4 in / 10 cm x 10 cm on a US G-6 / 4.0 mm hook, and the square measurement takes precedence
- Finished size XS: bust 32 in / 81 cm, waist 26 in / 66 cm, hip 36 in / 91 cm, length 52 in / 132 cm
- Finished size S: bust 34 in / 86 cm, waist 28 in / 71 cm, hip 38 in / 97 cm, length 53 in / 135 cm
- Finished size M: bust 36 in / 91 cm, waist 30 in / 76 cm, hip 40 in / 102 cm, length 54 in / 137 cm
- Finished size L: bust 38 in / 97 cm, waist 32 in / 81 cm, hip 42 in / 107 cm, length 55 in / 140 cm
- Finished size XL: bust 40 in / 102 cm, waist 34 in / 86 cm, hip 44 in / 112 cm, length 56 in / 142 cm
- Finished size 2XL: bust 44 in / 112 cm, waist 38 in / 97 cm, hip 48 in / 122 cm, length 57 in / 145 cm
- Construction: flat granny square panels joined as you go, approximately 130 (140, 152, 164, 174, 188) full squares plus approximately 12 to 16 half-square fill-ins depending on size; finished measurements include 1 to 2 inches (2.5 to 5 cm) of ease
- Skill level: Intermediate to Advanced
Sunflower Square Pattern
Every square uses the same colour sequence: Rounds 1 and 2 are Color A, Round 3 is Color B, and Round 4 is Color C. Make 4 test squares first and block them, and confirm each one measures exactly 4 in x 4 in / 10 cm x 10 cm before you begin the panels.
Round 1 (Color A, Burnt Orange): Make a MR. Ch 3 (counts as first dc). Work 11 dc into the MR. Pull the ring closed snugly. Sl st to top of beg ch-3 to join. (12 dc)
Round 2 (Color A continuing): Ch 1. Working in front loops only, work 1 sc in the same st, then work (ch 3, sl st in same st) to form a small petal loop, then sl st into the next st. Rep (1 sc, ch 3, sl st in same st, sl st to next st) around until 12 petal loops have been formed. Fasten off Color A. (12 petal loops)
Round 3 (Color B, Coral Pink): Join Color B with a sl st into any BLO of a dc from Round 1 (the back loops are still free behind the petals). Ch 3 (counts as first dc). Work 1 dc in the same BLO. Work 2 dc in BLO of each remaining dc from Round 1 around. Sl st to top of beg ch-3 to join. (24 dc)
Round 3 petal ring: Ch 1. Working in FLO of each dc just made in Round 3, work (sc, ch 4, sc) in the same FLO, sl st in FLO of next dc. Rep around to create 24 larger petal loops. Fasten off Color B. (24 petals)
Round 4 (Color C, Warm Peach): Join Color C with a sl st into any BLO of a dc from Round 3. Ch 3 (counts as first dc). Working into the BLOs of Round 3 only, with the petals sitting to the front, work 6 dc into the BLOs of 6 consecutive Round 3 stitches, ending at a natural corner point, then work (2 dc, ch 2, 2 dc) in the BLO of the next stitch to form the corner. Continue working 6 dc across the side, then a corner. Repeat for all 4 sides. Sl st to top of beg ch-3 to join. Fasten off Color C. (40 dc, 4 ch-2 sps: each side has 6 dc between corners plus the 4 corner dc)
For JAYG squares, work Round 4 while joining to the adjacent squares, following the join as you go method in Special Stitches.
Half Square Pattern
The half granny square fill-in triangles are worked in Color C, back and forth in rows. The long straight edge of the triangle equals one full side of a square (4 in / 10 cm), and the two short sides each equal half a square side (2 in / 5 cm).
Row 1 (RS, Color C): Ch 4. Work 3 dc in the 4th ch from hook. Turn. (3 dc plus the foundation ch, which counts as the first cluster)
Row 2 (Color C): Ch 3 (counts as dc). Work 2 dc in the same st, ch 1. In the turning ch-sp, work (3 dc, ch 2, 3 dc). Ch 1. Work 3 dc in the top of the beg ch-3 of the previous row. Turn.
Row 3 (Color C): Ch 3. Work 2 dc in the same st. Ch 1. Work 3 dc in the next ch-1 sp. Ch 1. In the corner ch-2 sp, work (3 dc, ch 2, 3 dc). Ch 1. Work 3 dc in the next ch-1 sp. Ch 1. Work 3 dc in the turning ch. Fasten off, leaving a tail for seaming.
Front Bodice Pattern
The front bodice panel is 4 (4, 5, 5, 5, 6) squares wide by 6 squares tall, built from the bottom (waist) to the top (shoulder). Add squares left to right, then begin a new row above, using JAYG for all squares after the first in each row. All stitch counts in the panel sections refer to the number of squares in each panel row.
Row 1 (bottom row, waist level): Place the starter square at the left position. JAYG squares 2 through 5 (size M) to the right of the first, joining along the right side of each preceding square. (5 squares in Row 1 for size M; XS and S: 4 squares, L and XL: 5 squares, 2XL: 6 squares)
Row 2: JAYG a new square at the left above Row 1 square 1, joining the new square bottom edge to the top edge of Row 1 square 1. Continue JAYG across to the right, joining each square left side to the previous square and bottom to the corresponding Row 1 square below. (Same width as Row 1)
Rows 3 through 6: Rep Row 2 for each subsequent row, working straight with no shaping for rows 3 through 4.
Neckline shaping, Row 5: Work the full width of the panel.
Neckline shaping, Row 6: Leave the centre 1 (1, 1, 1, 1, 2) square(s) unworked at the top centre to create the neckline opening. For size M, work the left side squares in positions 1 and 2 from the left, JAYG to Row 5 below, then work the right side squares in positions 4 and 5, leaving position 3 (centre) open. For XS and S (4-wide), leave the centre 2 squares of Row 6 open (positions 2 and 3) and work 1 square on each shoulder. For L and XL, leave the centre 1 square open and work 2 squares on each shoulder. For 2XL (6-wide), leave the centre 2 squares open and work 2 squares on each shoulder.
Checkpoint: the front bodice panel should measure approximately 20 in / 51 cm wide and 24 in / 61 cm tall for size M, with a neckline opening approximately 4 in / 10 cm wide and 4 in / 10 cm deep.
Back Bodice Pattern
Make 2 back bodice panels as mirror images. Each panel is 2 (2, 3, 3, 3, 3) squares wide by 6 squares tall, and the centre back edge remains a finished straight edge.
Row 1 (bottom of each back panel): Make a starter square. JAYG 2 additional squares to the right. (3 squares for size M)
Rows 2 through 5: Work straight, 3 squares wide, JAYG each square to the one below and to the left-neighbour square.
Row 6 (shoulder row): Work the full width. For size M, work all 3 squares.
Checkpoint: each back bodice panel should measure 12 in / 30 cm wide and 24 in / 61 cm tall for size M.
Sleeve Pattern
Make 2 sleeve panels. Each sleeve is a 2 square wide by 2 square tall panel for all sizes, giving a cuff-to-shoulder span of approximately 8 in x 8 in / 20 cm x 20 cm.
Make 1 starter square. JAYG 1 square to its right. JAYG 1 square below the starter square. JAYG 1 square to the right of the third square, completing the 2 by 2 grid. (4 squares total per sleeve)
Sleeve puff gathering row: Join Color C at the top left corner of the sleeve panel. Work sc evenly across the top 2-square edge, approximately 18 to 20 sc across 8 in / 20 cm. At the halfway point, work a gentle decrease by skipping 1 st once on each side of centre to pull the sleeve top inward slightly for the puff effect. (16 to 18 sc across the gathering row)
Set the sleeves aside.
Front Skirt Pattern
The skirt begins at the waist edge with the same width as the bottom of the front bodice, then increases by 1 square per side every 2 rows. The front skirt panel is 6 (7, 8, 9, 10, 11) squares wide by 7 (7, 7, 8, 8, 8) squares tall, tapered wider at the hem. Size M starts 5 squares wide at the top and expands to 8 squares wide at the hem over 7 rows.
Row 1 (waist row, attached to front bodice): JAYG 5 squares (size M) across, joining the top edge of each square to the bottom edge of the corresponding front bodice Row 1 square. (5 sq for size M; XS: 4 sq, S: 4 sq, L: 5 sq, XL: 5 sq, 2XL: 6 sq)
Row 2: JAYG the same width as Row 1. (5 sq)
Row 3 (first expansion row): Add 1 HGS at each end of the row before adding the full square at the outer edge, expanding the panel by 1 full square per side. (7 sq for size M)
Row 4: Work straight, the same width as Row 3. (7 sq)
Row 5 (second expansion row): Add 1 sq per side again. (8 sq for size M)
Rows 6 and 7: Work straight at the full hem width. (8 sq for size M)
Width progression by row for size M: Row 1: 5 sq, Row 2: 5 sq, Row 3: 7 sq, Row 4: 7 sq, Row 5: 8 sq, Row 6: 8 sq, Row 7: 8 sq, for a total skirt length of 7 rows x 4 in = 28 in / 71 cm.
Back Skirt Pattern
Make 2 back skirt panels. Each panel begins at the same width as the corresponding back bodice panel and expands similarly. For size M, each back skirt panel begins 3 sq wide and expands to 4 sq wide by the hem.
Row 1: 3 sq, attached to the back bodice bottom.
Rows 2 to 4: 3 sq.
Rows 5 to 7: 4 sq, expanding by 1 sq on the outer edge only, with the inner edge remaining at the centre back straight edge.
Checkpoint: the combined front skirt panel should measure 32 in / 81 cm wide and 28 in / 71 cm tall for size M, and each back skirt panel should measure 16 in / 41 cm wide and 28 in / 71 cm tall for size M.
Finishing & Assembly
Side seams: with RS facing each other, use a yarn needle and Color C to whipstitch the right side edge of the front bodice to the left side edge of the right back bodice panel, and repeat for the left side. Do not seam all 6 rows of the side edges: leave the top 2 rows (8 in / 20 cm) of each side seam open to form the armhole openings.
Sleeves: pin each sleeve into an armhole opening with RS facing and the gathering distributed evenly, then whipstitch it into place using Color C.
Skirt joins: with RS facing, pin the top (waist) edge of the front skirt panel to the bottom edge of the front bodice panel, matching squares to squares, and whipstitch across. Repeat for each back skirt panel joined to each back bodice panel bottom, then join the back skirt panels to the front skirt panel at the side seams using whipstitch.
Fill-ins: at any diagonal step edges created during the skirt expansion, sew in the HGS fill-in triangles using whipstitch, matching the long edge of the triangle to the step edge.
Neckline border: with RS facing, join Color C to any stitch along the neckline edge using the US F-5 / 3.75 mm hook. Work 1 round of sc evenly around the entire neckline opening, working approximately 1 sc per dc and 1 sc per ch-sp, and count the total sc. Adjust the total to be divisible by 6 by adding or subtracting 1 to 3 sc evenly spaced, then work the scallop shell border around the neckline, sl st to the first sl st, and fasten off.
Sleeve cuff borders: for each sleeve, with RS facing, join Color C to the lower edge of the sleeve panel using the US F-5 / 3.75 mm hook. Work 1 round of sc evenly around the cuff edge, ensure the count is divisible by 6, work the scallop shell border, and fasten off.
Hem border: with RS facing, join Color C to the bottom edge of the skirt. Work 1 round of sc evenly around the entire hem, ensure the count is divisible by 6, work the scallop shell border, and fasten off.
Back closure: the centre back seam is left open for approximately 10 in / 25 cm from the neckline downward. Reinforce both centre back edges with a row of sc worked evenly from the neckline to the point where the back seam begins. On the right back edge, work button loops at evenly spaced intervals (approximately 3 to 5 loops): ch 6, sl st back into the edge to create a loop. Sew the buttons to the left back edge to correspond with the loops. The dress has no zipper, and the opening can also be left as a simple overlapping flap.
Weave in all ends securely. Block the entire dress by soaking it in lukewarm water, gently squeezing out the excess, and laying it flat on blocking mats. Pin to measurements and allow 3 to 5 hours to dry completely. Add a slip lining for opacity if you like.
Tips
Test your gauge carefully and often. A fitted garment has no forgiveness for gauge issues, so make at least 4 full squares before purchasing your full yardage, and go down a hook size if your square is larger than 4 inches or up a size if it is smaller.
Keep your colour changes consistent. Every single square uses the same colour sequence, and that repetition is what creates the beautiful unified look.
If it helps, block your squares in batches before joining, so every panel starts from true 4-inch squares.
Plan for approximately 80 to 120 hours for a size Medium. Each square takes roughly 15 to 20 minutes, and taking happy breaks along the way keeps those 130-plus squares feeling joyful rather than endless.
Coral Sunset Granny Square Maxi Dress Free Crochet Pattern
Materials
Steps
- Crochet the 4-round sunflower granny squares and block them to 4 inches
- Crochet the half granny square fill-in triangles
- Join squares as you go into the front bodice panel with neckline shaping
- Join squares into two back bodice panels and two sleeve panels
- Build the front skirt and back skirt panels with expansion rows
- Seam the panels, set in the sleeves and sew in the fill-in triangles
- Work scallop shell borders at the neckline, cuffs and hem
- Add the back button-loop closure, weave in ends and block the dress
- Make at least 4 test squares and confirm they block to exactly 4 inches before starting the panels
- Keep the colour sequence identical in every square for a unified look
- Block squares in batches before joining if that keeps your sizing truer
- Leave the top 2 rows of each side seam open, those openings form the armholes