Lavender Wildflower Barrel Purse Free Crochet Pattern
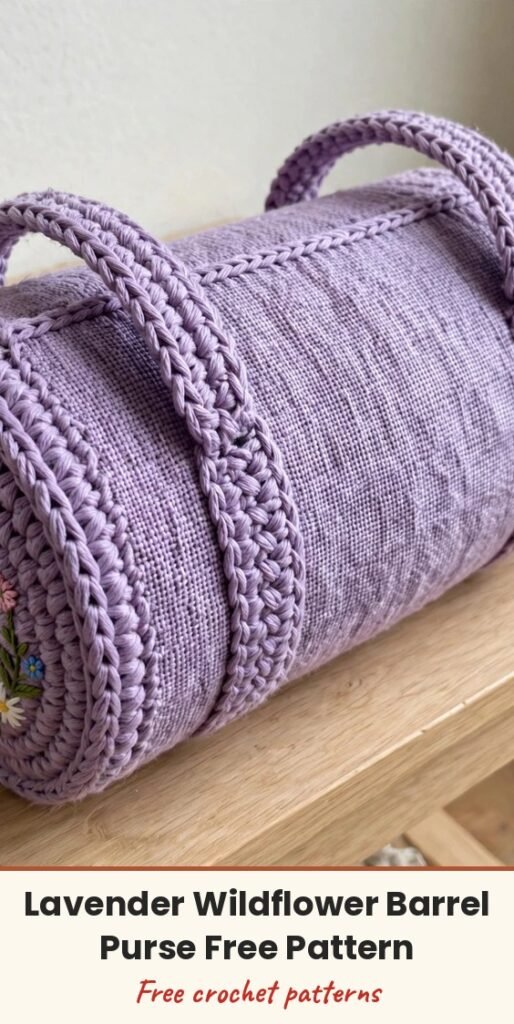
Table of Contents
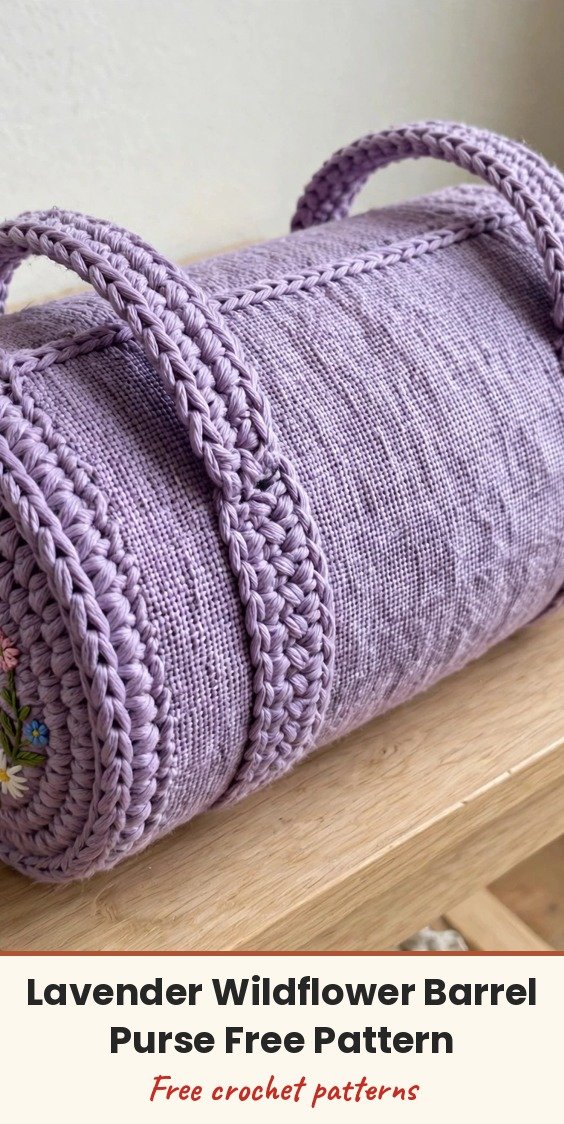
I have a serious weakness for bags that look like they belong in a cottage garden, and this lavender barrel purse has been living in my head for weeks! The cylindrical shape is so unexpected, the linen stitch texture is satisfyingly dense, and those wildflower end caps are absolute perfection.
We will work the main body as a seamless tube in the round, then crochet two flat circular end caps separately and whipstitch them on. From there we add a zipper closure along the top, floral-wrapped handles with silver hardware, and a charming butterfly tassel to finish.
The finished bag measures approximately 12 inches long with a 5-inch diameter, so it sits horizontally like a classic doctor bag, just in cylinder form, and it is the perfect size for everyday essentials. The stitch pattern itself is simple and meditative once you get going, I promise!
Materials
- Approximately 350 yards / 320 m of worsted weight (Category 4) cotton or cotton-blend yarn in soft lavender (Main Colour)
- US G-6 / 4.00mm crochet hook, or size needed to achieve gauge
- Tapestry needle, for seaming and weaving in ends
- Stitch markers (4 to 6)
- One 10-inch / 25.5 cm zipper in lavender or a coordinating colour
- Two 1-inch / 2.5 cm silver-tone D-rings
- Two 1-inch / 2.5 cm silver-tone swivel clips or lobster clasps (optional, for detachable handles)
- Four to six silver-tone rivets or Chicago screws, for handle attachment
- One set of floral fabric-wrapped handles, approximately 14 inches / 35.5 cm long
- One silver butterfly charm
- One silver chain tassel, approximately 3 inches / 7.5 cm long
- Coordinating floral fabric for end cap panels (two 5-inch circles plus seam allowance) OR embroidery floss in purple, yellow, green and white
- Sewing needle and thread in lavender
- Lightweight fusible interfacing, fabric glue and pins (optional)
Abbreviations
- beg: beginning
- ch: chain
- ch-sp: chain space
- dc: double crochet
- dec: decrease
- inc: increase
- MC: main colour
- pm: place marker
- rem: remaining
- rep: repeat
- rnd: round
- RS: right side
- sc: single crochet
- sc2tog: single crochet 2 together
- sk: skip
- sl st: slip stitch
- sm: stitch marker
- sp: space
- st/sts: stitch / stitches
- WS: wrong side
- yo: yarn over
Special Stitches
- Linen stitch in the round (also called moss stitch or granite stitch): Round 1: Sc in first st, (ch 1, sk 1 st, sc in next st) around, end with ch 1, sk 1 st, sl st to first sc to join. Round 2: Ch 1, sc in same st, (ch 1, sk ch-1 sp, sc in next sc) around, end ch 1, sk last ch-1 sp, sl st to first sc. Repeat Round 2 for the pattern. One single crochet plus one chain-1 space counts as 2 stitches for counting purposes, and because we do not turn between rounds, all rounds are worked from the right side.
- Magic ring: make an adjustable loop, insert your hook, yarn over, draw up a loop, and chain 1 to secure. Work the stitches into the ring, then pull the tail to close the centre hole for a nice tight centre on your circles.
- Whipstitch seam: hold two pieces with wrong sides together, insert the tapestry needle through one stitch on each piece simultaneously, and draw the yarn through. Continue around through corresponding stitches. For this bag, hold the pieces with right sides together when seaming so the ridge stays inside.
Gauge & Size
- Finished size: body approximately 12 inches long, 16 inches circumference, 5-inch diameter; handle drop approximately 5 inches
- Gauge: 18 stitches and 20 rows = 4 inches / 10 cm in linen stitch worked flat with the US G-6 / 4.00mm hook, after blocking
- Construction: seamless linen stitch tube, two flat circular end caps whipstitched on, zipper closure, riveted handles
- Skill level: Advanced Beginner to Intermediate
Body Pattern
The body is crocheted as a tube by working a foundation chain, joining it into a ring, and continuing in rounds. All stitch counts refer to sc stitches only, chain-1 spaces are implied, we join each round with a slip stitch to the first sc, we do not turn between rounds, and we place a stitch marker in the first sc of each round.
Foundation Chain: With MC and the G-6 hook, ch 73. Sl st to first ch, being careful not to twist, to form a ring.
Round 1 (Setup): Ch 1, sc in same ch, (ch 1, sk 1 ch, sc in next ch) around, end ch 1, sk last ch, sl st to first sc. (36 sc, 36 ch-1 spaces, 72 working positions total)
Your ring should measure approximately 16 inches in circumference, and laid flat across the diameter it should be approximately 5 inches.
Round 2: Ch 1, sc in same st as joining, (ch 1, sk ch-1 sp, sc in next sc) around, ch 1, sk last ch-1 sp, sl st to first sc. (36 sc)
Rounds 3 to 61: Repeat Round 2 until the body measures 12 inches from the foundation chain. At a gauge of 20 rows per 4 inches, you need 60 total rounds.
Fasten off and weave in ends. The tube should measure 12 inches long and 5 inches in diameter when laid flat, and the linen stitch texture should appear as a tight, woven grid.
End Caps Pattern
Make 2. Each end cap is a flat circle worked in sc with increases to maintain flatness. Start each cap with a magic ring.
Round 1: Ch 1, work 6 sc into the ring, pull the tail to close, sl st to first sc. (6 sc)
Round 2: Ch 1, 2 sc in each st around, sl st to first sc. (12 sc)
Round 3: Ch 1, (sc in next st, 2 sc in next st) around, sl st to first sc. (18 sc)
Round 4: Ch 1, (sc in next 2 sts, 2 sc in next st) around, sl st to first sc. (24 sc)
Round 5: Ch 1, (sc in next 3 sts, 2 sc in next st) around, sl st to first sc. (30 sc)
Round 6: Ch 1, (sc in next 4 sts, 2 sc in next st) around, sl st to first sc. (36 sc)
Round 7: Ch 1, sc in each st around, sl st to first sc. (36 sc)
Round 8: Ch 1, (sc in next 5 sts, 2 sc in next st) around, sl st to first sc. (42 sc)
Round 9: Ch 1, sc in each st around, sl st to first sc. (42 sc)
Round 10: Ch 1, (sc in next 6 sts, 2 sc in next st) around, sl st to first sc. (48 sc)
Round 11: Ch 1, sc in each st around, sl st to first sc. (48 sc)
Round 12: Ch 1, (sc in next 7 sts, 2 sc in next st) around, sl st to first sc. (54 sc)
Round 13: Ch 1, sc in each st around, sl st to first sc. (54 sc)
Round 14: Ch 1, (sc in next 8 sts, 2 sc in next st) around, sl st to first sc. (60 sc)
Round 15: Ch 1, sc in each st around, sl st to first sc. (60 sc)
Round 16: Ch 1, (sc in next 9 sts, 2 sc in next st) around, sl st to first sc. (66 sc)
Round 17: Ch 1, sc in each st around, sl st to first sc. (66 sc)
Round 18: Ch 1, (sc in next 10 sts, 2 sc in next st) around, sl st to first sc. (72 sc)
Fasten off the first cap, and leave the second cap attached if you are joining immediately. Each cap should lie flat without cupping or ruffling, with a diameter of approximately 5 inches.
Finishing & Assembly
Wet block the crochet body before assembling: submerge it in cool water, gently squeeze out the excess, roll it in a towel, then reshape it to measurements and allow it to dry completely flat. With right sides facing outward on both pieces, align one end cap to one open end of the tube so the 72 stitches match up, pin at four equally spaced points, and whipstitch around the full circumference with a tapestry needle and MC, working through both loops of each stitch on both pieces. Repeat for the second end cap, and your bag should now be a complete closed barrel shape with no gaps at the seams.
Position a 10-inch zipper centred along the top of the tube, spanning the length between the end caps and leaving approximately 1 inch of crochet at each end beyond the zipper stops. Pin the zipper tape to the inside of the crochet fabric with the zipper pull on the outside, and hand-sew using a backstitch along both sides, keeping your stitches small so they do not show on the right side. Attach the silver chain tassel to the zipper pull using a jump ring, and attach the butterfly charm to the tassel chain.
Mark the top of the tube at two points, each approximately 3 inches from centre top, on each side of the zipper. At each marked point, insert a rivet or Chicago screw through the crochet layer, thread the D-ring onto the rivet bracket, and close the rivet from inside. Thread the handle tabs through the D-rings before closing the rivets, or use lobster clasps for removable handles, and tug each handle firmly to check the rivets do not pull through.
For the end cap embellishment, either press floral fabric, back it with fusible interfacing, cut it to 4.75 inches diameter, centre it on the cap and whipstitch around the perimeter, or embroider wildflower motifs directly onto the caps using satin stitch for petals and leaves, lazy daisy stitch for small flowers, stem stitch for stems, and French knots for flower centres. For an optional lining, cut one fabric rectangle 13 inches wide by 16.5 inches long and two 5.5-inch circles, sew them into a barrel-shaped lining, turn it right side out, slip it inside the bag, and whipstitch it to the bag along the zipper tape.
Tips
Weave in ends as you go. Cotton ends can loosen, so weave each tail at least 1 inch in two directions.
For a stiffer bag, work at a tighter gauge or add the fabric lining. A simple lining dramatically improves durability and shape retention.
Hand wash in cool water with gentle detergent, press out the excess water without wringing, reshape and lay flat to dry, and store the bag stuffed with tissue paper to maintain its barrel shape.
To make the bag longer, add stitches to the foundation chain in multiples of 2, as each additional 2 stitches adds approximately 0.44 inch, and use a longer zipper.
Lavender Wildflower Barrel Purse Free Crochet Pattern
Materials
Steps
- Work the linen stitch body tube from a chain of 73 for 60 rounds
- Work two flat end caps, increasing to 72 sc each
- Whipstitch the end caps to the tube ends
- Install the 10-inch zipper along the top
- Attach the chain tassel and butterfly charm to the zipper pull
- Rivet the D-rings and attach the floral handles
- Embellish the end caps with fabric panels or embroidery
- Place a marker in the first sc of every round
- Weave cotton ends at least 1 inch in two directions
- Work at a tighter gauge or add a lining for a stiffer bag
- Tug each handle firmly to test the rivets before use


