Sage Green Lace Cable Crop Top Free Crochet Pattern
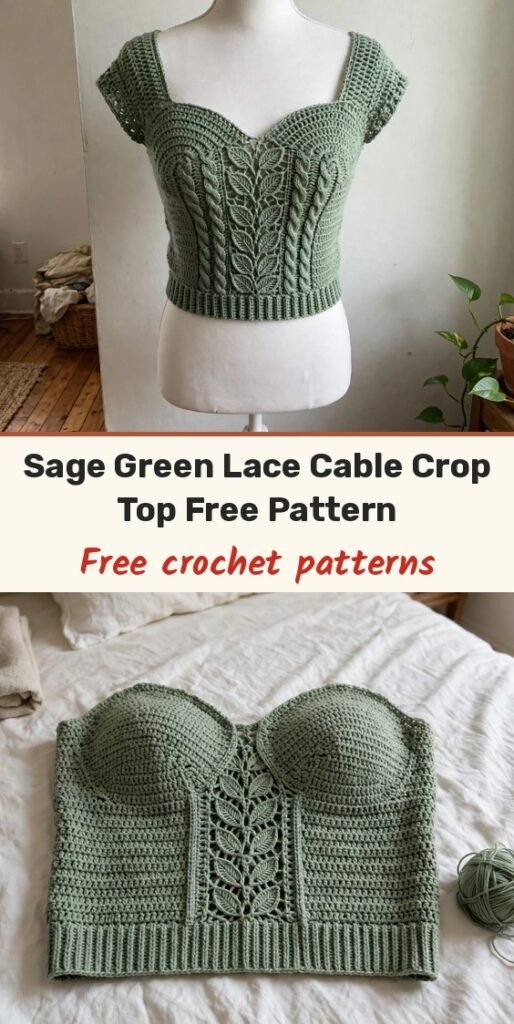
Table of Contents
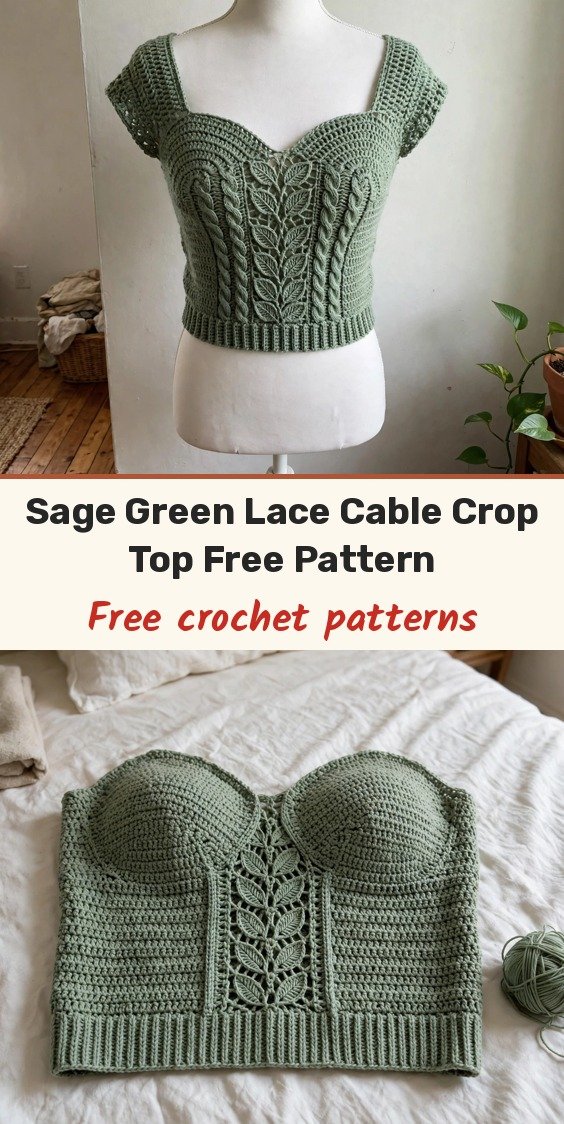
I have been hunting for a crop top that feels boutique rather than homemade, and this sage green beauty is exactly it. The central leaf lace cable panel runs right down the front bodice, and with the sweetheart neckline and little cap sleeves it looks far more complicated than it really is.
We will work the top in two flat pieces from the bottom up. Each panel starts with a ribbed hem band worked on its own, then we pick up stitches along the band and build the body upward. The front carries the 22-stitch cable panel; the back stays plain half double crochet. After shaping, we seam the shoulders and sides and finish the armholes and neckline.
The pattern is written for size S with the other sizes in parentheses in this order: XS, S, M, L, XL, 2XL. Plan on 14 to 22 hours for the small/medium size, and do swatch: this is a fitted garment and blocking is essential.
Materials
- 550 (550, 600, 650, 700, 750) yards of DK weight (weight 3) cotton or cotton blend yarn in sage green
- 3.5mm (US E-4) crochet hook for the main fabric
- 3.25mm (US D-3) crochet hook for ribbed bands and edging
- Tapestry needle for seaming and weaving in ends
- At least 8 stitch markers
- Measuring tape
- Blocking mat and rust-proof pins
Abbreviations
- ch: chain
- sl st: slip stitch
- sc: single crochet
- hdc: half double crochet
- dc: double crochet
- tr: treble crochet
- FPdc: front post double crochet
- BPdc: back post double crochet
- FPtr: front post treble crochet
- FPhdc: front post half double crochet
- BPhdc: back post half double crochet
- hdc2tog: half double crochet two together
- sk: skip
- st/sts: stitch / stitches
- RS: right side
- WS: wrong side
Special Stitches
- Leaf Petal Unit (LPU): work (dc2tog inserting the hook into the same stitch for both legs, but do not complete the final pull-through) twice into the same stitch or space, yarn over and pull through all 3 loops on hook, then ch 1 to lock. This makes the botanical leaf element.
- Crossed Cable (CC): skip the next 2 stitches, FPtr into the stitch 2 stitches before the skipped stitches (working behind them), then go back and FPtr into each of the 2 skipped stitches for a right-leaning cable cross.
- Ribbed Stitch Pattern: Row 1: ch a multiple of 2, hdc in 3rd ch from hook and in each ch across. Following rows: ch 2 (does not count), turn, BPhdc in first st, (FPhdc, BPhdc) across, ending FPhdc in last st.
Gauge & Size
- Finished bust: 31 (33, 35, 37, 39, 41) inches, to fit bust 30 to 42 inches with 1 to 2 inches of positive ease
- Finished length: 14 inches from hem to shoulder for all sizes; front neckline dips to 12.5 inches from the hem
- Gauge: 18 hdc x 14 rows = 4 inches / 10 cm blocked with the 3.5mm hook; the centre cable panel (22 sts) measures about 4.75 inches wide after blocking
- Construction: two flat panels, bottom-up, ribbed hem bands first, seamed at shoulders and sides
- Skill level: Intermediate to Advanced
Hem Band (Make 2)
With the 3.25mm hook, ch 10.
Row 1 (WS): Hdc in 3rd ch from hook and in each ch across. (8 hdc)
Row 2 (RS): Ch 2, turn. (FPhdc, BPhdc) 4 times. (8 sts)
Row 3: Ch 2, turn. (BPhdc, FPhdc) 4 times. (8 sts)
Repeat Rows 2 and 3 until the band measures 15 (16, 17, 18, 19, 20) inches, ending with a WS row. Fasten off and weave in ends. Each band should be 8 stitches tall (about 2 inches wide) with clear vertical ribs. Make one band for the front and one for the back.
Picking up stitches: with RS of the band facing and the 3.5mm hook, work sc evenly along the long top edge, picking up 1 sc per row end, for a total of 67 (72, 77, 82, 87, 92) sc for each panel. This picked-up row is the foundation and does not count as Row 1. At size S the 72 stitches divide as 25 left flank, 22 centre panel, 25 right flank.
Front Panel Body
The ch 2 at the start of every row does not count as a stitch; always work the first hdc into the first stitch. Odd rows are RS rows. Wrong-side rows are always plain: ch 2, turn, hdc in each st across.
Row 1 (RS, setup): Ch 2, turn. Hdc in each of first 25 sts. Centre panel: hdc in next 2 sts, FPdc around 3rd st of the centre 22, hdc in next 2 sts, (dc, ch 1, dc) in centre st, hdc in next 2 sts, FPdc around next st, hdc in last 2 sts of panel. Hdc in each of last 25 sts. (72 sts at size S)
Row 2 (WS): Ch 2, turn. Hdc in each st and ch-1 sp across. (72 sts)
Row 3 (RS, Cable Row A): Ch 2, turn. Hdc in each of first 25 sts. Centre panel: hdc in next 2 sts, FPdc around FPdc post from 2 rows below, ch 1, sk next st, (dc, ch 1, dc) in next st, ch 1, sk next st, LPU into centre st of panel, ch 1, sk next st, (dc, ch 1, dc) in next st, ch 1, sk next st, FPdc around FPdc post from 2 rows below, hdc in last 2 sts of panel. Hdc in each of last 25 sts. (72 sts)
Row 4 (WS): Ch 2, turn. Hdc in each st across. (72 sts)
Row 5 (RS, Cable Row B): Ch 2, turn. Hdc in each of first 25 sts. Centre panel: hdc 2 sts, FPdc around post, ch 1, sk 1, dc in next st, ch 1, FPtr around post 2 rows below, ch 1, dc in next st, ch 1, LPU in centre, ch 1, dc in next, ch 1, FPtr crossing back, ch 1, dc in next, ch 1, sk 1, FPdc around post, hdc 2 sts. Hdc in each of last 25 sts. (72 sts)
Row 6 (WS): Ch 2, turn. Hdc across. (72 sts)
Row 7 (RS, Cable Row C): Ch 2, turn. Hdc in each of first 25 sts. Centre panel: hdc 2, FPdc around post, ch 1, sk 1, (dc, ch 1, dc, ch 1, dc) in next sp, sk 1, FPdc around post, hdc 2, FPdc around post, sk 1, (dc, ch 1, dc, ch 1, dc) in next sp, sk 1, FPdc around post, hdc 2. Hdc in each of last 25 sts. (72 sts)
Row 8 (WS): Ch 2, turn. Hdc across. (72 sts)
Continue this 6-row cable repeat (Rows 3 to 8) throughout the body, working the shaping below on the rows indicated. Stitch counts below are given for size S.
Waist & Bust Shaping
Waist decreases: place markers at stitch 5 from each edge. Work a decrease row on every 4th RS row, twice. Decrease row: ch 2, turn, hdc in first 3 sts, hdc2tog over next 2 sts, hdc to centre panel, work centre panel as established, hdc to 5 sts from end, hdc2tog over next 2 sts, hdc in last 3 sts. (2 sts decreased)
Waist Decrease Row 1 falls at Row 3. (70 sts)
Waist Decrease Row 2 falls at Row 11. (68 sts)
Work 2 straight rows after Row 11. Checkpoint: after Row 13 the front panel measures about 4 inches tall with 68 sts.
Bust increases: work an increase row on every 4th RS row, twice. Increase row: ch 2, turn, hdc in first 3 sts, 2 hdc in next st, hdc across to 4 sts before centre panel, 2 hdc in next st, work centre panel, hdc to 4 sts from end, 2 hdc in next st, hdc in last 3 sts. (4 sts increased)
Bust Increase Row 1 falls at Row 15. (72 sts)
Bust Increase Row 2 falls at Row 19. (76 sts)
Continue straight from Row 20 through Row 27. Checkpoint: after Row 27 the panel measures about 8.5 inches tall with 76 sts.
Armhole Shaping
Row 28 (RS): Sl st across first 6 (5, 6, 7, 8, 8, 9) sts. Ch 2, work in pattern across to last 6 sts, leave last 6 sts unworked. (64 sts at size S)
Row 29 (WS): Ch 2, turn. Hdc2tog at beginning, hdc across to last 2 sts, hdc2tog. (62 sts)
Row 30 (RS): Ch 2, turn. Hdc2tog at beginning, work in pattern to last 2 sts, hdc2tog. (60 sts)
Row 31 (WS): Ch 2, turn. Hdc2tog, hdc across to last 2 sts, hdc2tog. (58 sts)
Row 32 (RS): Ch 2, turn. Hdc2tog, work in pattern to last 2 sts, hdc2tog. (56 sts)
Work straight from Row 33 through Row 36. Checkpoint: after Row 36 the panel measures about 11.5 inches tall with 56 sts, and the armhole is about 3 inches deep.
Sweetheart Neckline & Shoulders
At Row 37, split the work at the centre: 17 sts left shoulder, 22 centre sts left open for the neckline, 17 sts right shoulder.
Left Shoulder Row 37 (RS): Ch 2, turn. Work in pattern across first 17 sts. Turn. (17 sts)
Left Shoulder Row 38 (WS): Ch 2, turn. Hdc in each st, hdc2tog at neckline edge. (16 sts)
Left Shoulder Row 39 (RS): Ch 2, turn. Hdc2tog at neckline edge, work across. (15 sts)
Left Shoulder Row 40 (WS): Ch 2, turn. Hdc across, hdc2tog at neckline edge. (14 sts)
Left Shoulder Row 41 (RS): Ch 2, turn. Hdc2tog at neckline edge, hdc across. (13 sts)
Left Shoulder Row 42 (WS): Ch 2, turn. Hdc across. (13 sts)
Left Shoulder Row 43 (RS): Ch 2, turn. Hdc across. (13 sts)
Fasten off the left shoulder. For the right shoulder, skip the centre 22 sts and rejoin yarn at stitch 40.
Right Shoulder Row 37 (RS): Ch 2, hdc in each of 17 sts. (17 sts)
Right Shoulder Row 38 (WS): Ch 2, turn. Hdc2tog at neckline edge, hdc across. (16 sts)
Right Shoulder Row 39 (RS): Ch 2, turn. Hdc across to last 2 sts, hdc2tog. (15 sts)
Right Shoulder Row 40 (WS): Ch 2, turn. Hdc2tog, hdc across. (14 sts)
Right Shoulder Row 41 (RS): Ch 2, turn. Hdc across to last 2 sts, hdc2tog. (13 sts)
Right Shoulder Row 42 (WS): Ch 2, turn. Hdc across. (13 sts)
Right Shoulder Row 43 (RS): Ch 2, turn. Hdc across. (13 sts)
Fasten off. The front panel should measure about 14 inches from hem to shoulder, with each shoulder strap 13 sts wide.
Back Panel
Work the back exactly as the front for the hem band, pick-up row and all shaping through Row 36, but substitute plain hdc for the centre 22 stitches throughout; there is no cable motif on the back.
Row 37 (RS): Ch 2, turn. Hdc across all 56 sts. (56 sts)
Row 38 (WS): Ch 2, turn. Hdc across all 56 sts. (56 sts)
Row 39 (RS): Ch 2, turn. Hdc in first 13 sts, fasten off the centre 30 sts, rejoin yarn and hdc in last 13 sts. This makes a straight back neckline.
Rows 40 to 43: Work straight in hdc on each 13-st shoulder section separately. Fasten off.
Finishing & Assembly
Wet block both panels, pinning them to measurements, and let them dry completely before seaming; the lace cable motif opens up beautifully after blocking.
Join the 13-st shoulder sections with mattress stitch or a sl st seam. Seam the sides from the underarm down to the hem on both sides, matching stitch rows.
Armhole edging: with the smaller hook, work a round of sc evenly around each armhole opening, join with sl st, then work 1 round of (FPhdc, BPhdc) ribbing and fasten off.
Neckline edging: work a round of sc evenly around the entire neckline opening, following the sweetheart curve and taking care at the centre dip to keep the shape. Join and fasten off. Weave in all remaining ends and give the top a light steam if needed.
Tips
Sketch the 22-stitch centre panel on graph paper before you start and mark where the FPdc columns and leaf units fall; it makes the RS rows much less intimidating.
Run a lifeline of contrasting thread through your stitches at the end of each cable repeat so you can rip back safely if a row goes wrong.
Count at the end of every row until you trust the rhythm. With shaped garments and cable panels, the stitch count is everything.
Choose a cotton or cotton blend with good stitch definition and minimal stretch; the cable motif and shaping depend on the yarn holding its structure.
Sage Green Lace Cable Crop Top Free Crochet Pattern
Materials
Steps
- Work two ribbed hem bands in post-stitch ribbing
- Pick up stitches along each band for the front and back foundations
- Work the front body with the 22-stitch leaf cable panel and plain wrong-side rows
- Shape the waist with decreases and the bust with increases
- Shape the armholes, then split for the sweetheart neckline and shoulders
- Work the back panel plain with a straight neckline
- Block, seam shoulders and sides, and edge the armholes and neckline
- Sketch the 22-stitch cable panel on graph paper before starting
- Use lifelines at the end of each cable repeat
- Count at the end of every row on a fitted garment
- Block both panels before seaming so the seams align cleanly


