Midnight Purple Boho Crochet Set Free Pattern
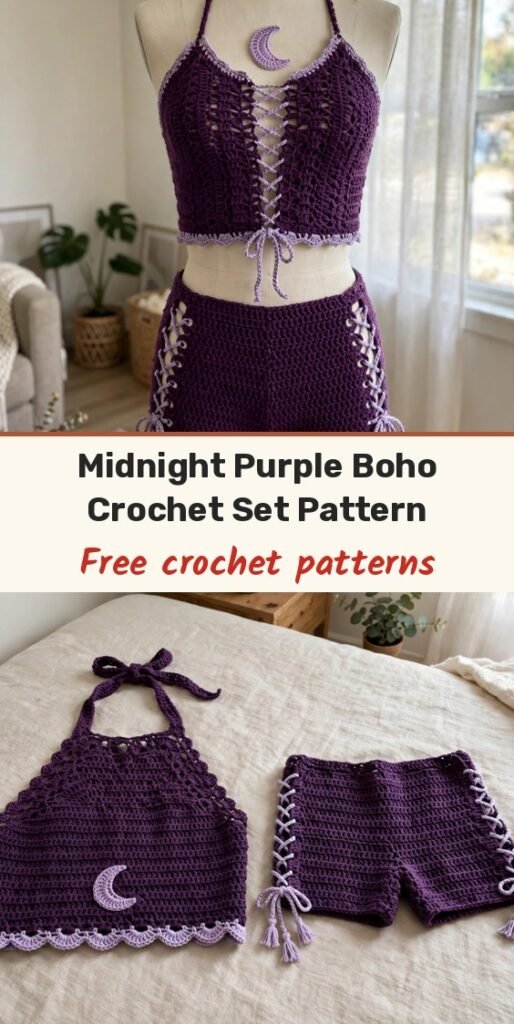
Table of Contents
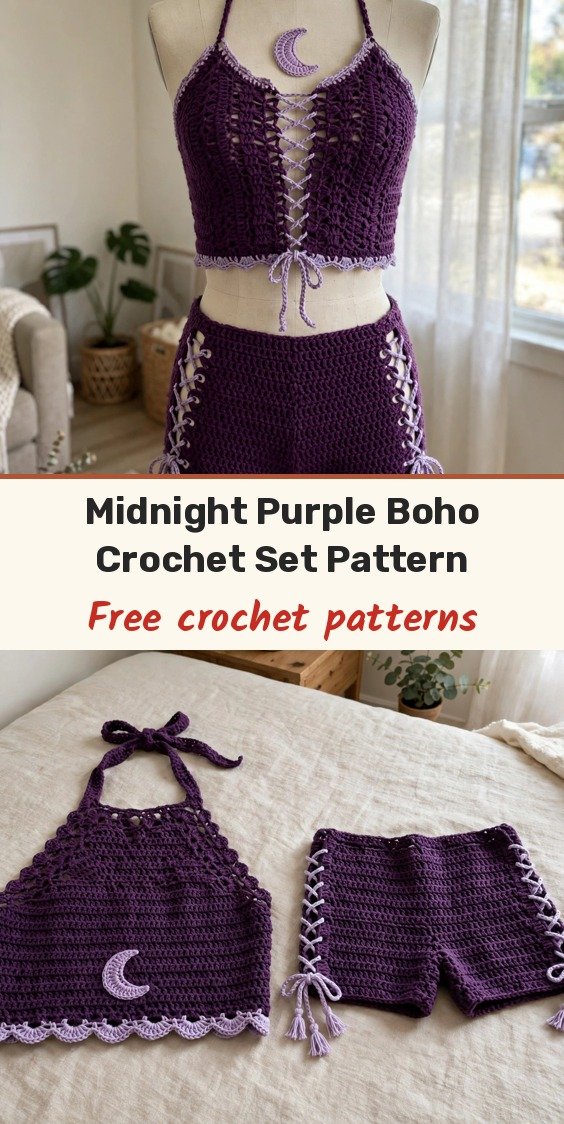
Deep midnight purple, soft lavender trim, a crescent moon at the chest and tassels that dance when you move — this two-piece boho set is pure festival magic! The halter crop top laces up the front, and the high-waist boy shorts have lace-up side panels to match.
I will not pretend this one is a quick make: plan on roughly 20 to 29 hours across both pieces. But every section is worked in friendly single crochet with shell edging, eyelet rows for the lacing, and a moon applique we make separately and sew on at the end. If you have finished a couple of garments before, you can absolutely do this.
The pattern fits size Small/Medium (US 4 to 8), for a 32 to 36 inch bust and 34 to 38 inch hips.
Materials
- 650 yards of worsted weight yarn in deep purple (main colour)
- 175 yards of worsted weight yarn in lavender (contrast colour)
- 5.5mm crochet hook, for the main fabric
- 5.0mm crochet hook, for edging and applique
- Yarn needle, for weaving in ends and seaming
- Stitch markers, at least 6
- Scissors
- Measuring tape
- Blocking mat and pins
- 2 yards of lavender crochet cord, for the shorts lace-up panels (instructions included)
- 1 yard of lavender crochet cord, for the halter top lace-up panel (instructions included)
- 10 lavender tassels, about 3 inches long (instructions included)
Abbreviations
- ch: chain
- sc: single crochet
- sc2tog: single crochet two together
- dc: double crochet
- sl st: slip stitch
- sk: skip
- ch-sp: chain space
- st/sts: stitch / stitches
- RS: right side
- WS: wrong side
- MC: main colour, deep purple
- CC: contrast colour, lavender
Special Stitches
- Shell stitch: work 5 dc all into the same stitch or space. In the edging, shells are separated by skip 2 stitches, sc 1, skip 2 stitches.
- Scallop edging: with CC, join the yarn to the edge and work: sc 1, skip 2 stitches, shell (5 dc) into the next stitch, skip 2 stitches, repeat across. At corners, work sc 1 into the corner stitch to keep the edging flat.
- Eyelet row: ch 1 (does not count as a stitch), sc 1, (ch 2, sk 2 sts, sc 1) across. On the following row, work sc into each sc and 2 sc into each ch-2 space to restore the stitch count.
- Lace-up cord: with CC and the 5.0mm hook, chain until the cord reaches the desired length (about 30 chains per inch of cord), then work 1 sl st back in each chain across to stiffen it. For a 24 inch cord, ch 200 and sl st back across.
- Tassel (make 10): cut 20 strands of CC, each 8 inches long. Hold them together and fold in half. With a separate 10 inch strand, tie tightly around the folded loop about 0.5 inch from the top to form the head, keeping the tie strand for attaching. Trim the ends to 3 inches below the tie.
Gauge & Size
- Finished size: Small/Medium — top 30 inches across the chest laid flat and about 13 inches long including the neck strap; shorts waistband 28 inches unstretched (stretches to about 36), hip 34 inches, length 9 inches, inseam about 2.5 inches
- Gauge: 16 sc = 4 inches and 18 rows = 4 inches in single crochet with MC and the 5.5mm hook, blocked
- Construction: top and shorts each worked as flat front and back panels, seamed, with lace-up panels and applique added
- Skill level: Intermediate to Advanced
Crescent Moon Applique
Outer circle Round 1: With CC and the 5.0mm hook, make a magic ring, ch 2, work 12 dc into the ring, sl st to the first dc to join. (12 dc)
Outer circle Round 2: Ch 2, work 2 dc in each stitch around, sl st to join. (24 dc)
Outer circle Round 3: Ch 2, (dc in the next stitch, 2 dc in the next stitch) around, sl st to join. (36 dc)
Fasten off, leaving a long tail, and set aside.
Inner circle Round 1: With CC and the 5.0mm hook, make a magic ring, ch 2, work 12 dc into the ring, sl st to join. (12 dc)
Inner circle Round 2: Ch 2, work 2 dc in each stitch around, sl st to join. (24 dc)
Fasten off, leaving a long tail.
Align the smaller circle on top of the larger one so their edges overlap on one side only, with the crescent facing left. With your yarn needle and CC, whipstitch the inner circle to the outer circle only around the overlapping curved edge; the unattached arc of the outer circle forms the crescent.
Halter Top Front Panel
Foundation: With MC and the 5.5mm hook, ch 62.
Row 1 (RS): Sc in the 2nd chain from the hook and in each chain across, turn. (61 sc)
Row 2: Ch 1, sc in each stitch across, turn. (61 sc)
Row 3: Ch 1, sc in each stitch across, turn. (61 sc)
Row 4: Ch 1, sc in each stitch across, turn. (61 sc)
Row 5: Ch 1, sc in each stitch across, turn. (61 sc)
Row 6: Ch 1, sc in each stitch across, turn. (61 sc)
Row 7: Ch 1, sc2tog over the first 2 sts, sc across to the last 2 sts, sc2tog, turn. (59 sc)
Row 8: Ch 1, sc in each stitch across, turn. (59 sc)
Row 9: Ch 1, sc2tog over the first 2 sts, sc across to the last 2 sts, sc2tog, turn. (57 sc)
Row 10: Ch 1, sc in each stitch across, turn. (57 sc)
Row 11: Ch 1, sc2tog over the first 2 sts, sc across to the last 2 sts, sc2tog, turn. (55 sc)
Row 12: Ch 1, sc in each stitch across, turn. (55 sc)
Row 13: Ch 1, sc2tog over the first 2 sts, sc across to the last 2 sts, sc2tog, turn. (53 sc)
Row 14: Ch 1, sc in each stitch across, turn. (53 sc)
Row 15: Ch 1, sc2tog over the first 2 sts, sc across to the last 2 sts, sc2tog, turn. (51 sc)
Row 16: Ch 1, sc in each stitch across, turn. (51 sc)
Row 17: Ch 1, sc2tog over the first 2 sts, sc across to the last 2 sts, sc2tog, turn. (49 sc)
Row 18: Ch 1, sc in each stitch across, turn. (49 sc)
Row 19: Ch 1, sc2tog, sc2tog, sc across to the last 4 sts, sc2tog, sc2tog, turn. (45 sc)
Row 20: Ch 1, sc2tog, sc2tog, sc across to the last 4 sts, sc2tog, sc2tog, turn. (41 sc)
Row 21: Ch 1, sc2tog, sc2tog, sc across to the last 4 sts, sc2tog, sc2tog, turn. (37 sc)
Row 22: Ch 1, sc2tog, sc2tog, sc across to the last 4 sts, sc2tog, sc2tog, turn. (33 sc)
Row 23: Ch 1, sc2tog, sc2tog, sc across to the last 4 sts, sc2tog, sc2tog, turn. (29 sc)
Row 24: Ch 1, sc2tog, sc2tog, sc across to the last 4 sts, sc2tog, sc2tog, turn. (25 sc)
Row 25: Ch 1, sc2tog, sc2tog, sc across to the last 4 sts, sc2tog, sc2tog, turn. (21 sc)
Row 26: Ch 1, sc2tog, sc2tog, sc across to the last 4 sts, sc2tog, sc2tog, turn. (17 sc)
Row 27: Ch 1, sc2tog, sc across to the last 2 sts, sc2tog, turn. (15 sc)
Row 28: Ch 1, sc in each stitch across, turn. (15 sc)
Row 29: Ch 1, sc 6, ch 2, sk 2, sc 7, turn. (15 sts including the ch-2 space)
Row 30: Ch 1, sc 7, 2 sc in the ch-2 space, sc 6, turn. (15 sc)
Row 31: Ch 1, sc 6, ch 2, sk 2, sc 7, turn. (15 sts including the ch-2 space)
Row 32: Ch 1, sc 7, 2 sc in the ch-2 space, sc 6, turn. (15 sc)
Row 33: Ch 1, sc 6, ch 2, sk 2, sc 7, turn. (15 sts including the ch-2 space)
Row 34: Ch 1, sc 7, 2 sc in the ch-2 space, sc 6, turn. (15 sc)
Row 35: Ch 1, sc 6, ch 2, sk 2, sc 7, turn. (15 sts including the ch-2 space)
Row 36: Ch 1, sc 7, 2 sc in the ch-2 space, sc 6, turn. (15 sc)
Fasten off MC, leaving a 12 inch tail for seaming. Rows 29 to 36 form the lace-up column with 4 eyelets.
Halter Top Back Panel & Straps
Back Panel Foundation: With MC and the 5.5mm hook, ch 62.
Back Row 1 (RS): Sc in the 2nd chain from the hook and in each chain across, turn. (61 sc)
Back Rows 2 to 26: Ch 1, sc in each stitch across, turn. (61 sc each row)
Fasten off, leaving a 12 inch tail for seaming.
Neck Strap Row 1: With MC and the 5.5mm hook, ch 5, sc in the 2nd chain from the hook and in each chain across, turn. (4 sc)
Neck Strap Rows 2 to 60: Ch 1, sc in each stitch across, turn. (4 sc each row)
Continue until the strap measures 15 inches. With CC and the 5.0mm hook, work a row of sl st along each long edge of the strap for contrast trim, and fasten off. Make a second identical strap.
Attach each strap to the top outer corners of the front panel with whipstitch, angling them inward so they converge at the neck.
Side seams: With wrong sides together, align the front and back panels at the side edges and whipstitch or mattress stitch the side seams, leaving the top 2 inches of each side open for the armhole gap.
Top edging: With CC and the 5.0mm hook, join the yarn at the lower right corner of the front panel and work the scallop edging across the bottom — sc 1 in the first stitch, sk 2 sts, shell (5 dc) in the next stitch, sk 2 sts, sc 1, repeated across, for 10 complete shell repeats. Repeat identically across the bottom of the back panel.
Sew the crescent moon applique to the front centre, approximately 1 to 2 inches above the lower hem, whipstitching around the outer edge. Make one cord about 24 inches long and thread it through the 4 eyelets of the lace-up column, weaving in an X-cross pattern from top to bottom.
Shorts Back Panel
Foundation: With MC and the 5.5mm hook, ch 70.
Row 1 (RS): Sc in the 2nd chain from the hook and in each chain across, turn. (69 sc)
Rows 2 to 6: Ch 1, sc in each stitch across, turn. (69 sc each row)
Row 7 (waistband eyelet row): Ch 1, sc 2, (ch 1, sk 1, sc 3) across, ending with sc 2, turn. (69 sts)
Row 8: Ch 1, sc 2, (1 sc in the ch-space, sc 3) across, ending with sc 2, turn. (69 sc)
Rows 9 to 28: Ch 1, sc in each stitch across, turn. (69 sc each row)
Row 29: Ch 1, sc2tog, sc across to the last 2 sts, sc2tog, turn. (67 sc)
Row 30: Ch 1, sc2tog, sc across to the last 2 sts, sc2tog, turn. (65 sc)
Row 31: Ch 1, sc2tog, sc across to the last 2 sts, sc2tog, turn. (63 sc)
Row 32: Ch 1, sc2tog, sc across to the last 2 sts, sc2tog, turn. (61 sc)
Row 33: Ch 1, sc2tog, sc across to the last 2 sts, sc2tog, turn. (59 sc)
Row 34: Ch 1, sc2tog, sc across to the last 2 sts, sc2tog, turn. (57 sc)
Row 35: Ch 1, sc2tog, sc across to the last 2 sts, sc2tog, turn. (55 sc)
Row 36: Ch 1, sc2tog, sc across to the last 2 sts, sc2tog, turn. (53 sc)
Row 37: Ch 1, sc in each stitch across, turn. (53 sc)
Fasten off, leaving a 14 inch tail for crotch seaming.
Shorts Front Panel
Foundation: With MC and the 5.5mm hook, ch 70.
Row 1 (RS): Sc in the 2nd chain from the hook and in each chain across, turn. (69 sc)
Rows 2 to 6: Ch 1, sc in each stitch across, turn. (69 sc each row)
Row 7 (waistband eyelet row): Ch 1, sc 2, (ch 1, sk 1, sc 3) across, ending with sc 2, turn. (69 sts)
Row 8: Ch 1, sc 2, (1 sc in the ch-space, sc 3) across, ending with sc 2, turn. (69 sc)
Rows 9 to 30: Ch 1, sc in each stitch across, turn. (69 sc each row)
Row 31: Ch 1, sc2tog, sc across to the last 2 sts, sc2tog, turn. (67 sc)
Row 32: Ch 1, sc2tog, sc across to the last 2 sts, sc2tog, turn. (65 sc)
Row 33: Ch 1, sc2tog, sc across to the last 2 sts, sc2tog, turn. (63 sc)
Row 34: Ch 1, sc2tog, sc across to the last 2 sts, sc2tog, turn. (61 sc)
Row 35: Ch 1, sc2tog, sc across to the last 2 sts, sc2tog, turn. (59 sc)
Row 36: Ch 1, sc in each stitch across, turn. (59 sc)
Fasten off, leaving a 14 inch tail.
Shorts Lace-Up Panels & Finishing
Side panel Row 1: With CC and the 5.0mm hook, join the yarn at the top corner of one side edge of the front panel. Ch 1, work sc evenly along the side edge, approximately 1 sc per row end — for 36 rows, work 36 sc — turn. (36 sc)
Side panel Row 2: Ch 1, sc 1, (ch 2, sk 2, sc 1) across, creating 12 eyelet pairs, turn. (36 sts)
Side panel Row 3: Ch 1, sc 1, (2 sc in the ch-2 space, sc 1) across, turn. (36 sc)
Fasten off. Repeat on all 4 side edges of the shorts.
Assembly: With wrong sides facing, align the front and back panels at the sides and whipstitch only the top 1.5 inches of each side seam at the waistband, leaving the rest open for the lace-up gap. Fold the shorts so the front and back crotch edges align and whipstitch the crotch seam along the decrease-shaped edges, stopping 2 to 3 inches from each side edge.
Leg opening edging: With CC and the 5.0mm hook, join at one leg opening, work 1 round of sc evenly around to exactly 30 sc, then work the shell edging: (sc 1, sk 2, 5 dc in the next stitch, sk 2) 5 times, sl st to the first sc to join. Fasten off, and repeat for the second leg opening.
Waistband Round 1: With CC and the 5.0mm hook, join at the centre back top edge and work 1 sc in each stitch around the entire waistband, sl st to the first sc to join. (138 sc)
Waistband Round 2: Ch 1, sc in each stitch around, sl st to join. (138 sc)
Waistband Round 3 (scallop edging): (Sc 1, sk 2, shell (5 dc) in the next stitch, sk 2) around, for 23 shells, sl st to join. Fasten off.
Make 2 cords, each about 20 inches long, and thread one through the eyelet panels on each side of the shorts, weaving from top to bottom in a crisscross X pattern.
Tassel placement: 4 tassels at the side lace-up panels (2 per side), 2 at the halter top neck strap tie ends, 1 at the centre bottom of the halter lace-up cord, and 1 optional tassel at the centre front of the shorts waistband.
Finishing & Assembly
Weave in all ends, block both pieces lightly to the finished measurements, and check that all the lace-up cords slide freely through their eyelets before you attach the tassels.
Tips
Gauge really matters on this set — even one stitch per 4 inches changes the fit across the chest and hips, so please swatch and block your swatch.
To size up, add 6 stitches to the foundation chain of both top panels and both shorts panels for each size; to size down, remove 6 stitches per panel per size.
For a larger bust, after the fast shaping of Rows 19 to 26 of the halter front, work 2 extra even rows before starting the lace-up column.
Use a smooth yarn for this set. Textured or novelty yarn hides the stitch detail and the eyelets will not lace up properly.
Midnight Purple Boho Crochet Set Free Pattern
Materials
Steps
- Make the crescent moon applique from two overlapping circles
- Work the halter front panel with side and triangle shaping and a lace-up column
- Work the halter back panel and 2 neck straps, then seam the sides
- Add scallop edging, sew on the moon and lace up the front
- Work the shorts front and back panels with crotch shaping
- Add the 4 side lace-up panels, crotch seam and leg edging
- Work the waistband rounds with scallop edging
- Lace up the shorts sides and attach the 10 tassels
- Swatch and block the swatch, gauge decides the fit on this set
- Add or remove 6 foundation stitches per panel to change size
- Use smooth yarn so the eyelets lace up properly


