Pink Rose Garden Crochet Vase Free Crochet Pattern
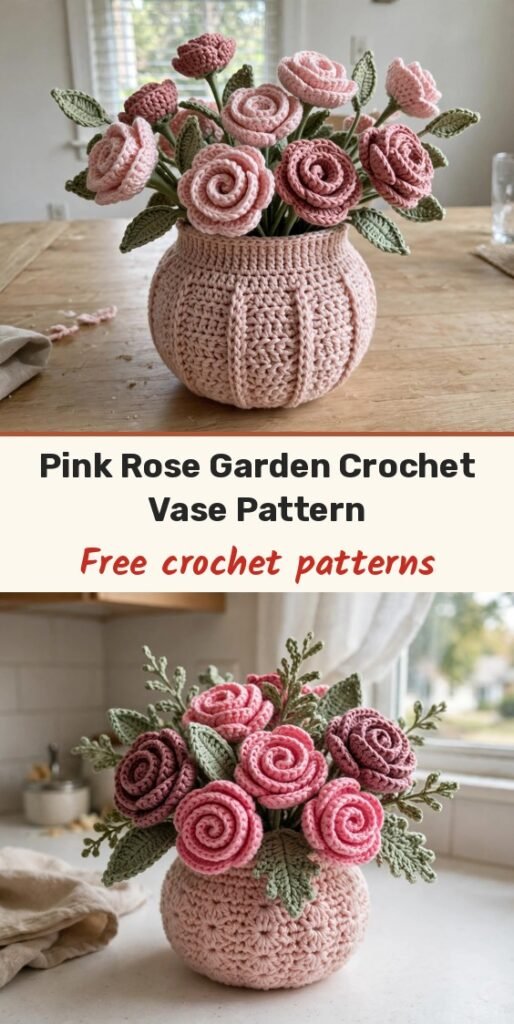
Table of Contents
I have been looking for the perfect everlasting floral centrepiece for months, and this pink rose garden vase is my absolute favourite! It combines everything I love about crochet flowers: realistic spiral roses, delicate leaves, and a sturdy vase that actually holds its shape.
We will crochet the rounded vase in continuous single crochet rounds, roll long shell strips into spiral roses in two sizes, add pointed leaves, wrap floral wire stems with tape, and arrange everything into a bouquet that never wilts. The whole arrangement stands approximately 10 to 12 inches tall when assembled.
I love that this pattern uses small amounts of yarn in several colours, so it is perfect for using up those partial skeins you have been saving for something special. This is that something special!
Materials
- Approximately 150 yards of worsted weight yarn (medium weight, category 4) in blush pink, for the vase and light roses
- Approximately 100 yards of worsted weight yarn in dusty rose, for the darker roses
- Approximately 80 yards of worsted weight yarn in sage green, for the leaves and stems
- 4.0mm (G/6) crochet hook, for the vase
- 3.5mm (E/4) crochet hook, for the roses and leaves
- Tapestry needle, for weaving in ends and sewing
- Polyester fiberfill, for stuffing the vase
- Floral wire, 18 gauge, approximately 12 pieces of 8 inches each
- Green floral tape
- Scissors
- Stitch marker (optional but helpful)
Abbreviations
- ch: chain
- sl st: slip stitch
- sc: single crochet
- hdc: half double crochet
- dc: double crochet
- inc: increase, work 2 stitches into the same stitch
- dec: decrease (invisible decrease for sc)
- FLO: front loop only
- BLO: back loop only
- st/sts: stitch / stitches
Gauge & Size
- Finished size: vase approximately 4 inches tall and 5 inches wide at the widest point; large roses 2.5 to 3 inches across; small roses and buds 1.5 to 2 inches; leaves approximately 2 inches long; complete arrangement 10 to 12 inches tall
- Gauge: 16 sc and 18 rows = 4 inches with the 4.0mm hook (gauge is not critical, but a tighter gauge helps the vase hold its shape)
- Construction: vase worked in continuous rounds and stuffed, spiral roses rolled from shell strips, leaves worked around a foundation chain, wire stems wrapped in floral tape
- Skill level: Intermediate Beginner
Vase Pattern
The vase is worked from the bottom up in continuous rounds. Do not join rounds unless specified, and use a stitch marker to track the beginning of each round. With blush pink yarn and the 4.0mm hook:
Round 1: Create a magic ring, work 6 sc into the ring, pull tight to close. (6 sts)
Round 2: Inc in each st around. (12 sts)
Round 3: (Sc 1, inc) repeat around. (18 sts)
Round 4: (Sc 2, inc) repeat around. (24 sts)
Round 5: (Sc 3, inc) repeat around. (30 sts)
Round 6: (Sc 4, inc) repeat around. (36 sts)
Round 7: (Sc 5, inc) repeat around. (42 sts)
Round 8: (Sc 6, inc) repeat around. (48 sts)
This completes the flat bottom of the vase. Now we work the sides.
Round 9: Working in BLO only, sc in each st around. (48 sts)
This creates a nice defined edge at the base.
Rounds 10 to 14: Sc in each st around. (48 sts)
Round 15: (Sc 6, dec) repeat around. (42 sts)
Round 16: Sc in each st around. (42 sts)
Round 17: (Sc 5, dec) repeat around. (36 sts)
Round 18: Sc in each st around. (36 sts)
Round 19: (Sc 4, dec) repeat around. (30 sts)
Rounds 20 to 22: Sc in each st around. (30 sts)
Begin stuffing the vase now, and add more stuffing as you continue to the top.
Round 23: (Sc 3, dec) repeat around. (24 sts)
Rounds 24 to 26: Sc in each st around. (24 sts)
Finish stuffing firmly. The vase should feel solid and hold its shape upright.
Round 27: Sl st in each st around. Fasten off and weave in ends. (24 sts)
Rose Pattern
Make approximately 12 to 15 roses in a mix of blush pink and dusty rose, varying the sizes by adjusting the starting chain length. For each large spiral rose (make 6 to 8), with rose colour yarn and the 3.5mm hook:
Row 1: Ch 52. Starting in 2nd ch from hook, sc in first ch, (skip 1 ch, 5 dc in next ch (shell made), skip 1 ch, sc in next ch) repeat across. (12 to 13 shells)
Fasten off, leaving a 12 inch tail for sewing. To form the rose, start at the beginning of the strip and roll it tightly at first, then continue rolling more loosely so the outer petals open up. Use the long tail to sew through the bottom layers as you roll, stitching through the base several times to lock everything in place.
For each small rose or bud (make 6 to 8), with rose colour yarn and the 3.5mm hook:
Row 1: Ch 28. Starting in 2nd ch from hook, sc in first ch, (skip 1 ch, 5 dc in next ch, skip 1 ch, sc in next ch) repeat across. (6 to 7 shells)
Fasten off and form the same way as the large rose. Rolling more tightly creates a bud shape, and rolling more loosely creates a small open rose. Do not stress if your roses look slightly different from each other, because real roses are not identical either, and the variety makes the arrangement look more natural!
Leaf Pattern
Make approximately 20 to 24 leaves. With sage green yarn and the 3.5mm hook, ch 11.
Row 1: Starting in 2nd ch from hook, sl st, sc, hdc, dc, dc, dc, hdc, sc, sl st, ch 3 for the point. Now work down the other side of the foundation chain: sl st, sc, hdc, dc, dc, dc, hdc, sc, sl st.
Fasten off, leaving a tail for attaching to stems. The ch 3 at the tip creates a small point, and for a more pronounced centre vein you can add a surface slip stitch line down the middle of the leaf after completing it.
Finishing & Assembly
Cut the floral wire into 8 inch pieces, one per rose plus a few extra for leaf sprigs. Starting at one end, wrap green floral tape around the wire, stretching the tape slightly as you go so it sticks to itself, and continue wrapping in a spiral down the entire length. For stems with leaves, stop partway down, position a leaf against the wire, and continue wrapping to secure it. To attach a rose, bend one end of a wrapped stem into a small hook or coil, insert it into the bottom of the rose, sew the rose base securely to the wire with matching yarn, and cover the attachment point with additional floral tape.
Create a few leaf-only stems by attaching 2 to 3 leaves at intervals along a wrapped wire. If you want the stems to stay in position, add a small piece of floral foam or dense stuffing inside the vase opening before inserting the stems. Arrange your roses in the vase with taller roses in the centre and back and shorter roses toward the front and edges, tucking leaf stems throughout to fill gaps. Take your time, step back and look from different angles, and bend the stems until you are happy with the fullness and balance.
Tips
The tighter you roll the centre of a rose strip, the more bud-like it looks, while looser rolling creates more open, full-bloom roses. Mix both styles in your arrangement.
Alternate your pink shades throughout the arrangement rather than grouping them, for better visual balance.
Angle the leaves in different directions, some pointing up, some out to the sides, and some slightly downward, to mimic how real leaves grow.
If your vase tips over, add a small bag of rice or dried beans to the bottom before stuffing, to add weight to the base.

Pink Rose Garden Crochet Vase Free Crochet Pattern
Materials
Steps
- Work the vase in continuous sc rounds to 48 sts, then decrease to 24 sts
- Stuff the vase firmly as you close the top rounds
- Work 6 to 8 large spiral roses from 52-chain shell strips
- Work 6 to 8 small roses and buds from 28-chain shell strips
- Work 20 to 24 pointed leaves
- Wrap wire stems with floral tape and attach roses and leaves
- Arrange the bouquet in the vase, taller roses at the back
- Roll rose centres tightly for buds and loosely for open blooms
- Alternate the pink shades through the arrangement for balance
- Add a small bag of rice to the vase base if it tips
- Angle leaves in different directions for a natural look