Mint Garden Butterfly Baby Dress Free Crochet Pattern
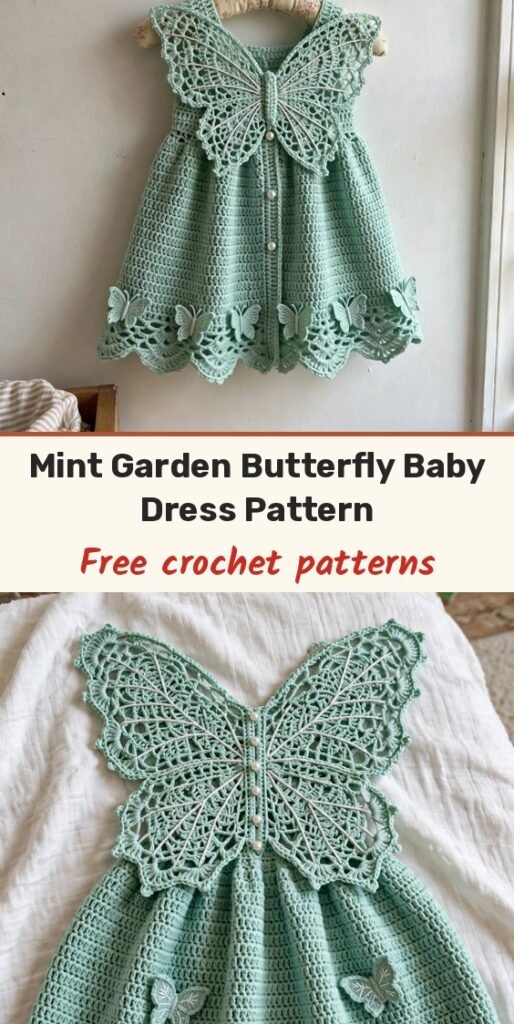
Table of Contents
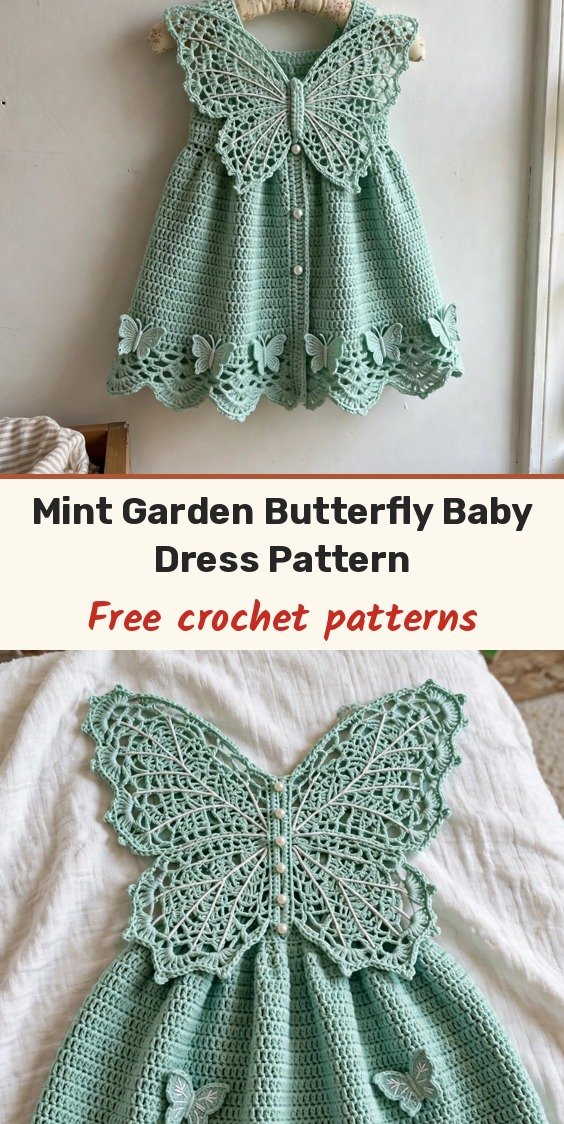
I have a serious soft spot for baby clothes that feel like tiny works of art, and this dress is exactly that project. The butterfly wings form the entire bodice, shoulder straps and all, in mint green cotton with delicate white embroidered veins, and everyone at the baby shower will gasp and ask if you really made it yourself.
Here is what makes this design so clever: there is no separate strap construction or traditional armhole shaping. The two lace wings are worked flat, joined at the centre to become the butterfly body, and the ribbed skirt is worked in the round right onto the joined bodice, growing through gentle increase rounds to a scalloped hem. Three little applique butterflies flutter across the skirt, and the antenna chains tie at the back for the closure.
It is sized for newborn to 3 months. This is an intermediate to advanced project, so if you have tackled a few lace motifs and worked in the round before, you can absolutely do this. I will walk you through every step.
Materials
- Main Colour (MC): 100% cotton DK weight (light worsted) yarn in mint green, approximately 350 yards / 320 metres
- Contrast Colour (CC): 100% cotton DK weight yarn in white, approximately 20 yards / 18 metres
- US E-4 / 3.5mm crochet hook (or size needed to obtain gauge)
- Stitch markers, 6 to 8 locking type
- Yarn needle (tapestry needle with blunt tip)
- 5 pearl buttons, approximately 8mm diameter
- 2 yards / 1.8 metres white satin ribbon, 3/8 inch wide (optional, for the hem eyelet round)
- Pearl bead embellishments (optional), approximately 3 to 5 small beads
- Scissors
- Blocking board and rust-proof pins
- Spray bottle with water, for wet blocking cotton
Abbreviations
- beg: beginning
- BLO: back loop only
- ch: chain
- ch-sp: chain space
- dc: double crochet
- dtr: double treble crochet
- hdc: half double crochet
- inc: increase (2 sc in same stitch)
- MC: main colour
- CC: contrast colour
- pm: place marker
- RS: right side
- WS: wrong side
- sc: single crochet
- sc2tog: single crochet 2 together (decrease)
- sk: skip
- sl st: slip stitch
- st/sts: stitch / stitches
- tr: treble crochet
- yo: yarn over
Special Stitches
- Shell Stitch: Work 5 double crochet into the same stitch or space. All 5 dc share the same base, spreading out like a fan.
- Picot: Chain 3, then slip stitch into the first chain made. The picot loop is complete.
- Scallop Border: Skip 2 stitches, work 5 double crochet into the next stitch, skip 2 stitches, slip stitch into the next stitch. Repeat around.
- V-Stitch: Work 1 double crochet, chain 1, and 1 double crochet, all into the same stitch or space. The chain-1 forms the centre of the V.
Gauge & Size
- Finished size: newborn to 3 months (fits chest 14 to 16 inches / 35.5 to 40.5 cm); dress length from shoulder to hem approximately 13 inches / 33 cm; skirt circumference at hem approximately 22 inches / 56 cm; bodice width at widest wing span approximately 10 inches / 25.5 cm
- Gauge: 18 sc = 4 inches / 10 cm and 20 rows sc = 4 inches / 10 cm with MC and a US E-4 / 3.5mm hook
- Construction: two flat lace wings joined at the centre body seam, skirt worked in joined rounds from the bodice edge, scalloped hem, 3 applique butterflies sewn on
- Skill level: Advanced
Right Wing
The right wing is worked flat, from the outer wing tip inward to the centre body edge. With MC and E-4 hook, ch 37. Turn.
Row 1 (WS): Sc in 2nd ch from hook and in each ch across. Turn. (36 sc)
Row 2 (RS): Ch 3 (counts as dc), dc in next st, ch 1, sk 1 st, (shell in next st, ch 1, sk 2 sts) 5 times, shell in next st, ch 1, sk 1 st, dc in each of last 2 sts. Turn. (6 shells, 2 edge dc pairs, 7 ch-1 sps)
Row 3 (WS): Ch 3 (counts as dc), dc in next dc, ch 1, (V-st in ch-sp of shell centre dc, ch 1) 6 times, dc in 2nd dc of beg edge pair, dc in top of ch-3. Turn. (2 edge dc, 6 V-sts, 7 ch-1 sps)
Row 4 (RS): Ch 3, dc in next dc, ch 1, sk ch-sp, (shell in V-st ch-sp, ch 1, sk V-st dc, sk ch-1, sk V-st dc) across, ending shell in last V-st ch-sp, ch 1, dc in each of last 2 dc. Turn. (6 shells, 7 ch-1 sps, 4 edge dc)
Row 5 (WS): Repeat Row 3. (same structure as Row 3)
Row 6 (RS): Repeat Row 4. (same structure as Row 4)
Row 7 (WS): Ch 1 (does not count as st), sc in first dc, sc in next dc, (2 sc in ch-sp, sc in each dc of shell, 2 sc in ch-sp) 6 times, 2 sc in final ch-sp, sc in 2nd dc, sc in top of ch-3. (58 sc)
Upper Wing Lobe
This section is worked on the first 30 sts of Row 7 only, creating the rounded upper wing lobe.
Row 8 (RS): Ch 3, turn, dc in next 4 sts, (ch 1, sk 1, shell in next st, ch 1, sk 1) 3 times, dc in next 5 sts. Leave rem sts unworked. Turn. (3 shells, 10 dc, 6 ch-1 sps)
Row 9 (WS): Ch 3, dc in next 4 dc, ch 1, (V-st in shell centre ch-sp, ch 1) 3 times, dc in next 4 dc, dc in top of ch-3. Turn. (10 dc, 3 V-sts, 4 ch-1 sps)
Row 10 (RS): Ch 3, dc in next 4 dc, ch 1, (shell in V-st ch-sp, ch 1) 3 times, dc in next 4 dc, dc in top of ch-3. Turn. (3 shells, 10 dc, 4 ch-1 sps)
Row 11 (WS, upper lobe rounding): Ch 1, sc2tog (first 2 dc), sc in next 3 dc, 2 sc in ch-sp, sc in each dc of shell, 2 sc in ch-sp, sc in 5 dc of centre, 2 sc in ch-sp, sc in each dc of shell, 2 sc in ch-sp, sc in 3 dc, sc2tog (last 2 dc). Turn. (29 sc)
Row 12 (RS): Ch 1, sc2tog, sc across to last 2 sts, sc2tog. Turn. (27 sc)
Row 13 (WS): Ch 1, sc2tog, sc across to last 2 sts, sc2tog. Turn. (25 sc)
Row 14 (RS): Ch 1, sc2tog, sc across to last 2 sts, sc2tog. Turn. (23 sc)
Row 15 (WS): Ch 1, sc2tog, sc across to last 2 sts, sc2tog. Turn. (21 sc)
Row 16 (RS): Ch 1, sc2tog, sc across to last 2 sts, sc2tog. Turn. (19 sc)
Fasten off. The upper lobe tip is complete.
Lower Wing Lobe
Return to Row 7 and rejoin MC at stitch 31 with RS facing.
Rejoin Row (RS): Attach MC at st 31 of Row 7 with sl st. Ch 3 (counts as dc), dc in next 27 sts. Turn. (28 dc, including ch-3)
Lower Lobe Row 1 (WS): Ch 3, dc in next 2 dc, ch 1, sk 1, (shell in next st, ch 1, sk 2 sts) 3 times, shell in next st, ch 1, sk 1, dc in next 2 dc, dc in top of ch-3. Turn. (4 shells, 8 edge dc, 5 ch-1 sps)
Lower Lobe Row 2 (RS): Ch 3, dc in next 2 dc, ch 1, (V-st in shell centre ch-sp, ch 1) 4 times, dc in next 2 dc, dc in top of ch-3. Turn. (8 edge dc, 4 V-sts, 5 ch-1 sps)
Lower Lobe Row 3 (WS): Ch 3, dc in next 2 dc, ch 1, (shell in V-st ch-sp, ch 1) 4 times, dc in next 2 dc, dc in top of ch-3. Turn. (4 shells, 8 edge dc, 5 ch-1 sps)
Lower Lobe Row 4 (RS): Repeat Lower Lobe Row 2. (same structure)
Lower Lobe Row 5 (WS): Ch 1, sc2tog, sc in next 2 dc, 2 sc in ch-sp, (sc in 5 dc of shell, 2 sc in ch-sp) 4 times, sc in 2 dc, sc2tog. Turn. (40 sc)
Lower Lobe Row 6: Ch 1, sc2tog, sc to last 2 sts, sc2tog. Turn. (38 sc)
Lower Lobe Row 7: Ch 1, sc2tog, sc to last 2 sts, sc2tog. Turn. (36 sc)
Lower Lobe Row 8: Ch 1, sc2tog, sc to last 2 sts, sc2tog. Turn. (34 sc)
Lower Lobe Row 9: Ch 1, sc2tog, sc to last 2 sts, sc2tog. Turn. (32 sc)
Lower Lobe Row 10: Ch 1, sc2tog, sc to last 2 sts, sc2tog. Turn. (30 sc)
Lower Lobe Row 11: Ch 1, sc2tog, sc to last 2 sts, sc2tog. Turn. (28 sc)
Lower Lobe Row 12: Ch 1, sc2tog, sc to last 2 sts, sc2tog. Turn. (26 sc)
Lower Lobe Row 13: Ch 1, sc2tog, sc to last 2 sts, sc2tog. Turn. (24 sc)
Fasten off.
Right Wing Inner Edge: With RS facing, rejoin MC at the foundation chain edge of the right wing at the inner (centre body) straight edge. Work 1 row of sc evenly along the entire straight inner edge of the wing from base to top, picking up approximately 1 sc per row end or 1 sc per stitch as appropriate to keep the edge flat. The inner edge should measure approximately 4 inches / 10 cm. Work approximately 20 sc along this edge. Do not fasten off. This edge will be seamed to the left wing.
Antenna Chain (Right Wing): With RS facing, at the top of the right wing (upper tip area), rejoin MC and ch 18. Sl st back along ch to form a loop. Fasten off. This forms the right shoulder strap and back tie.
Left Wing
Work the Left Wing as a mirror image of the Right Wing. All row directions are reversed (begin Row 1 at the opposite end of the foundation chain). Work the upper lobe on the last 28 sts and the lower lobe on the first 30 sts of Row 7. The inner edge and antenna chain are worked identically.
Joining the Wings
Place the right wing and left wing with RS facing up, inner straight edges together. Using MC and a yarn needle, whip stitch the two inner edges together for the full 4 inches / 10 cm length. Pull stitches snugly but do not pucker. This seam forms the butterfly body centre spine.
Wing Vein Embroidery: thread your yarn needle with CC (white). Bring the needle up from WS to RS at the centre body seam, approximately 0.5 inch / 1.3 cm from the top. Draw a straight line of chain stitch or running stitch diagonally out toward the wing tip, using the natural direction of the lace stitches as a guide. Return to centre and work additional veins in a fan pattern, 4 to 5 veins per wing pair. Secure on WS and trim. Work veins on both front-facing sides.
Pearl Button Embellishment: sew 5 pearl buttons evenly spaced along the centre body seam, approximately 0.5 inch / 1.3 cm apart, starting approximately 0.5 inch / 1.3 cm from the top antenna base. The buttons are decorative only; the back ties are the real closure.
Checkpoint: after completing the joined bodice, the butterfly should measure approximately 10 inches / 25.5 cm at its widest wingspan and approximately 6 inches / 15 cm from the top antenna base to the bottom edge. Block the bodice before proceeding to the skirt.
Skirt
The skirt is worked in the round, beginning by picking up stitches along the bottom straight edge of the joined bodice butterfly. The RS always faces outward; use a locking stitch marker to mark the beginning of each round.
Foundation Round: With RS facing and MC and E-4 hook, join yarn at the bottom right corner of the joined bodice bottom edge. Work sc evenly across the entire bottom edge of the bodice, picking up approximately 1 sc per stitch and 1 sc per row end. Work a total of 72 sc across. Join with sl st to first sc to form a ring. Do not turn. Place marker at join. (72 sc)
Round 1: Ch 1 (does not count as st), sc in each st around. Join with sl st to first sc. (72 sc)
Round 2 (increase round): Ch 1, (sc in next 8 sts, inc) around. Join. (80 sc)
Round 3: Ch 1, sc in each st around. Join. (80 sc)
Round 4 (increase round): Ch 1, (sc in next 9 sts, inc) around. Join. (88 sc)
Round 5: Ch 1, sc in each st around. Join. (88 sc)
Round 6 (increase round): Ch 1, (sc in next 10 sts, inc) around. Join. (96 sc)
Round 7: Ch 1, sc in each st around. Join. (96 sc)
Round 8 (increase round): Ch 1, (sc in next 11 sts, inc) around. Join. (104 sc)
Round 9: Ch 1, sc in each st around. Join. (104 sc)
Round 10 (increase round): Ch 1, (sc in next 12 sts, inc) around. Join. (112 sc)
Round 11: Ch 1, sc in each st around. Join. (112 sc)
Round 12 (increase round): Ch 1, (sc in next 13 sts, inc) around. Join. (120 sc)
Rounds 13 and 14: Ch 1, sc in each st around. Join. (120 sc each round)
Round 15 (increase round): Ch 1, (sc in next 14 sts, inc) around. Join. (128 sc)
Rounds 16 and 17: Ch 1, sc in each st around. Join. (128 sc each round)
Round 18 (increase round): Ch 1, (sc in next 15 sts, inc) around. Join. (136 sc)
Rounds 19 and 20: Ch 1, sc in each st around. Join. (136 sc each round)
Round 21 (increase round): Ch 1, (sc in next 16 sts, inc) around. Join. (144 sc)
Rounds 22 and 23: Ch 1, sc in each st around. Join. (144 sc each round)
Round 24 (increase round): Ch 1, (sc in next 17 sts, inc) around. Join. (152 sc)
Rounds 25 and 26: Ch 1, sc in each st around. Join. (152 sc each round)
Round 27 (final increase round): Ch 1, (sc in next 18 sts, inc) around. Join. (160 sc)
Rounds 28 and 29: Ch 1, sc in each st around. Join. (160 sc each round)
Checkpoint: after Round 29, the skirt should measure approximately 6.5 inches / 16.5 cm in length from the bodice attachment edge, and the circumference should measure approximately 35.5 inches / 90 cm. The skirt should lie flat without cupping or ruffling.
Hem Border
Hem Round 1 (eyelet round): Ch 4 (counts as dc + ch 1), sk 1 st, (dc in next st, ch 1, sk 1 st) around. Join with sl st to 3rd ch of beginning ch-4. (80 dc, 80 ch-1 sps)
Adjusted Hem Round 2: Ch 1, (sc in dc, sc in ch-sp) around to last 4 sts, sc in dc, 2 sc in ch-sp, sc in dc, 2 sc in ch-sp. Join. (162 sc)
Hem Round 3 (scallop border): Ch 1, sl st in first st, (sk 2 sts, 5 dc in next st, sk 2 sts, sl st in next st) 27 times. Join. Fasten off. (27 scallops)
The finished hem should have 27 evenly spaced scallops with no puckering, and measure approximately 22 inches / 56 cm around the scallop tips.
Applique Butterflies
Make 3. Each applique butterfly is worked flat in two wing pairs (upper pair and lower pair), joined at centre, and finished with surface embroidery.
Upper Wing Pair (make 1 per butterfly): Ch 2.
Row 1: 6 sc in 2nd ch from hook. Do not join. Turn. (6 sc)
Row 2: Ch 3 (counts as dc), 2 dc in same st, ch 1, sk 1, (dc in next st, ch 1) 2 times, 3 dc in last st. Turn. (9 dc, 3 ch-1 sps)
Row 3: Ch 1, sc in first dc, hdc in next 2 dc, (2 dc in ch-sp, dc in dc) 2 times, 2 dc in last ch-sp, hdc in next 2 dc, sc in last dc. Fasten off.
Work the lower wing pair similarly but slightly smaller. Join both pairs at centre with whip stitch. Add white embroidered veins using the same technique as the bodice. Sew the appliques to the skirt at varying heights.
Finishing & Assembly
Weave in all remaining ends using your yarn needle. Block the entire dress flat on your blocking board, pinning out the scallops at the hem and the wing tips on the bodice. Spray lightly with water and allow to dry completely.
Thread the white satin ribbon through the eyelet round at the hem if desired for additional decoration. Tie the antenna chain loops at the back into a bow for closure.
This dress is hand wash only in cool water. Lay flat to dry. Store carefully to preserve the lace detail and embellishments.
Tips
If you are nervous about the lace sections, practice the shell and V-stitch pattern on a small swatch first. Once you get the rhythm, it moves quickly.
If the skirt is cupping, you have not increased enough; if it is ruffling, you have increased too much. Trust the checkpoint measurements at Round 29.
Work lace sections loosely. If your gauge is running tight on the lace rows, go up one hook size for the bodice sections only, then return to the main hook for the skirt.
For 3 to 6 months (chest 16 to 18 inches), work the bodice foundation chain as 56 stitches instead of 48 and add 4 additional increase rounds at the base of the skirt, working each increase round as (sc, inc) across. For 6 to 9 months (chest 18 to 20 inches), work the bodice foundation chain as 64 stitches and add 8 additional increase rounds.
Mint Garden Butterfly Baby Dress Free Crochet Pattern
Materials
Steps
- Work the right wing flat in lace rows with upper and lower lobe shaping
- Work the left wing as a mirror image
- Work the inner edges and ch-18 antenna loops, then whip stitch the wings together
- Embroider white wing veins and sew 5 pearl buttons down the centre seam
- Pick up 72 sc along the bodice edge and work the skirt in rounds up to 160 sc
- Work the eyelet round, adjustment round and 27-scallop hem border
- Make 3 applique butterflies and sew them to the skirt
- Block the dress flat and tie the antenna loops at the back
- Block the joined bodice flat before starting the skirt
- Keep lace rows loose; go up a hook size for the bodice if gauge runs tight
- Check the Round 29 checkpoint: about 6.5 inches long and 160 sts
- Pin out every hem scallop and wing tip when blocking


