Cropped Crochet Sweater Tutorial – Stylish and Customizable
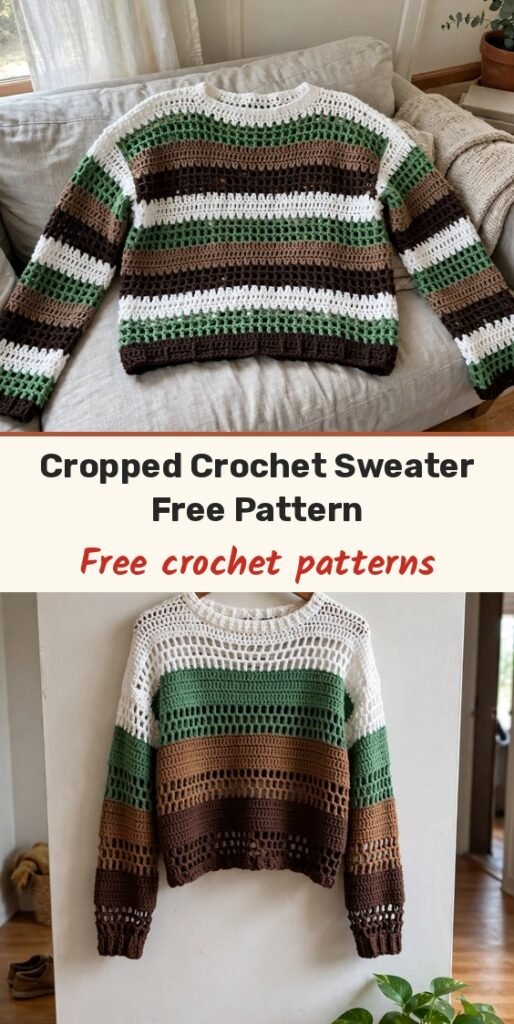
Table of Contents
I love a sweater you can truly make your own, and this cropped crochet sweater is exactly that! We will work two simple panels in bold stripes, mixing solid double crochet bands, open mesh rows, treble crochet texture, and single crochet sections, so the fabric changes character with every colour.
There is no complicated shaping to worry about. You measure your own shoulder width to set the foundation chain, repeat the panel rows until the cropped length feels right for your torso, join the shoulders and sides, and then work the sleeves directly around the armholes until they reach your wrist.
The sample uses weight 4 acrylic in white, green, brown, and dark brown, but you can use as many colours as you like. Let us get started!
Materials
- Weight 4 acrylic yarn in multiple colours (the sample uses white, green, brown, and dark brown/black)
- 5.5 mm crochet hook
- Stitch markers
- Scissors
- Darning or tapestry needle
Abbreviations
- CH: chain
- ST(S): stitch(es)
- SC: single crochet
- DC: double crochet
- TR: treble crochet
- SL ST: slip stitch
- REP: repeat
- YO: yarn over
Special Stitches
Treble Crochet: Yarn over twice, insert your hook into the stitch, pull up a loop, then yarn over and pull through 2 loops three times. These taller stitches create the textured band in Row 6 of the panel pattern.
Mesh Row: A repeating sequence of double crochet and chain-1 spaces, worked as (ch 1, skip 1 st, dc in next st) across. The chain-1 spaces are the gaps your next solid row will fill.
Gauge & Size
- Finished size: cropped sweater, completely made to measure; foundation chain is an even number of chains that stretches comfortably from your left shoulder to your right shoulder (the sample uses 64 chains)
- Construction: two identical flat panels, shoulder seams of 14 sc and side seams of 10 sc, sleeves worked in joined rounds directly around the armholes
- Skill level: Easy
Body Panels
Make 2 identical panels. Keep your row edges straight and your turning chains consistent so both panels match when joined. Hold your foundation chain across your shoulders before Row 1 to check the width, as the chain must be an even number for the mesh spacing to work.
Colour changes: at the end of a row, pull the new yarn colour through the final loops of the last stitch to finish it. Tighten the previous yarn, cut the old working yarn, and tie the new and old tails together with a secure double knot. Whenever you can, hold the cut tails flat against the top of the stitches in the next row and crochet directly over them to keep loose ends controlled.
Foundation: Start with a slip knot and ch an even number of stitches until the chain reaches from your left shoulder to your right shoulder. The sample uses 64 chains for reference.
Row 1, Solid DC: YO, skip the first 2 chains on the hook, insert your hook into the 3rd chain and work 1 dc. Continue working 1 dc in each chain across the entire row.
Row 2, Mesh: Ch 3, turn. Skip the first dc stitch and work dc into the second st, then (ch 1, skip 1 st, dc into next st) rep across the entire row, placing the final dc into the final stitch. With a 64-chain foundation, this creates 31 gaps.
Check your mesh spacing before you continue. Each open gap should stay clearly visible, without loose or oversized loops.
Row 3, Solid DC: Attach the second colour, such as green. Ch 2, turn. Work 1 dc into the first gap (ch-space), then 1 dc on top of the next dc stitch, and rep this sequence across. Place the final dc directly into the top loop of the ch-3 from the previous row.
Row 4, Mesh: Ch 3, turn. Skip the first st, dc into the second st, then (ch 1, skip 1 st, dc into next st) rep across.
Row 5, Solid DC: Attach the third colour, such as brown. Ch 2, turn. Work 1 dc in the gap and 1 dc on top of the next dc stitch, rep across, and finish with 1 dc in the top of the turning chain.
Row 6, Treble Crochet: Ch 4, turn. Work 1 tr into the first stitch and 1 tr into each stitch across the entire row.
Row 7, Single Crochet: Attach the fourth colour, such as dark brown or black. Ch 1, turn. Work 1 sc in each stitch across.
Row 8, Single Crochet: Ch 1, turn. Work 1 sc in each stitch across.
Row 9, Solid DC: Attach a new colour. Ch 2, turn. Work 1 dc in each stitch across.
Row 10, Solid DC: Continue with the same colour. Ch 2, turn. Work 1 dc in each stitch across.
Row 11, Mesh: Ch 3, turn. Skip the first st, dc into the second st, then (ch 1, skip 1 st, dc into next st) rep across.
After Row 11, repeat Rows 2 through 11 consecutively to build your panel length. Because the sweater is cropped, compare the panel length against your torso rather than counting toward fixed measurements, and stop once the front and back reach your desired crop.
Final Row: Once your desired length is reached, stop after a Row 10. Ch 1, turn, and work 1 sc into each stitch across the entire row. Ch 1, cut the yarn, and pull through to tie off. This solid edge gives the bottom a cleaner finish than ending on a mesh row.
Make the second panel using the identical row sequence and matching finished length.
Joining the Panels
Place the front and back panels together with right sides facing each other inside, so the textured right sides of the stitches are touching. This hides your seam work inside the sweater once it is turned right-side out.
Shoulder Seam 1: Create a slip knot on your hook. Insert your hook through the outer top corners of both panels and work 14 sc through both panels, moving inward toward the neck. Ch 1, cut the yarn, and tie off.
Shoulder Seam 2: Repeat the exact 14-sc joining process on the opposite shoulder. Ch 1, cut the yarn, and tie off. Keep both shoulder joins even, as uneven positioning can affect how the sleeve openings sit.
Side Seam 1: Create a slip knot. Insert your hook at the bottom corner through both panels and work 10 sc upward along the side to secure the lower section. Ch 1, cut the yarn, and tie off. The large open section above these 10 sc becomes your armhole.
Side Seam 2: Repeat the same 10-sc joining process on the opposite side.
Turn the entire sweater right-side out. The shoulder and lower side seams should now sit inside, leaving the outer surface clean. Before starting the sleeves, check that both armholes are a similar size, as matching openings help keep sleeve length and drape consistent.
Sleeves
Make 2 sleeves, worked in joined rounds directly around the armhole openings. Keep your spacing even when inserting dc along the side edges.
Round 1, Solid DC Base: Create a slip knot. Insert your hook into the bottom of the armhole gap and pull the slip knot through. Ch 2, then work dc stitches evenly around the entire armhole opening, placing stitches into gaps or along stitch sides as needed and spacing them evenly so the fabric does not bunch or stretch. The sample reaches 56 dc stitches around the armhole. Sl st into the top of the first dc to join.
Do not force stitches into every visible edge space if that makes the armhole tight. Even distribution matters more than placing stitches mechanically into every point.
Round 2, Mesh: Ch 3. Skip the first stitch, dc into the second stitch, then (ch 1, skip 1 st, dc into next st) rep completely around the armhole. Sl st into the top of the beginning ch-3.
Round 3, Solid DC: Attach the next colour. Ch 2. Work 1 dc into the chain space and 1 dc on top of the next dc stitch, and continue around the sleeve. Sl st to join.
Continue the sleeve using the same sequence as the body pattern, repeating Rows 2 through 11 as sleeve rounds, until the sleeve reaches your desired wrist length. Because acrylic yarn can relax slightly during wear, check the sleeve length against your arm before final fastening.
Sleeve Finish: Ch 1, cut the yarn, and tie off. Repeat the exact sleeve process for the second armhole, using the same stitch count and row sequence.
Neckline & Finishing
Your neckline can stay wide for relaxed, off-the-shoulder styling, or you can narrow it for more standard coverage. To adjust it, thread a darning needle and sew 10 to 12 stitches together on both sides of the top neckline.
Try the sweater on before tightening the neckline fully, so you can judge how much shoulder exposure you want without accidentally making the opening smaller than intended. Weave in any remaining ends, and your colourful cropped sweater is ready to wear!
Tips
Weave tails in while you crochet whenever possible by crocheting over them in the next row. It keeps the colour changes secure and saves so much finishing time later.
Your foundation chain must be an even number, because the mesh sections depend on consistent skip-one, chain-one spacing.
Compare both finished panels side by side before joining. Matching lengths and row sequences make the shoulder and side seams so much easier to align.

Cropped Crochet Sweater Tutorial – Stylish and Customizable
Materials
Steps
- Chain an even number to your shoulder width and work the first panel through Rows 1 to 11
- Repeat Rows 2 to 11 to your cropped length and finish with a solid single crochet edge
- Work a second identical panel
- Join both shoulders with 14 sc seams
- Join both lower sides with 10 sc seams, leaving the armholes open
- Work the first sleeve in joined rounds around the armhole to wrist length
- Repeat the sleeve on the second armhole and adjust the neckline if you like
- Keep the foundation chain an even number so the mesh spacing stays consistent
- Crochet over colour-change tails in the next row to reduce weaving in
- Check sleeve length against your arm before fastening off, acrylic relaxes with wear