Cream Daisy Lace Cardigan Crochet Pattern
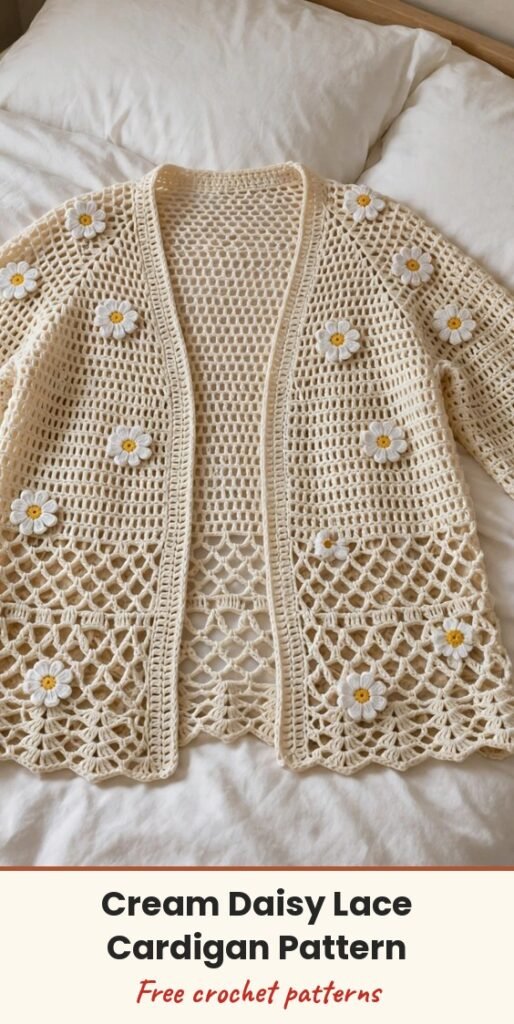
Table of Contents
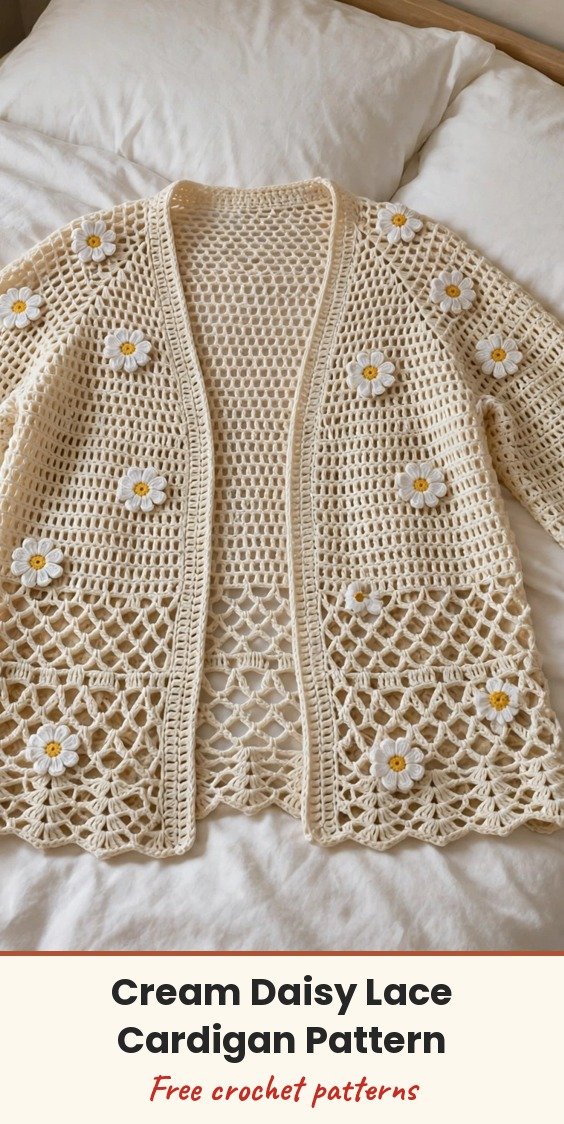
Meet Daisy, the cardigan that looks like a sunny afternoon wrapped around your shoulders! I love her creamy mesh body, the cheerful butter-yellow centred daisies scattered across the lower body and sleeves, and that relaxed open-front silhouette. She has such vintage charm, yet she is so easy to wear.
We will work three panels from the shoulder down: one back panel and two front panels in a structured small mesh that transitions into an airy large lattice below the bust. Then we join the shoulders and sides, attach flat-worked sleeves with ribbed cuffs, add a continuous front edging, and finish with twelve sweet five-petal daisy appliques.
This is one adult size, fitting an 88 to 94 cm bust with roughly 8 to 14 cm of positive ease. The body length is about 62 cm and the sleeves run approximately 40 cm including the cuffs.
Materials
- 700 g / 1540 m smooth DK cotton blend yarn in cream (main colour), about 220 m per 100 g
- 100 g / 220 m DK cotton blend yarn in butter yellow, for the daisy centres
- 4 mm crochet hook, for the main fabric
- 3.5 mm crochet hook, for cuffs and trim
- Tapestry needle
- 8 stitch markers
- Measuring tape
- Scissors
- Optional: 12 sew-on imitation pearls and strong thread, for the pearl version
Abbreviations
- ch: chain
- st/sts: stitch / stitches
- sp: space
- sl st: slip stitch
- sc: single crochet
- hdc: half double crochet
- dc: double crochet
- tr: treble crochet
- BLO: back loop only
- RS/WS: right side / wrong side
- rep: repeat
- inc: increase
- sc2tog: single crochet 2 stitches together (a decrease)
Special Stitches
- Small mesh (worked flat): ch 3 (counts as first dc), then repeat (ch 1, skip next ch-1 sp, dc in next dc) to end of row. Work the dc into the post stitch, not into the gap. A mesh cell is one ch-1 space bounded by dc posts on either side. For flat work with C cells, you will have C+1 dc posts and C chains, giving total positions of 2C+1.
- Large lattice foundation: ch 1, sc in first dc, then repeat (ch 5, skip next mesh cell and its following cell, sc in their ending dc post) across. Each arch spans 4 old stitch positions, ending on every second old dc post.
- Large lattice continuing row (offset row): ch 5 (counts as edge dc + ch 2), sc in first old arch, then repeat (ch 5, sc in next old arch) to last arch, ch 2, dc in last edge sc (or third chain of prior turning ch-5), turn. Count the two edge half-arches together as one arch.
- Large lattice return row: ch 1, sc in first dc, then repeat (ch 5, sc in next full arch) across, then ch 5, sc in last edge dc, turn. The offset and return rows alternate.
- Shell trim: on a prepared sc edge with a multiple of 6 stitches, repeat (skip 2 sc, 5 dc in next sc, skip 2 sc, sl st in next sc) across.
- Picot trim: repeat (sc in next 3 sts, ch 3, sl st into third ch from hook) across.
- Bobble (BO): (yarn over, insert hook in indicated anchor, yarn over and draw up loop, yarn over and pull through 2 loops) 5 times, then yarn over and pull through all 6 loops on hook.
Gauge & Size
- Small mesh gauge: 16 stitch positions (8 cells) x 10 rows = 10 cm
- Large lattice gauge: 4 arches x 10 rows = 10 cm, lightly blocked
- Finished size: one adult size, about 102 cm total body coverage for an 88 to 94 cm bust, body length about 62 cm, sleeves about 40 cm including cuffs
- Construction: back and two front panels worked top down in small mesh then large lattice, seamed at shoulders and sides, flat-worked sleeves attached, ribbed cuffs, continuous front edging, sewn daisy appliques
- Skill level: Intermediate
Before you begin: the turning ch 3 counts as a dc, the ch 1 does NOT count as a sc, and you join rounds with sl st unless stated otherwise. Flat rows turn after each row, brackets enclose a repeat, and joining slip stitches are not counted in your stitch counts. Sew with right sides together unless directed otherwise, work the main fabric in cream, and use contrast colours only where specifically named. All dimensions are blocked targets.
Back Panel Pattern
Row 1: Ch 84. Dc in sixth ch from hook, (ch 1, skip 1 ch, dc in next ch) 39 times, turn. (40 cells, 41 dc + 40 ch-1 spaces)
Rows 2 to 30: Work small mesh across, turn. (40 cells)
Row 31: Work the large-lattice foundation, turn. (20 arch equivalents)
Rows 32 to 62: Continue alternating offset lattice rows and return lattice rows with plain sc anchors, turn after each row. (20 arch equivalents throughout)
Checkpoint: the back should measure approximately 62 cm long and 51 cm wide. Do not block the lower lace wider than the upper grid section.
Left Front Panel Pattern
Row 1: Ch 28. Dc in sixth ch from hook, (ch 1, skip 1 ch, dc in next ch) 11 times, turn. (12 cells, 13 dc + 12 ch-1 spaces)
Mark the neck edge and keep the opposite armhole edge straight. For the left front, the neck edge is at the start of Row 2. To increase at the row start: ch 3, then work (ch 1, dc) in the first dc. To increase at the row end: work (ch 1, dc) again in the last dc.
Rows 2 to 9: Work small mesh, increasing one cell at the marked neck edge only each row, turn.
Row 2: 13 cells
Row 3: 14 cells
Row 4: 15 cells
Row 5: 16 cells
Row 6: 17 cells
Row 7: 18 cells
Row 8: 19 cells
Row 9: 20 cells
Rows 10 to 30: Work small mesh across without increases, turn. (20 cells)
Row 31: Work the large-lattice foundation, turn. (10 arch equivalents)
Rows 32 to 62: Continue alternating offset lattice rows and return lattice rows with plain sc anchors, turn after each row. (10 arch equivalents throughout)
Checkpoint: the left front should measure approximately 62 cm long and 26 cm wide.
Right Front Panel Pattern
Row 1: Ch 28. Dc in sixth ch from hook, (ch 1, skip 1 ch, dc in next ch) 11 times, turn. (12 cells, 13 dc + 12 ch-1 spaces)
Mark the neck edge. For the right front, the neck edge is at the end of Row 2.
Rows 2 to 9: Work small mesh, increasing one cell at the marked neck edge only each row, turn.
Row 2: 13 cells
Row 3: 14 cells
Row 4: 15 cells
Row 5: 16 cells
Row 6: 17 cells
Row 7: 18 cells
Row 8: 19 cells
Row 9: 20 cells
Rows 10 to 30: Work small mesh across without increases, turn. (20 cells)
Row 31: Work the large-lattice foundation, turn. (10 arch equivalents)
Rows 32 to 62: Continue alternating offset lattice rows and return lattice rows with plain sc anchors, turn after each row. (10 arch equivalents throughout)
Checkpoint: the right front should measure approximately 62 cm long and 26 cm wide.
Sleeve Pattern
Make 2. The sleeves are worked flat from the upper arm down, then seamed and attached to the armholes.
Row 1: Ch 68. Dc in sixth ch from hook, (ch 1, skip 1 ch, dc in next ch) 31 times, turn. (32 cells)
Row 2: Work the large-lattice foundation, turn. (16 arches)
Rows 3 to 35: Continue alternating offset lattice rows and return lattice rows, turn after each row. (16 arch equivalents throughout)
Ribbed Cuff Pattern
Make 2. Switch to your 3.5 mm hook for the cuffs.
Row 1: Ch 11. Sc in second ch and each remaining ch, turn. (10 sc)
Rows 2 to 40: Ch 1, sc BLO in each st, turn. (10 sc)
The cuff should measure approximately 5 cm deep x 20 cm around before joining into a ring. Adjust the row count only if needed to pass comfortably over the hand, and record your actual count so you can match the second cuff exactly.
Daisy Flower Pattern
Make 12. These cheerful appliques are the signature detail of the cardigan. For the contrast centres, work Round 1 in butter yellow, then switch to cream for Round 2.
Round 1: Into an adjustable ring, ch 1, work 10 sc, join to first sc. (10 sc)
Round 2: (Sl st in next sc, (ch 2, 3 dc, ch 2, sl st) in next sc) 5 times, fasten off. (5 petals, 15 dc total)
Block each motif flat. The small flowers should measure approximately 5 cm across in cardigan-weight yarn.
Finishing & Assembly
Gather your main colour yarn, tapestry needle, 4 mm hook, both sleeves, and the cuffs.
Seam pass 1 (shoulders): at each side, join the outer 12 front mesh cells to the outer 12 back mesh cells along the foundation edge. Leave the centre 16 back cells unseamed for the neck opening. (2 shoulder seams, 12 cells each)
Seam pass 2 (sides): mark 20 cm down from the shoulder on the back and the corresponding front panels. Sew the body sides from hem to markers. (2 armholes, approximately 40 cm circumference each)
Seam pass 3 (sleeves): sew each sleeve lengthwise to form a tube. Place the sleeve seam at the underarm, match the sleeve-top midpoint to the shoulder seam, and sew the top edge evenly into the armhole. (2 sleeves attached)
Seam pass 4 (cuffs): join each cuff’s first and last rows into a ring. Quarter-mark both the cuff and the sleeve opening, then whipstitch while gathering the sleeve evenly to fit. Do not stretch the cuff beyond a comfortable hand circumference. (2 cuffs attached)
Assembly checkpoint: the shoulders should sit evenly, the sleeves should move comfortably, and the front edges remain open. Upper back width approximately 51 cm, each front approximately 26 cm.
For the front edging, switch to your 3.5 mm hook and main colour. Border Round 1: join at one lower front corner and sc evenly around the entire open-front, neck and hem outline, working 2 sc per dc row end, 1 sc per foundation position, 4 sc per complete lower-lattice arch (2 per edge half-arch), and 3 sc at each outward corner. Record your total stitch count and mark the middle corner stitches. Border Round 2: sc in each st, placing 3 sc in each marked corner st, and move the markers to the middle corner stitches. Border Round 3 (optional, for a broader band): repeat Round 2.
If you would like extra trim, add the shell trim along the lower hem and sleeve openings using complete 6-st repeats and finish any remainder in sc, or add the picot trim along the hem. Keep the front and neck edge plain to avoid curling.
To attach the daisies, sew all 12 flower appliques on with matching yarn. Place half on the fronts and half across the back and sleeves, distributing them evenly and avoiding the underarm areas. Secure each centre and each outer petal point.
Finish by weaving every yarn end through at least 5 cm of fabric, reversing direction, and trimming. Wet-block the cardigan flat, aligning the side seams and matching the sleeve lengths, and pin the lace section to match the upper-panel width rather than stretching it wider. Final measurements: body length approximately 62 cm, sleeves approximately 40 cm including cuffs, total body coverage approximately 102 cm.
Tips
Swatch both fabrics. The small mesh and the large lattice behave differently, and swatching both keeps your finished cardigan in the right proportions.
Count at the end of every row for the first several rows of each section. Mesh patterns make it easy to lose or gain stitches without noticing.
Use stitch markers liberally: mark your neck edge increases, armhole positions, and corner stitches. Future you will be grateful.
Make all the daisies at once, assembly-line style (all the Round 1s, then all the Round 2s). It is faster and keeps the sizing consistent.
For care, hand-wash cool with mild detergent, support the wet fabric when lifting, and dry flat away from direct heat. Do not wring, tumble dry, or iron acrylic components.
Cream Daisy Lace Cardigan Crochet Pattern
Materials
Steps
- Work the back panel: Row 1 small mesh (40 cells), Rows 2 to 30 mesh, Row 31 lattice foundation (20 arches), Rows 32 to 62 lattice
- Work each front panel: Row 1 (12 cells), neck-edge increases Rows 2 to 9 up to 20 cells, Rows 10 to 30 mesh, lattice to Row 62
- Make 2 sleeves flat: Row 1 (32 cells), lattice foundation (16 arches), Rows 3 to 35
- Make 2 ribbed cuffs in BLO sc (10 sc x 40 rows) with the 3.5 mm hook
- Make 12 daisy appliques (10 sc ring, 5 petals)
- Seam shoulders (12 cells each) and sides, attach sleeves and cuffs
- Work the continuous front edging and sew on the daisies
- Weave in ends and wet-block to size
- Swatch both the small mesh and the large lattice; they behave differently
- Count cells at the end of every row in the first rows of each section
- Block the lace to match the upper mesh width, not wider, or the cardigan bells out
- Make all 12 daisies assembly-line style for consistent sizing


