Cream and Peach Ombre Baby Dress Free Crochet Pattern
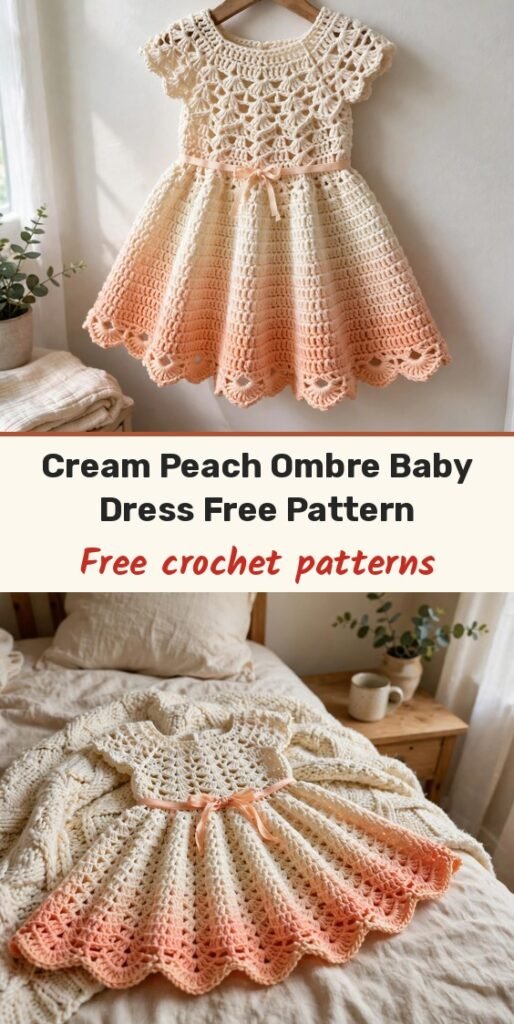
Table of Contents
- Materials
- Abbreviations
- Special Stitches
- Gauge & Size
- Front Bodice Panel
- Armhole Shaping for Front Bodice
- Neckline Shaping for Front Bodice
- Left Back Panel
- Armhole and Back Keyhole Shaping for Left Back
- Neckline Shaping for Left Back
- Right Back Panel
- Seaming
- Waistband and Eyelet Row
- Skirt
- Skirt Expansion for A-line Flare
- Skirt Hem
- Neckline and Armhole Edging
- Center Back Edging and Keyhole
- Finishing & Assembly
- Tips
Got a gorgeous gradient skein hiding in your stash? This cream and peach ombre baby dress is the project to finally use it on. It combines a fitted lace bodice with a flared fan shell skirt, creating an heirloom piece that looks far more complicated than it actually is, and I love watching the colours melt from cream at the neckline down through warm peach at the hem.
We will work the bodice flat in panels, seam them together, then pick up stitches and work the skirt in the round. The bodice uses an interlocking shell and eyelet construction that creates a delicate lace fabric with beautiful drape, and the skirt uses a fan shell stitch that naturally forms that scalloped hem at the bottom edge.
A few design details make this dress special. There is a keyhole opening at the center back for easy dressing. A twisted cord or ribbon drawstring threads through an eyelet row at the waist to define the silhouette. The neckline and armhole edges get finished with scallop edging that mirrors the hem. Fair warning, though: this one sits in the intermediate to advanced category. If you have made a couple of garments before and feel comfortable with shaping, you will be just fine.
Materials
- Sport weight yarn (CYCA #2), approximately 600 to 700 yards (549 to 640 m) total: either 1 skein of a cream to peach gradient in sport weight (approximately 700 yards), or approximately 350 yards (320 m) cream and 350 yards (320 m) peach
- US E-4 / 3.5 mm crochet hook
- Yarn needle for finishing
- Stitch markers (at least 6)
- Small buttons or snaps x2 for back closure (optional, approximately 0.5 inch / 12 mm diameter)
- 24 inches (61 cm) of 0.25 inch (6 mm) ribbon or handmade twisted cord for the waist tie
- Scissors
- Blocking mat and rust proof pins
Abbreviations
- ch: chain
- sl st: slip stitch
- sc: single crochet
- hdc: half double crochet
- dc: double crochet
- tr: treble crochet
- sp: space
- sk: skip
- st(s): stitch(es)
- rep: repeat
- rem: remaining
- beg: beginning
- yo: yarn over
- RS: right side
- WS: wrong side
- pm: place marker
- inc: increase (work 2 stitches into same stitch)
- dec: decrease (work 2 stitches together)
- tog: together
- t-ch: turning chain
- BLO: back loop only
- FLO: front loop only
Special Stitches
- Bodice Shell (used in bodice lace pattern): Skip 2 stitches. Work 5 double crochet into the next stitch. Skip 2 stitches. This group of 5 dc is the shell. It sits over a cluster of 6 stitches total (2 skipped, 1 worked into, 2 skipped, with the anchor stitch counted once).
- Bodice V-stitch (used to anchor bodice shells): Work 1 dc, ch 1, 1 dc all into the same stitch or space. This creates a V shape that serves as the anchor point for the next row of shells.
- Fan Shell (used in skirt): Skip 2 stitches. Work 7 double crochet into the next stitch. Skip 2 stitches. Work 1 single crochet into the next stitch. This 12 stitch unit forms one fan. Each fan repeat consumes 6 foundation stitches.
- Scallop Edging (used at neckline and armholes): Join yarn, ch 1. Work 1 sc into same stitch. Skip 2 stitches. Work 6 dc into next stitch. Skip 2 stitches. Work 1 sc into next stitch. Repeat across or around.
- Eyelet Row (used at waistband for drawstring): Ch 3 (counts as dc), dc into next st. Ch 1, skip 1 st, dc into next st. Repeat ch 1, skip 1, dc across. End with dc into last st. This creates a row of alternating dc and ch 1 spaces for threading the drawstring.
- Twisted Cord (optional, for waist tie): Cut 6 strands of cream yarn, each 48 inches (122 cm) long. Hold all strands together and fold in half at the midpoint. Anchor the fold to a fixed point. Twist the strands tightly in one direction until they begin to kink when released. Fold the twisted length in half at the midpoint, allowing the two halves to twist around each other naturally. Knot both ends. Trim to desired length, approximately 20 inches (51 cm) finished.
Gauge & Size
- Finished size: 12 to 18 months
- Chest circumference: 19 to 20 inches (48 to 51 cm), with 1 to 2 inches of ease
- Bodice length (shoulder to waist): approximately 6.5 inches (16.5 cm)
- Skirt length (waist to hem): approximately 7 inches (18 cm)
- Total length (shoulder to hem): approximately 13.5 inches (34 cm)
- Gauge with US E-4 / 3.5 mm hook: bodice lace pattern, 1 complete repeat (6 stitches) = 1 inch (2.5 cm) wide and 4 rows = 1.25 inches (3.2 cm) tall; fan shell stitch (skirt), 1 complete fan repeat (12 stitches) = 2 inches (5 cm) wide and 4 rows = 1.5 inches (3.8 cm) tall; general, 20 sts x 24 rows in single crochet = 4 x 4 inches (10 x 10 cm)
- Construction: front and back bodice panels worked flat and seamed, skirt worked in the round from the waist down
- Skill level: Intermediate to Advanced
The dress is constructed in three main sections: the front bodice panel, the back bodice (worked in two panels to create the center back keyhole opening), and the skirt (worked in the round after panels are seamed). The lace bodice pattern is a 6 stitch repeat, and the fan shell skirt is also a 6 stitch repeat. If you are using two separate colors instead of a gradient yarn, follow this blend: Rows 1 to 7 cream only; Rows 8 to 9 alternate cream and peach (carry both); Rows 10 to 11 peach, with cream carried; Rows 12 onward peach only through bodice completion; skirt in peach throughout, working to deeper peach toward the hem. Always turn work unless specified otherwise. A turning chain of 3 counts as the first dc throughout. Choose a smooth, plied yarn with good stitch definition so the fan shell pattern reads clearly, and always work a gauge swatch, because stitch count accuracy is critical for fit in a garment.
Front Bodice Panel
The front bodice panel is worked flat over 48 stitches (8 complete 6 stitch shell repeats), producing a front panel approximately 8 inches (20 cm) wide before seaming.
Foundation: With cream yarn, ch 50.
Row 1 (WS): Sc in 2nd ch from hook and in each ch across. Turn. (49 sc)
Row 2 (RS): Ch 3 (counts as dc), sk first st, dc in next st. Sk 2 sts, work Bodice Shell (5 dc) in next st, sk 2 sts, work V-st (dc, ch 1, dc) in next st. Rep from the shell sequence 6 more times. Sk 2 sts, Bodice Shell in next st, sk 2 sts, dc in last 2 sts. Turn. (8 shells + 7 V-sts + 4 edge dc)
Row 3 (WS): Ch 1, sc in first dc, sc in each dc of shell (5 sc), sc in dc of V-st, sc in ch 1 sp, sc in 2nd dc of V-st. Rep from the shell sequence across, ending sc in top of t-ch. Turn. (49 sc)
Row 4 (RS): Same as Row 2. (8 shells established)
Row 5 (WS): Same as Row 3. (49 sc)
Row 6 (RS): Same as Row 2.
Row 7 (WS): Same as Row 3. (49 sc)
Rows 8 through 13: Repeat Rows 2 and 3, continuing in lace pattern. Begin color transition in these rows if using two separate colors. After Row 13, piece measures approximately 5.5 inches (14 cm) from beginning.
Checkpoint: After Row 13, your front bodice panel should measure approximately 5.5 inches (14 cm) tall and 8 inches (20 cm) wide. The lace pattern should show 6 complete rows of shells.
Armhole Shaping for Front Bodice
Row 14 (RS, armhole shaping): Sl st across first 6 sts (1 full V-st + shell base). Ch 3, work in established lace pattern across until 6 sts rem. Leave last 6 sts unworked. Turn. (37 working sts)
Row 15 (WS): Ch 1, sc across. Turn. (37 sc)
Row 16 (RS): Ch 3, sk 1, dc in next st. Sk 2, shell in next, sk 2, V-st in next. Rep from the shell sequence 5 more times. Sk 2, shell in next, sk 2, dc in last 2. Turn. (6 shells + 5 V-sts + 4 edge dc)
Row 17 (WS): Ch 1, sc across. Turn. (37 sc)
Row 18 (RS): Dec row. Ch 3, dc2tog over next 2 sts (decrease at armhole edge), work in pattern across until 3 sts rem, dc2tog, dc in last st. Turn. (35 sts)
Row 19 (WS): Ch 1, sc across. Turn. (35 sc)
Row 20 (RS): Ch 3, sk 1, dc in next. Work in pattern as established across. Turn. (35 sts)
Row 21 (WS): Ch 1, sc across. Turn. (35 sc)
Neckline Shaping for Front Bodice
Row 22 (RS, first shoulder): Work across first 12 sts only in pattern. Turn. Leave remaining sts on hold. (12 sts, left shoulder section)
Row 23 (WS): Dec 1 at neck edge. Ch 1, sc2tog over first 2 sts, sc across. Turn. (11 sc)
Row 24 (RS): Work in pattern to last 2 sts, dc2tog. Turn. (10 sts)
Row 25 (WS): Sc2tog, sc across. Turn. (9 sc)
Row 26 (RS): Work even in pattern. Turn. (9 sts)
Fasten off. This completes the left shoulder of the front.
Return to held stitches for Row 22. Skip center 11 sts for front neckline opening. Rejoin yarn to next st.
Row 22 continued (RS, second shoulder): Work across remaining 12 sts in pattern. Turn. (12 sts)
Row 23 (WS): Sc across to last 2 sts, sc2tog. Turn. (11 sc)
Row 24 (RS): Dc2tog at neck edge, work in pattern across. Turn. (10 sts)
Row 25 (WS): Sc across to last 2 sts, sc2tog. Turn. (9 sc)
Row 26 (RS): Work even. Turn. (9 sts)
Fasten off. The front bodice panel is complete. Shoulder straps measure approximately 1.5 inches (3.8 cm) wide. Total bodice height from foundation to shoulder tip is approximately 6.5 inches (16.5 cm). Set aside.
Left Back Panel
Foundation: With cream yarn, ch 29.
Row 1 (WS): Sc in 2nd ch from hook and in each ch across. Turn. (28 sc)
Row 2 (RS): Ch 3, sk 1, dc in next. Sk 2, shell in next, sk 2, V-st in next. Rep from the shell sequence 3 more times. Sk 2, shell in next, sk 2, dc in last 2. Turn. (4 shells + 3 V-sts + 4 edge dc)
Row 3 (WS): Ch 1, sc across. Turn. (28 sc)
Rows 4 through 13: Repeat Rows 2 and 3, continuing in lace pattern and color transition as for front. (28 sc after each WS row)
Armhole and Back Keyhole Shaping for Left Back
Row 14 (RS): Sl st across first 6 sts. Ch 3, work in pattern to end. Turn. (22 sts)
Row 15 (WS): Ch 1, sc across. Turn. (22 sc)
Row 16 (RS): Dc2tog at armhole edge (beg of row), work in pattern across. Turn. (21 sts)
Row 17 (WS): Sc across, sc2tog at center back edge. Turn. (20 sc)
Row 18 (RS): Work even in pattern. Turn. (20 sts)
Row 19 (WS): Ch 1, sc across. Turn. (20 sc)
Rows 20 and 21: Work even. (20 sts after each row)
Neckline Shaping for Left Back
Row 22 (RS): Work across first 9 sts for shoulder. Leave remaining sts for neckline extension. Turn. (9 sts)
Row 23 (WS): Dec 1 at neck edge. Sc2tog, sc across. Turn. (8 sc)
Row 24 (RS): Work across to neck edge, dec 1. Turn. (7 sts)
Row 25 (WS): Work even. (7 sc)
Row 26 (RS): Work even. (7 sts)
Fasten off.
Right Back Panel
Work as for Left Back Panel, reversing all shaping (armhole decrease at end of RS rows, back edge decrease at start of WS rows, neckline worked on opposite side).
Foundation: With cream yarn, ch 29.
Row 1 (WS): Sc in 2nd ch from hook and in each ch across. Turn. (28 sc)
Row 2 (RS): Ch 3, sk 1, dc in next. Sk 2, shell in next, sk 2, V-st in next. Rep from the shell sequence 3 more times. Sk 2, shell in next, sk 2, dc in last 2. Turn.
Rows 3 through 13: As for Left Back Panel. (28 sc after each WS row)
Row 14 (RS): Work in pattern to last 6 sts. Leave last 6 sts unworked. Turn. (22 sts)
Row 15 (WS): Sc2tog at center back edge (beg of WS row), sc across. Turn. (21 sc)
Row 16 (RS): Work in pattern to last 2 sts, dc2tog at armhole edge. Turn. (20 sts)
Row 17 (WS): Ch 1, sc across. Turn. (20 sc)
Rows 18 through 21: Work even. (20 sts)
Row 22 (RS): Skip first 11 sts (neckline). Rejoin to next st, work remaining 9 sts for shoulder. Turn. (9 sts)
Row 23 (WS): Sc across to last 2 sts, sc2tog at neck edge. Turn. (8 sc)
Row 24 (RS): Dec 1 at neck edge, work across. Turn. (7 sts)
Row 25 (WS): Work even. (7 sc)
Row 26 (RS): Work even. (7 sts)
Fasten off. Both back panels are complete. Each panel measures approximately 4.5 inches (11.5 cm) wide and 6.5 inches (16.5 cm) tall.
Seaming
With yarn needle and matching yarn, seam the front panel to each back panel at the side edges using whipstitch or mattress stitch on the WS. Seam the shoulder sts of front and back panels together (7 to 9 sts per shoulder, aligned). The center back remains open, forming the keyhole. After seaming, the bodice should measure approximately 19 to 20 inches (48 to 51 cm) in circumference at the lower edge.
Waistband and Eyelet Row
With RS facing and peach yarn, join to side seam at lower edge of bodice.
Setup Round: Ch 1, sc evenly around the entire lower edge of bodice. Work approximately 3 sc per 2 rows on side edges and 1 sc per st across the panel lower edges. Target 120 sc total (must be a multiple of 6). Join with sl st to first sc. (120 sc)
Eyelet Round: Ch 3 (counts as dc), dc in next st. Ch 1, sk 1 st, dc in next st. Rep from the ch 1 sequence around. Join with sl st to top of beg ch 3. (60 dc, 60 ch 1 sps)
Transition Round: Ch 1, sc in each dc and in each ch 1 sp around. Join. (120 sc)
Gathering Setup Round: Sc2tog, sc in next 4 sts. Rep from the sc2tog sequence around. Join. (100 sc)
Skirt
The skirt is worked in the round, in the fan shell stitch, beginning from the 100 stitch gathered waist.
Skirt Expansion Round: Sc in next 4 sts, 2 sc in next st. Rep from the beginning around. End with sc in last 5 sts. Join. (120 sc)
Skirt Round 1 (fan setup): Ch 3 (counts as dc). Sk 2 sts, work Fan Shell (7 dc) in next st, sk 2 sts, sc in next st. Rep from the fan sequence 19 more times. Join with sl st to top of beg ch 3. (160 sts)
Skirt Round 2: Ch 1, sc in same st (this sc is between fans). Sk 3 dc, Fan Shell (7 dc) in center (4th) dc of previous fan, sk 3 dc, sc in next sc. Rep from the fan sequence around. Join. (160 sts)
Skirt Rounds 3 through 8: Repeat Skirt Round 2. (160 sts each round)
After Round 8, the skirt measures approximately 4 inches (10 cm) from the waist.
Skirt Expansion for A-line Flare
Skirt Round 9 (expansion): Ch 1, sc in every st around including inside the fans. This is a full sc flattening round: sc in each of the 160 sts. Join. (160 sc)
Then increase: Sc in next 7 sts, 2 sc in next st. Rep from the increase sequence 20 times. Join. (180 sc)
Skirt Round 10 (new fan round): Ch 3. Sk 2, Fan Shell (7 dc) in next st, sk 2, sc in next st. Rep from the fan sequence 29 more times. Join. (240 sts)
Skirt Rounds 11 through 16: Work in established fan pattern (each fan worked into center dc of previous fan). (240 sts each round)
After Round 16, the skirt measures approximately 7 inches (18 cm) from waist. The skirt should flare to approximately 28 to 30 inches (71 to 76 cm) in circumference at the widest point.
Skirt Hem
The hem is finished by the last round of fan shells, which naturally creates a scalloped lower edge. No additional hem edging is needed.
Optional additional scallop at hem: Join in any sc between fans. Ch 3, sl st in 3rd ch from hook (picot), sc in each dc of fan (7 sc across top of fan), ch 3, sl st in 3rd ch from hook (picot), sl st in next sc. Rep from the picot sequence around.
Neckline and Armhole Edging
Neckline Edging: With RS facing and cream yarn, join at right back neck edge. Work 1 round of Scallop Edging around entire neckline, spacing sc anchors approximately 3 sts apart. Approximate neckline stitch count: 72 sts around full neckline (adjust to nearest multiple of 4). Join with sl st. Fasten off.
Armhole Edging: With RS facing and cream yarn, join at underarm seam of right armhole. Work 1 round of Scallop Edging around armhole opening. Approximate stitch count: 48 sts around each armhole. Adjust to nearest multiple of 4. Join with sl st. Fasten off. Repeat for left armhole.
Center Back Edging and Keyhole
With RS facing and cream yarn, join at top of right back neck edge at center back. Work 1 row of sc down the right back center edge to the keyhole opening (approximately 14 sc). At base of keyhole: ch 4, sl st to left back edge at same level to bridge the keyhole. Continue sc up left back center edge to top. Fasten off.
Work button loops on one side: On RS of one back edge, join yarn approximately 0.75 inch (2 cm) from top. Ch 5, sk 3 sts on edge, sl st to edge. Repeat 0.75 inch (2 cm) below first loop for second button. Sew buttons to opposite back edge aligned with loops.
Finishing & Assembly
Thread ribbon or twisted cord through the eyelet row at the waist, entering and exiting through the same eyelet space at center front. Tie in a small bow at front center. Trim ends evenly. Knot ends to prevent fraying if using ribbon.
Weave in all ends securely, especially at color transition points. Do not knot yarn. Weave each tail in at least 1 inch (2.5 cm) in two different directions through the lace fabric.
Block the finished dress by soaking in lukewarm water with a drop of wool wash, then gently squeeze out excess water without wringing. Lay flat on a blocking mat and pin to measurements, paying special attention to opening up the lace pattern and ensuring the scalloped edges lay flat and even. Allow to dry completely before removing pins.
Tips
To size down to 0 to 6 months: reduce foundation chain by 12 stitches (2 shell repeats) for front and 6 stitches for each back panel. Reduce skirt expansion round to add 15 increases instead of 20, producing 150 sc and working 25 fan repeats. Adjust total length by eliminating 2 rounds from bodice and 2 rounds from skirt.
To size up to 2T to 3T: increase foundation chain by 12 stitches (2 shell repeats) for front and 6 stitches for each back panel. Target 144 sc at waist gather pickup, expand to 168 or 180 sc for skirt, and work 2 extra rounds of fan pattern before the expansion round and 2 extra rounds after. Add 0.5 inch to bodice length before armhole shaping.
General rule: each additional 6 stitch repeat in the bodice adds approximately 1 inch (2.5 cm) to the circumference. Each additional round of fan shells adds approximately 0.75 inch (2 cm) to skirt length.
Gauge is mandatory for this garment. Even a small deviation will significantly alter the finished size, so work your swatch, wash and block it, then measure before beginning.

Cream and Peach Ombre Baby Dress Free Crochet Pattern
Materials
Steps
- Work the front bodice panel flat in the shell and V-stitch lace pattern
- Shape the front armholes and neckline, then work both back panels with reversed shaping
- Seam the side edges and shoulders, leaving the center back keyhole open
- Work the waistband, eyelet round and gathering round at 100 sts
- Expand to 120 sc and work the fan shell skirt in the round
- Flatten, increase to 180 sc, and work the wider fan rounds to the hem
- Add scallop edging at the neckline and armholes and finish the keyhole with button loops
- Thread the ribbon or cord through the eyelet row, weave in ends and block
- Swatch, wash and block your gauge sample before starting; fit depends on it
- Follow the two-colour blend rows carefully if you are not using a gradient yarn
- Keep the skirt pickup at a multiple of 6 so the fan repeats line up
- Weave colour transition tails at least 1 inch in two directions, never knotted


