Spring Garden Granny Tote Bag Free Crochet Pattern
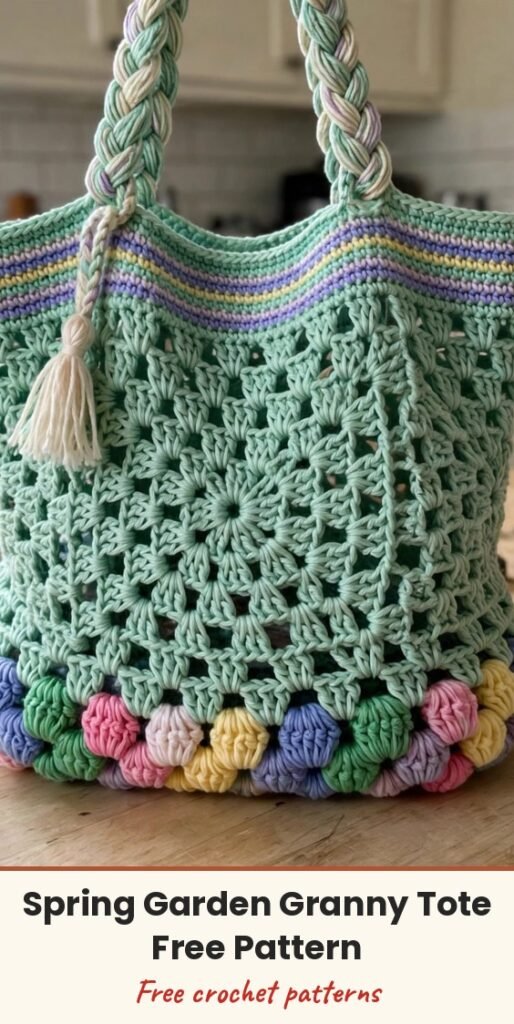
Table of Contents
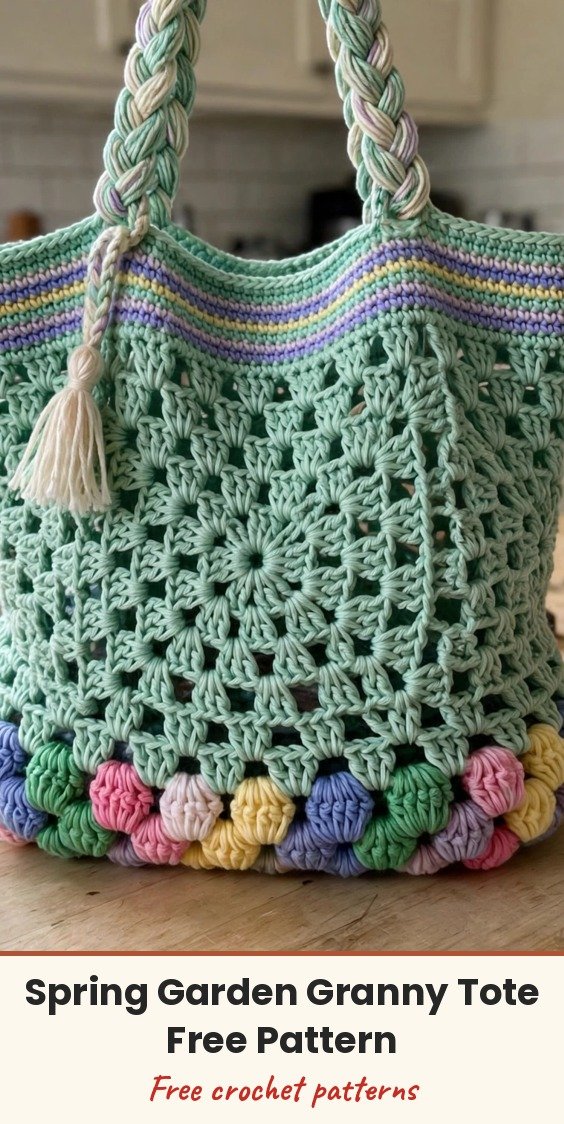
I love a tote that actually stands up on its own, and this Spring Garden Granny Tote does exactly that! We start with a firm flat base, work the walls in cheerful open granny mesh, then add a colourful puff stitch border, a striped top band, and braided handles with a sweet bead-and-tassel finish.
It is roomy enough for farmers market runs and sturdy enough for everyday errands, in a soft spring palette of mint green, lavender, yellow, pink and periwinkle blue. If you have made a basic granny square before, you can absolutely make this bag with me.
This is an intermediate make that takes around 15 to 22 hours, but every section builds on the last in a really satisfying way. Let us walk through it together, step by step.
Materials
- Worsted weight cotton yarn, Color A Mint Green: approximately 400 yards
- Worsted weight cotton yarn, Color B Lavender Purple: approximately 80 yards
- Worsted weight cotton yarn, Color C Yellow: approximately 60 yards
- Worsted weight cotton yarn, Color D Soft Pink: approximately 60 yards
- Worsted weight cotton yarn, Color E Medium Green: approximately 45 yards
- Worsted weight cotton yarn, Color F Periwinkle Blue: approximately 45 yards
- Worsted weight cotton yarn, Color G Light Pink or Blush: approximately 30 yards, for the bead and tassel cap
- Worsted weight cotton yarn, Color H Natural Off White or Cream: approximately 80 yards, for the tassel fringe
- Optional multicolor or rainbow strand: approximately 20 yards, for the top stripe band
- US J/10 (6.0 mm) crochet hook for the main body
- US I/9 (5.5 mm) crochet hook for handles (optional)
- Yarn needle for weaving ends
- Scissors
- 4 to 6 stitch markers
Abbreviations
- ch: chain
- sl st: slip stitch
- sc: single crochet
- dc: double crochet
- hdc: half double crochet
- ps: puff stitch (see Special Stitches)
- sp: space
- ch-sp: chain space
- st/sts: stitch / stitches
- RS: right side
- sk: skip
- yo: yarn over
Special Stitches
- Granny cluster: 3 dc worked into the same chain space.
- Chain 1 granny mesh: work 1 granny cluster into a chain space, ch 1, skip the next cluster or space, work 1 granny cluster into the next chain space, ch 1, and repeat.
- Puff stitch: yo, insert hook into the stitch, yo and pull up a loop to the height of a dc. Repeat twice more in the same stitch so you have 7 loops on your hook. Yo and pull through all 7 loops, then ch 1 to close.
- Standing single crochet: make a slip knot with the new colour, insert hook into the designated stitch, pull up a loop (2 loops on hook), yo and pull through both loops.
Gauge & Size
- Finished size: approximately 13 inches wide by 13.5 inches tall, not including handles; base approximately 13 inches by 4.5 inches
- Gauge: in granny mesh with Color A and J/10 hook, 3 granny clusters and 3 ch-1 spaces = approximately 3.5 inches wide, 3 rows = about 2.5 inches tall; in sc stripes, 14 sc = 4 inches and 16 rows = 4 inches
- Construction: flat sc base, joined in the round for mesh walls, puff border worked onto the set-up round, braided handles attached at 4 points
- Skill level: Intermediate
Base Pattern
The base is worked flat in rows of single crochet to create a firm rectangular foundation. With Color A and your J hook, chain 47.
Row 1 (RS): Single crochet in 2nd chain from hook and in each chain across. Turn. (46 sc)
Rows 2 through 16: Chain 1, single crochet in each stitch across. Turn. (46 sc)
After Row 16, do not turn and do not fasten off. Your base should measure approximately 13 inches wide by 4.5 inches tall.
Joining in the Round
Without turning, rotate your work so you are working along the long edge, and pick up stitches along all four sides of the rectangle.
Set-up Round: Still with Color A, chain 1. Place a stitch marker at this first corner.
Work 16 single crochets evenly along the short right side edge of the base (1 sc per row end, 16 rows). Place stitch marker at second corner.
Work 46 single crochets across the top edge of the base into the starting chain. Place stitch marker at third corner.
Work 16 single crochets evenly along the short left side edge. Place stitch marker at fourth corner.
Work 46 single crochets across the bottom of Row 16. Join with slip stitch to first single crochet of this round. (124 sc total: 46 + 16 + 46 + 16)
Granny Mesh Body
Round 1 of Mesh (Color A): Chain 3 (counts as first double crochet of first cluster here and throughout mesh section). Work 2 more double crochets into same corner stitch (first cluster made). Chain 2 (corner). Skip 1 stitch. Work 3 dc cluster into next stitch, chain 1, skip 2 stitches, repeat 14 more times along front (15 clusters total along front). At corner stitch: work 3 dc cluster, chain 2. Skip 1 stitch. Work 3 dc cluster into next stitch, chain 1, skip 2 stitches, repeat 4 more times along side (5 clusters total along side). At corner stitch: work 3 dc cluster, chain 2. Skip 1 stitch. Work 3 dc cluster into next stitch, chain 1, skip 2 stitches, repeat 14 more times along back (15 clusters total). At corner stitch: work 3 dc cluster, chain 2. Skip 1 stitch. Work 3 dc cluster into next stitch, chain 1, skip 2 stitches, repeat 4 more times along remaining side (5 clusters total). Join with slip stitch to top of beginning chain 3. (40 clusters, 4 ch-2 corner spaces)
Round 2 of Mesh (Color A): Slip stitch into next 2 double crochets and into chain 2 corner space. Chain 3, 2 double crochets into same corner space (cluster). Chain 2 (corner). Work 3 dc cluster into next chain 1 space, chain 1, repeat 15 times (15 clusters along front). Cluster into corner space, chain 2. Work 3 dc cluster into next chain 1 space, chain 1, repeat 5 times (5 clusters along side). Cluster into corner space, chain 2. Work 3 dc cluster into next chain 1 space, chain 1, repeat 15 times (15 clusters along back). Cluster into corner space, chain 2. Work 3 dc cluster into next chain 1 space, chain 1, repeat 5 times (5 clusters along remaining side). Join with slip stitch to top of beginning chain 3. (40 clusters, 4 ch-2 corner spaces)
Rounds 3 through 16 of Mesh (Color A): Repeat Round 2 exactly for all remaining mesh rounds. (40 clusters, 4 ch-2 corner spaces per round)
After completing all 16 mesh rounds, the body should measure approximately 13 inches tall from base to top.
Top Stripe Band
After the final mesh round, work single crochet across the top, treating the top of each cluster as 3 single crochets, each chain 1 space as 1 single crochet, and each chain 2 corner as 2 single crochets, adjusting at corners as needed to reach 164 stitches.
Stripe Round 1 (Color B, Lavender): Join with slip stitch to any top stitch. Chain 1, single crochet in each stitch around. Join with slip stitch to first single crochet. (164 sc)
Stripe Round 2 (Color B): Chain 1, single crochet in each stitch around. Join with slip stitch to first single crochet. (164 sc)
Stripe Round 3 (Color C, Yellow): Chain 1, single crochet in each stitch around. Join with slip stitch to first single crochet. (164 sc)
Stripe Round 4 (Color C): Chain 1, single crochet in each stitch around. Join with slip stitch to first single crochet. (164 sc)
Stripe Round 5 (Multicolor or Color A): Chain 1, single crochet in each stitch around. Join with slip stitch to first single crochet. (164 sc)
Stripe Round 6 (Color B): Chain 1, single crochet in each stitch around. Join with slip stitch to first single crochet. (164 sc)
Stripe Round 7 (Color B): Chain 1, single crochet in each stitch around. Join with slip stitch to first single crochet. Do not fasten off. (164 sc)
Final Top Edge Round (Color B): Chain 1, single crochet in each stitch around. Join with slip stitch to first single crochet. Fasten off and weave in ends. (164 sc)
Puff Stitch Border
Hold the bag with the base facing down. Attach colour to the Set-up Round at the very bottom of the bag walls, and work outward rounds of puff stitches, stacking them so each round sits just above the previous one.
Puff Border Round 1 (Color F, Periwinkle Blue): Join Color F with slip stitch to any stitch of the Set-up Round. Chain 2. Puff stitch into next stitch, chain 1, skip 1 stitch, repeat around. Join with slip stitch to top of first puff stitch. (82 puff stitches, 82 ch-1 spaces)
Puff Border Round 2 (Color E, Green): Join Color E to any chain 1 space. Chain 2. Puff stitch into next chain 1 space, chain 1, repeat around. Join with slip stitch to top of first puff stitch. (82 puff stitches)
Puff Border Round 3 (Color D, Pink): Join Color D to any chain 1 space. Chain 2. Puff stitch into next chain 1 space, chain 1, repeat around. Join with slip stitch to top of first puff stitch. (82 puff stitches)
Puff Border Round 4 (Color C, Yellow): Join Color C to any chain 1 space. Chain 2. Puff stitch into next chain 1 space, chain 1, repeat around. Join with slip stitch to top of first puff stitch. (82 puff stitches)
Puff Border Round 5 (Color B, Lavender): Join Color B to any chain 1 space. Chain 2. Puff stitch into next chain 1 space, chain 1, repeat around. Join with slip stitch to top of first puff stitch. Fasten off. (82 puff stitches)
Handles
For each handle, cut 18 strands of Color A (or a mix of Colors A, B and C), each strand measuring 60 inches long.
Divide into 3 groups of 6 strands each. Fold all strands in half so each working group is now 30 inches long and doubled. Braid tightly and evenly for the full working length. Knot at each end to secure. Trim ends neatly.
Each finished handle should be approximately 22 to 24 inches long when braided. Make 2 handles.
Position the first handle on the front and back of the bag, centred on each panel, with attachment points approximately 3.5 inches from each side edge.
Thread your yarn needle with a length of Color A. Fold the knotted end of the handle over the top edge of the bag by approximately 1 inch. Whipstitch the folded end firmly to the inside of the bag, going through multiple layers at least 10 to 12 times. Reinforce with a second pass. Repeat for all 4 attachment points.
Bead & Tassel
With Color G and J hook, make a magic ring.
Round 1: 6 single crochet into magic ring. (6 sc)
Round 2: 2 single crochet in each stitch around. (12 sc)
Round 3: Single crochet in next stitch, 2 single crochet in next stitch, repeat around. (18 sc)
Round 4: Single crochet in each stitch around. (18 sc)
Round 5: Single crochet in next stitch, single crochet 2 together, repeat around. (12 sc)
Round 6: Single crochet 2 together around. (6 sc)
Stuff the bead lightly with yarn scraps or fiberfill. Fasten off leaving a long tail. Thread the tail through the 6 remaining stitches and pull tight to close.
For the tassel, cut approximately 60 strands of Color H, each 12 inches long. Bundle together and fold in half to create a tassel approximately 6 inches long.
Cut a 16 inch length of Color G. Wrap it tightly around the folded bundle approximately 0.75 inch below the top fold, winding 8 to 10 times, and secure. Thread the bead tail through the fold at the top of the tassel, pull the bead down just above the wrapped portion, and stitch it in place.
Attach the tassel to one handle where it meets the top left corner of the bag front, and trim the tassel ends evenly.
Finishing & Assembly
Weave in all yarn ends thoroughly, working tails back through at least 1 to 2 inches of stitches in two directions.
Wet blocking is recommended for cotton yarns. Submerge the finished bag in cool water, squeeze out excess water without wringing, then reshape to the finished dimensions and pin the walls straight and the base flat while drying. Allow to dry completely before handling, and block before attaching the handles so everything is squared up properly.
Tips
Use stitch markers generously — mark your corners and the beginning of your rounds, and count your stitches at each checkpoint. Taking two minutes to count can save hours of frogging later!
Practise your puff stitches on a small swatch first. Consistent tension makes a huge difference in the finished border.
When you switch colours, keep the same tension you have been using. Tight joins create puckers, so stay relaxed and steady.
For care, machine wash on a gentle cycle in cool water or hand wash, then lay flat to dry. Do not tumble dry, iron, or bleach.
Spring Garden Granny Tote Bag Free Crochet Pattern
Materials
Steps
- Work the flat single crochet base in 16 rows
- Pick up 124 stitches around the base to join in the round
- Work 16 rounds of granny mesh for the body
- Add the 7-round striped top band plus final edge round
- Work 5 rounds of puff stitch border at the bottom
- Braid 2 handles and whipstitch them on at 4 points
- Make the crocheted bead and tassel and attach to a handle
- Weave in ends and wet block to finished size
- Mark all 4 corners and count stitches at every checkpoint
- Practise puff stitches on a swatch before the border
- Block the bag body before attaching the handles
- Keep colour-change tension relaxed to avoid puckers


