Crochet Mini Backpack for Beginners
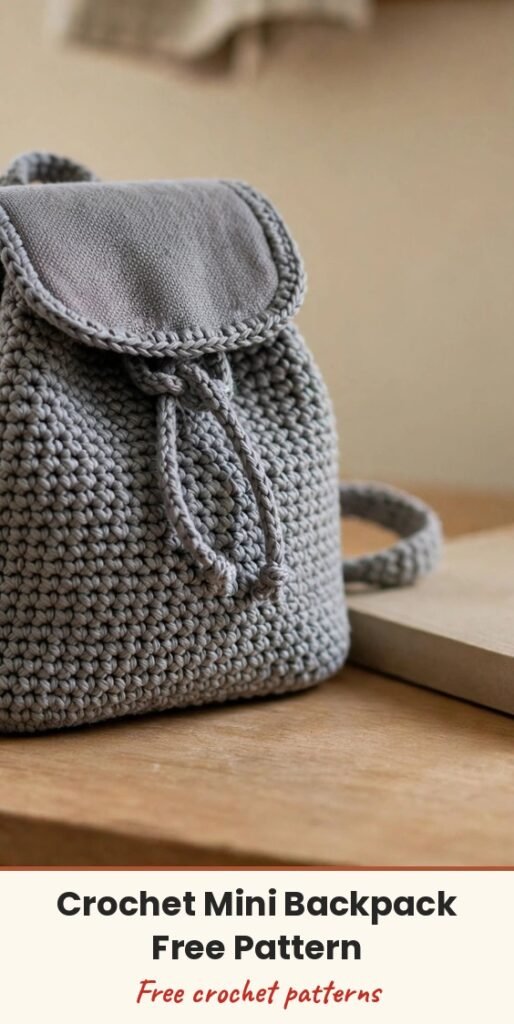
Table of Contents
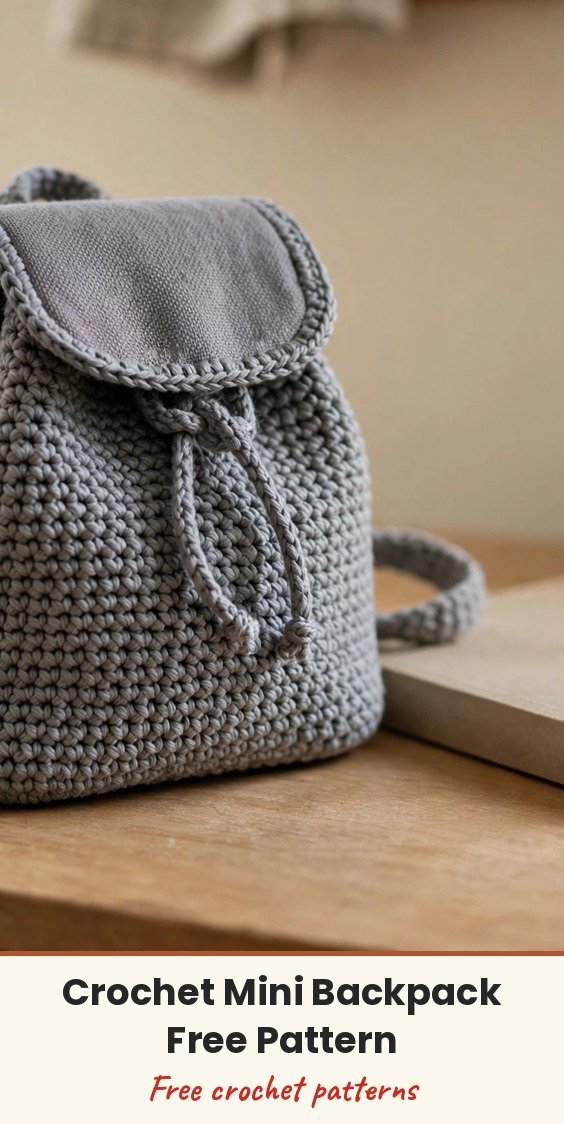
A real, working backpack — flap, drawstring, straps and all — that a beginner can genuinely finish: that is the whole promise of this little project, and I just love it. The body is covered in a pebbly suzette-stitch texture that looks far more complicated than it is (it is only a two-stitch repeat), topped with a smooth single-crochet flap and cinched with a drawstring threaded through a row of eyelets.
The construction is a friendly guided tour of bag-making. We start with an oval base worked in the round, grow the sides straight up with zero shaping, add one flat rectangle for the flap, and finish with straps that are honestly just long, skinny rows of single crochet. Every piece is beginner territory — the only “advanced” part is sewing them together in the right places, and I will walk you through that inch by inch.
Worked tightly in a firm gray cotton, it stands up on its own like a little soldier, no lining required. It holds a phone, wallet, keys and a paperback — everything a mini backpack should. First bag? This is the one.
Materials
- 480 to 520 yards of worsted weight (#4) cotton yarn in medium gray — a firm, tightly-plied cotton gives the bag its structure
- 4.0mm (US G-6) crochet hook, intentionally snug for the yarn so the fabric stays dense
- Tapestry needle
- Scissors
- 6 to 8 locking stitch markers (for assembly)
- Measuring tape
- Optional: 0.5 yard of cotton fabric plus a sewing needle and thread for a lining; a magnetic snap or button for the flap
Abbreviations
- ch: chain
- sc: single crochet
- dc: double crochet
- inc: increase (2 sc in the same st)
- blo: back loop only
- sl st: slip stitch
- sp: space
- st/sts: stitch / stitches
- Rnd/Row: round / row
Special Stitches
- Suzette Pair: work (sc, dc) in the same stitch. For the suzette stitch in the round, work (sc, dc) in the next st, skip 1 st, and repeat — every round is identical, worked over an even stitch count. The dc of each pair naturally leans over the skipped stitch, creating the pebbled texture.
Gauge & Size
- Finished size: approximately 8.5 in wide x 8 in tall x 3 in deep (21.5 x 20 x 7.5 cm)
- Gauge: 15 sc x 17 rows = 4 in / 10 cm in tight single crochet — exact size is not critical for a bag, but a loose gauge means a floppy backpack, so if your fabric bends like a dishcloth, go down a hook size
- Construction: oval base and body worked in continuous spiral rounds with a stitch marker (no joining or turning), flap, straps, handle and drawstring worked flat in rows and sewn on
- Skill level: Beginner
Base Pattern
Crochet this bag TIGHT — tighter than feels natural. Your hands will adjust by Round 10, and the bag will thank you by standing upright forever.
Rnd 1: Ch 31. Sc in 2nd ch from hook and in each of the next 28 ch (29 sc), 3 sc in the last ch. Rotate to work along the opposite side of the chain: sc in the next 28 ch, 2 sc in the last ch. (62)
Rnd 2: Inc in the first st, sc 28, inc in each of the next 3 sts, sc 28, inc in each of the last 2 sts. (68)
Body Pattern
Rnd 3: Working in blo, sc in each st around. (68)
This back-loop round creates the crisp fold line where the base turns upward into the walls.
Rnds 4 to 25: (Sc, dc) in the next st, skip 1 st; repeat around. (34 suzette pairs = 68 sts each rnd)
That is 22 rounds, approximately 8 in of textured wall. The pairs stack in a spiral — just keep working (sc, dc) into the sc of each pair below and skipping the dc, and the texture takes care of itself.
Drawstring Eyelets & Top Edge
Rnd 26: Sc in the next 2 sts, ch 2, skip 2 sts; repeat around. (17 eyelets)
Rnd 27: Sc in each sc and 2 sc in each ch-2 sp around. (68)
Rnd 28: Sc in each st around. (68)
Sl st in the next st and fasten off. Weave in the end.
Flap (Worked Flat)
Row 1: Ch 27. Sc in 2nd ch from hook and in each ch across. (26)
Rows 2 to 18: Ch 1, turn. Sc in each st across. (26)
Border: Ch 1, and sc evenly around all four sides of the rectangle, working 2 sc in each corner and rounding the two front corners slightly by working the corner sts snugly. Join with a sl st and fasten off, leaving a 24 in (60 cm) tail for sewing. The flap measures approximately 6.5 x 4.5 in / 16.5 x 11 cm.
Straps (Make 2, Worked Flat)
Row 1: Ch 71. Sc in 2nd ch from hook and in each ch across. (70)
Rows 2 to 3: Ch 1, turn. Sc in each st across. (70)
Fasten off, leaving a 15 in (38 cm) tail at each end for sewing. Each strap is approximately 16.5 in long x 0.75 in wide.
Grab Handle (Worked Flat)
Row 1: Ch 15. Sc in 2nd ch from hook and in each ch across. (14)
Row 2: Ch 1, turn. Sc in each st across. (14)
Fasten off, leaving a 10 in (25 cm) tail at each end.
Drawstring
Ch 121. Sc in 2nd ch from hook and in each ch across. (120)
Fasten off and weave in the ends. The finished cord is approximately 30 in / 76 cm.
Finishing & Assembly
Flap: center the flap’s starting edge on the back of the bag, its top row overlapping Rnd 28 by one round, right sides out. Pin, then whip stitch across the full width through both layers — twice for strength. The flap should fold forward over the drawstring opening and reach about halfway down the front.
Grab handle: fold the handle into an arc and sew its two ends to the top back edge, just above the flap seam, about 3 in (7.5 cm) apart.
Straps, top ends: sew both straps’ top ends side by side at the top center back, directly under the flap seam (they hide beneath the flap), with 8 to 10 firm stitches each.
Straps, bottom ends: try the bag on and pin the bottom ends at the lower back corners where the wall meets the base, adjusting the length to taste before sewing — then anchor each with 8 to 10 stitches through both wall and base ridge.
Drawstring: thread it through the 17 eyelets, starting and ending at center front. Knot each cord end, or knot the two together loosely.
Optional closures and lining: a magnetic snap or button under the flap’s front edge keeps it shut on windy days. For a lining, trace the base oval and wall height onto cotton fabric, add a 0.5 in seam allowance, sew a fabric bag, and slip-stitch it in just below the eyelet round.
Tips
Make the front-versus-back decision first: lay the bag flat and pick the flatter, prettier side as the front — the beginning-of-round seam of the spiral should live on the back, hidden under the flap.
Work the eyelet round at normal tension even though everything else is tight — cramped ch-2 eyelets make threading the drawstring a wrestling match. Thread the drawstring with a safety pin or bobby pin clipped to one end, going over-under through the eyelets and bringing both ends out at the center front.
Mark every sewing position with locking markers before threading a single needle. Backpack geometry is decided at the pinning stage: flap centered on the back, straps meeting at the top center and splaying to the bottom back corners in a V.
If your bag leans or slouches, the fix is a firmer base: cut a piece of plastic canvas or stiff cardboard in a fabric sleeve to the oval’s size and drop it in the bottom — instant posture. And yes, it really will hold its shape without a lining, as long as you crochet tightly in firm cotton.
Crochet Mini Backpack for Beginners
Materials
Steps
- Work the oval base in spiral rounds to 68 sts
- Work the BLO fold round, then 22 suzette stitch rounds for the textured walls
- Work the eyelet round with 17 eyelets and finish the top edge
- Crochet the flat single crochet flap with a sc border
- Make 2 straps, the grab handle and the 120-st drawstring cord
- Sew the flap and handle to the top back edge
- Sew the strap ends at the top center back and lower back corners
- Thread the drawstring through the eyelets and knot the ends
- Crochet tighter than feels natural - dense fabric is what makes the bag stand up on its own
- Hide the spiral seam line on the back, underneath the flap
- Work the eyelet round at normal tension so threading the drawstring stays easy
- Pin and mark every sewing position with locking markers before you sew anything


