Crochet Monstera Wall Hanging Free Trailing Plant Pattern

Table of Contents
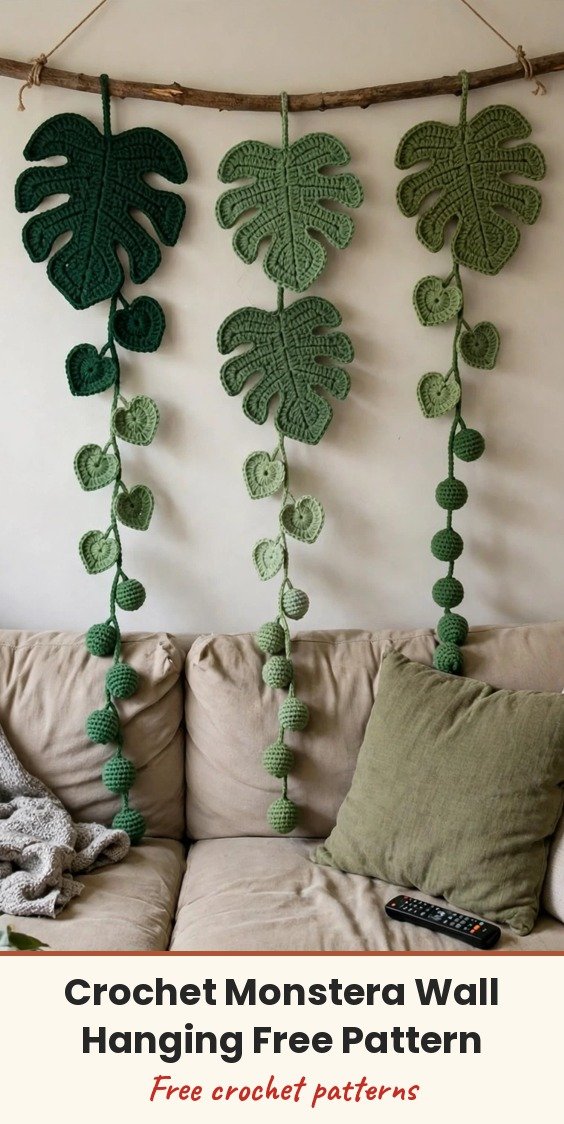
Some corners simply will not keep a plant alive: too dark, too dry, or just too easy to forget to water. This hanging is my answer to that corner. Three trailing vines hang from a wooden dowel at staggered lengths, carrying five monstera leaves, eight little heart leaves and twenty-four tiny round pearls that dangle like a string-of-pearls succulent.
The whole piece is built from four repeating components and nothing else. The monstera leaves get their famous holes as chain-space buttonholes that are bridged on the very next row, so they come out as clean ovals that hold their shape after blocking. The heart leaves are the same idea shrunk down, the pearls are four quick rounds each, and the vines are chains worked back over themselves with the side stems built in as you go.
We will use three shades of green: pale sage (A), fern green (B) and deep forest (C). New growth is pale, mature leaves are dark, and that mix is what makes the piece read as a plant from across the room. Difficulty is easy intermediate; the finish depends on blocking the leaves flat, and DK cotton does that job beautifully.
Materials
- 1 ball (50 g / 137 yd) DK weight cotton yarn in pale sage (colour A, about 90 yd used)
- 1 ball (50 g / 137 yd) DK weight cotton yarn in fern green (colour B, about 100 yd used)
- 1 ball (50 g / 137 yd) DK weight cotton yarn in deep forest (colour C, about 60 yd used)
- 3.25mm (US D-3) crochet hook
- Wooden dowel, 12 inches (30 cm) long and 3/8 inch (10 mm) diameter (a trimmed branch or bamboo works too)
- Blunt yarn needle
- At least 10 locking stitch markers
- Blocking mat and rust-proof pins
- Scissors, measuring tape and a pencil for marking the dowel
Abbreviations
- ch: chain
- sl st: slip stitch
- sc: single crochet
- hdc: half double crochet
- sc2tog: single crochet two together
- hdc2tog: half double crochet two together
- st/sts: stitch / stitches
- sp: space
- MR: magic ring
- RS: right side
- WS: wrong side
Gauge & Size
- Finished size: about 12 inches (30 cm) wide x 32 inches (81 cm) tall, from the top of the hanging cord to the lowest pearl
- Gauge (helpful but not critical): leaves 22 hdc and 16 rows = 4 inches (10 cm); edgings and pearls 24 sc = 4 inches; vine cords 26 ch = 4 inches once slip stitched over
- Construction: leaves worked flat in rows from the tip up, pearls in spiral rounds, vines worked along a chain; everything sewn to three cords and hung from a dowel
- Skill level: Easy Intermediate
- Working notes: turning chains never count as a stitch; ch 2 at the start of hdc rows, ch 1 at the start of sc rounds; all cord work goes into the back bump of the chain so the smooth braided side faces forward
Monstera Leaf (Make 5)
Make 2 in A (pale sage) and 3 in C (deep forest). The leaf grows from a three-stitch tip, widens to nineteen stitches, then splits into two lobes with a notch between them. Make one leaf completely first; it takes about 45 minutes and teaches you every technique in the pattern. Ch 5 to begin.
Row 1 (RS): Hdc in 3rd ch from hook and in each ch across. (3 hdc)
Row 2: Ch 2, turn. 2 hdc in first st, hdc in next st, 2 hdc in last st. (5)
Row 3: Ch 2, turn. 2 hdc in first st, hdc in next 3 sts, 2 hdc in last st. (7)
Row 4: Ch 2, turn. 2 hdc in first st, hdc in next 5 sts, 2 hdc in last st. (9)
Row 5: Ch 2, turn. 2 hdc in first st, hdc in next 7 sts, 2 hdc in last st. (11)
Row 6 (first fenestrations): Ch 2, turn. 2 hdc in first st, hdc in next 2 sts, ch 2, skip 2 sts, hdc in next st, ch 2, skip 2 sts, hdc in next 2 sts, 2 hdc in last st. (9 hdc and 2 ch-2 sps, 13 stitch positions)
Row 7: Ch 2, turn. 2 hdc in first st, hdc in next 3 sts, 2 hdc in ch-2 sp, hdc in next st, 2 hdc in ch-2 sp, hdc in next 3 sts, 2 hdc in last st. (15)
Row 8: Ch 2, turn. 2 hdc in first st, hdc in next 13 sts, 2 hdc in last st. (17)
Row 9 (second fenestrations): Ch 2, turn. 2 hdc in first st, hdc in next 3 sts, ch 3, skip 3 sts, hdc in next 3 sts, ch 3, skip 3 sts, hdc in next 3 sts, 2 hdc in last st. (13 hdc and 2 ch-3 sps, 19 stitch positions)
Row 10: Ch 2, turn. Hdc in first 5 sts, 3 hdc in ch-3 sp, hdc in next 3 sts, 3 hdc in ch-3 sp, hdc in next 5 sts. (19)
Row 11 (third fenestrations): Ch 2, turn. Hdc in first 4 sts, ch 3, skip 3 sts, hdc in next 5 sts, ch 3, skip 3 sts, hdc in next 4 sts. (13 hdc and 2 ch-3 sps, 19 stitch positions)
Row 12: Ch 2, turn. Hdc in first 4 sts, 3 hdc in ch-3 sp, hdc in next 5 sts, 3 hdc in ch-3 sp, hdc in next 4 sts. (19)
The leaf now measures about 3.5 inches (9 cm) across at its widest. From here the two lobes are worked separately.
First Lobe Row 13: Ch 2, turn. Hdc in next 9 sts, leaving the remaining 10 sts unworked. (9)
First Lobe Row 14: Ch 2, turn. Hdc2tog, hdc in next 5 sts, hdc2tog. (7)
First Lobe Row 15: Ch 2, turn. Hdc2tog, hdc in next 3 sts, hdc2tog. (5)
Fasten off, leaving a 4 inch (10 cm) tail.
Second Lobe Row 13: With RS facing, skip the 10th st of Row 12 (this skipped stitch becomes the base of the notch) and join yarn with a sl st in the 11th st. Ch 2, hdc in same st and in each of the next 8 sts. (9)
Second Lobe Row 14: Ch 2, turn. Hdc2tog, hdc in next 5 sts, hdc2tog. (7)
Second Lobe Row 15: Ch 2, turn. Hdc2tog, hdc in next 3 sts, hdc2tog. (5)
Fasten off, leaving a 4 inch (10 cm) tail.
Monstera Edging & Vein
Work the edging a touch loosely; a tight edging cups the leaf. With RS facing, join the same colour with a sl st in the skipped st at the base of the notch. Ch 1.
Edging step 1: Sc in the notch st. (1)
Edging step 2: Up the inner edge of the second lobe, over 3 row ends: 2 sc, 2 sc, 1 sc. (5 sc, 6 total)
Edging step 3: Across the top of the second lobe: 2 sc in first st, sc in next 3 sts, 2 sc in last st. (7 sc, 13 total)
Edging step 4: Down the outer edge of the second lobe, over 3 row ends: 2 sc, 2 sc, 1 sc. (5 sc, 18 total)
Edging step 5: Down the side of the leaf, over the 11 row ends of Rows 12 through 2: (2 sc in the end of the next row, 1 sc in the end of the next row) 5 times, 2 sc in the end of the next row. (17 sc, 35 total)
Edging step 6: Around the tip, into the 3 sts of Row 1: sc in first st, (sc, ch 2, sc) in centre st, sc in last st. (4 sc and a ch-2 point, 39 total)
Edging step 7: Up the other side, over the 11 row ends of Rows 2 through 12: (2 sc in the end of the next row, 1 sc in the end of the next row) 5 times, 2 sc in the end of the next row. (17 sc, 56 total)
Edging step 8: Up the outer edge of the first lobe: 2 sc, 2 sc, 1 sc. (5 sc, 61 total)
Edging step 9: Across the top of the first lobe: 2 sc in first st, sc in next 3 sts, 2 sc in last st. (7 sc, 68 total)
Edging step 10: Down the inner edge of the first lobe: 2 sc, 2 sc, 1 sc. (5 sc, 73 total)
Join with a sl st to the first sc. (73 sc) Fasten off, leaving a 4 inch tail.
Centre vein: with B (fern green) and a 20 inch (50 cm) length of yarn, work 15 surface slip stitches down the middle of the leaf, one in each row, from the base of the notch to the tip. Hold the yarn behind the leaf and keep the tension light so the vein sits on the surface instead of gathering the leaf. Finished leaf: about 3.75 inches (9.5 cm) wide and 4 inches (10 cm) tall.
Heart Leaf (Make 8)
Make 4 in A (pale sage) and 4 in B (fern green). These take about fifteen minutes each and fill the space between the big leaves. Ch 5 to begin.
Row 1 (RS): Hdc in 3rd ch from hook and in each ch across. (3 hdc)
Row 2: Ch 2, turn. 2 hdc in first st, hdc in next st, 2 hdc in last st. (5)
Row 3: Ch 2, turn. 2 hdc in first st, hdc in next 3 sts, 2 hdc in last st. (7)
Row 4: Ch 2, turn. 2 hdc in first st, hdc in next 5 sts, 2 hdc in last st. (9)
Row 5: Ch 2, turn. Hdc in each st across. (9)
Row 6: Ch 2, turn. Hdc in each st across. (9)
First Lobe Row 7: Ch 2, turn. Hdc2tog, hdc in next 2 sts, leaving the remaining 5 sts unworked. (3)
Fasten off.
Second Lobe Row 7: With RS facing, skip the 5th st of Row 6 (the notch) and join yarn with a sl st in the 6th st. Ch 2, hdc in same st and in next st, hdc2tog over the last 2 sts. (3)
Fasten off.
Edging: with RS facing, join the same colour with a sl st in the skipped notch st. Ch 1. Sc in the notch st (1). Up the inner edge of the second lobe over 1 row end: 2 sc (3 total). Across the top of the second lobe: 2 sc in first st, sc in next st, 2 sc in last st (5 sc, 8 total). Down the outer edge of the second lobe over 1 row end: 2 sc (10 total). Down the side over the 5 row ends of Rows 6 through 2: (2 sc in the end of the next row, 1 sc in the end of the next row) 2 times, 2 sc in the end of the next row (8 sc, 18 total). Around the tip, into the 3 sts of Row 1: sc in first st, (sc, ch 2, sc) in centre st, sc in last st (4 sc and a ch-2 point, 22 total). Up the other side over 5 row ends: (2 sc, 1 sc) 2 times, 2 sc (8 sc, 30 total). Up the outer edge of the first lobe: 2 sc (32 total). Across the top of the first lobe: 2 sc in first st, sc in next st, 2 sc in last st (5 sc, 37 total). Down the inner edge of the first lobe: 2 sc (39 total). Join with a sl st to the first sc. (39 sc) Fasten off, leaving a 4 inch tail.
Centre vein: work 7 surface slip stitches from the notch to the tip. Work pale sage leaves in fern green, and fern green leaves in pale sage. Finished leaf: about 2 inches (5 cm) wide and 2 inches (5 cm) tall.
Pearl (Make 24)
Make 14 in A (pale sage) and 10 in B (fern green). The pearls are worked in a continuous spiral with no joining, and each takes about six minutes once you have made a few.
Round 1: 5 sc in MR. (5)
Round 2: 2 sc in each st around. (10)
Round 3: Sc in each st around. (10)
Before the last round, stuff the pearl with a scrap of the same yarn: snip a 6 inch length, roll it into a loose ball, and push it in with the blunt end of your hook, firm enough to hold a round shape without stretching the stitches open.
Round 4: (Sc2tog) 5 times. (5)
Fasten off, leaving a 6 inch (15 cm) tail. Thread the tail through the front loop of each remaining stitch and pull tight to close. Keep the tail; it is what sews the pearl to its stem. Finished pearl: about 0.5 inch (1.3 cm) across.
Vine Cords (Make 3)
All three cords are worked in B (fern green). Chain the full length, then travel back along the chain in slip stitch worked into the back bumps, building side stems as you go. You work from the bottom of the vine to the top, finishing exactly where the hanging loop needs to be. Chain loosely, and drop a locking marker every 20 chains as you count.
Pearl stem: Ch 4, sl st in 2nd ch from hook and in next 2 ch. (About 0.5 inch / 1.3 cm long)
Leaf stem: Ch 7, sl st in 2nd ch from hook and in next 5 ch. (About 1 inch / 2.5 cm long)
Place a locking marker at each point where a monstera leaf attaches, since those have no stem to mark them.
Cord A (left strand, 28 inches / 71 cm): Ch 182, leaving a 6 inch tail. Working in the back bumps from the hook end: sl st in next 3 ch, make a pearl stem (pearl 1). (Sl st in next 6 ch, make a pearl stem) 13 times (pearls 2 to 14, 81 ch used). Sl st in next 26 ch, place a marker (monstera leaf 2, 107 ch used). Sl st in next 22 ch, make a leaf stem (heart leaf, 129 ch used). Sl st in next 26 ch, place a marker (monstera leaf 1, 155 ch used). Sl st in next 27 ch (182 ch used, the full chain). Ch 8, sl st in the last ch worked to form a hanging loop. Fasten off, leaving a 6 inch tail.
Cord B (centre strand, 26 inches / 66 cm): Ch 169, leaving a 6 inch tail. Working in the back bumps from the hook end: sl st in next 8 ch, make a leaf stem (heart leaf 4, 8 ch used). Sl st in next 18 ch, make a leaf stem (heart leaf 3, 26 ch used). Sl st in next 18 ch, make a leaf stem (heart leaf 2, 44 ch used). Sl st in next 18 ch, make a leaf stem (heart leaf 1, 62 ch used). Sl st in next 16 ch, place a marker (monstera leaf 2, 78 ch used). Sl st in next 45 ch, place a marker (monstera leaf 1, 123 ch used). Sl st in next 46 ch (169 ch used, the full chain). Ch 8, sl st in the last ch worked to form a hanging loop. Fasten off, leaving a 6 inch tail.
Cord C (right strand, 24 inches / 61 cm): Ch 156, leaving a 6 inch tail. Working in the back bumps from the hook end: sl st in next 3 ch, make a pearl stem (pearl 1). (Sl st in next 6 ch, make a pearl stem) 9 times (pearls 2 to 10, 57 ch used). Sl st in next 22 ch, make a leaf stem (heart leaf 3, 79 ch used). Sl st in next 18 ch, make a leaf stem (heart leaf 2, 97 ch used). Sl st in next 18 ch, make a leaf stem (heart leaf 1, 115 ch used). Sl st in next 22 ch, place a marker (monstera leaf, 137 ch used). Sl st in next 19 ch (156 ch used, the full chain). Ch 8, sl st in the last ch worked to form a hanging loop. Fasten off, leaving a 6 inch tail.
Hanging cord (make 1): With B, ch 85, leaving a 6 inch tail. Working in the back bumps, sl st in 2nd ch from hook and in each ch across. (84 sl sts, about 13 inches / 33 cm) Fasten off, leaving a 6 inch tail.
Blocking
Block before any assembly; sewing a curled leaf to a vine and then trying to block it is a fight you will lose. Spritz all 5 monstera leaves and all 8 heart leaves with cool water until evenly damp, pin each one flat right side up, pinning the two lobes, the tip and the widest point on each side. On the monstera leaves, push a pin through the centre of each fenestration so the holes open up and stay open. Leave until bone dry. Do not block the pearls or the cords.
Finishing & Assembly
Lay the three cords flat with their hanging loops at the top: Cord A on the left, Cord B in the middle, Cord C on the right. Work top to bottom on each cord.
Attach the monstera leaves at the marked points: Cord A gets a pale sage leaf 4.25 inches (11 cm) below the loop and a second pale sage leaf at 11.5 inches (29 cm). Cord B gets a deep forest leaf at 7 inches (18 cm) and a second at 14 inches (36 cm). Cord C gets one deep forest leaf at 3 inches (7.5 cm). For each leaf, cut a 10 inch (25 cm) length of B, lay the leaf face down with the cord along the back of its centre vein and the notch against the cord, sew three small stitches through the notch, then three more spaced up the back of the leaf along the first inch of vein so the leaf does not swing forward. Run the tail inside the cord for 1 inch and trim.
Attach the heart leaves: sew the notch of each heart leaf to the last chain of its side stem with the leaf’s own 4 inch tail, using 3 or 4 small stitches. Alternate which side of the vine each stem falls on as you sew, first leaf to the left, next to the right, so the vine reads as growth rather than a comb.
Attach the pearls: sew the cinched top of each pearl to the last chain of its stem with the pearl’s own 6 inch tail, 3 or 4 small stitches through both. Alternate sides the same way and let a few sit slightly askew.
Mount on the dowel: mark the dowel in pencil at 3, 6 and 9 inches from the left end. Slip each cord’s ch-8 loop over the dowel at its mark (A at 3, B at 6, C at 9) and sew the loop closed around the dowel with 4 or 5 stitches in B so it cannot slide. Erase the pencil marks.
Attach the hanging cord: tie one end to the dowel 1 inch (2.5 cm) in from the left end and the other 1 inch in from the right end with a double knot on the back, sew the knots down, and trim the tails. Hang the piece for a day, then adjust: turn any sideways leaf, nudge heart leaves clear of the big ones, and separate any clustered pearls.
Tips
Make all five monstera leaves before anything else. They are the slowest component, and making them consecutively means leaf five matches leaf one.
On fenestration rows, count the skipped stitches out loud: Row 6 skips 2 each time, Rows 9 and 11 skip 3. Mixing them up is the most common mistake, and it shows up when the next row refuses to reach its count.
Work the stitches of Rows 7, 10 and 12 into the chain-space itself, not into the individual chains, or you will get too many stitches and the hole will close up.
Never count the turning chain as a stitch in this pattern; over fifteen rows it makes the leaf lopsided.
To change the length, chain 6.5 stitches per inch of desired vine length, keep the leaves in the upper two thirds and the pearls in the lower third, and stagger the three cords so no two end level.
Care: dust with a hairdryer on cool and low from about 12 inches away. If washing is needed, hand wash in cool water with mild detergent, support the whole piece as you lift it out, lay flat, and re-pin the leaves as in the blocking step.
Crochet Monstera Wall Hanging Free Trailing Plant Pattern
Materials
Steps
- Crochet 5 monstera leaves (2 pale sage, 3 deep forest) with buttonhole fenestrations, edging and surface-slip-stitch veins
- Crochet 8 heart leaves (4 pale sage, 4 fern green) with edging and veins
- Crochet 24 pearls (14 pale sage, 10 fern green), stuffed with yarn scraps
- Work 3 vine cords (182, 169 and 156 chains) with built-in pearl and leaf stems
- Work 1 hanging cord of 85 chains
- Block all leaves flat, pinning the fenestrations open
- Sew leaves and pearls to the cords at the marked points
- Mount the cords on the dowel and tie on the hanging cord
- Make one monstera leaf fully first - it teaches every technique in the pattern
- Count skipped stitches out loud on fenestration rows (skip 2 on Row 6, skip 3 on Rows 9 and 11)
- Keep the edging round loose so the leaves lie flat
- Stuff pearls with matching yarn scraps, never white filler
- Leave the marker in each monstera attachment point until the leaf is sewn