Ocean Breeze Mesh Cropped Hoodie Free Crochet Pattern
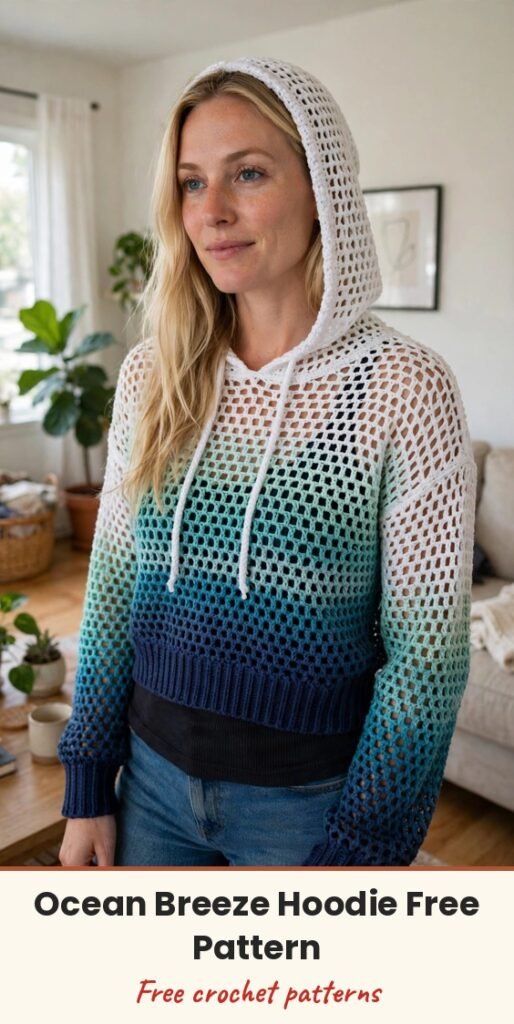
Table of Contents
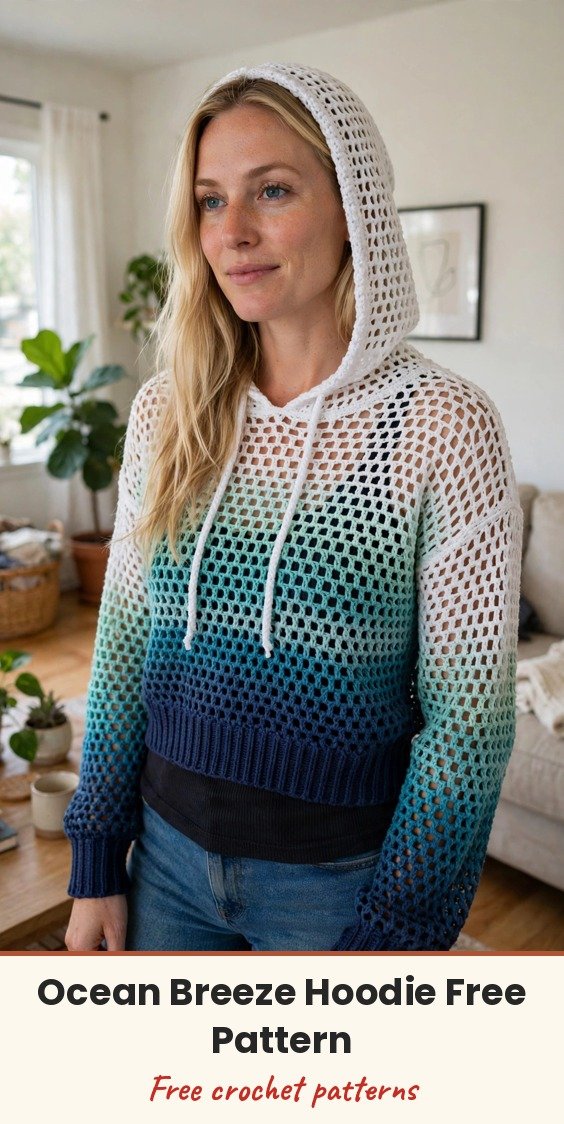
I love this cropped pullover hoodie so much! We work it in granny mesh stitch, so each row moves quickly, and the ombre colour sequence does all the visual work for us as it transitions from deep navy at the hem through teals, aqua, mint and periwinkle, finishing with white at the hood, just like an ocean gradient.
The body hits at your natural waist with a slightly cropped length, the sleeves are oversized with a dropped shoulder for that relaxed, cosy feel, and a drawstring cord threads through the front edge of the hood. The open mesh fabric keeps the hoodie lightweight and breathable, so it works beautifully for three seasons.
This pattern offers six sizes from XS through 2XL, with finished bust measurements ranging from 32 inches to 52 inches. The design includes 2 to 4 inches of positive ease, giving you that relaxed fit. Instructions are written for size XS with larger sizes in parentheses (S, M, L, XL, 2XL).
Materials
- Worsted weight yarn, Color A (deep navy): 1 skein all sizes, approximately 200 to 220 yards per 100 gram skein
- Worsted weight yarn, Color B (dark teal): 1 skein all sizes
- Worsted weight yarn, Color C (bright teal): 1 skein for XS through M, 2 skeins for L through 2XL
- Worsted weight yarn, Color D (aqua): 1 skein for XS through M, 2 skeins for L through 2XL
- Worsted weight yarn, Color E (mint green): 1 skein for XS through L, 2 skeins for XL and 2XL
- Worsted weight yarn, Color F (periwinkle): 1 skein for XS through L, 2 skeins for XL and 2XL
- Worsted weight yarn, Color G (white): 1 skein for XS and S, 2 skeins for M through 2XL
- Total yardage: XS 900 yards, S 1000 yards, M 1150 yards, L 1350 yards, XL 1550 yards, 2XL 1750 yards
- US Size J-10 (6.0 mm) crochet hook for the body and hood
- US Size I-9 (5.5 mm) crochet hook for the ribbed cuffs and hem band
- Tapestry needle
- At least 6 stitch markers
- Scissors
- 1 yard of white cotton cord or ribbon, approximately 3/8 inch wide, for the drawstring
- Safety pin or bobby pin for threading the drawstring
Abbreviations
- ch: chain
- sl st: slip stitch
- sc: single crochet
- dc: double crochet
- flo: front loop only
- t-ch: turning chain
- RS: right side
- WS: wrong side
- sk: skip
- sp: space
Special Stitches
- Granny Mesh Stitch (worked flat): Foundation row (RS): Chain the required number. Work 1 dc in the 4th chain from hook (the skipped chains count as dc plus ch 1). Ch 1, skip 1 chain, dc in next chain. Repeat across. Turn. Working row: Ch 4 (counts as dc plus ch 1). Skip the first dc and first ch-sp. Dc in next dc, ch 1. Repeat across. End with dc in the 3rd chain of the turning chain. Turn. When the pattern gives stitch counts for the mesh body, it refers to the number of dc posts only, not the chain spaces.
- Single Crochet Ribbing: Row 1: Ch 7, sc in 2nd chain from hook and in each chain across. Turn. (6 sc) Subsequent rows: Ch 1, sc in flo of each sc across. Turn.
Gauge & Size
- Finished bust: XS 32 in / 81 cm, S 36 in / 91.5 cm, M 40 in / 101.5 cm, L 44 in / 112 cm, XL 48 in / 122 cm, 2XL 52 in / 132 cm
- Finished length: XS 14 in / 35.5 cm, S 14.5 in / 37 cm, M 15 in / 38 cm, L 15.5 in / 39.5 cm, XL 16 in / 40.5 cm, 2XL 16.5 in / 42 cm
- Sleeve length from underarm to cuff: approximately 17 inches for all sizes
- Gauge with larger hook in granny mesh: 3 mesh repeats (each repeat equals 1 dc plus ch 1) = 2 inches; 7 mesh rows = 4 inches
- Gauge with smaller hook in sc ribbing: 14 sc = 4 inches; 16 rows = 4 inches
- Construction: flat panels, seaming, and a hood picked up from the neckline
- Skill level: Intermediate
Back Panel Pattern
Hem Ribbing: Using the smaller hook and Color A, ch 7.
Ribbing Row 1: Sc in 2nd chain from hook and each chain across. Turn. (6 sc)
Ribbing Rows 2 through 48 (54, 60, 66, 72, 78): Ch 1, sc in flo of each sc across. Turn.
After the last ribbing row, rotate the ribbing 90 degrees so the long edge faces you.
Body Setup Row (RS, larger hook, Color A): Ch 1, work 48 (54, 60, 66, 72, 78) sc evenly across the long edge of the ribbing. Turn. (48, 54, 60, 66, 72, 78 sc)
Mesh Foundation Row (RS): Ch 4 (counts as dc plus ch 1). Skip 1 sc. Dc in next sc, ch 1, skip 1 sc. Repeat across to last sc, dc in last sc. Turn. (25, 28, 31, 34, 37, 40 dc including t-ch dc)
Mesh Working Row: Ch 4, skip first dc and first ch-sp. Dc in next dc, ch 1. Repeat across. Dc in 3rd ch of t-ch. Turn. (same dc count as previous row)
Body Colour Stripe Sequence: Work the mesh working row continuously, changing colours as follows: Rows 1 through 3: Color A. Rows 4 through 6: Color B. Rows 7 through 9: Color C. Rows 10 through 12: Color D. Rows 13 through 15: Color E. Rows 16 through 18: Color F. Rows 19 onward: Color G.
Total body rows by size: XS: 21 rows (rows 19 through 21 in Color G). S: 22 rows (rows 19 through 22 in Color G). M: 23 rows (rows 19 through 23 in Color G). L: 24 rows (rows 19 through 24 in Color G). XL: 25 rows (rows 19 through 25 in Color G). 2XL: 26 rows (rows 19 through 26 in Color G).
After the final row, fasten off with a long tail for seaming. Checkpoint: Your back panel should measure approximately 8 (8.5, 9, 9.5, 10, 10.5) inches wide and 12 (12.5, 13, 13.5, 14, 14.5) inches tall from top of ribbing to final row.
Back Neckline Shaping
The center 7 (8, 9, 10, 11, 12) dc posts form the back neck opening. Work shoulders separately.
Right Back Shoulder Row 1: Rejoin yarn at the right edge. Work mesh row across the first 9 (10, 11, 12, 13, 14) dc posts. Turn.
Right Back Shoulder Row 2: Work 1 more mesh row. Fasten off.
Left Back Shoulder: Skip the center 7 (8, 9, 10, 11, 12) dc posts. Rejoin yarn at the next dc.
Left Back Shoulder Row 1: Work mesh row across the remaining 9 (10, 11, 12, 13, 14) dc posts. Turn.
Left Back Shoulder Row 2: Work 1 more mesh row. Fasten off.
Front Panel Pattern
Work the front panel exactly as the back panel through all body rows with the same colour sequence.
Left Front Shoulder Row 1: Work mesh row across the first 9 (10, 11, 12, 13, 14) dc posts. Turn.
Left Front Shoulder Row 2: Work mesh row across same stitches. Fasten off.
Center Front: Skip the center 7 (8, 9, 10, 11, 12) dc posts. Leave them unworked to form the neck opening.
Right Front Shoulder Row 1: Rejoin yarn at the next dc after center stitches. Work mesh row across remaining 9 (10, 11, 12, 13, 14) dc posts. Turn.
Right Front Shoulder Row 2: Work mesh row. Fasten off.
Sleeves Pattern
Make 2 sleeves. Cuff Ribbing: Using the smaller hook and Color A, ch 7.
Ribbing Row 1: Sc in 2nd ch from hook and in each ch across. Turn. (6 sc)
Ribbing Rows 2 through 26 (28, 30, 32, 34, 36): Ch 1, sc in flo of each sc across. Turn.
After the last ribbing row, rotate 90 degrees. Work into row-end edges to begin sleeve body.
Sleeve Setup Row (RS, larger hook, Color A): Ch 1, work 26 (28, 30, 32, 34, 36) sc evenly across the long edge of cuff ribbing. Turn.
Sleeve Mesh Foundation Row (RS): Ch 4, skip 1 sc. Dc in next sc, ch 1, skip 1 sc. Repeat to last sc, dc in last sc. Turn. (14, 15, 16, 17, 18, 19 dc)
Sleeve Increases: The sleeve widens from cuff to underarm. Each increase row adds 1 dc at each end (2 dc total). Increase at beginning of row: Ch 6 instead of ch 4, work dc in 4th ch from hook, ch 1, skip 1 ch, then continue mesh row as normal. Increase at end of row: After last dc of mesh row, ch 1, dc in the same stitch (the 3rd ch of the t-ch).
For XS and S: Rows 1 through 3: Mesh working row, no increase.
Row 4: Increase row. (16, 17 dc)
Rows 5 through 7: Mesh working row, no increase.
Row 8: Increase row. (18, 19 dc)
Rows 9 through 11: Mesh working row, no increase.
Row 12: Increase row. (20, 21 dc)
Rows 13 through 15: Mesh working row, no increase.
Row 16: Increase row. (22, 23 dc)
Rows 17 through 19: Mesh working row, no increase.
Row 20: Increase row. (24, 25 dc)
Rows 21 through 22: Mesh working row, no increase. Final dc count: (24, 25 dc)
For M and L: Rows 1 through 3: Mesh working row, no increase.
Row 4: Increase row. (18, 19 dc)
Rows 5 through 7: Mesh working row, no increase.
Row 8: Increase row. (20, 21 dc)
Rows 9 through 11: Mesh working row, no increase.
Row 12: Increase row. (22, 23 dc)
Rows 13 through 15: Mesh working row, no increase.
Row 16: Increase row. (24, 25 dc)
Rows 17 through 19: Mesh working row, no increase.
Row 20: Increase row. (26, 27 dc)
Rows 21 through 23: Mesh working row, no increase. Final dc count: (26, 27 dc)
For XL and 2XL: Rows 1 through 3: Mesh working row, no increase.
Row 4: Increase row. (20, 21 dc)
Rows 5 through 7: Mesh working row, no increase.
Row 8: Increase row. (22, 23 dc)
Rows 9 through 11: Mesh working row, no increase.
Row 12: Increase row. (24, 25 dc)
Rows 13 through 15: Mesh working row, no increase.
Row 16: Increase row. (26, 27 dc)
Rows 17 through 19: Mesh working row, no increase.
Row 20: Increase row. (28, 29 dc)
Rows 21 through 24: Mesh working row, no increase. Final dc count: (28, 29 dc)
Sleeve Colour Stripe Sequence: Rows 1 through 3: Color A. Rows 4 through 6: Color B. Rows 7 through 9: Color C. Rows 10 through 12: Color D. Rows 13 through 15: Color E. Rows 16 through 18: Color F. Rows 19 onward: Color G. Fasten off with a long tail for seaming.
Checkpoint: Each sleeve should measure approximately 5 (5.5, 6, 6.5, 7, 7.5) inches wide at the underarm edge and approximately 17 inches long.
Hood Pattern
Hood Pickup Row: With right side facing, join Color G yarn at the right front shoulder seam. Using the larger hook, work sc evenly around the entire neckline opening. Neckline pickup counts by size: XS: 44 sc. S: 48 sc. M: 52 sc. L: 56 sc. XL: 60 sc. 2XL: 64 sc. Turn after the pickup row.
Hood Mesh Foundation Row (WS): Ch 4, skip 1 sc. Dc in next sc, ch 1, skip 1 sc. Repeat to last sc, dc in last sc. Turn. (23, 25, 27, 29, 31, 33 dc)
Hood Body: Work the mesh working row for 21 (21, 22, 22, 23, 23) total rows (including foundation row), maintaining the same stitch count throughout, in Color G.
Hood Seam: Fold the hood in half lengthwise so the first and last row align at the top. Whipstitch across the top to close. Fasten off and weave in the end.
Hood Edging: With right side facing and using the larger hook and Color G, join yarn at the bottom right front corner of the hood. Work 1 row of sc up the right front edge, around the face opening, and down the left front edge. Work 1 sc per row end. Fasten off.
Drawstring: Thread your white cord through the ch-1 spaces along the front two rows of the hood, starting at the right front corner and exiting at the left front corner. Knot each end to prevent fraying.
Finishing & Assembly
Step 1: Shoulder Seams. Hold the back and front panels with right sides facing outward. Align the right shoulder edges. Using a tapestry needle and Color G yarn, whipstitch through corresponding stitches across the shoulder. Fasten off and weave in the end. Repeat for the left shoulder.
Step 2: Mark Armhole Openings. Measure down 8.5 (9, 9.5, 10, 10.5, 11) inches from the shoulder seam along each side edge. Place stitch markers at these points on both front and back.
Step 3: Set In Sleeves. Match the center top of each sleeve to the shoulder seam. Seam the sleeve top edge to the body armhole edge using whipstitch, with right sides facing outward. The sleeve top should fit exactly between your two armhole markers.
Step 4: Side and Sleeve Seams. Starting at the sleeve cuff edge, seam up the sleeve and continue down the body side in one continuous seam, ending at the bottom hem ribbing. Repeat for the other side.
Weave in all remaining yarn ends securely. Wet blocking gives the best results: submerge the finished hoodie in cool water with a small amount of wool wash for 15 to 20 minutes, lift gently and squeeze out excess water without wringing, roll in a clean dry towel, then lay flat on a blocking mat, pin to finished measurements, and let dry completely.
Tips
Take your time with the seaming. Good seams make the difference between a homemade look and a professional finish, and this hoodie rewards neat joins.
Block before you wear it, especially if you used acrylic yarn. The mesh really opens up and the drape improves dramatically.
When changing colours, work that last yarn over of the previous stitch with your new colour. This keeps your colour transitions crisp.
Count your stitches regularly, especially through the first few rows of each section. Catching a mistake early saves frogging later.
Ocean Breeze Mesh Cropped Hoodie Free Crochet Pattern
Materials
Steps
- Work back panel ribbing, mesh body and shoulder shaping
- Work front panel and neckline shaping
- Make two sleeves with cuff ribbing and increases
- Seam shoulders, set in sleeves, seam sides
- Pick up and work the hood
- Add hood edging and thread the drawstring
- Block to finished measurements
- Count dc posts only when checking mesh stitch counts
- Change colour on the last yarn over for crisp transitions
- Block before wearing so the mesh opens up beautifully
- Take your time with seaming for a professional finish


