Sage Green Woodland Fairy Top Free Crochet Pattern
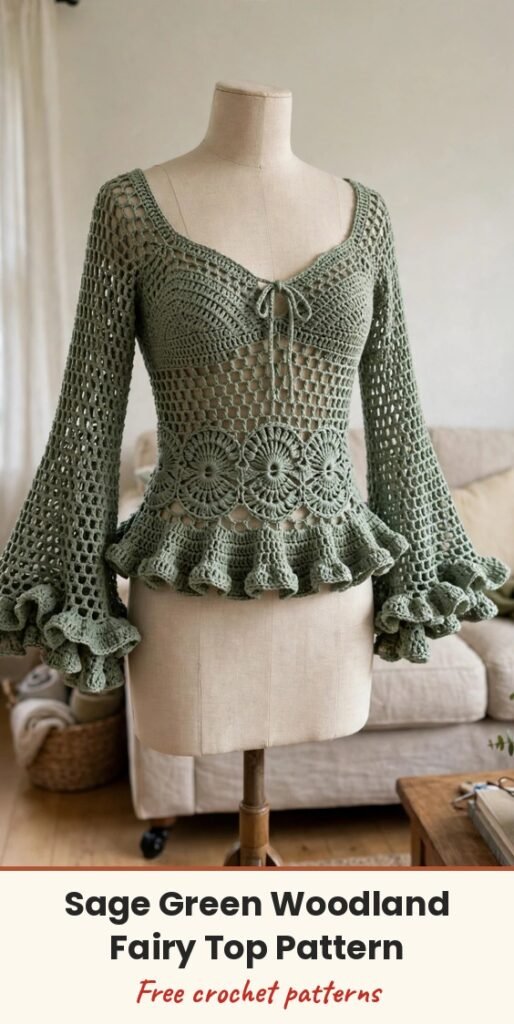
Table of Contents
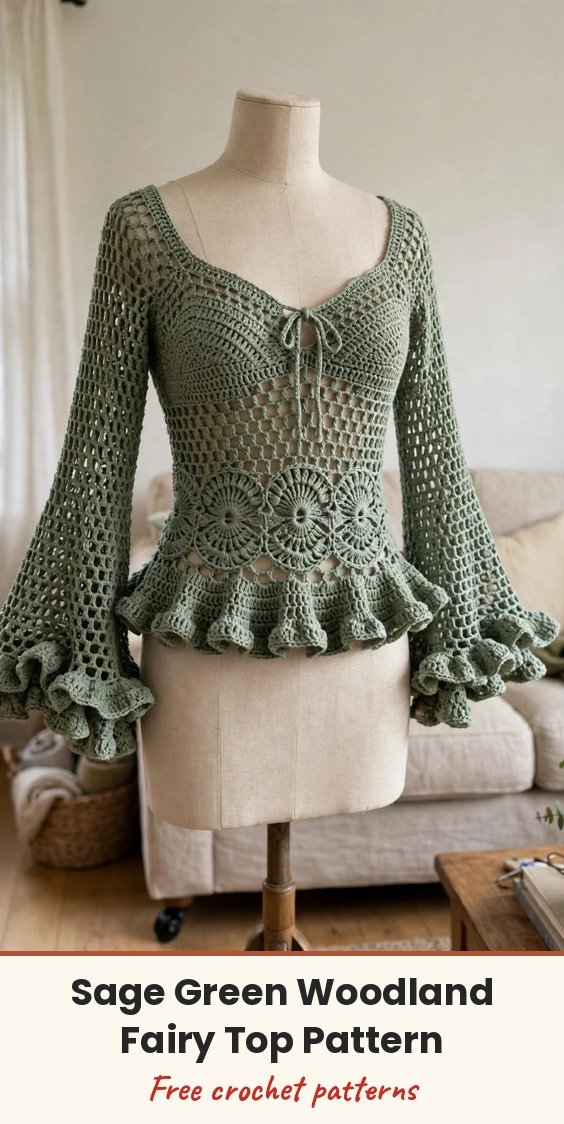
I fell in love with this top the moment I saw it: a fitted crochet top with the most dramatic bell sleeves, an open mesh body that catches the light, a decorative shell motif band at the waist, and a ruffled peplum hem that adds just the right amount of whimsy. It feels like something from an enchanted forest, and people will absolutely stop you to ask if you made it!
We will work four flat pieces: a front bodice with two sweetheart cups that join at the center, a back bodice, and two sleeves worked from the cap down to the bell cuff. The bell shape develops through gradual increases spread throughout the sleeve, so the fabric flows naturally without bunching. After seaming, we add the ruffle edging, the neckline edging, and a front tie.
Fair warning: this is an advanced project, and you can expect 30 to 45 hours. If you have completed several garments before and feel comfortable with shaping, multiple stitch textures, and seaming, you are absolutely ready. Instructions are written for size S with the other sizes in parentheses as XS (S, M, L, XL); when only one number appears, it applies to all sizes.
Materials
- 800 (900, 1000, 1100, 1200) yards of DK weight (CYCA 3) yarn in sage green, 100% cotton or a cotton blend recommended
- US E-4 (3.5mm) crochet hook, for the body and motif sections
- US F-5 (3.75mm) crochet hook, for the sleeves and ruffle sections
- Yarn needle, for seaming
- At least 8 stitch markers
- Scissors
- Rust-proof blocking pins and a blocking board or foam mat
- Measuring tape
- Two 18 inch lengths of matching ribbon or twisted cord, for the front tie (or crochet a chain tie during finishing)
Abbreviations
- ch: chain
- sc: single crochet
- dc: double crochet
- hdc: half double crochet
- tr: treble crochet
- sl st: slip stitch
- sc2tog: single crochet two together (decrease)
- sk: skip
- ch-sp: chain space
- RS: right side
- WS: wrong side
- t-ch: turning chain
- BLO: back loop only
Special Stitches
- Mesh Stitch Pattern (worked flat over a multiple of 2 stitches plus 2 for the foundation chain): Row 1 (RS): ch 1, sc in first st, (ch 1, sk 1 st, sc in next st) across, turn. Row 2 (WS): ch 1, sc in first st, (ch 1, sk ch-1 sp, sc in next sc) across, turn. Repeat Row 2 for pattern. Each sc sits directly above a sc from the previous row, and the stitch count stays constant.
- V-Stitch (V-st): work (dc, ch 1, dc) all in the same stitch or space.
- Shell Stitch: work 5 dc all in the same stitch or space.
- Picot Edge: ch 3, sl st in first ch made. This forms a small decorative loop.
- Ruffle Stitch: work 3 dc in each stitch or space across.
Gauge & Size
- Finished sizes: XS (S, M, L, XL) — bust 32 (34, 36, 38, 40) inches, waist 26 (28, 30, 32, 34) inches, length 14 (14.5, 15, 15.5, 16) inches from shoulder to hem before the ruffle; designed with 1 to 2 inches of negative ease at the bust
- Gauge: 18 sts and 20 rows = 4 inches in sc with the E-4 hook; 16 sts and 8 rows = 4 inches in mesh stitch pattern; 1 shell motif repeat (6 sts) = 1.5 inches wide
- Construction: four flat pieces seamed, ruffle and neckline edging added after seaming
- Skill level: Advanced
Front Bodice Pattern
The front bodice has two separate cups that create the sweetheart neckline. We work each cup separately, then join them. For mesh counting, count each sc and each ch-1 sp as one mesh unit. Note that ch 1 does not count as a stitch, ch 3 counts as the first dc, and ch 4 counts as dc plus ch 1.
Right Cup foundation: with the E-4 hook, ch 24 (26, 28, 30, 32).
Row 1 (RS): Sc in 2nd ch from hook, (ch 1, sk 1 ch, sc in next ch) across, turn. (12 (13, 14, 15, 16) sc, 11 (12, 13, 14, 15) ch-1 sps = 23 (25, 27, 29, 31) mesh units)
Row 2 (WS): Ch 1, sc in first sc, (ch 1, sk ch-1 sp, sc in next sc) across, turn. (23 (25, 27, 29, 31) mesh units)
Rows 3 to 10: Repeat Row 2. (23 (25, 27, 29, 31) mesh units each row)
After Row 10, your right cup measures approximately 2 inches tall. Now the sweetheart shaping.
Row 11 (RS, shaping): Ch 1, sc in first sc, (ch 1, sk ch-1 sp, sc in next sc) across to last 3 mesh units, sc2tog over next sc and ch-1 sp, sc in last sc, turn. (21 (23, 25, 27, 29) mesh units)
Row 12 (WS): Ch 1, sc in first sc, (ch 1, sk ch-1 sp, sc in next sc) across, turn. (21 (23, 25, 27, 29) mesh units)
Row 13 (RS, shaping): Ch 1, sc in first sc, (ch 1, sk ch-1 sp, sc in next sc) across to last 3 mesh units, sc2tog over next sc and ch-1 sp, sc in last sc, turn. (19 (21, 23, 25, 27) mesh units)
Row 14 (WS): Ch 1, sc in first sc, (ch 1, sk ch-1 sp, sc in next sc) across, turn. (19 (21, 23, 25, 27) mesh units)
Fasten off. Place a stitch marker at the center-front edge (the decreased edge) and set this piece aside.
Left Cup foundation: with the E-4 hook, ch 24 (26, 28, 30, 32).
Row 1 (RS): Sc in 2nd ch from hook, (ch 1, sk 1 ch, sc in next ch) across, turn. (23 (25, 27, 29, 31) mesh units)
Rows 2 to 10: Repeat the mesh Row 2. (23 (25, 27, 29, 31) mesh units each row)
Row 11 (RS, shaping, mirrored): Ch 1, sc in first sc, sc2tog over next ch-1 sp and following sc, (ch 1, sk ch-1 sp, sc in next sc) across, turn. (21 (23, 25, 27, 29) mesh units)
Row 12 (WS): Repeat mesh row. (21 (23, 25, 27, 29) mesh units)
Row 13 (RS, shaping, mirrored): Ch 1, sc in first sc, sc2tog over next ch-1 sp and following sc, (ch 1, sk ch-1 sp, sc in next sc) across, turn. (19 (21, 23, 25, 27) mesh units)
Row 14 (WS): Repeat mesh row. (19 (21, 23, 25, 27) mesh units)
Do not fasten off. Now we join the cups and work the front bodice main body.
Row 15 (RS, joining row): Ch 1, sc in first sc of left cup, (ch 1, sk ch-1 sp, sc in next sc) across left cup, ch 1, sc in first sc of right cup (pick up the right cup with RS facing), (ch 1, sk ch-1 sp, sc in next sc) across right cup, turn. (39 (43, 47, 51, 55) mesh units)
The ch 1 between the cups forms the center join; your tie will attach here during finishing. The front bodice has a center front opening approximately 4 inches long, secured by the tie at the top.
Row 16 (WS): Ch 1, sc in first sc, (ch 1, sk ch-1 sp, sc in next sc) across, turn. (39 (43, 47, 51, 55) mesh units)
Rows 17 to 28: Repeat the mesh row. (39 (43, 47, 51, 55) mesh units each row)
After Row 28, the front bodice should measure approximately 8 inches from the foundation chain. Now we shape the waist with decreases at each side edge every other row.
Row 29 (RS, dec): Ch 1, sc in first sc, sc2tog over next ch-1 sp and following sc, (ch 1, sk ch-1 sp, sc in next sc) across to last 3 units, sc2tog over next sc and ch-1 sp, sc in last sc, turn. (35 (39, 43, 47, 51) mesh units)
Row 30 (WS): Repeat mesh row. (35 (39, 43, 47, 51) mesh units)
Row 31 (RS, dec): Same decreases as Row 29. (31 (35, 39, 43, 47) mesh units)
Row 32 (WS): Repeat mesh row. (31 (35, 39, 43, 47) mesh units)
Row 33 (RS, dec): Same decreases as Row 29. (27 (31, 35, 39, 43) mesh units)
Row 34 (WS): Repeat mesh row. (27 (31, 35, 39, 43) mesh units)
Now the waist motif band, a simplified shell band that gives the same beautiful butterfly effect at your natural waistline.
Row 35 (RS, transition): Ch 3 (counts as dc), dc in each st across, turn. (XS: 27, S: 31, M: 35, L: 39, XL: 43 dc)
Row 36 (WS): Ch 4 (counts as dc + ch 1), sk next dc, (dc in next dc, ch 1, sk 1 dc) across to last dc, dc in last dc, turn. (XS: 14, S: 16, M: 18, L: 20, XL: 22 dc-ch-sps)
Row 37 (RS, shell row): Ch 3 (counts as dc), sk first ch-1 sp, (shell in next dc, sk ch-1 sp, sk 1 dc, sk ch-1 sp) across, ending dc in last st, turn. (XS: 4 shells, S: 5 shells, M: 6 shells, L: 6 shells, XL: 7 shells)
Row 38 (WS): Ch 1, sc in first dc, ch 2, (sc in center dc of each shell, ch 2) across to last dc, sc in last dc, turn.
Row 39 (RS): Ch 3 (counts as dc), 2 dc in first ch-2 sp, (sc in next sc, 5 dc in next ch-2 sp) across, ending sc in last sc, 3 dc in last ch-2 sp, dc in last dc, turn.
Row 40 (WS): Ch 1, sc in each dc and each sc across, turn. (XS: 27, S: 31, M: 35, L: 39, XL: 43 sc)
Your front bodice including the motif band should now measure approximately 12 inches from the foundation chain. Finish with the hem flare.
Row 41 (RS): Ch 3 (counts as dc), 2 dc in same st (inc made), dc across to last st, 3 dc in last st, turn. (XS: 31, S: 35, M: 39, L: 43, XL: 47 dc)
Row 42 (WS): Ch 3 (counts as dc), dc in each dc across, turn. (XS: 31, S: 35, M: 39, L: 43, XL: 47 dc)
Row 43 (RS): Ch 3 (counts as dc), 2 dc in same st, dc across to last st, 3 dc in last st, turn. (XS: 35, S: 39, M: 43, L: 47, XL: 51 dc)
Row 44 (WS): Ch 3 (counts as dc), dc in each dc across, turn. (XS: 35, S: 39, M: 43, L: 47, XL: 51 dc)
Fasten off the front bodice. Weave in ends but do not trim until seaming is confirmed.
Back Bodice Pattern
The back has a straight square neckline and is worked as one continuous flat piece from the top down. Foundation: with the E-4 hook, ch 42 (46, 50, 54, 58).
Row 1 (RS): Sc in 2nd ch from hook, (ch 1, sk 1 ch, sc in next ch) across, turn. (41 (45, 49, 53, 57) mesh units)
Rows 2 to 14: Repeat the mesh stitch row. (41 (45, 49, 53, 57) mesh units each row)
Rows 15 to 28: Repeat the mesh stitch row. (41 (45, 49, 53, 57) mesh units each row)
Row 29 (RS, dec): Ch 1, sc in first sc, sc2tog over next ch-1 sp and sc, (ch 1, sk ch-1 sp, sc in next sc) across to last 3 units, sc2tog, sc in last sc, turn. (37 (41, 45, 49, 53) mesh units)
Row 30 (WS): Repeat mesh row. (37 (41, 45, 49, 53) mesh units)
Row 31 (RS, dec): Same decrease as Row 29. (33 (37, 41, 45, 49) mesh units)
Row 32 (WS): Repeat mesh row. (33 (37, 41, 45, 49) mesh units)
Row 33 (RS, dec): Same decrease as Row 29. (29 (33, 37, 41, 45) mesh units)
Row 34 (WS): Repeat mesh row. (29 (33, 37, 41, 45) mesh units)
For the back motif band and hem flare, work Rows 35 to 44 as for the front bodice but with the back stitch counts.
Row 35: Ch 3, dc in each st across. (XS: 29, S: 33, M: 37, L: 41, XL: 45 dc)
Rows 36 to 40: Work the simplified waist motif band exactly as the front, using the back stitch counts. End Row 40 with (XS: 29, S: 33, M: 37, L: 41, XL: 45 sc).
Row 41: Ch 3, 2 dc in first st, dc across to last st, 3 dc in last st. (XS: 33, S: 37, M: 41, L: 45, XL: 49 dc)
Row 42: Ch 3, dc across. (Same counts as Row 41)
Row 43: Ch 3, 2 dc in first st, dc across to last st, 3 dc in last st. (XS: 37, S: 41, M: 45, L: 49, XL: 53 dc)
Row 44: Ch 3, dc across. (Same counts as Row 43)
Fasten off the back bodice. It should measure approximately 14 (14.5, 15, 15.5, 16) inches tall.
Sleeve Pattern (Make 2)
The sleeves are worked flat, beginning at the upper sleeve cap and working down to the bell cuff. The sleeve cap fits an armhole depth of 7 (7.5, 8, 8.5, 9) inches, and the sleeve length from underarm to cuff edge, before the ruffle, is approximately 22 inches for all sizes. Foundation: with the E-4 hook, ch 28 (30, 32, 34, 36).
Row 1 (RS): Sc in 2nd ch from hook, (ch 1, sk 1, sc in next ch) across, turn. (27 (29, 31, 33, 35) mesh units)
Rows 2 to 4: Repeat mesh row. (27 (29, 31, 33, 35) mesh units)
Row 5 (RS, cap inc): Ch 1, 2 sc in first sc, ch 1, (sc in next sc, ch 1) across, sc in last sc, ch 1, 2 sc in last sc, turn. (29 (31, 33, 35, 37) mesh units)
Row 6 (WS): Repeat mesh row. (29 (31, 33, 35, 37) mesh units)
Row 7 (RS): Increase row, same as Row 5. (31 (33, 35, 37, 39) mesh units)
Row 8 (WS): Repeat mesh row. (31 (33, 35, 37, 39) mesh units)
Row 9 (RS): Increase row, same as Row 5. (33 (35, 37, 39, 41) mesh units)
Row 10 (WS): Repeat mesh row. (33 (35, 37, 39, 41) mesh units)
Rows 11 to 14: Repeat mesh row. (33 (35, 37, 39, 41) mesh units)
Row 15 (RS, bell inc): Increase row. (35 (37, 39, 41, 43) mesh units)
Rows 16 to 18: Repeat mesh row. (35 (37, 39, 41, 43) mesh units)
Row 19 (RS, bell inc): Increase row. (37 (39, 41, 43, 45) mesh units)
Rows 20 to 22: Repeat mesh row. (37 (39, 41, 43, 45) mesh units)
Row 23 (RS, bell inc): Increase row. (39 (41, 43, 45, 47) mesh units)
Rows 24 to 26: Repeat mesh row. (39 (41, 43, 45, 47) mesh units)
Row 27 (RS, bell inc): Increase row. (41 (43, 45, 47, 49) mesh units)
Rows 28 to 30: Repeat mesh row. (41 (43, 45, 47, 49) mesh units)
Row 31 (RS, bell inc): Increase row. (43 (45, 47, 49, 51) mesh units)
Rows 32 to 34: Repeat mesh row. (43 (45, 47, 49, 51) mesh units)
Row 35 (RS, bell inc): Increase row. (45 (47, 49, 51, 53) mesh units)
Rows 36 to 38: Repeat mesh row. (45 (47, 49, 51, 53) mesh units)
Row 39 (RS, bell inc): Increase row. (47 (49, 51, 53, 55) mesh units)
Rows 40 to 42: Repeat mesh row. (47 (49, 51, 53, 55) mesh units)
Row 43 (RS, bell inc): Increase row. (49 (51, 53, 55, 57) mesh units)
Rows 44 to 46: Repeat mesh row. (49 (51, 53, 55, 57) mesh units)
Fasten off. Repeat for the second sleeve.
Finishing & Assembly
Before seaming, wet block all pieces: soak each piece in lukewarm water for 15 to 20 minutes, gently squeeze out the excess water without wringing, pin to measurements on your blocking mat, and allow to dry completely.
Using your yarn needle and matching yarn, seam the shoulder seams first, leaving the neckline opening. Then seam the side seams from underarm to hem. Finally, set in the sleeves by pinning each sleeve cap to the armhole, easing as needed, and whipstitching in place.
For the ruffle edging, switch to the F-5 (3.75mm) hook and join yarn at the center back hem with RS facing. Rnd 1: ch 3 (counts as dc), work 2 dc in each st around the entire hem edge, sl st to top of beginning ch-3 to join. Rnd 2: ch 3, dc in each dc around, sl st to join. Rnd 3: ch 1, (sc in next dc, picot, sc in next dc) around, sl st to join. Fasten off. Repeat a similar ruffle edging at the sleeve cuffs.
For the front tie, create a chain approximately 24 inches long, or thread your ribbon through the center front join, and secure with a few small stitches on the inside.
For the neckline edging, join yarn at the center back neckline and work 1 round of sc evenly around the entire neckline edge, working sc2tog at the inner corners of the sweetheart dip. On round 2, work (sc, picot, sc) evenly around for a delicate finish. Fasten off and weave in all remaining ends.
Tips
Take breaks. This is a substantial project, and rushing leads to mistakes; try working on it over several weeks rather than all at once.
Check your gauge often. Fabric can relax as you work, so compare your work to your original swatch periodically, especially on a fitted top like this one.
Try it on as you go: once you have seamed the bodice, try it on before adding the sleeves, to make sure the fit works for your body before you commit to the finishing.
Block all four pieces before seaming, not after. Flat, true pieces seam together far more neatly, and the mesh and shell sections open up beautifully.
Sage Green Woodland Fairy Top Free Crochet Pattern
Materials
Steps
- Work the right and left front cups in mesh stitch with sweetheart shaping, Rows 1 to 14
- Join the cups in Row 15 and work the front mesh body to Row 28
- Shape the front waist in Rows 29 to 34, then work the shell motif band in Rows 35 to 40
- Add the front hem flare in Rows 41 to 44
- Work the back bodice in mesh with matching waist shaping, motif band and flare
- Crochet 2 sleeves from the cap down, increasing to a bell cuff by Row 46
- Block all pieces, seam shoulders, sides and sleeves
- Add the ruffle edging to the hem and cuffs, the neckline edging and the front tie
- Do not skip the gauge swatch: a small difference over 4 inches becomes a big difference across a fitted bodice
- Compare your work to your swatch often, because mesh fabric relaxes as you work
- Try the seamed bodice on before setting in the sleeves
- Block every piece flat before seaming so the mesh and shells open up and seams sit neatly


