Sage Green Daisy Crochet Dress Free Crochet Pattern
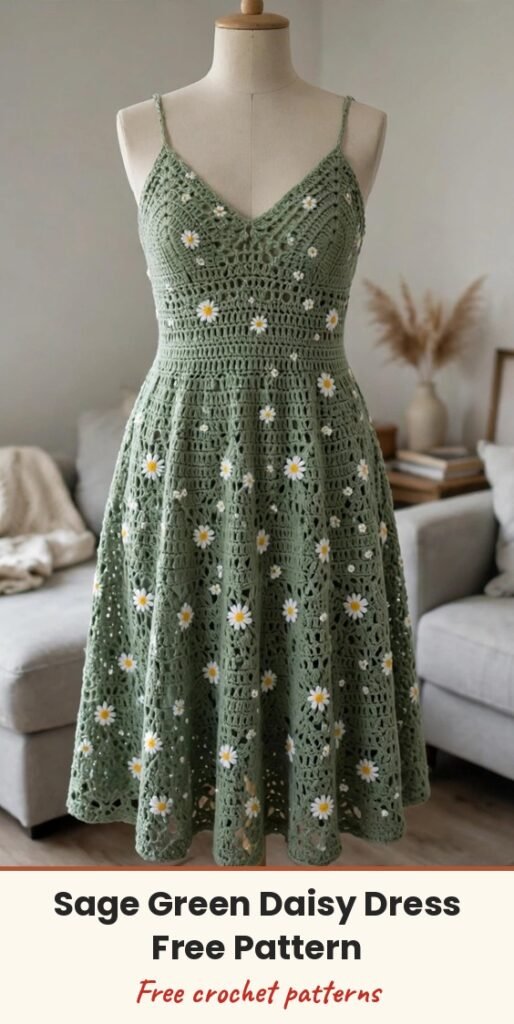
Table of Contents
A whole crochet dress sounds like a big mountain, doesn’t it? But I promise, this sage green daisy dress is really just friendly building blocks: a bodice front, a bodice back, two skirt panels, skinny straps, and a happy scatter of little daisy appliques, every piece worked flat in single crochet.
The bodice gives the dress its lovely fitted shape with gentle bust darts and a V-neck, while the skirt is worked in back-loop-only stitches so it falls in soft ridges with a beautiful A-line swing. The daisies are tiny projects all on their own — perfect for using up white and yellow scraps — and we sew on about 50 of them at the end.
The pattern is written for women’s size Small/Medium, with finished measurements of bust 34 inches, waist 27 inches, hip 54 inches at the fullest skirt point, and a total length of 46 inches. Plan on this being a true labour of love, around 80 to 120 hours in total, spread over happy evenings.
Materials
- 1,800 to 2,200 yards of DK weight cotton or cotton-blend yarn in sage green (main colour)
- 200 yards of DK weight yarn in white, for the daisy petals
- 50 yards of DK weight yarn in yellow, for the daisy centres
- 3.5mm crochet hook, for the bodice and daisy appliques
- 3.75mm crochet hook, for the skirt
- Stitch markers, at least 12
- Tapestry needle, for seaming and weaving in ends
- Scissors
- Rust-proof straight pins, for blocking
- Measuring tape
- 1 yard of 0.5 inch sage green ribbon and 28 inches of thin elastic (optional)
Abbreviations
- ch: chain
- sc: single crochet
- hdc: half double crochet
- dc: double crochet
- sl st: slip stitch
- sc2tog: single crochet two together, a decrease
- dec: decrease
- inc: increase, 2 sc in the same stitch
- BLO: back loop only
- ch-sp: chain space
- sk: skip
- st/sts: stitch / stitches
- RS: right side
- WS: wrong side
- MC: main colour, sage green
- CA: colour A, white
- CB: colour B, yellow
Special Stitches
- V-neck decrease: at the beginning of a right-side row at the neckline edge, ch 1, sc2tog over the first 2 sts, sc to the end. At the end of a right-side row at the neckline edge, sc to the last 2 sts, sc2tog over the last 2 sts. One stitch is decreased at the neckline edge, and this decrease is worked on every right-side row of the V-neck shaping.
- Scallop edging: join MC with a sl st at any point along the hem edge, then (sk 2 sts, 5 dc in the next st, sk 2 sts, sl st in the next st) repeated around. Each scallop uses 6 sts, so the total hem stitch count must be divisible by 6. At the end of the round, sl st to the first sl st and fasten off.
- Waist band row: ch 1, hdc in each stitch across, turn. This makes a denser horizontal ridge that defines the waist seam.
Gauge & Size
- Finished size: women’s Small/Medium — bust 34 inches, waist 27 inches, total length 46 inches, skirt length 34 inches, strap length approximately 11 inches (adjustable)
- Gauge: bodice 20 sts x 24 rows = 4 inches in sc with the 3.5mm hook, blocked; skirt 18 sts x 20 rows = 4 inches in BLO sc with the 3.75mm hook, blocked; each daisy measures about 1.25 inches across
- Construction: bodice and skirt worked flat in separate panels, pleated and seamed, straps and daisies added at the end
- Skill level: Intermediate to Advanced
- Turning chains count as 0 stitches throughout, and the right side of the fabric is the side facing you on Row 1
Bodice Front Pattern
Foundation: With MC and the 3.5mm hook, ch 87.
Row 1 (RS): Sc in the 2nd chain from the hook and in each chain across, turn. (86 sc)
Row 2: Ch 1, sc in each stitch across, turn. (86 sc)
Row 3: Ch 1, sc in each stitch across, turn. (86 sc)
Row 4: Ch 1, sc in each stitch across, turn. (86 sc)
Row 5: Ch 1, sc in each stitch across, turn. (86 sc)
Row 6: Ch 1, sc in each stitch across, turn. (86 sc)
Row 7: Ch 1, sc in each stitch across, turn. (86 sc)
Row 8: Ch 1, sc in each stitch across, turn. (86 sc)
Row 9: Ch 1, sc in each stitch across, turn. (86 sc)
Row 10: Ch 1, sc in each stitch across, turn. (86 sc)
After Row 10 the bodice front should measure approximately 1.75 inches tall.
Row 11 (waist band row): Ch 1, hdc in each stitch across, turn. (86 hdc)
Row 12: Ch 1, sc in each stitch across, turn. (86 sc)
Row 13: Ch 1, sc in each stitch across, turn. (86 sc)
Row 14: Ch 1, sc in each stitch across, turn. (86 sc)
Row 15 (RS): Ch 1, sc in the first 20 sts, sc2tog, sc in the next 42 sts, sc2tog, sc in the last 20 sts, turn. (84 sc)
Row 16 (WS): Ch 1, sc in each stitch across, turn. (84 sc)
Row 17 (RS): Ch 1, sc in the first 19 sts, sc2tog, sc in the next 42 sts, sc2tog, sc in the last 19 sts, turn. (82 sc)
Row 18 (WS): Ch 1, sc in each stitch across, turn. (82 sc)
Row 19 (RS): Ch 1, sc in the first 18 sts, sc2tog, sc in the next 42 sts, sc2tog, sc in the last 18 sts, turn. (80 sc)
Row 20 (WS): Ch 1, sc in each stitch across, turn. (80 sc)
After Row 20 the bodice front should measure approximately 3.5 inches tall.
Row 21 (RS): Ch 1, sc in the first 40 sts, turn, placing the remaining 40 sts on a stitch holder or a length of scrap yarn. (40 sc, right front bodice)
Right Front Bodice
The neckline edge is at the left when the right side faces you, which is the centre of the garment.
Row 22 (WS): Ch 1, sc in each stitch across, turn. (40 sc)
Row 23 (RS, neckline decrease): Ch 1, sc in the first 38 sts, sc2tog over the last 2 sts, turn. (39 sc)
Row 24 (WS): Ch 1, sc in each stitch across, turn. (39 sc)
Row 25 (RS, neckline decrease): Ch 1, sc in the first 37 sts, sc2tog over the last 2 sts, turn. (38 sc)
Row 26 (WS): Ch 1, sc in each stitch across, turn. (38 sc)
Row 27 (RS, neckline decrease): Ch 1, sc in the first 36 sts, sc2tog over the last 2 sts, turn. (37 sc)
Row 28 (WS): Ch 1, sc in each stitch across, turn. (37 sc)
Row 29 (RS, neckline decrease): Ch 1, sc in the first 35 sts, sc2tog over the last 2 sts, turn. (36 sc)
Row 30 (WS): Ch 1, sc in each stitch across, turn. (36 sc)
Row 31 (RS, neckline decrease): Ch 1, sc in the first 34 sts, sc2tog over the last 2 sts, turn. (35 sc)
Row 32 (WS): Ch 1, sc in each stitch across, turn. (35 sc)
Row 33 (RS, neckline decrease): Ch 1, sc in the first 33 sts, sc2tog over the last 2 sts, turn. (34 sc)
Row 34 (WS): Ch 1, sc in each stitch across, turn. (34 sc)
Row 35 (RS, neckline decrease): Ch 1, sc in the first 32 sts, sc2tog over the last 2 sts, turn. (33 sc)
Row 36 (WS): Ch 1, sc in each stitch across, turn. (33 sc)
Row 37 (RS, neckline decrease): Ch 1, sc in the first 31 sts, sc2tog over the last 2 sts, turn. (32 sc)
Row 38 (WS): Ch 1, sc in each stitch across, turn. (32 sc)
Row 39 (RS, neckline decrease): Ch 1, sc in the first 30 sts, sc2tog over the last 2 sts, turn. (31 sc)
Row 40 (WS): Ch 1, sc in each stitch across, turn. (31 sc)
Row 41 (RS): Ch 1, sc in each stitch across, turn. (31 sc)
Row 42 (WS): Ch 1, sc in each stitch across, turn. (31 sc)
Fasten off, leaving a 16 inch tail for seaming.
Left Front Bodice
Return to the held stitches. With RS facing, join MC with a sl st to the first held stitch at the centre front. The neckline edge is now at your right.
Row 22 (WS): Ch 1, sc in each stitch across, turn. (40 sc)
Row 23 (RS, neckline decrease): Ch 1, sc2tog over the first 2 sts, sc in the remaining 38 sts, turn. (39 sc)
Row 24 (WS): Ch 1, sc in each stitch across, turn. (39 sc)
Row 25 (RS, neckline decrease): Ch 1, sc2tog over the first 2 sts, sc in the remaining 37 sts, turn. (38 sc)
Row 26 (WS): Ch 1, sc in each stitch across, turn. (38 sc)
Row 27 (RS, neckline decrease): Ch 1, sc2tog over the first 2 sts, sc in the remaining 36 sts, turn. (37 sc)
Row 28 (WS): Ch 1, sc in each stitch across, turn. (37 sc)
Row 29 (RS, neckline decrease): Ch 1, sc2tog over the first 2 sts, sc in the remaining 35 sts, turn. (36 sc)
Row 30 (WS): Ch 1, sc in each stitch across, turn. (36 sc)
Row 31 (RS, neckline decrease): Ch 1, sc2tog over the first 2 sts, sc in the remaining 34 sts, turn. (35 sc)
Row 32 (WS): Ch 1, sc in each stitch across, turn. (35 sc)
Row 33 (RS, neckline decrease): Ch 1, sc2tog over the first 2 sts, sc in the remaining 33 sts, turn. (34 sc)
Row 34 (WS): Ch 1, sc in each stitch across, turn. (34 sc)
Row 35 (RS, neckline decrease): Ch 1, sc2tog over the first 2 sts, sc in the remaining 32 sts, turn. (33 sc)
Row 36 (WS): Ch 1, sc in each stitch across, turn. (33 sc)
Row 37 (RS, neckline decrease): Ch 1, sc2tog over the first 2 sts, sc in the remaining 31 sts, turn. (32 sc)
Row 38 (WS): Ch 1, sc in each stitch across, turn. (32 sc)
Row 39 (RS, neckline decrease): Ch 1, sc2tog over the first 2 sts, sc in the remaining 30 sts, turn. (31 sc)
Row 40 (WS): Ch 1, sc in each stitch across, turn. (31 sc)
Row 41 (RS): Ch 1, sc in each stitch across, turn. (31 sc)
Row 42 (WS): Ch 1, sc in each stitch across, turn. (31 sc)
Fasten off, leaving a 16 inch tail for seaming. The bodice front should measure approximately 7.5 inches tall, and each shoulder edge about 6.25 inches wide.
Bodice Back Pattern
The back mirrors the front but keeps a higher neckline, with no V-neck shaping.
Foundation: With MC and the 3.5mm hook, ch 87.
Row 1 (RS): Sc in the 2nd chain from the hook and in each chain across, turn. (86 sc)
Rows 2 to 10: Ch 1, sc in each stitch across, turn. (86 sc each row)
Row 11 (waist band row): Ch 1, hdc in each stitch across, turn. (86 hdc)
Rows 12 to 14: Ch 1, sc in each stitch across, turn. (86 sc each row)
Row 15 (RS): Ch 1, sc in the first 20 sts, sc2tog, sc in the next 42 sts, sc2tog, sc in the last 20 sts, turn. (84 sc)
Row 16 (WS): Ch 1, sc in each stitch across, turn. (84 sc)
Row 17 (RS): Ch 1, sc in the first 19 sts, sc2tog, sc in the next 42 sts, sc2tog, sc in the last 19 sts, turn. (82 sc)
Row 18 (WS): Ch 1, sc in each stitch across, turn. (82 sc)
Row 19 (RS): Ch 1, sc in the first 18 sts, sc2tog, sc in the next 42 sts, sc2tog, sc in the last 18 sts, turn. (80 sc)
Row 20 (WS): Ch 1, sc in each stitch across, turn. (80 sc)
Rows 21 to 36: Ch 1, sc in each stitch across, turn. (80 sc each row)
Row 37 (RS): Ch 1, sc in the first 30 sts, turn. (30 sc, right back shoulder)
Row 38 (WS): Ch 1, sc in each stitch across, turn. (30 sc)
Row 39 (RS): Ch 1, sc in the first 28 sts, sc2tog, turn. (29 sc)
Row 40 (WS): Ch 1, sc in each stitch across, turn. (29 sc)
Row 41 (RS): Ch 1, sc in the first 27 sts, sc2tog, turn. (28 sc)
Row 42 (WS): Ch 1, sc in each stitch across, turn. (28 sc)
Fasten off, leaving a 16 inch tail for seaming. The right back shoulder edge is 28 sts wide.
Left back shoulder: Count 20 sts from the right edge of Row 36 and skip those centre 20 sts — they form the back neckline opening, so leave them on a stitch holder. Rejoin MC with a sl st to the 21st stitch from the right edge.
Row 37 (RS): Ch 1, sc in each of the remaining 30 sts, turn. (30 sc)
Row 38 (WS): Ch 1, sc in each stitch across, turn. (30 sc)
Row 39 (RS): Ch 1, sc2tog, sc in the remaining 28 sts, turn. (29 sc)
Row 40 (WS): Ch 1, sc in each stitch across, turn. (29 sc)
Row 41 (RS): Ch 1, sc2tog, sc in the remaining 27 sts, turn. (28 sc)
Row 42 (WS): Ch 1, sc in each stitch across, turn. (28 sc)
Fasten off, leaving a 16 inch tail for seaming. Both bodice pieces should be approximately 7.5 inches tall, with matching 42-row side edges for seaming.
Skirt Pattern (Front & Back)
Foundation: With MC and the 3.75mm hook, ch 63.
Row 1 (RS): Sc in the 2nd chain from the hook and in each chain across, turn. (62 sc)
Row 2 (WS): Ch 1, sc in BLO in each stitch across, turn. (62 sc)
Rows 3 to 6: Ch 1, sc in BLO in each stitch across, turn. (62 sc each row)
Row 7 (RS, increase row): Ch 1, 2 sc in BLO in the first stitch, sc in BLO in the next 19 sts, 2 sc in BLO in the next stitch, sc in BLO in the next 20 sts, 2 sc in BLO in the next stitch, sc in BLO in the next 19 sts, 2 sc in BLO in the last stitch, turn. (66 sc)
Rows 8 to 12: Ch 1, sc in BLO in each stitch across, turn. (66 sc each row)
Row 13 (RS, increase row): Ch 1, 2 sc in BLO in the first stitch, sc in BLO in the next 21 sts, 2 sc in BLO in the next stitch, sc in BLO in the next 20 sts, 2 sc in BLO in the next stitch, sc in BLO in the next 21 sts, 2 sc in BLO in the last stitch, turn. (70 sc)
Rows 14 to 18: Ch 1, sc in BLO in each stitch across, turn. (70 sc each row)
Row 19 (RS, increase row): Ch 1, 2 sc in BLO in the first stitch, sc in BLO in the next 23 sts, 2 sc in BLO in the next stitch, sc in BLO in the next 20 sts, 2 sc in BLO in the next stitch, sc in BLO in the next 23 sts, 2 sc in BLO in the last stitch, turn. (74 sc)
Rows 20 to 24: Ch 1, sc in BLO in each stitch across, turn. (74 sc each row)
Row 25 (RS, increase row): Ch 1, 2 sc in BLO in the first stitch, sc in BLO in the next 25 sts, 2 sc in BLO in the next stitch, sc in BLO in the next 20 sts, 2 sc in BLO in the next stitch, sc in BLO in the next 25 sts, 2 sc in BLO in the last stitch, turn. (78 sc)
Continue in the established BLO single crochet pattern, working an increase row every 6th row and adding 4 stitches per increase row — 2 extra stitches of plain BLO sc on each outer section and the same 20-stitch centre section — until the skirt measures 34 inches from the foundation chain, or your desired length. Make sure your final stitch count is divisible by 6 for the scallop edging, then fasten off.
Work the skirt back exactly the same as the skirt front.
Daisy Appliques (Make 50)
Centre Round 1: With CB (yellow), make a magic ring, ch 1, work 6 sc into the ring, sl st to the first sc to join. (6 sc)
Fasten off CB, leaving a 6 inch tail.
Petal Round 2: Join CA (white) with a sl st to any sc of Round 1. (Ch 4, sl st into the 2nd chain from the hook, sc in the next chain, hdc in the last chain, sl st into the same stitch of Round 1, sl st into the next stitch of Round 1) 6 times. (6 petals)
Fasten off CA, leaving a 12 inch tail for sewing. Each finished daisy measures approximately 1.25 inches across. Make 50 daisies in total — 45 to 55 is fine, depending on how dense you want them.
Finishing & Assembly
Block all the pieces before assembly. Wet block or steam block to the measurements and allow everything to dry completely — the cotton relaxes a lot, and this step is essential.
Seam the bodice sides, joining the front to the back along both side seams with mattress stitch or whipstitch. Seam the skirt sides the same way.
Pleat the skirt at the waist: pin the top edge of the skirt to the bottom edge of the bodice, making soft, evenly spaced box pleats until the skirt waist matches the bodice waist, then whipstitch it in place.
Straps (make 2): With MC and the 3.5mm hook, ch 60 (or your desired length plus seaming allowance), and sl st in each chain across for reinforcement. Fasten off. Sew each strap securely to the front bodice at the shoulder edge and to the back bodice at the matching point.
Sew the daisies evenly across the bodice and skirt with their 12 inch tails, spacing them roughly 2 to 3 inches apart.
Add the scallop hem edging from the Special Stitches section all around the hem, fasten off, and weave in the ends. Give the finished dress a final light steam or spray blocking to even out the stitches.
Tips
Gauge is critical on this dress — even one stitch per 4 inches changes the bust by over an inch across the full width. Swatch, block, and re-swatch if you need to.
To go up a size (Medium/Large, about 36 to 38 inch bust), add 8 stitches to the foundation chain of both bodice pieces and 12 stitches to the skirt chain; to go down to XS, remove the same amounts. Keep the stitch multiples in mind: multiples of 2 for the body, multiples of 6 for the scallop edging.
Place stitch markers at the side seam points, the V-neck split point, and the start of every shaping section. Future you will be very grateful!
There is no zipper — the dress slips on thanks to the natural give of the cotton mesh, and the optional thin elastic at the waist keeps everything comfortably in place.

Sage Green Daisy Crochet Dress Free Crochet Pattern
Materials
Steps
- Work the bodice front flat with bust dart and V-neck shaping
- Work the bodice back flat with a shallow back neckline
- Work two skirt panels in BLO sc with A-line increases
- Block all pieces and seam the bodice and skirt sides
- Pleat the skirt to the bodice waist and whipstitch in place
- Make 2 chain straps and sew them to the shoulders
- Make 50 daisy appliques and sew them across the bodice and skirt
- Work the scallop edging around the hem
- Swatch and block before starting, gauge changes alter the bust by over an inch
- Place markers at the V-neck split and shaping sections
- Make sure the final hem stitch count is divisible by 6 for the scallop edging