Ocean Breeze Granny Romper Free Crochet Pattern
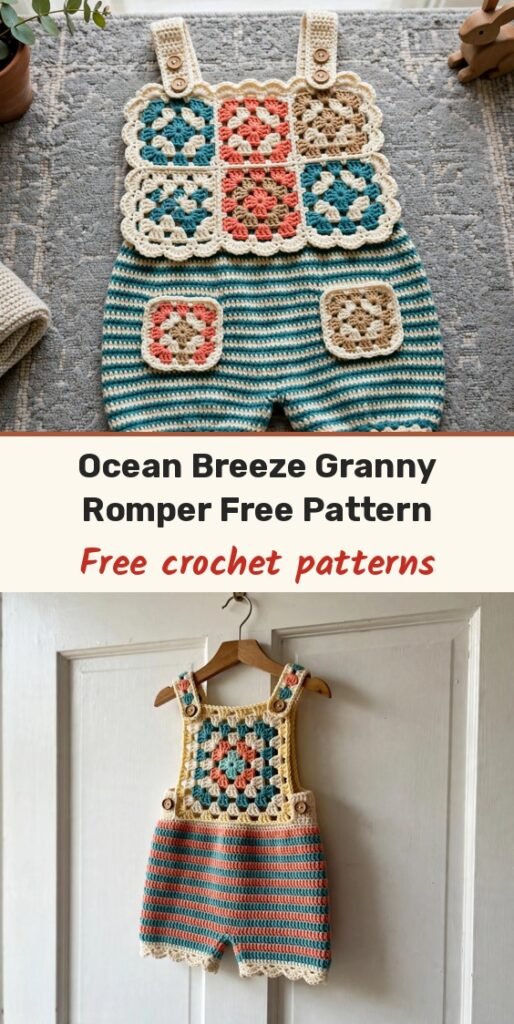
Table of Contents
I have been dreaming about this little romper for months — classic granny squares, fresh ocean colours, and the prettiest scallop edging! It looks like something from a boutique, but it is built from techniques you probably already know and love.
Here is how it comes together: we make eight granny squares in total. Six of them join into the front bib panel, two across and three down, and the other two become decorative pockets on the shorts. The back bodice is simple horizontal stripes of single crochet, and the shorts are worked in back loop only single crochet with a clever two-stitch colour change that makes vertical stripes pop.
It is designed for babies of 3 to 6 months, with buttoned straps for easy dressing. The pattern is rated intermediate — if you have joined granny squares and worked in the round before, you are ready, and I will walk you through every step anyway!
Materials
- Sport weight (size 2) yarn, 100% cotton or cotton blend, Color A (Teal): approximately 220 yards
- Sport weight yarn, Color B (Cream): approximately 100 yards
- Sport weight yarn, Color C (Coral): approximately 60 yards
- Sport weight yarn, Color D (Tan): approximately 60 yards
- Sport weight yarn, Color E (Pale White): approximately 80 yards
- US B-1 / 2.25 mm crochet hook (adjust for gauge)
- Yarn needle, for seaming and weaving in ends
- 8 decorative shell or wood buttons, approximately 12 mm
- Stitch markers
- Scissors
- Blocking mat and rust-proof pins
Abbreviations
- ch: chain
- sl st: slip stitch
- sc: single crochet
- dc: double crochet
- sp: space
- ch-sp: chain space
- sk: skip
- st(s): stitch(es)
- rep: repeat
- pm: place marker
- RS: right side
- WS: wrong side
- blo: back loop only
- yo: yarn over
- rnd(s): round(s)
Special Stitches
- Granny Cluster: Work 3 double crochets together into the same chain space. Do not chain between the three stitches within a single cluster.
- Scallop Edging Shell: Work 5 double crochets into a single stitch or chain space to create one scallop shell.
- Vertical Stripe Single Crochet: Work single crochet in the back loop only while changing colours every 2 stitches. This creates vertical stripes rather than horizontal ones.
Gauge & Size
- Gauge: 18 sc x 22 rows = 4 inches in single crochet, blocked; 1 completed granny square (3 rounds) = 2.25 inches square, blocked
- Finished size: approximately 17 inches around the chest and 12.5 inches from shoulder to crotch; each leg opening about 9 inches around; size 3 to 6 months
- Construction: 8 granny squares (6 for the bib, 2 pockets), striped back bodice, shorts worked in back-loop stripes
- Skill level: Intermediate
Granny Squares Pattern
Make 8 squares in total: 6 for the bib and 2 for the pockets. Vary the centre colours as noted after the rounds.
Round 1 (Color C or D, alternate between squares): Make a magic ring. Ch 3 (counts as first dc of first cluster). Work 2 more dc into the ring. Ch 2 (corner chain). [Work 3 dc into ring, ch 2] 3 times. Join with sl st to top of beginning ch-3. Cut yarn and pull the tail through. (4 clusters, 4 ch-2 corner spaces)
Round 2 (Color B): Join Color B with sl st into any ch-2 corner space. Ch 3, work 2 dc into the same corner space. Ch 2, work 3 dc into the same corner space. Ch 1. [Work (3 dc, ch 2, 3 dc) into next ch-2 corner sp, ch 1] 3 times. Join with sl st to top of beginning ch-3. Cut yarn. (8 clusters total, 4 ch-1 side spaces, 4 ch-2 corner spaces)
Round 3 (Color A): Join Color A with sl st into any ch-2 corner space. Ch 3, work 2 dc into the same space. Ch 2, work 3 dc into the same corner space. Ch 1. Work 3 dc into the ch-1 side space. Ch 1. [(3 dc, ch 2, 3 dc) into next ch-2 corner sp, ch 1, 3 dc into ch-1 side sp, ch 1] 3 times. Join with sl st to top of beginning ch-3. (12 clusters, 4 ch-2 corners, 8 ch-1 spaces)
Colour variations: Square 1 (top-left bib) has a Color D (tan) centre; Square 2 (top-right bib) Color C (coral); Square 3 (middle-left bib) Color C; Square 4 (middle-right bib) Color D; Square 5 (bottom-left bib) Color D; Square 6 (bottom-right bib) Color C. Pocket Squares 1 and 2 both have Color C centres. Block all squares to 2.25 inches before joining.
Bib Assembly and Edging
Arrange your 6 bib squares in a 2-column by 3-row grid: Row 1 (top) is Square 1 left and Square 2 right; Row 2 (middle) is Square 3 left and Square 4 right; Row 3 (bottom) is Square 5 left and Square 6 right.
We join with the flat slip stitch method: hold two squares with wrong sides facing each other, and using Color A, insert your hook through the outermost loops of both squares at a corner ch-2 space and join with a sl st. Working along one edge, sl st through the corresponding outer loops of each stitch and chain space until the opposite corner, then fasten off. Join in this order: Square 1 to Square 2, Square 3 to Square 4, Square 5 to Square 6, then Row 1 pair to Row 2 pair, then Row 2 pair to Row 3 pair. Your completed bib panel measures approximately 4.5 inches wide by 6.75 inches tall.
Now the bib top edging. Using Color A, join yarn to the top-left corner of the bib panel.
Top Edge Row 1 (Color A, RS): Starting at the top-left outer corner: work 3 sc into the corner sp, work approximately 8 sc across the top edge of Square 1, work 3 sc into the centre-top joining area, work 8 sc across the top of Square 2, work 3 sc into the top-right outer corner sp. (26 sc total across the top of the bib)
Scallop Edging Row (Color B): Ch 1, turn to work back across the 26 sc. [Sk 1 sc, work 5 dc into next sc, sk 1 sc, sl st into next sc] repeat across. Approximately 6 scallops across.
Cut Color B. Mark the top-left and top-right outer corners with stitch markers — these are your strap attachment points.
Back Bodice Pattern
Using Color A, chain 39.
Row 1 (Color A, RS): Sc in the 2nd ch from the hook and in each ch across. Turn. (38 sc)
Row 2 (Color A): Ch 1, sc in each sc across. Turn. (38 sc)
Row 3 (Color B): Ch 1, sc in each sc across. Turn. (38 sc)
Row 4 (Color D): Ch 1, sc in each sc across. Turn. (38 sc)
Row 5 (Color E): Ch 1, sc in each sc across. Turn. (38 sc)
Row 6 (Color C): Ch 1, sc in each sc across. Turn. (38 sc)
Row 7 (Color B): Ch 1, sc in each sc across. Turn. (38 sc)
Row 8 (Color A): Ch 1, sc in each sc across. Turn. (38 sc)
Cut all colours. Your back bodice measures approximately 8.5 inches wide by 3.5 inches tall.
Shorts Pattern
Position the bib panel (front) and back bodice panel with right sides facing outward. The bib is narrower than the back panel, so centre it. Using Color A and a yarn needle, seam the right side edge of the bib to the corresponding right portion of the back bodice with a flat whip stitch or mattress stitch, leaving the top 1 inch of each side open for the armhole. Repeat on the left side.
Using Color A, work 1 round of sc evenly around the entire lower opening of the bodice to create a uniform foundation for the shorts. Work approximately 76 sc evenly around. Join with sl st. (76 sc)
Decrease Round (Color A): [Sc 17, sc2tog] 4 times around, sl st to join. (72 sc)
The stripe colour sequence runs per 2-stitch column, repeating around: Column 1 Color A (teal), Column 2 Color E (pale cream), Column 3 Color D (tan), Column 4 Color C (coral), Column 5 Color B (warm cream), Column 6 Color D (tan), then repeat from Column 1.
Rounds 1 through 12: [Work 2 sc blo in Color A, work 2 sc blo in Color E, work 2 sc blo in Color D, work 2 sc blo in Color C, work 2 sc blo in Color B, work 2 sc blo in Color D] repeat 6 times around. Join with sl st to first sc of round. (72 sc per round)
Work 12 rounds total. Now divide for the crotch: the front leg is stitches 1 through 36, the back leg is stitches 37 through 72.
Front Section Row 1: Ch 1, sc blo across 36 sc in the established stripe sequence. Turn. (36 sc)
Front Section Row 2: Ch 1, sc blo across in stripe sequence. Turn. (36 sc)
Fasten off. Join yarn to stitch 37 for the back section and work the same 2 rows of 36 sc blo in the stripe sequence, then fasten off. Fold the garment so the front and back crotch panels meet, and seam the front bottom edge to the back bottom edge with a flat whip stitch in Color A. This creates the crotch seam and forms two leg openings.
Leg Edging, Straps and Pockets
Using Color A, join to the edge of one leg opening.
Leg Edging Round 1 (Color A): Sc evenly around the leg opening, adjusting to 40 sc. Join with sl st. (40 sc)
Leg Edging Round 2 (Color B): Sl st into first sc. [Sk 1 sc, 5 dc into next sc, sk 1 sc, sl st into next sc] repeat around. (10 scallop shells per leg opening)
Repeat on the second leg opening. Now the shoulder straps — make 2, using Color A. Chain 5.
Row 1: Sc in the 2nd ch from the hook and in each ch across. Turn. (4 sc)
Rows 2 through 30: Ch 1, sc in each sc across. Turn. (4 sc per row)
Each strap measures approximately 5.5 inches long. At the back end of each strap, make a button loop: ch 4, sl st into the same stitch to form the loop, and fasten off. Sew the front end of each strap to the top outer corners of the bib panel, sewing a decorative button through both strap and bib at each corner. Sew 2 buttons to the back bodice top corners, and button the strap loops onto these.
For the pockets, take your two pocket granny squares. Using Color A, work 1 round of sc evenly around the outer edge of each square: join Color A to any corner ch-2 sp, then [3 sc in corner sp, sc in each dc and 1 sc in each ch-1 sp across each side] repeat around all 4 sides, and join with sl st. (Approximately 48 sc)
Sew each pocket to the front of the shorts, centred on the left and right sides, approximately 0.75 inch below the bodice-to-shorts join. Stitch along the bottom and two side edges, leaving the top open, and sew one decorative button to the centre of each pocket.
Finishing & Assembly
You will sew 6 buttons in total: 1 at the top-left bib corner through strap and bib, 1 at the top-right bib corner, 2 on the back bodice top corners for the strap loops, and 1 on each front pocket. Weave in all ends securely with a yarn needle and trim all tails.
Blocking really is essential for this romper. Soak the finished piece in cool water with a small amount of gentle wool wash for 15 minutes, gently squeeze out the water without wringing, and roll it in a clean towel. Lay it flat on a blocking mat, pin the granny squares to 2.25 inches each and the shorts to the finished dimensions, and allow at least 24 hours to dry completely.
Tips and Sizing
To size up to 6 to 12 months: work a Round 4 on each granny square to make them 2.75 inches, increase the back bodice foundation chain to 45, increase the shorts foundation round to 84 sc, add 4 additional rounds to the shorts body (16 total), and lengthen the straps to 35 rows.
To size down to 0 to 3 months: keep the squares at 2 inches (work only 2 rounds plus a tighter Round 3), reduce the back bodice chain to 33, reduce the shorts foundation to 60 sc, and reduce the shorts body to 10 rounds.
For care, machine wash on a gentle cycle in cool or cold water with a mild, baby-safe detergent, and lay flat to dry. Check all buttons before each use to make sure they are secure.

Ocean Breeze Granny Romper Free Crochet Pattern
Materials
Steps
- Crochet 8 granny squares (6 bib squares and 2 pocket squares)
- Block the squares to 2.25 inches and join the bib panel
- Work the bib scallop edging and mark the strap points
- Work the striped back bodice panel
- Seam front and back, then work the shorts in back-loop stripes
- Shape the crotch and add scallop leg edging
- Make and attach the buttoned shoulder straps
- Attach the pocket squares, sew on all buttons, and block
- Block every square to exactly 2.25 inches before joining
- Change colour every 2 stitches in the shorts for vertical stripes
- Leave the top 1 inch of each side seam open for the armhole
- Check all buttons are secure before dressing baby