Ocean Blue Floral Lace Top Free Crochet Pattern
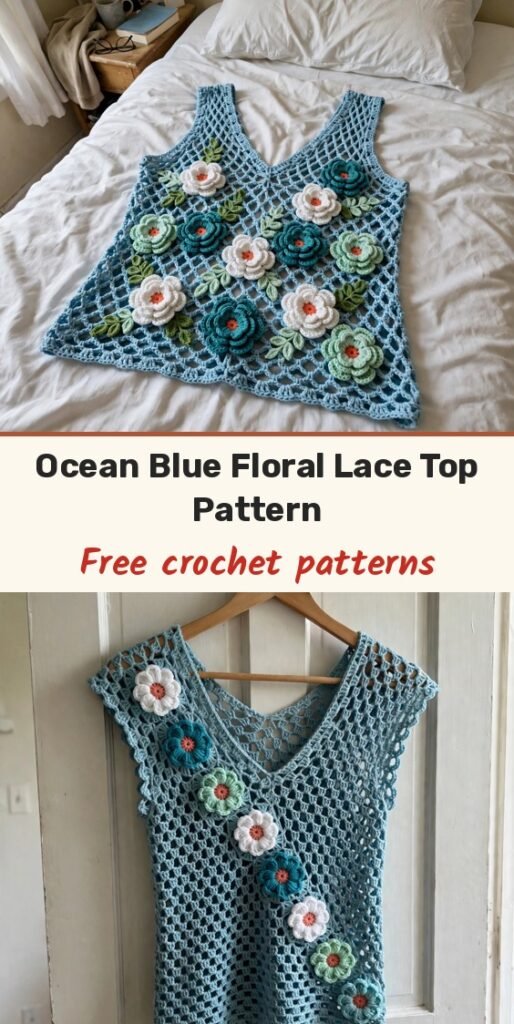
Table of Contents
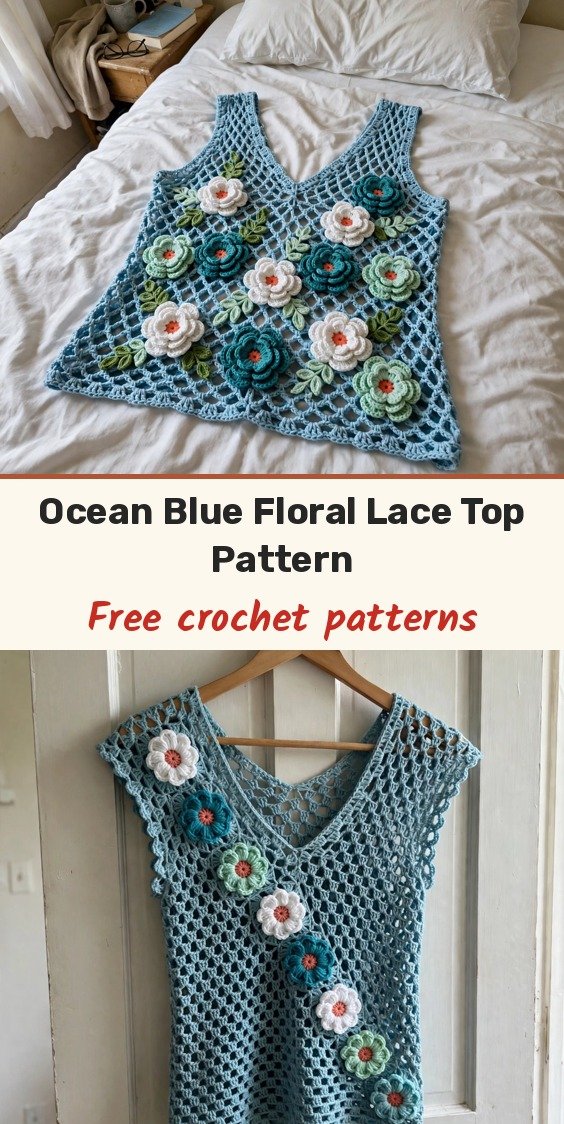
I am so in love with this top, because it is a real wearable piece of art! We have an airy diamond mesh body in ocean blue, a pretty leaf border at the hem, and three-dimensional flowers in white, teal and mint scattered across the front, each with a textured coral center.
The construction uses basic stitches like double crochet and chains, though the mesh pattern and dimensional flowers place this in the intermediate to advanced skill range. If you can work consistently in double crochet and have made a few projects with joining rounds, you are ready. Plan for 40 to 60 hours of meditative stitching that results in a garment you will treasure.
This pattern creates a fitted top with a finished bust of 38 inches and approximately 18 inches of total length. The V-neck front and shallow scoop back give it an elegant silhouette, while the cap sleeve edging adds just enough coverage without bulk.
Materials
- About 700 yards light worsted or DK weight smooth cotton yarn in light blue (Main Colour)
- About 80 yards white cotton yarn, same weight (Colour A)
- About 50 yards teal or medium green-blue cotton yarn, same weight (Colour B)
- About 50 yards soft mint or light green cotton yarn, same weight (Colour C)
- About 40 yards coral or orange-red cotton yarn, same weight (Colour D)
- US size E-4 / 3.5mm crochet hook for the mesh body and borders
- US size D-3 / 3.25mm crochet hook for the flower appliques
- Yarn needle for weaving ends and sewing flowers
- Rust-proof pins for blocking
- Blocking mats or clean towels
- Measuring tape
- 6 to 8 locking stitch markers
- Sharp scissors
Abbreviations
- ch: chain
- sl st: slip stitch
- sc: single crochet
- hdc: half double crochet
- dc: double crochet
- tr: treble crochet
- sk: skip
- sp: space
- ch-sp: chain space
- st(s): stitch(es)
- tch: turning chain
- RS: right side
- WS: wrong side
- rep: repeat
- rem: remaining
- yo: yarn over
- sc3tog: single crochet three together
Special Stitches
- Diamond mesh stitch Row 1 (RS): ch 3 (counts as dc), sk 2 sts, dc in next st, (ch 2, sk 2 sts, dc in next st) rep across, turn.
- Diamond mesh stitch Row 2 (WS): ch 5 (counts as dc + ch 2), dc in next dc, ch 2, rep to last dc, dc in top of tch, turn. Repeat Row 2 for the pattern. Each mesh square equals 1 dc plus ch 2. When counting stitches, count each dc as 1 stitch and treat each ch-2 as the space between.
- Bobble stitch (for flower centers): yarn over, insert hook in stitch, yarn over, pull up a loop, yarn over, pull through 2 loops. Work 4 more partial dc in the same stitch for 5 total partial dc. Yarn over, pull through all 6 loops on hook. Chain 1 to lock.
- Leaf motif: ch 12. Sc in 2nd ch from hook, hdc in next ch, dc in next 2 ch, tr in next 2 ch, dc in next 2 ch, hdc in next ch, sc in next ch, ch 1, do not turn. Working back along the opposite side of the foundation chain: sc in first ch, hdc in next ch, dc in next 2 ch, tr in next 2 ch, dc in next 2 ch, hdc in next ch, sc in last ch, sl st in base of first sc to close. Fasten off, leaving a 12-inch tail for sewing. The finished leaf measures approximately 2 inches long and 0.75 inch wide.
Gauge & Size
- Finished size: bust 38 inches, total length about 18 inches
- Gauge: with Main Colour and the E-4 hook in diamond mesh stitch, 16 stitches and 10 rows = 4 inches / 10 cm after blocking. Each mesh repeat of 1 dc plus ch 2 = about 0.5 inch wide, and each mesh row = about 0.4 inch tall
- Construction: front and back panels worked flat in diamond mesh, joined at shoulders and sides, with sewn-on flower and leaf appliques
- Skill level: Advanced (intermediate to advanced)
Front Panel Pattern
With Main Colour and the E-4 hook, ch 170.
Foundation Row (WS): Sc in 2nd ch from hook and in each ch across. Turn. (169 sc)
Your foundation row should measure approximately 21 inches in width.
Leaf Border Row 1 (RS): Ch 1, sc in first sc, (ch 3, sk 2 sc, sc in next sc) rep across. Turn. (56 ch-3 spaces)
Leaf Border Row 2 (WS): Ch 1, sc in first sc, (3 sc in next ch-3 sp, sc in next sc) rep across. Turn. (169 sc)
Leaf Border Row 3 (RS): Ch 3 (counts as dc), sk 1 sc, dc in next sc, (ch 2, sk 2 sc, dc in next sc) rep across. Turn. (56 mesh units)
Leaf Border Row 4 (WS): Ch 5 (counts as dc + ch 2), dc in next dc, ch 2, rep to last st, dc in top of tch. Turn. (56 mesh units)
Leaf Border Row 5 (RS): Rep Row 4. Turn. (56 mesh units)
Body Mesh Rows 6-30 (25 rows total): Each row: ch 5 (counts as dc + ch 2), dc in next dc, ch 2, rep across, dc in top of tch. Turn. (56 mesh units per row)
After completing Row 30, your front panel should measure approximately 12 inches from the cast-on edge.
Armhole Row 31 (RS): Sl st across first 4 mesh units (sl st into each of the next 4 dc and their ch-2 sp), ch 5 (counts as dc + ch 2), continue in mesh pattern across until 4 mesh units remain, leave last 4 mesh units unworked. Turn. (48 mesh units)
Armhole Row 32: Ch 5, continue in mesh across. Turn. (48 mesh units)
Armhole Row 33: Sl st across 1 mesh unit, ch 5, continue in mesh across until 1 mesh unit remains, leave unworked. Turn. (46 mesh units)
Armhole Row 34: Ch 5, continue in mesh across. Turn. (46 mesh units)
Armhole Row 35: Rep Row 33 shaping. Turn. (44 mesh units)
Armhole Row 36: Ch 5, continue in mesh across. Turn. (44 mesh units)
Armhole Rows 37-42: Work even in mesh, no shaping. (44 mesh units per row)
After Row 42, the armhole opening should measure approximately 2.5 inches from the first armhole row.
Front Neckline Pattern
The V-neck begins at Row 43, and we work the left and right sides separately. With 44 mesh units across, place a stitch marker at the center point between unit 22 and unit 23.
Right Side Row 43 (RS): Ch 5, work in mesh across first 20 mesh units only. Leave remaining sts unworked. Turn. (20 mesh units)
Right Side Row 44 (WS): Ch 5, work in mesh across, stop 1 mesh unit before end of row. Leave last unit unworked. Turn. (19 mesh units)
Right Side Row 45: Ch 5, work across all 19 units. Turn. (19 mesh units)
Right Side Row 46: Ch 5, work across, stop 1 unit before end. Turn. (18 mesh units)
Right Side Row 47: Ch 5, work across. Turn. (18 mesh units)
Right Side Row 48: Ch 5, work across, stop 1 unit before end. Turn. (17 mesh units)
Right Side Rows 49-51: Work even in mesh. Turn. (17 mesh units)
Fasten off Main Colour.
Left Side Row 43 (RS): With RS facing, rejoin Main Colour in the dc at the start of the left side (unit 23 from the right edge on Row 43). Ch 5, work in mesh across remaining 21 mesh units, dc in top of tch. Turn. (21 mesh units)
Left Side Row 44 (WS): Ch 5, work across, stop 1 unit before end of row. Turn. (20 mesh units)
Left Side Row 45: Ch 5, work across. Turn. (20 mesh units)
Left Side Row 46: Ch 5, work across, stop 1 unit before end. Turn. (19 mesh units)
Left Side Row 47: Ch 5, work across. Turn. (19 mesh units)
Left Side Row 48: Ch 5, work across, stop 1 unit before end. Turn. (18 mesh units)
Left Side Rows 49-51: Work even. Turn. (18 mesh units)
Fasten off Main Colour.
Back Panel Pattern
Work the back panel exactly as the front panel from the Foundation Row through Row 42. All hem, body and armhole shaping rows are identical. (44 mesh units after armhole shaping)
Back Row 43 (RS): Ch 5, work across all 44 mesh units. Turn. (44 mesh units)
Back Row 44 (WS): Ch 5, work across all 44 mesh units. Turn. (44 mesh units)
Now divide for the shallow scoop back neckline.
Right Back Row 45 (RS): Ch 5, work across first 17 mesh units, leave rest unworked. Turn. (17 mesh units)
Right Back Row 46: Ch 5, work across. Turn. (17 mesh units)
Right Back Rows 47-51: Work even. (17 mesh units)
Fasten off Main Colour.
Left Back Row 45 (RS): With RS facing, skip the center 10 mesh units for the back neckline opening, rejoin Main Colour in next dc. Ch 5, work across remaining 17 mesh units. Turn. (17 mesh units)
Left Back Row 46: Ch 5, work across. Turn. (17 mesh units)
Left Back Rows 47-51: Work even. (17 mesh units)
Fasten off Main Colour.
Flower Appliques Pattern
Large flower (make 10 total, about 2.5 inches in diameter, Colour A white with a Colour D coral center). Layer 1: magic ring or ch 4, join with sl st to form ring.
Large Flower Rnd 1: Ch 1, work 10 sc in ring, join with sl st to first sc. (10 sc)
Large Flower Rnd 2: (Ch 6, sl st in 2nd ch from hook, sc in next ch, hdc in next ch, dc in next ch, hdc in next ch, sl st in next sc of Rnd 1) rep 10 times in total. (10 petals)
Fasten off Colour A.
Large Flower Rnd 3: Rejoin Colour A in any sl st between petals of Rnd 1. (Ch 8, sl st in 2nd ch from hook, sc in next 2 ch, hdc in next ch, dc in next ch, hdc in next ch, sc in next ch, sl st in next sl-st between petals) rep 10 times in total. (10 petals)
Fasten off Colour A. Join Colour D in the center ring opening of Rnd 1 and work 1 bobble in the center. Fasten off Colour D.
Medium flower (make 14 total, about 1.5 inches in diameter, Colour B teal with a Colour D center). Make a magic ring.
Medium Flower Rnd 1: Ch 1, work 8 sc in ring, join. (8 sc)
Medium Flower Rnd 2: (Ch 5, sl st in 2nd ch from hook, sc in next ch, hdc in next 2 ch, sl st in next sc) rep 8 times in total. (8 petals)
Fasten off Colour B. Join Colour D in center ring, work 1 bobble. Fasten off Colour D.
Small flower (make 12 total, about 1 inch in diameter, Colour C mint with a Colour D center). Make a magic ring.
Small Flower Rnd 1: Ch 1, work 6 sc in ring, join. (6 sc)
Small Flower Rnd 2: (Ch 4, sl st in 2nd ch from hook, sc in next ch, hdc in next ch, sl st in next sc) rep 6 times in total. (6 petals)
Fasten off Colour C. Join Colour D in center ring, work 1 bobble. Fasten off Colour D.
Make 28 leaf motifs total using the Leaf Motif in Special Stitches.
Finishing & Assembly
Block both panels before seaming. Soak the finished panels in cool water for 20 minutes, gently press out excess water without wringing, lay flat on blocking mats and pin to dimensions of 21 inches wide and 18 inches long, using rust-proof pins every 1 to 1.5 inches along the mesh edges. Allow to dry fully for 12 to 24 hours.
Align the front and back panels with wrong sides facing each other. Using Main Colour and a yarn needle, whipstitch the 17-unit shoulder sections of front to back on each side. On the left shoulder, fold the extra unit of the front panel under by one dc and seam from there so the finished width is even.
With wrong sides facing each other, align the front and back panels at the side edges and whipstitch from the lower hem edge upward to the armhole, leaving the armhole open for the sleeve edging.
For the neckline edging, with RS facing, join Main Colour with sl st at the center back neckline. Work sc evenly around the entire neckline opening: sc in each dc, 2 sc in each corner, and 1 sc in each ch-2 sp. When you reach the V center point, work sc3tog across the V point to create a clean angle. Work 1 round of sl st in the back loops of these sc for a tidy rolled edge. Join with sl st and fasten off.
Sleeve Edging Rnd 1: With RS facing, join Main Colour with sl st at the underarm side seam on one armhole. Ch 1, sc evenly around armhole opening, placing sc in each dc and 1 sc per ch-2 sp. Aim for approximately 44 sc around each armhole. Join with sl st. (44 sc)
Sleeve Edging Rnd 2: Ch 3, sk 1 sc, sl st in next sc, rep around. Join. (22 ch-3 picot loops)
Fasten off and repeat for the second armhole.
Position the leaves in pairs pointing upward at the hem and shoulder areas. Arrange the flowers in a diagonal grid following the natural structure of the mesh: 1 large flower at each shoulder flanked by 1 small flower on each side at the top, large flowers at intersections of every 4th diagonal mesh line spaced approximately 4 inches apart in the center body, 1 medium flower at each midpoint between large flowers, and 1 small flower clustered near each leaf pair at hem border level. Use locking stitch markers to pin all flowers before sewing, then sew each flower with its matching yarn colour using small tack stitches through the base of each flower into the mesh fabric.
Tips
Work a gauge swatch before starting the body panels. If your swatch is too small, go up a hook size. If it is too large, go down a hook size.
Use the smaller hook for the flowers and do not skip it. It keeps your flowers firm and three-dimensional.
To size up, add mesh units in multiples of 3 to the foundation chain. Every 3 mesh units equals approximately 1.5 inches of additional width. To size down, remove mesh units in multiples of 3.
To change length, add or remove rows in the body mesh section. Every 2.5 rows equals approximately 1 inch.
Hand wash in cool water with gentle detergent, do not wring or twist, press gently in a clean towel to remove water, and lay flat to dry away from direct sunlight. Store folded rather than hung to prevent the mesh from stretching.
Ocean Blue Floral Lace Top Free Crochet Pattern
Materials
Steps
- Work the front panel hem border and diamond mesh body to Row 30
- Shape the armholes to 44 mesh units by Row 35, then work to Row 42
- Shape the V-neck in two sides to Row 51
- Work the back panel with shallow scoop neckline to Row 51
- Block both panels and sew the shoulder and side seams
- Work the neckline edging and both sleeve edgings
- Make 10 large, 14 medium and 12 small flowers plus 28 leaves
- Pin and sew all flowers and leaves onto the mesh
- Count each dc as 1 stitch and each ch-2 as a space when checking mesh counts
- Use the smaller hook for flowers so they stay firm and dimensional
- Pin every flower with markers before sewing any of them
- Block panels to 21 by 18 inches before seaming


