Mint and Sage Green Baby Dress Free Crochet Pattern
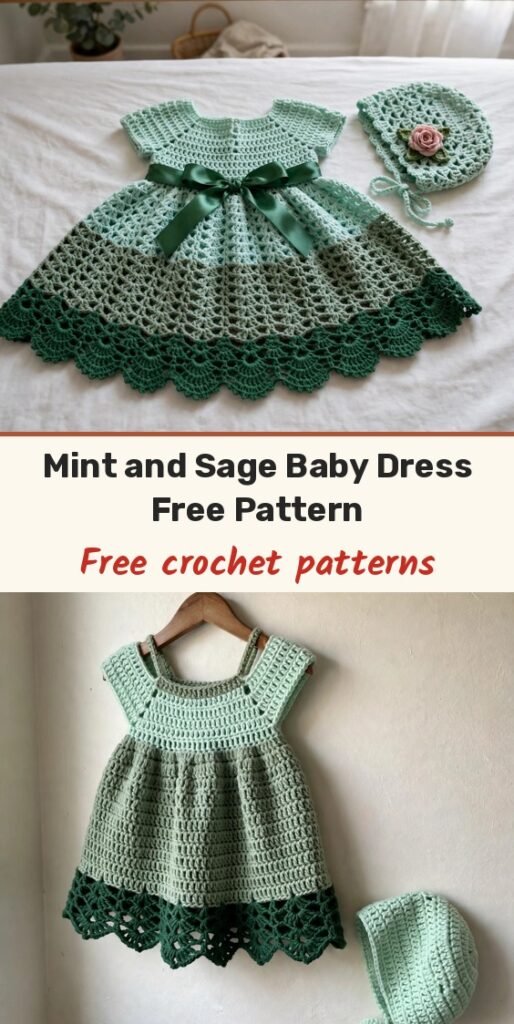
Table of Contents
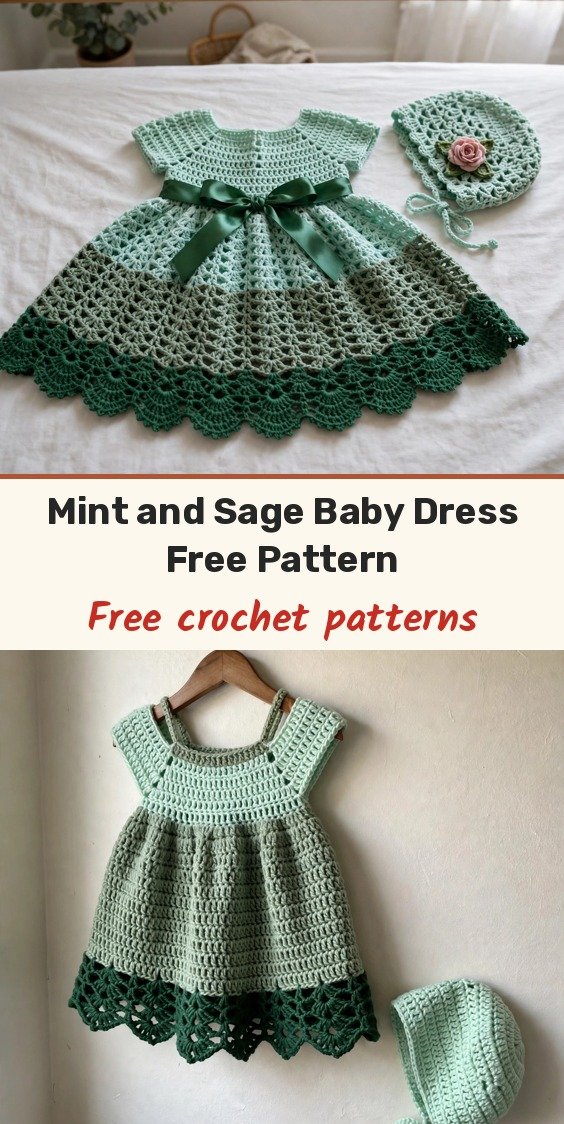
I designed this mint and sage baby dress for a baby shower gift, and it turned into a true little heirloom! We will make a top-down dress with a raglan yoke, an airy mesh skirt with a rose cluster band and a deep lace hem border, a peter pan collar, and a matching bonnet with a crocheted rose.
The mint and sage shades feel fresh but classic, and the deep forest green border makes all those delicate stitch patterns pop. A satin ribbon threaded through the waistline and tied into a bow is the perfect finishing touch.
This set fits a baby of approximately 3 to 6 months, and it is an intermediate project of about 15 to 22 hours. The lace border at the hem is the most time-intensive section, so save that part for when you can really focus and enjoy it.
Materials
- Approximately 280 yards DK weight yarn in mint (Color A)
- Approximately 120 yards DK weight yarn in sage (Color B)
- Approximately 130 yards DK weight yarn in deep forest green (Color C)
- US E-4 (3.5mm) crochet hook for the dress body and bonnet
- US D-3 (3.25mm) crochet hook for the collar and edgings
- 3 small buttons, approximately 3/8 inch (10mm), in white or green
- 1 yard satin ribbon, 5/8 inch (16mm) wide, in sage or mint green
- At least 4 stitch markers
- Yarn needle
- Safety pins for holding stitches
- Small amount of polyester fiberfill (optional, for the bonnet rose)
Abbreviations
- ch: chain
- ch-sp: chain space
- sl st: slip stitch
- sc: single crochet
- hdc: half double crochet
- dc: double crochet
- tr: treble crochet
- st/sts: stitch / stitches
- sk: skip
- pm: place marker
- RS: right side
- WS: wrong side
- rep: repeat
Special Stitches
- Shell Stitch: work 5 dc into the same stitch or space, creating a fan shape. Each shell counts as one stitch unit in repeat instructions.
- V-Stitch (V-st): work (dc, ch 1, dc) into the same stitch or space.
- Picot: ch 3, sl st into the first of those 3 chains.
- 3-Double-Crochet Cluster (3dc-cl): yarn over, insert hook into the indicated stitch, yarn over and pull up a loop, yarn over and draw through 2 loops (2 loops on hook). Repeat two more times in the same stitch (4 loops on hook). Yarn over and draw through all 4 loops. The cluster counts as one stitch.
- Rose Cluster Stitch: yarn over twice, insert hook into the indicated stitch, yarn over and pull up a loop (4 loops on hook), yarn over and draw through 2 loops (3 loops), yarn over and draw through 2 loops (2 loops), and do not complete the treble. Repeat in the same stitch, then yarn over and draw through all 3 loops on the hook. Work 5 of these clusters in a ring of chains for the full rose motif.
- Scallop Edge: skip 2 stitches, work 5 dc in the next stitch (shell), skip 2 stitches, sl st in the next stitch. Each scallop uses 6 stitches.
Gauge & Size
- Finished size: fits approximately 3 to 6 months; chest approximately 16 inches at the underarm, dress length approximately 14 inches from shoulder to hem, bonnet circumference approximately 14 to 15 inches
- Gauge: with E-4 hook and Color A, 20 stitches and 22 rows = 4 inches in single crochet; one mesh repeat (ch 1, skip 1, dc) over 10 stitches = approximately 2 inches
- Construction: dress worked top-down, yoke flat in rows for the back button opening, then joined in rounds for the skirt; sleeves, collar and bonnet made to finish
- Skill level: Intermediate
Dress Yoke Pattern
With Color A and the E-4 hook, ch 75. Place stitch markers at the four raglan points as directed and move them up each row.
Row 1 (WS): Sc in second ch from hook and in each ch across, turn. (74 sc)
Row 2 (RS, Raglan Setup Row): Ch 3 (counts as dc throughout), dc in next 6 sts, pm in next st (raglan point 1), 2 dc in next st, dc in next st, 2 dc in next st, pm in next st (raglan point 2), dc in next 16 sts, pm in next st (raglan point 3), 2 dc in next st, dc in next st, 2 dc in next st, pm in next st (raglan point 4), dc in next 6 sts, dc in last st, turn. (78 dc)
After Row 2 the sections are: left back 7 sts, left sleeve 5 sts, front 18 sts, right sleeve 5 sts, right back 7 sts, plus the raglan bridge stitches.
Row 3: Ch 3, dc in each st to first marker, 2 dc in marked st, dc in next st, 2 dc in marked st, dc to next marker, 2 dc in marked st, dc in next st, 2 dc in marked st, dc to next marker, 2 dc in marked st, dc in next st, 2 dc in marked st, dc to next marker, 2 dc in marked st, dc in next st, 2 dc in marked st, dc to end, turn. (86 dc)
Row 4: Ch 3, dc in each st to first marker, 2 dc in marked st, dc in next st, 2 dc in marked st, dc to next marker, 2 dc in marked st, dc in next st, 2 dc in marked st, dc to next marker, 2 dc in marked st, dc in next st, 2 dc in marked st, dc to next marker, 2 dc in marked st, dc in next st, 2 dc in marked st, dc to end, turn. (94 dc)
Row 5: Ch 3, dc in each st to first marker, 2 dc in marked st, dc in next st, 2 dc in marked st, dc to next marker, 2 dc in marked st, dc in next st, 2 dc in marked st, dc to next marker, 2 dc in marked st, dc in next st, 2 dc in marked st, dc to next marker, 2 dc in marked st, dc in next st, 2 dc in marked st, dc to end, turn. (102 dc)
Row 6: Ch 3, dc in each st to first marker, 2 dc in marked st, dc in next st, 2 dc in marked st, dc to next marker, 2 dc in marked st, dc in next st, 2 dc in marked st, dc to next marker, 2 dc in marked st, dc in next st, 2 dc in marked st, dc to next marker, 2 dc in marked st, dc in next st, 2 dc in marked st, dc to end, turn. (110 dc)
Row 7: Ch 3, dc in each st to first marker, 2 dc in marked st, dc in next st, 2 dc in marked st, dc to next marker, 2 dc in marked st, dc in next st, 2 dc in marked st, dc to next marker, 2 dc in marked st, dc in next st, 2 dc in marked st, dc to next marker, 2 dc in marked st, dc in next st, 2 dc in marked st, dc to end, turn. (118 dc)
After Row 7 the distribution should be: each back panel 12 sts, each sleeve 15 sts, front 28 sts, 4 raglan bridge sections totaling 12 sts, for 118 sts in all. Confirm this count before moving on.
Row 8 (Sleeve Separation Row): Ch 3, dc in next 11 sts (left back), ch 4 (underarm bridge), sk all 17 sleeve sts, dc in next 30 sts (front including raglan bridges), ch 4 (underarm bridge), sk all 17 sleeve sts, dc in next 12 sts (right back), turn. (54 dc + 8 ch = 62 working sts)
Row 9 (Join to Work in Rounds): Ch 3, dc in next 11 sts, dc in 4 ch of underarm bridge, dc in next 30 sts, dc in 4 ch of second underarm bridge, dc in next 11 sts. Do not turn. Join to top of ch-3 with sl st to form a ring. (62 dc)
You are now working in joined rounds. The center-back opening remains open for buttons.
Round 10: Ch 3, dc in each st around, join. (62 dc)
Round 11: Ch 3, dc in each st around, join. (62 dc)
Round 12 (Ribbon Channel Round): Ch 4 (counts as dc + ch 1), sk 1 st, (dc in next st, ch 1, sk 1 st) around, join to 3rd ch of beginning ch-4. (31 dc + 31 ch-1 sps = 62 stitch units)
Round 13: Ch 3, (dc in ch-1 sp, dc in dc) around, dc in last ch-1 sp, join. (62 dc)
After Round 13 the bodice should measure approximately 3.5 to 4 inches from the neckline foundation, with a chest circumference of approximately 16 inches.
Dress Skirt Pattern
Round 14 (Increase Round): Ch 3, (dc in next 2 sts, 2 dc in next st) around, adjusting the last repeat as needed to reach exactly 82 dc, join. (82 dc)
Round 15: Ch 3, dc in each st around, join. (82 dc)
Round 16 (Mesh Section Begins): Ch 4 (counts as dc + ch 1), sk 1 st, (dc in next st, ch 1, sk 1 st) around, join to 3rd ch of beginning ch-4. (41 dc + 41 ch-1 sps = 82 stitch units)
Round 17: Ch 4, (dc in ch-1 sp, ch 1, dc in dc, ch 1) around, ending dc in last ch-1 sp, ch 1, join. (82 stitch units)
Round 18: Ch 4, (dc in ch-1 sp, ch 1, dc in dc, ch 1) around, ending dc in last ch-1 sp, ch 1, join. (82 stitch units)
Round 19: Ch 3, (dc in ch-1 sp, dc in dc) around, join. (82 dc)
Round 20 (Increase Round): Ch 3, (dc in next 3 sts, 2 dc in next st) around, adjusting the last repeat as needed to reach exactly 102 dc, join. (102 dc)
Round 21: Ch 4 (counts as dc + ch 1), sk 1 st, (dc in next st, ch 1, sk 1 st) around, join to 3rd ch. (51 dc + 51 ch-1 sps = 102 stitch units)
Round 22: Ch 4, (dc in ch-1 sp, ch 1, dc in dc, ch 1) around, ending dc in last ch-1 sp, ch 1, join. (102 stitch units)
Round 23: Ch 4, (dc in ch-1 sp, ch 1, dc in dc, ch 1) around, ending dc in last ch-1 sp, ch 1, join. (102 stitch units)
Round 24: Ch 3, (dc in ch-1 sp, dc in dc) around, join. (102 dc)
After Round 24 the skirt from the waist down should measure approximately 4.5 inches, with a hem circumference of approximately 20 inches.
Rose Cluster Band & Shell Section
Fasten off Color A at the end of Round 24. Join Color B with a sl st in any stitch.
Round 25 (Cluster Round): Sc in first st of Round 24, ch 5, sl st in first ch of that ch-5 to form a ring. Into that ring work (3dc-cl, ch 3) 5 times, sl st to close the ring, ch 3, sk 3 sts of Round 24, sc in next st of Round 24. Repeat from the beginning of the rose instruction around, placing one rose every 6 stitches, for approximately 17 roses around the 102-stitch circumference.
Round 26 (Color B): Ch 1, sc in each sc and ch-sp around, working approximately 3 sc per ch-3 space and 1 sc per sc connector, adjusting to reach exactly 102 sc. Join. (102 sc)
Fasten off Color B. Join Color C with a sl st in any stitch of Round 26.
Round 27: Ch 3, dc in next 4 sts (first half-shell at join), sk 2 sts, sc in next st, sk 2 sts, (5 dc in next st, sk 2 sts, sc in next st, sk 2 sts) around, join to top of beginning ch-3. (17 shells)
Round 28: Ch 1, sc in first st (top of shell), (ch 3, sc in next sc connector, ch 3, sc in top of next shell) around, join. (34 ch-3 arches + 34 sc)
Round 29: Sl st to first ch-3 sp, ch 3, 2 dc in same sp, sc in next sc, (3 dc in next ch-3 sp, sc in next sc, 3 dc in next ch-3 sp, sc in next sc) around, join.
Fasten off Color C. After Round 29 the skirt from the waist should measure approximately 7.5 to 8 inches, with a hem circumference of approximately 24 inches.
Hem Lace Border
Rejoin Color C in any sc between shells. This border needs a stitch count divisible by 5, so adjust from Round 29 to a target of 85 stitches (17 repeats) or 90 stitches (18 repeats). The counts below use 85 stitches and 17 arches.
Round 30 (Foundation Arch Row): Ch 6, sk 4 sts, sc in next st, (ch 5, sk 4 sts, sc in next st) around, ending ch 5, join to first ch of beginning ch-6. (17 arches)
Round 31 (Shell into Arches): Sl st into first ch-5 arch, ch 3, 4 dc in same arch (half-shell), sc in next sc between arches, (5 dc in next ch-5 arch, sc in next sc between arches) around, join. (17 shells)
Round 32 (Picot Points): Ch 1, sc in top of shell (3rd dc of shell), (ch 3, sl st in first ch to form picot, sc in same st, ch 5, sc in top of next shell) around, joining after last ch-5. (17 picots, 17 arches)
Round 33 (Final Arch Fill): Sl st into ch-5 arch, (sc, hdc, 5 dc, hdc, sc) in each ch-5 arch around, join. (17 large shells)
Round 34 (Scallop Hem Finish): Ch 1, working along the outside edges of the large shells: sc in first sc, (ch 3, sk 1 st, sc in next st) across each shell and joining arch, forming a picot-edged finish. Join and fasten off.
Sleeves
The sleeves are worked in rounds using the held stitches. With RS facing, join Color A at the underarm ch-4 bridge, and repeat for the second sleeve.
Round 1: Ch 3, dc in next 3 ch of underarm bridge, dc in each of the 17 held sleeve sts, join. (21 dc)
Round 2: Ch 3, dc in each st around, join. (21 dc)
Round 3: Ch 3, dc in each st around, join. (21 dc)
Join Color C.
Round 4 (Sleeve Edging): Ch 1, (sc in next 5 sts, sc2tog) 3 times, join. (18 sc)
Round 5 (Scallop Edging): Ch 1, sc in first st, sk 2 sts, 5 dc in next st, sk 2 sts, (sc in next st, sk 2 sts, 5 dc in next st, sk 2 sts) around. Join and fasten off. (3 scallops)
Note: sc2tog means single crochet two together, working 2 stitches together into one decrease.
Collar & Button Bands
The peter pan collar is worked flat with the D-3 hook and Color A. Ch 65.
Row 1: Sc in second ch from hook and each ch across, turn. (64 sc)
Row 2: Ch 1, sc in first 8 sts, hdc in next 48 sts, sc in last 8 sts, turn. (64 sts)
Row 3: Ch 3 (counts as dc), dc in next 2 sts, (2 dc in next st, dc in next 3 sts) 14 times, dc to end, turn. (78 dc)
Row 4 (Scallop Edge, Color C): Join Color C at the start of the row, ch 1, sc in first st, sk 2 sts, 5 dc in next st, sk 2 sts, (sc in next st, sk 2 sts, 5 dc in next st, sk 2 sts) across. (13 scallops)
Inner Neck Edge: With Color B and the D-3 hook, work 1 row of sc along the foundation chain edge of the collar, then 1 row of reverse sc (crab stitch) for a neat rolled edge.
For the back opening, work 1 column of sc along each side of the center-back opening with Color A and the D-3 hook, picking up approximately 1 sc per row edge. On the left back band (as worn), work 3 button loops evenly spaced by replacing 3 sc with (ch 3, sk 1 sc). Sew 3 buttons onto the right back band to correspond.
Bonnet Pattern
With Color A and the E-4 hook, work in joined rounds.
Round 1: Magic ring, ch 3 (counts as dc), 11 dc in ring, join to top of ch-3. (12 dc)
Round 2: Ch 3, dc in same st, 2 dc in each st around, join. (24 dc)
Round 3: Ch 3, dc in next st, (2 dc in next st, dc in next st) around, join. (36 dc)
Round 4: Ch 3, dc in next 2 sts, (2 dc in next st, dc in next 2 sts) around, join. (48 dc)
Round 5: Ch 3, dc in next 3 sts, (2 dc in next st, dc in next 3 sts) around, join. (60 dc)
Round 6: Ch 3, dc in each st around, join. (60 dc)
Round 7: Ch 3, dc in each st around, join. (60 dc)
Round 8: Ch 3, dc in each st around, join. (60 dc)
Round 9: Ch 3, dc in each st around, join. (60 dc)
After Round 9 the bonnet crown should measure approximately 5.5 to 6 inches across the flat top. Turn the bonnet so the opening faces you and count 30 stitches for the brim section (the front half).
Brim Row 1: Join Color A in the first of the 30 front sts, ch 3, dc in each of the 30 sts, turn. (30 dc)
Brim Row 2: Ch 3, 2 dc in next st, (dc in next 2 sts, 2 dc in next st) across to last st, dc in last st, turn. (40 dc)
Brim Row 3: Ch 3, dc in each st across, turn. (40 dc)
Brim Row 4: Ch 3, 2 dc in next st, (dc in next 3 sts, 2 dc in next st) 8 times, dc in each remaining st, turn. (48 dc)
Brim Row 5 (Color C, Scallop Edge): Join Color C, ch 1, sc in first st, sk 2 sts, 5 dc in next st, sk 2 sts, (sc in next st, sk 2 sts, 5 dc in next st, sk 2 sts) across. (8 scallops)
Back Edging: With Color C, work 1 round of sc along the back half of the bonnet opening (the 30 non-brim stitches), then work two ch-40 ties by joining Color C at each back corner and chaining 40, then fastening off.
Bonnet Rose
With Color C and the D-3 hook, ch 36.
Row 1: 3 dc in 4th ch from hook, (sk 2 ch, sl st in next ch, sk 2 ch, 5 dc in next ch) 5 times, sk 2 ch, sl st in next ch, turn.
Row 2: Ch 3, 4 dc in first sl st space, (sl st in center of next 5-dc group, 5 dc in next sl st) 5 times, sl st in final sp.
Gently roll this strip into a spiral with Row 1 on the inside, and sl st through the base to secure the rose shape. The rose should measure approximately 1.5 to 2 inches across. Sew it securely to the left side of the bonnet brim.
Optional Leaves (make 3 to 4): Ch 8, sc in second ch from hook, hdc in next ch, dc in next 3 ch, hdc in next ch, sc in last ch. Fasten off and sew around the base of the rose.
Finishing & Assembly
Weave in all ends on the wrong side with your yarn needle.
Sew the collar to the neckline with whip stitch using Color A, centered at the front neckline and laying flat. Thread the satin ribbon through the ch-1 spaces of Round 12, beginning and ending at the center front, and tie it into a bow.
Sew the 3 buttons to the right back band at the positions matching the button loops on the left back band, and sew the bonnet rose securely to the left side of the brim.
Block the dress by dampening it with clean water, gently shaping it on a flat padded surface, and pinning the hem to open up the lace details.
Tips
Count your stitches frequently, especially through the yoke. With so many increases and stitch pattern changes, checking at the end of every yoke row saves a lot of unpicking later.
Use locking stitch markers at the four raglan points and move them up every row. They are much easier to shift than split-ring markers.
Block your finished piece. The lace border at the hem looks ten times more impressive after blocking, when all those arches open up and the shells really pop.
Avoid fuzzy or highly textured yarns for this dress, as the lace panels and shell borders will get lost. A smooth DK yarn shows every stitch beautifully.
Mint and Sage Green Baby Dress Free Crochet Pattern
Materials
Steps
- Work the raglan yoke flat from 74 sts up to 118 sts
- Separate the sleeves and join the bodice in rounds at 62 dc
- Work the ribbon channel round and the mesh skirt up to 102 dc
- Add the sage rose cluster band and the forest green shell section
- Work the deep lace hem border through Round 34
- Work both sleeves with scallop edging
- Make the peter pan collar and the back button bands
- Crochet the bonnet, its scalloped brim, ties and rose, then finish and block
- Count stitches at the end of every yoke row and keep the four raglan markers moving up
- Block the finished dress so the lace hem border opens fully
- Use smooth DK yarn so the lace and shell details are not lost
- Save the hem lace border for a quiet, focused session


