Dusty Rose Monochrome Baby Dress Free Crochet Pattern
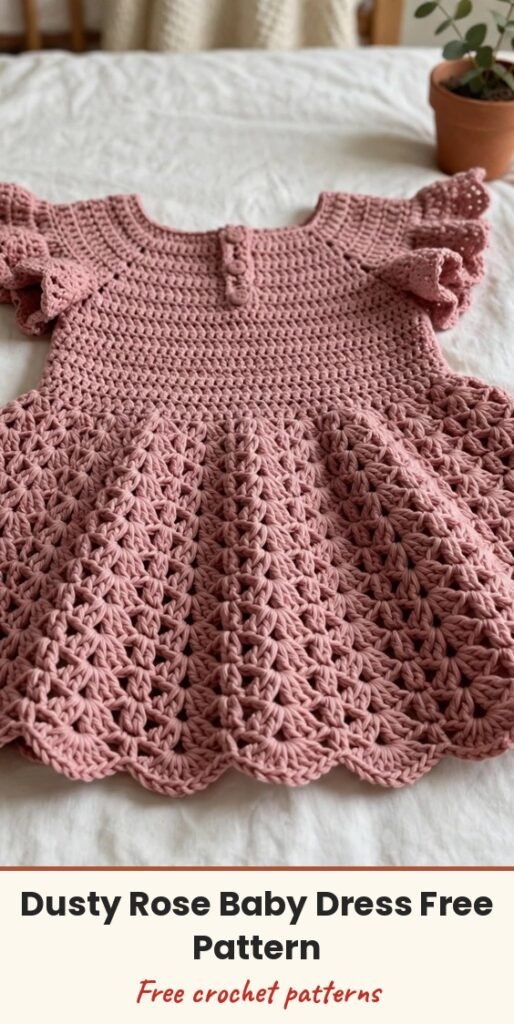
Table of Contents
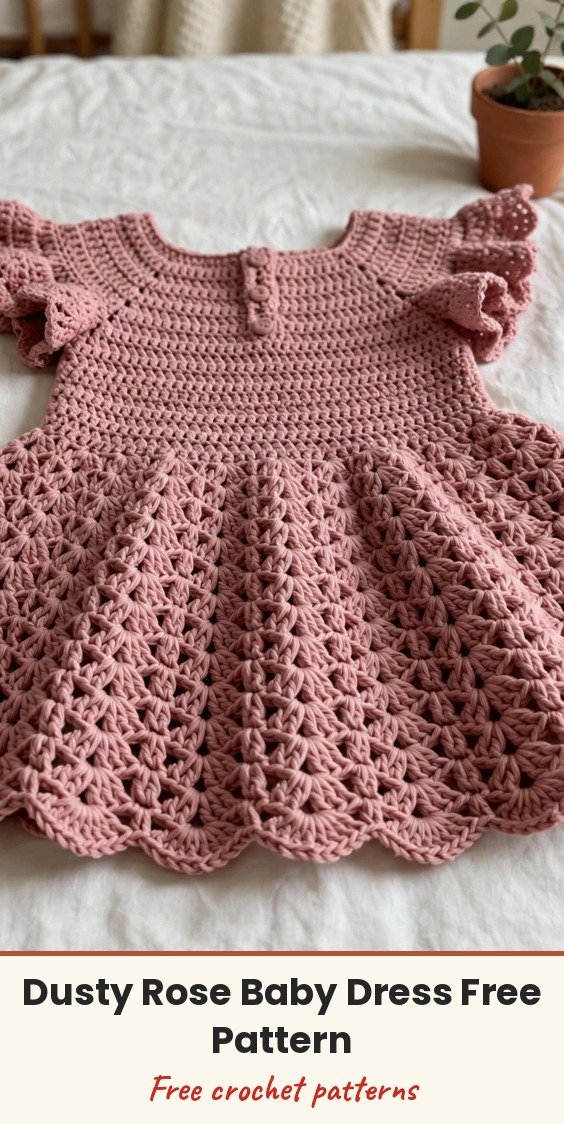
I have such a weakness for baby dresses with flutter sleeves, and this dusty rose dress is exactly why! A fitted bodice, a flared fan shell stitch skirt, delicate scalloped edges, all worked in one warm dusty rose colour for a clean, modern monochrome look.
We make it in three calm stages. First the bodice, worked flat from the top down in two panels and joined at the sides. Then we switch to working in the round for that gorgeous shell stitch skirt. Finally we add the flutter sleeve ruffles and the pretty scalloped edgings. Once you understand the shell pattern, the skirt practically works itself.
The pattern is written for size 6 to 12 months, with sizing notes at the end for 0 to 3 months and 12 to 18 months.
Materials
- Approximately 300 to 350 yards / 275 to 320 meters of DK weight yarn (CYCA weight 3), 100% cotton or cotton blend recommended, in one dusty rose colour throughout
- US D/3 (3.25mm) crochet hook, for the bodice and edging
- US E/4 (3.5mm) crochet hook, for the skirt shell pattern
- 2 small wooden or shell buttons, approximately 3/8 inch / 10mm diameter
- Yarn needle, for weaving in ends
- Stitch markers (at least 4)
- Measuring tape
- Scissors
Abbreviations
- ch: chain
- sl st: slip stitch
- sc: single crochet
- hdc: half double crochet
- dc: double crochet
- st/sts: stitch / stitches
- sp/sps: space / spaces
- sk: skip
- rep: repeat
- RS: right side
- WS: wrong side
- rem: remaining
- beg: beginning
- inc: increase, work 2 stitches into the same stitch
- BLO: back loop only
- FLO: front loop only
- rnd: round
Special Stitches
- Fan shell stitch: work 5 dc all into the same stitch or space, creating a fan shape. Each fan shell is separated by chain spaces and single crochets that form the base of the next row’s pattern.
- Scallop edging: work sl st into the first st, then repeat [sk 1 st, 5 dc into next st, sk 1 st, sl st into next st] across or around. Each scallop uses 4 stitches plus the sl st base.
- Button loop: ch 5, sl st into the same stitch to form a loop, fasten off, and sew securely at the back neckline edge.
Gauge & Size
- Finished size: 6 to 12 months; finished chest approximately 18 inches / 46cm in the round, finished length approximately 14 inches / 35.5cm
- Construction: bodice worked flat in two panels, joined at the sides, skirt worked in the round, flutter sleeves and edgings added last
- Skill level: Intermediate
- Gauge: 18 sc = 4 inches / 10cm and 22 rows = 4 inches / 10cm with the D/3 hook; one fan shell repeat (6 stitches) is approximately 1.25 inches / 3.2cm wide
Pattern Notes
The back has a 2-stitch button band overlap at the top centre. Two buttons fasten the back neckline opening to allow the dress to go over a baby’s head.
Use stitch markers at the beginning of every round and at the underarm join points.
The ch-3 at the beginning of any dc row or round counts as one dc throughout this pattern. The ch-1 at the beginning of sc rows does not count as a stitch.
The skirt is worked in the round from the waist down using the larger E/4 hook, with the right side facing you for all skirt rounds.
Back Bodice Panel
With the D/3 hook, ch 38.
Foundation Row (WS): Sc in the 2nd ch from hook and in each ch across, turn. (37 sc)
Row 1 (RS): Ch 1, sc in each sc across, turn. (37 sc)
Row 2 (WS): Ch 1, sc in each sc across, turn. (37 sc)
Rows 3 to 6: Repeat Row 1 for 4 more rows. (37 sc each row)
Rows 1 to 6 form the neckline edge and button band. After Row 6 your piece should measure approximately 1 inch / 2.5cm tall. Now we add stitches at each end to build the shoulder width.
Row 7 (RS): Ch 1, 2 sc in the first st, sc in each st to the last st, 2 sc in the last st, turn. (39 sc)
Row 8 (WS): Ch 1, 2 sc in the first st, sc in each st to the last st, 2 sc in the last st, turn. (41 sc)
Row 9 (RS): Ch 1, 2 sc in the first st, sc in each st to the last st, 2 sc in the last st, turn. (43 sc)
Row 10 (WS): Ch 1, sc in each st across, turn. (43 sc)
Row 11 (RS): Ch 1, sc in each st across, turn. (43 sc)
Rows 12 to 16: Repeat Rows 10 and 11 for 5 more rows, ending on a RS row after Row 16. (43 sc each row)
After Row 16, the back bodice panel should measure approximately 3 inches / 7.5cm tall from the foundation.
Rows 17 to 22: Ch 1, sc in each st across, turn. (43 sc each row)
After Row 22, the back bodice panel should measure approximately 5 inches / 12.5cm. This is the waistline. Fasten off and set aside.
Front Bodice Panel
Work exactly as the Back Bodice Panel through Row 22. (43 sc)
Do not fasten off after Row 22. You will join front and back at the sides in the next step.
Joining Front and Back
Hold the front and back panels with right sides facing out. With the D/3 hook and working yarn attached at the end of the front panel Row 22, place the front and back panels side by side with wrong sides together along one side edge.
Side Join Row: Ch 1, working through both layers together, sc evenly along the side edge, working 1 sc per row end for 22 rows. (22 sc along the side seam)
Repeat for the second side seam. After both side seams are joined, you will have a tube at the waist with the armhole openings at the top corners on both sides.
Checkpoint: after joining, the waist of the bodice measured in the round should be approximately 18 inches / 46cm, and the piece should measure approximately 5.5 inches / 14cm from shoulder edge to waist.
Waist Transition Round
This round sets up the fan shell stitch in the skirt. With the E/4 hook, attach yarn at the back left side seam at the bottom edge of the bodice, which is the waist edge. You will now work in the round.
The goal of this round is to increase the stitch count to 90 stitches, a multiple of 6 for 15 fan shell repeats. There are 86 working stitches around the waist edge (front 43 plus back 43).
Waist Transition Round: Ch 1, sc in each st around, working 4 evenly spaced increases (2 sc in the same st) across the round, place a marker at the beginning, sl st to the first sc to join. Work 1 increase approximately every 21 sts, at about stitch positions 11, 32, 53, and 74. (90 sc)
Skirt
All rounds are worked with the E/4 hook and RS facing.
Skirt Round 1 (fan setup round): Ch 3 (counts as dc), 2 dc in the same st, sk 2 sts, sc in the next st, sk 2 sts, [5 dc in next st, sk 2 sts, sc in next st, sk 2 sts] 13 times, 2 dc in the same st as the beg ch-3, sl st to the top of the beg ch-3. (15 fan shells established)
Skirt Round 2: Ch 1, sc in the top of the beg ch-3, [ch 2, 5 dc in next sc, ch 2, sc in the centre dc (3rd dc) of the next 5-dc fan] 14 times, ch 2, 5 dc in next sc, ch 2, sl st to the first sc to join. (15 fans; 15 sc; 30 ch-2 spaces)
Skirt Round 3: Ch 3 (counts as dc), 2 dc in the same sc, [sc in the centre dc of next fan, 5 dc in next sc] 14 times, sc in the centre dc of the last fan, 2 dc in the same sc as the beg ch-3, sl st to the top of the beg ch-3. (15 fans)
Skirt Rounds 4 to 9: Repeat Rounds 2 and 3 three more times, 6 more rounds, ending on a Round 3 equivalent. (15 fans each round)
After Skirt Round 9, the skirt should measure approximately 3.5 inches / 9cm from the waist.
Skirt Round 10 (increase setup round): Ch 1, sc in the first joined st, [ch 2, 5 dc in next sc, ch 2, sc in the centre dc of next fan] 4 times, ch 2, 5 dc in next sc, ch 2, sc in the centre dc of next fan, ch 2, 5 dc in the SAME sc just used (this creates a new fan insertion), ch 2, sc in the centre dc of next fan, [ch 2, 5 dc in next sc, ch 2, sc in the centre dc of next fan] 4 times, ch 2, 5 dc in next sc, ch 2, sc in the centre dc of next fan, ch 2, 5 dc in the SAME sc just used, ch 2, sc in the centre dc of next fan, [ch 2, 5 dc in next sc, ch 2, sc in the centre dc of next fan] 4 times, ch 2, 5 dc in next sc, ch 2, sc in the centre dc of next fan, ch 2, 5 dc in the SAME sc just used, ch 2, sl st to the first sc to join. (18 fans)
You have added 3 new fans at evenly spaced positions, after fans 5, 10, and 15, for 18 fans of 5 dc each plus 18 sc, with 36 ch-2 spaces.
Skirt Rounds 11 to 20: Work even in the fan shell pattern, repeating the Skirt Rounds 2 and 3 equivalents, now working 18 fans each round, for 10 rounds. (18 fans each round)
After Skirt Round 20, the skirt should measure approximately 7 inches / 18cm from the waist.
Skirt Rounds 21 and 22: Work one more Round 2 equivalent and one more Round 3 equivalent. (18 fans each round)
Checkpoint: after Skirt Round 22, the total dress length from shoulder to the bottom of the last fan round should be approximately 13 to 13.5 inches / 33 to 34cm.
Hem Scallop Edging
With the D/3 hook, join yarn at any sc between fans at the bottom of the last skirt round.
Hem Edging Round: Ch 1, sl st in the first sc, [sk ch-2 sp, 5 dc in the centre dc of the next fan, sk ch-2 sp, sl st in next sc] 18 times, sl st to the first sl st to join. Fasten off. (18 scallops)
Flutter Sleeves
Work both sleeves the same way. With RS facing and the D/3 hook, join yarn at the bottom centre of one armhole opening.
Armhole Pickup Round: Ch 1, sc evenly around the entire armhole opening. Work 1 sc for every row end along the straight vertical edges, and 1 sc into each available stitch at the shoulder curve. You should end with approximately 36 sc around the armhole opening; if your count is slightly different, adjust to the nearest even number. Place a marker at the beginning, sl st to the first sc to join. (36 sc)
Flutter Ruffle Round 1: Ch 3 (counts as dc), 2 dc in the same st, [2 dc in next st] around, sl st to the top of the beg ch-3 to join. (72 dc)
Flutter Ruffle Round 2 (scallop): Ch 1, sl st in the first dc, [sk 1 dc, 5 dc in next dc, sk 1 dc, sl st in next dc] 18 times, sl st to the beg sl st to join. Fasten off. (18 scallops)
Repeat for the second armhole.
Neckline Edging & Buttons
With the D/3 hook, join yarn at the back right neckline corner.
Neckline Pickup Row: Ch 1, sc evenly across the neckline edge. Work 1 sc per stitch across the foundation row of each panel (37 sc front, 37 sc back), and 1 sc per row end at each corner, approximately 2 to 3 sc at each inner corner, for approximately 78 to 80 sc total. Do not join; work flat across.
Scallop Row: Ch 1, sl st in the first sc, [sk 1 sc, 5 dc in next sc, sk 1 sc, sl st in next sc] across. Adjust the start as needed to begin and end evenly. Fasten off.
The back of the dress has a 2-stitch overlap at the top centre back neckline for button placement. The left back panel edge overlaps over the right back panel edge by approximately 0.5 inch / 1.5cm.
Sew two buttons onto the right back panel band, spaced approximately 0.75 inch / 2cm apart vertically, positioned approximately 0.25 inch / 0.5cm from the centre back edge.
On the left back panel, work two button loops: attach yarn at the position corresponding to the first button, ch 5, sl st into the same stitch to form a loop, fasten off and weave in ends. Repeat for the second button loop. Sew the loops securely with a yarn needle, and align the buttons through the loops to test the fit before final tightening.
Finishing & Assembly
Weave in all ends securely using a yarn needle, going in at least two directions to prevent unravelling.
Wet blocking is strongly recommended and will significantly improve the drape and stitch definition of the fan skirt. Soak the finished dress in cool water for 15 to 20 minutes, gently squeeze out the water without wringing, roll in a clean towel and press to remove excess moisture, then lay flat on a blocking mat, pinning the skirt scallops open to their full width, and allow to dry completely, usually 12 to 24 hours.
Sew on the buttons after blocking is complete.
Sizing Notes
To make the dress larger (12 to 18 months): add 6 to the foundation chain (44 ch total, 43 sc). Work 4 additional rows in the bodice before the waist transition. Increase to 96 stitches at the waist transition (16 fan repeats) and continue with the skirt as written. Finished chest will be approximately 19 to 20 inches / 48 to 51cm.
To make the dress smaller (0 to 3 months): subtract 4 from the foundation chain (34 ch total, 33 sc). Reduce the waist to 84 stitches (14 fan repeats).
To add length to the skirt: each additional pair of fan rows (one Round 2 equivalent plus one Round 3 equivalent) adds approximately 0.75 inch / 2cm. All stitch counts must remain divisible by 6 for the fan repeat to work correctly.
Tips
Cotton or cotton-blend yarn is strongly recommended over acrylic for this dress, because cotton gives the drape, weight and stitch definition the fan skirt needs to lay properly. Avoid yarns with heavy texture or halo, which will obscure the shell pattern.
For care, hand wash in cool water with gentle soap, do not wring, and lay flat to dry away from direct sunlight. Do not tumble dry. Store folded, not hung, to prevent stretching.
Dusty Rose Monochrome Baby Dress Free Crochet Pattern
Materials
Steps
- Work the back bodice panel flat to Row 22 (43 sc)
- Work the front bodice panel the same way
- Join front and back at the side seams
- Work the waist transition round up to 90 sc
- Work the fan shell skirt, increasing to 18 fans at Round 10
- Work the hem scallop edging
- Add flutter sleeves with scallop ruffles
- Finish with neckline edging, buttons and button loops, then block
- Cotton gives the drape and stitch definition the fan skirt needs
- Wet block and pin the skirt scallops open for the prettiest finish
- Keep all waist stitch counts divisible by 6 for the fan repeat


